My 67 Camaro 5.3/t56 Writeup
 12-19-2009, 02:43 AM
#1
TECH Enthusiast
Thread Starter
iTrader: (2)

Join Date: Jan 2009
Posts: 621
Likes: 0
Received 0 Likes
on
0 Posts

Well I figure its about time to start a writeup on my car so ill begin by telling you a little about it.
I recieved this car about three months ago when i traded my 99 camaro Z28 for it. It came as a roller (no motor or transmission). Very straight bodied and great interior is what caught my attention as ive been wanting a car that had a good interior but needed paint and a powertrain to do this sort of swap. It has been minitubbed, and also has a large fuel cell in the trunk with a sump that i will utilize for the fuel injected ls1 powerplant. Also has a 12 bolt 4.10 gears with coilovers and ladder bars.
this writeup is in a little better format on cardomain.com if you would rather look at it there the address is http://www.cardomain.com/ride/3802714 dont forget to leave some feedback
10/25/09: It Begins
Ok this is the first entry into the log. Over the last week ive purchased the engine, transmission, fuel pump, Mufflers. All should be here within a week or two.
Engine: If your on a budget as i am, i highly recommend you purchasing a Gen III/IV 5.3 liter Truck engine, identical to an ls1 engine with the exceptions of....
1. its an iron block which is actually much stronger than the ls1 aluminum block
2. slightly smaller bore, compare it as the equivilent of a 327 to the old 350, however you can bore it to an ls1 use the same rods and crank, buy ls1 pistons and have an iron block ls1 that can hold a good shot of nitrous and tons of hp. A stock ls1 bottom end is rated at over 500HP.
3. will come with a different intake, however it is easy and cheap to switch to an ls1 intake.
4. there are some other minor differences such as accessory drives, injector plugs etc... which i will get into later.
So y did i get a 5.3 instead of an aluminum ls1 engine? Well check ebay for the price of an aluminum ls1 to the price of an 5.3. Ls1's run anywhere from $1000 to $2000 while the 5.3 u can easily find for anywhere from $299 to $699. I myself payed $399 plus $274 shipping for an 5.3 with 75000 miles(may seem high but these engines can easily run over 200,000 miles) out of an 04 Escalade.
Transmission: I decided i couldnt live without a 6 speed since that was what was in the car i traded off and in order to be able to daily drive it and achieve my 24 mpg's i need all the gears i can get. be prepared to spend some money if going this route. you can also put an old th350 or th400 as well as powerglides on these engines.
To install a th350 or 400 all you have to do is order a crankshaft spacer for an ls1 from gm or many distributors. use the stock flexplate for the ls1, and hook it up, you will not use one hole when bolting up the bellhousing. also you may have to elongate the flywheel holesin order for the th400 converter to fit. or you can order one from many distributors. for more help on that or anything about a th350 or 400 swap go to LS1Tech.com (I have a th400 for sale if anyone wants
Last edited by RNation0001; 12-19-2009 at 03:01 AM.


 12-19-2009, 02:58 AM
#3
TECH Enthusiast
Thread Starter
iTrader: (2)
Join Date: Jan 2009
Posts: 621
Likes: 0
Received 0 Likes
on
0 Posts
Update #2 10/29/09
Well i got the bulk of everything in. Engine, Transmission, Mufflers, Fuel Pump, Ls1 Intake. Started Snapping some photo's today while i played a little. Took the ugly 5.3 intake off of the engine by removing the 10 bolts, and disconnecting neccissary wire connectors. The valley cover and heads were a little dirty so i decided to do a little cleaning with a wet scotchbrite pad. to keep all the dirt and grime I was cleaning from falling into the Intake runners i stuffed each one with a paper towel. Cleaned everything off then removed each paper towel. afterwards i took duct tape and taped over the intake runners to keep anything from going in. Sat the Ls1 intake in just for a test fit and snapped some pics of it. Tomorrow my Clutch Kit should be in so ill be working on coupling the motor and tranny this weekend as well as possibly fitting it in the car to check clearances.
Well i got the bulk of everything in. Engine, Transmission, Mufflers, Fuel Pump, Ls1 Intake. Started Snapping some photo's today while i played a little. Took the ugly 5.3 intake off of the engine by removing the 10 bolts, and disconnecting neccissary wire connectors. The valley cover and heads were a little dirty so i decided to do a little cleaning with a wet scotchbrite pad. to keep all the dirt and grime I was cleaning from falling into the Intake runners i stuffed each one with a paper towel. Cleaned everything off then removed each paper towel. afterwards i took duct tape and taped over the intake runners to keep anything from going in. Sat the Ls1 intake in just for a test fit and snapped some pics of it. Tomorrow my Clutch Kit should be in so ill be working on coupling the motor and tranny this weekend as well as possibly fitting it in the car to check clearances.


 12-19-2009, 03:10 AM
#5
TECH Enthusiast
Thread Starter
iTrader: (2)
Join Date: Jan 2009
Posts: 621
Likes: 0
Received 0 Likes
on
0 Posts
Update 12/5/09:
Well i apologize for taking so long to get an update up but its been a busy month. engine is now sitting in the car. had to take the front clip off to install motor and tranny together. plus it was only like 10 bolts and real easy to take off. much easier to get in and work on the car now. i made mounts which are similar to s&p mounts out of 1/4 inch plate steel.
This is right before the engine went in. we ended up putting it in and out about 6 times before leaving it in. the reason bein was we ran into a few snags, mainly being that the oilpan was touchin the crossmember by just a hair on the pass. side. so we took it out and did some tap work with some sledge hammers to massage a slight divit so the pan would not bottom out. fit great after that. make sure you take the shifter out of the tranny completely cause it makes it really rough to try and put in


alrighty, engine in!! hopefully for good. we took the seats out and cut a hole for the shifter. its about 4 inches back from stock location. Gonna have to fab up a tranny mount prolly out of some square tubing. ill post pics of all that later.


got my hooker headers in today. great looking and for the most part slide right in. now if your going to use these headers for your swap make sure you order the hooker swap engine mounts or make some that place the engine back towards the firewall another inch. because the driver side header will slightly hit the steering box. now you could also put a very small ding in the header and im talkin a very small ding. in my case it wont matter because im going to be switchin to rack and pinion steering because its a daily driver i want it to drive like a new car.
My only dislike of these headers is that theres no oxygen sensor bung. not a big downside but for the price i think they should come with some. well thats about it for this update hope to have another pretty soon but with christmas coming up its kinda hard to come up with cash. Also ordered my ecu and wiring harness of ebay. completly custom made not a cut up harness and i would recommend doing this.
Well i apologize for taking so long to get an update up but its been a busy month. engine is now sitting in the car. had to take the front clip off to install motor and tranny together. plus it was only like 10 bolts and real easy to take off. much easier to get in and work on the car now. i made mounts which are similar to s&p mounts out of 1/4 inch plate steel.
This is right before the engine went in. we ended up putting it in and out about 6 times before leaving it in. the reason bein was we ran into a few snags, mainly being that the oilpan was touchin the crossmember by just a hair on the pass. side. so we took it out and did some tap work with some sledge hammers to massage a slight divit so the pan would not bottom out. fit great after that. make sure you take the shifter out of the tranny completely cause it makes it really rough to try and put in
alrighty, engine in!! hopefully for good. we took the seats out and cut a hole for the shifter. its about 4 inches back from stock location. Gonna have to fab up a tranny mount prolly out of some square tubing. ill post pics of all that later.
got my hooker headers in today. great looking and for the most part slide right in. now if your going to use these headers for your swap make sure you order the hooker swap engine mounts or make some that place the engine back towards the firewall another inch. because the driver side header will slightly hit the steering box. now you could also put a very small ding in the header and im talkin a very small ding. in my case it wont matter because im going to be switchin to rack and pinion steering because its a daily driver i want it to drive like a new car.
My only dislike of these headers is that theres no oxygen sensor bung. not a big downside but for the price i think they should come with some. well thats about it for this update hope to have another pretty soon but with christmas coming up its kinda hard to come up with cash. Also ordered my ecu and wiring harness of ebay. completly custom made not a cut up harness and i would recommend doing this.
Last edited by RNation0001; 12-19-2009 at 03:19 AM.


 12-19-2009, 04:25 AM
#7
TECH Enthusiast
Thread Starter
iTrader: (2)
Join Date: Jan 2009
Posts: 621
Likes: 0
Received 0 Likes
on
0 Posts
ok then now were back caught up to present day. over the last week we made some pretty good progress. We recieved the wiring harness starter maf sensor one coil because we had a broken one and various odd and ends.
Wiring Harness from ebay W/ecu from chevythunder. I will say this looks to be pretty well made. i would have liked a few of the connectors to have a slightly longer pigtail on it such as the crank sensor and trans sensors because it makes it to where u have to put the harness down in behind the intake which kinda scares me being that close to the block. may try to wrap it with some kind of heat resistant tape ( any suggestions or anything is appreciated ). other than that no real issues. looks like im going to mount the ecu on the tranny tunnel under the dash which i know is kinda a weird place to do it but im probabbly going to build a fiberglass console to go over it so its ok. i made a mock up shifter at work which actually worked out really well i may use it for a while till i get a pro 5.0 or something. started figuring out the original 67 wiring which isnt easy but finally figured out where the hot in and starter out and a few others are. recieved a s&p trans xmember and it looks great but it dont fit. and i dunno if its a defect or just my problem.... my problem is that where the xmember bolts to the tranny its about an inch or so off. in my case the flange needs to be centered where the xmember i recieved is offset like an inch or so. has anyone had this problem need some input bad. i contacted them and there sending me a new one so i can seewhats up very good customer service. We got the front clip sitting in place with a couple of loose bolts. got my intake permanantly bolted up with new gaskets along with the throttle body i bought. (note to self and anyone else... dont use duct tape to cover intake holes, it leaves a horrible sticky mess to get off when ur ready to bolt ur intake up..) also if ur using a 5.3 with truck waterpump like i am then u will have to do some ding work on outlet tube to clear the throttle body looks kinda ugly but itll work.


Wiring Harness from ebay W/ecu from chevythunder. I will say this looks to be pretty well made. i would have liked a few of the connectors to have a slightly longer pigtail on it such as the crank sensor and trans sensors because it makes it to where u have to put the harness down in behind the intake which kinda scares me being that close to the block. may try to wrap it with some kind of heat resistant tape ( any suggestions or anything is appreciated ). other than that no real issues. looks like im going to mount the ecu on the tranny tunnel under the dash which i know is kinda a weird place to do it but im probabbly going to build a fiberglass console to go over it so its ok. i made a mock up shifter at work which actually worked out really well i may use it for a while till i get a pro 5.0 or something. started figuring out the original 67 wiring which isnt easy but finally figured out where the hot in and starter out and a few others are. recieved a s&p trans xmember and it looks great but it dont fit. and i dunno if its a defect or just my problem.... my problem is that where the xmember bolts to the tranny its about an inch or so off. in my case the flange needs to be centered where the xmember i recieved is offset like an inch or so. has anyone had this problem need some input bad. i contacted them and there sending me a new one so i can seewhats up very good customer service. We got the front clip sitting in place with a couple of loose bolts. got my intake permanantly bolted up with new gaskets along with the throttle body i bought. (note to self and anyone else... dont use duct tape to cover intake holes, it leaves a horrible sticky mess to get off when ur ready to bolt ur intake up..) also if ur using a 5.3 with truck waterpump like i am then u will have to do some ding work on outlet tube to clear the throttle body looks kinda ugly but itll work.
Trending Topics
 12-19-2009, 10:33 AM
#9

looks good. keep em coming
12-19-2009, 06:29 PM
#10
TECH Enthusiast
Thread Starter
iTrader: (2)
Join Date: Jan 2009
Posts: 621
Likes: 0
Received 0 Likes
on
0 Posts
i believe what im going to use is the setup from kwikperf.com. its a alternator/powersteering pump bracket that will work with any of the accessory drives . im open to ideas tho. running truck waterpump and crank. is there any cheaper accessory drives that i can do?
12-19-2009, 10:07 PM
#12
Teching In

Join Date: Mar 2009
Location: Georgia Peach
Posts: 31
Likes: 0
Received 0 Likes
on
0 Posts
I have the kwick perf. kit on my 69 camaro and its nice. i just dyno'd mine last week. th350 with a loose convertor "no lockup" put down 405 hp 386 tq. If you figure 20% loss for auto and convertor thats a little over 500 hp . Full accesories with a/c. if you have any questions please send me a PM. I fought a lot of issues and maybe I can be of help
 the names David
. Full accesories with a/c. if you have any questions please send me a PM. I fought a lot of issues and maybe I can be of help the names David
12-19-2009, 10:20 PM
#13
TECH Enthusiast
Thread Starter
iTrader: (2)
Join Date: Jan 2009
Posts: 621
Likes: 0
Received 0 Likes
on
0 Posts
I have the kwick perf. kit on my 69 camaro and its nice. i just dyno'd mine last week. th350 with a loose convertor "no lockup" put down 405 hp 386 tq. If you figure 20% loss for auto and convertor thats a little over 500 hp. Full accesories with a/c. if you have any questions please send me a PM. I fought a lot of issues and maybe I can be of help the names David
. Full accesories with a/c. if you have any questions please send me a PM. I fought a lot of issues and maybe I can be of help the names David
12-20-2009, 03:51 AM
#14
Staging Lane
Join Date: Sep 2009
Location: Anchorage, Alaska
Posts: 71
Likes: 0
Received 0 Likes
on
0 Posts
Cool build! I'm doing a similar swap in my 67 firebird. Yours is a bit further along then mine... I'm in the process of painting it right now after a full blown restoration. I'm also using an LM7 but I'm going with a carbureted setup. What was the model # for the Hooker Headers you used?
12-20-2009, 03:16 PM
#15
Staging Lane
iTrader: (2)
Join Date: Sep 2009
Location: Dallas, Texas
Posts: 92
Likes: 0
Received 0 Likes
on
0 Posts
Nice looking project. Just curious how much clearance you have behind the back of the passenger head and firewall? I have the Hooker mounts and headers and mine has approximately 1/8" to 1/4" clearance... its tight!
I would appreciate any pics you may have of this area in particular?
Thanks.
I would appreciate any pics you may have of this area in particular?
Thanks.
 12-20-2009, 07:43 PM
#17
TECH Enthusiast
Thread Starter
iTrader: (2)
Join Date: Jan 2009
Posts: 621
Likes: 0
Received 0 Likes
on
0 Posts
Nice looking project. Just curious how much clearance you have behind the back of the passenger head and firewall? I have the Hooker mounts and headers and mine has approximately 1/8" to 1/4" clearance... its tight!
I would appreciate any pics you may have of this area in particular?
Thanks.
I would appreciate any pics you may have of this area in particular?
Thanks.
12-20-2009, 07:46 PM
#18
TECH Enthusiast
Thread Starter
iTrader: (2)
Join Date: Jan 2009
Posts: 621
Likes: 0
Received 0 Likes
on
0 Posts
truthfully i would like to buy a firewall mounted cnc master cyl but i dont know which one i need. i think it would be so much easier to do but i dunno. any info would be great if anyone knows.
12-20-2009, 07:53 PM
#19
TECH Enthusiast
Thread Starter
iTrader: (2)
Join Date: Jan 2009
Posts: 621
Likes: 0
Received 0 Likes
on
0 Posts
Cool build! I'm doing a similar swap in my 67 firebird. Yours is a bit further along then mine... I'm in the process of painting it right now after a full blown restoration. I'm also using an LM7 but I'm going with a carbureted setup. What was the model # for the Hooker Headers you used?
thats the page the part number is 2288-1hkr. really nice headers but expensive they also make a black coated set i believe they are 2288-hkr for much less. any reason your going carb?
01-03-2010, 12:46 AM
#20
TECH Enthusiast
Thread Starter
iTrader: (2)
Join Date: Jan 2009
Posts: 621
Likes: 0
Received 0 Likes
on
0 Posts
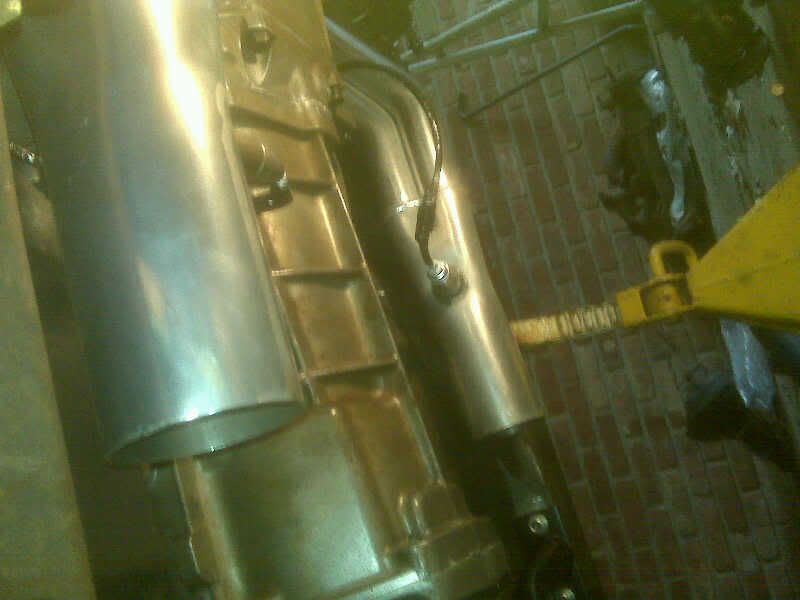
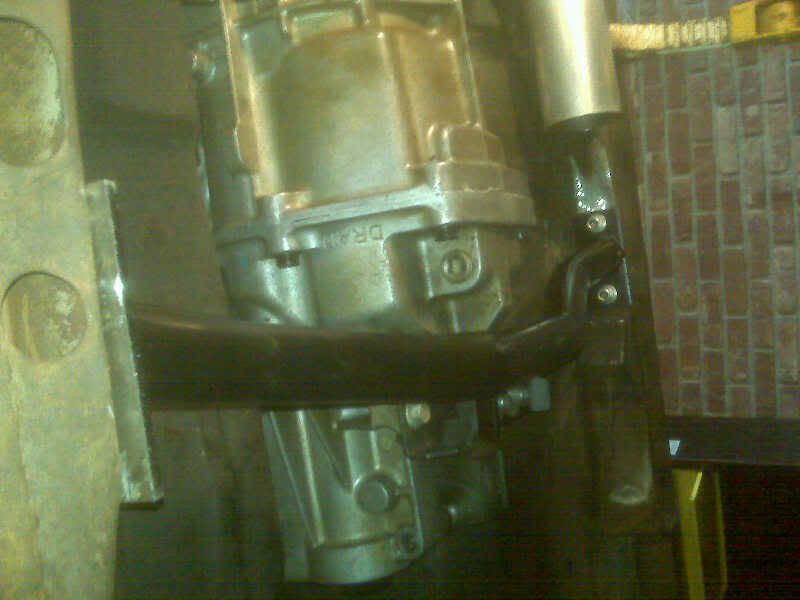
real quick update....... got my tranny xmember installed yesterday, havent got to work on it much fromthe holidays and 15 degree weather(no heat in the garage) got the fuse block wired in for the most part and now im starting to do some organising of the wires. anyone know of a good tape to use on convoluted tubing? also installed the oxygen sensors and got the starter wired up to the original wiring. turned the car over a couple times. now im waiting on my fuel lines to get here. side note if anyone is running a rear mount battery and need some cheap 4 guage wire go to walmart and get a 4 guage set of jumper cables. it was like 30 bucks for 40 ft of 4 guage wire which is pretty good. here are some a couple of crappy blackberry pics of the xmember and oxygen sensors