
'70 Nova LY6/TH400 6.0VVT


 12-12-2012, 11:47 PM
#704
Used Global West uppers with del a lum bushings. Adding caster should help with bump steer and general cornering. I've been keeping my eyes peeled for the last two years; these things rarely turn up used for a reasonable price. $350 shipped including new premium balljoints.
12-20-2012, 05:16 PM
#707
On The Tree
iTrader: (3)

Join Date: Aug 2011
Location: WA
Posts: 125
Likes: 0
Received 0 Likes
on
0 Posts
I had accessory drive question number 1000 for you. Have you figured out what you are doing for the alternator mount and idler? Looking back through the old posts it looks like you were thinking about spacing an f-body bracket out. I havent found an example of a low mount truck or F-body alternator at the truck belt spacing yet and I was thinking of going that route in my car.
01-02-2013, 10:44 AM
#708
TurtleBite - Sorry for the late reply. I plan to use an F-body bracket & idler and space it out to mount the alternator in line with the truck spacing. I haven't picked one up yet.
The holidays were great this year. I had the full week of Christmas off. My son is 2 now and so much fun. Mrs. TheBandit had us running all over town doing holiday activities: light parades, snow deliveries (gotta love SoCal!), ice carvings, Santa Claus, trains, etc. Not a moment was wasted on me - spending time with my son is time well spent.
On the project side, I managed a little bit of progress. My in-laws bought me a sweet new tool for Christmas - a rivet nut gun.

I have been wanting one of these for ever but never knew much about them until I started researching them a couple weeks ago. This one is made by Marson. I got it as a kit with steel ribbed rivet nuts, Marson PN 39315 which costs about $80. A trusted friend who does fabrication for a living told me the Harbor Freight rivet nut tool is actually pretty decent and it's only around $10, but the rivet nuts it comes with should be tossed in favor of some quality nuts. I might have gone that direction, but the Marson had already hit the Christmas list when I heard about the HF one.
Here is what one of my installed rivet nuts looks like from the backside. You can see how the body of the nut deforms and clamps down on the sheet metal. You can install these blind just about anywhere you can drill a hole.

Happy with my new found capability, I proceeded to mount a few things. First, not shown, I threw a couple rivet nuts into the firewall to mount my ignition coils. I'll have to post photos of that later because I forgot to upload them. Then, after jockeying some dusty body panels out of the rafters, I put a couple rivet nuts into the core support to mount the ECM.

My original plan was to mount the ECM on the firewall behind the driver's fender. I eventually decided against this for accessibility reasons, though I still think dropping the inner fender would provide reasonable access if I had put it there.
I am going to mount a fuse/relay box above the ECM. I'm currently leaning toward a Bussman 15303 box like this one: http://www.nxtbook.com/nxtbooks/wayt.../#/133/OnePage This is a nice compact sealed unit, but I need to make sure there is enough space. It will only fit 3 mini relays which would be eaten up quickly with the fuel pump and fan controls. The factory wiring has a master power relay which I'd like to include in my harness, but will probably be external due to current considerations.
Speaking of harness, I am going to rework and/or remake the factory harness. I am planning on two main feeders, one coming into the bottom front of the engine that will run around the oil pan and a second that will come from the ECM, under the fender, and back along the firewall to feed the rear. The front line will have the cam sensor, VVT, knock sensors, crank sensor, throttle body, MAP, MAF, alternator and water temp. The rear will do oil pressure, ignition coils, and fuel injectors. I am not sure which run I'll use for the O2s and VSS - probably the rear line.
With that tentative plan and a wild hair, I spend several hours reducing my mess of wiring from this:

To this:

I started on faith by completely depinning the ECM connectors. Then I worked may way from there cutting or unwrapping harness tape, snipping a few ground junctions, and weeding the individual connector pigtails out of the harness. This was work best done in the comfort of your livingroom with some towels or paper down to catch debris, gloves to keep your fingers clean, and plenty of liquid patience (your choice of brew). It took me roughly 4 hours, though I'm sure with some cutting technique it could be done faster - I prefer to unwrap tape where possible to prevent damaging wiring insulation and this takes time.
Here is a shot of all the pigtails I think I'll need and a tub full of mostly throw-aways. The tub includes some of the fuse-to-ECM wires which I will probably reuse.

I am likely going to replace the wiring altogether for the coils, oil pressure and fuel injectors because they are way too short to route the way I want them to. I hope to reuse the connectors, but I need to get new terminals and seals, which also means a new crimper that can do the metri-pack stuff (needed that anyway really).
I have a lot of work to do before I go making this into a harness. It doesn't make sense wiring it up until most of the bits and pieces are mounted, but at least now I have an idea of what I'll need to get and I can start shopping around and collecting wiring parts & tools.
Some random things on the near term checklist:
- Finish coil mounting
- Trans dipstick
- Trans cooler lines
- Power steering lines
- Assemble suspension
The holidays were great this year. I had the full week of Christmas off. My son is 2 now and so much fun. Mrs. TheBandit had us running all over town doing holiday activities: light parades, snow deliveries (gotta love SoCal!), ice carvings, Santa Claus, trains, etc. Not a moment was wasted on me - spending time with my son is time well spent.
On the project side, I managed a little bit of progress. My in-laws bought me a sweet new tool for Christmas - a rivet nut gun.
I have been wanting one of these for ever but never knew much about them until I started researching them a couple weeks ago. This one is made by Marson. I got it as a kit with steel ribbed rivet nuts, Marson PN 39315 which costs about $80. A trusted friend who does fabrication for a living told me the Harbor Freight rivet nut tool is actually pretty decent and it's only around $10, but the rivet nuts it comes with should be tossed in favor of some quality nuts. I might have gone that direction, but the Marson had already hit the Christmas list when I heard about the HF one.
Here is what one of my installed rivet nuts looks like from the backside. You can see how the body of the nut deforms and clamps down on the sheet metal. You can install these blind just about anywhere you can drill a hole.
Happy with my new found capability, I proceeded to mount a few things. First, not shown, I threw a couple rivet nuts into the firewall to mount my ignition coils. I'll have to post photos of that later because I forgot to upload them. Then, after jockeying some dusty body panels out of the rafters, I put a couple rivet nuts into the core support to mount the ECM.
My original plan was to mount the ECM on the firewall behind the driver's fender. I eventually decided against this for accessibility reasons, though I still think dropping the inner fender would provide reasonable access if I had put it there.
I am going to mount a fuse/relay box above the ECM. I'm currently leaning toward a Bussman 15303 box like this one: http://www.nxtbook.com/nxtbooks/wayt.../#/133/OnePage This is a nice compact sealed unit, but I need to make sure there is enough space. It will only fit 3 mini relays which would be eaten up quickly with the fuel pump and fan controls. The factory wiring has a master power relay which I'd like to include in my harness, but will probably be external due to current considerations.
Speaking of harness, I am going to rework and/or remake the factory harness. I am planning on two main feeders, one coming into the bottom front of the engine that will run around the oil pan and a second that will come from the ECM, under the fender, and back along the firewall to feed the rear. The front line will have the cam sensor, VVT, knock sensors, crank sensor, throttle body, MAP, MAF, alternator and water temp. The rear will do oil pressure, ignition coils, and fuel injectors. I am not sure which run I'll use for the O2s and VSS - probably the rear line.
With that tentative plan and a wild hair, I spend several hours reducing my mess of wiring from this:
To this:
I started on faith by completely depinning the ECM connectors. Then I worked may way from there cutting or unwrapping harness tape, snipping a few ground junctions, and weeding the individual connector pigtails out of the harness. This was work best done in the comfort of your livingroom with some towels or paper down to catch debris, gloves to keep your fingers clean, and plenty of liquid patience (your choice of brew). It took me roughly 4 hours, though I'm sure with some cutting technique it could be done faster - I prefer to unwrap tape where possible to prevent damaging wiring insulation and this takes time.
Here is a shot of all the pigtails I think I'll need and a tub full of mostly throw-aways. The tub includes some of the fuse-to-ECM wires which I will probably reuse.
I am likely going to replace the wiring altogether for the coils, oil pressure and fuel injectors because they are way too short to route the way I want them to. I hope to reuse the connectors, but I need to get new terminals and seals, which also means a new crimper that can do the metri-pack stuff (needed that anyway really).
I have a lot of work to do before I go making this into a harness. It doesn't make sense wiring it up until most of the bits and pieces are mounted, but at least now I have an idea of what I'll need to get and I can start shopping around and collecting wiring parts & tools.
Some random things on the near term checklist:
- Finish coil mounting
- Trans dipstick
- Trans cooler lines
- Power steering lines
- Assemble suspension
01-09-2013, 12:36 AM
#709
After playing around with the old dipstick tube and researching options, I decided to get a Lokar flexible tube. I spent a lot of time researching these things. You can get Chinese knockoffs of the standard/classic Lokar design for as little as $25 on eBay, but even the real Lokar units are elegedly very difficult to fill and those eBay dipsticks are questionable. I came across a Milodon flexible dipstick that advertised being larger and US made, but in the end decided on a newer design from Lockar they call "Anchor Tight". It is NOT cheap. I paid $100 for this damn dipstick and it's just a dipstick for an old tranny I will likely replace down the road anyway. BUT I have seen the classic Lokars resale for decent money and I'm sure this will retain some value if I sell it later on.
I got the "firewall mount" which was advertised to be 24" long, but turned out to be quite a bit longer. When I mocked it up on the passenger side it was so long it would have to stick through the hood or bunch up in the tranny tunnel. So I decided to swing it over the top of the transmission and mount it on the driver's side to take up length.

I made a simple bracket from 1-1/4"x1/8" mild steel which I drilled and bent in a vise to tilt the dipstick slightly forward. It attaches to two of the intake bolts. I will round it out later to eliminate the corners behind the dipstick.


There are a few things that sold me on this overglorified dip stick. First, it is bigger than the standard ones (about the same ID as the hard tube was) so it shouldn't be hard to fill. Second, it is locking. There are couplings at both the transmission and the dip stick handle that function much like quick connects for pneumatic lines. They keep the flexible tube and the dipstick locked to eachother. To remove, you pull back a colar. Finally, as you can see below, this tube actually has a nut underneath that "anchors" it to the transmission. Installing the tube requires removing the transmission pan, but once the lower coupling is installed, you can remove the flexible tube at the coupling external to the transmission. Lokar also includes a plug for this location for when the tube is out or if you were racing and had a spare tranny.

I also picked up some bits and pieces to make the spark plug wires. I'm going to wait until I have the rear harness figured out before I make these, but I had some giftcards from Christmas and went for it.

What I have above are:
- Tayler 46069 ls1 coil boots, 135deg black
- Tayler 135* plug boots
- MSD 34014 8.5mm superconductor wire (25ft)
- MSD 3508 spark plug wire crimper dies
- Harbor Freight 97420 ratcheting wire crimpers
I have made about a dozen or so sets of plug wires in the last 10 years either for myself or for friends and until now I have always stripped the wire using a razer blade and crimped using vise-mounted dies and a hammer. I knew there had to be a better way and I finally put some well spent money into these crimping/stripping dies from MSD. They sell these in their own crimper, the "Pro Crimp 2" which is actually a Palladin 8000 series ratcheting crimper. The set (die + crimper) runs around $75 while the dies alone are about $25. For $8 after coupon, I picked up some crimpers from Harbor Freight that the dies work in and seem to function pretty well for a HF tool. The dies are, IMO, a lot more important than the crimper.

Here is a practice strip & crimp. It looks a million times better than what I was doing with the vise dies (though I will also say I never had one of those fail). Funny how having the right tools is gratifying and ungratifying at the same time; you no longer have to fuss with anything, but you just spent money on something that gets used now for only a few seconds.

The cheap HF crimper is not without its shortfalls. Here is something very important to look out for:

These crimpers have a lot of side-to-side play. It's not a problem for crimping because the dies are pretty wide, but for stripping it's critical to line up the dies as you cut. This can be done just holding the dies with your fingers being careful not to get pinched. I may pony up for some better crimpers down the road, but these do work pretty well for this purpose.
I've been spending a lot of time planning and head scratching so don't expect a lot from me while I work through all the little details on this. It is great to be making progress though, however small.
I got the "firewall mount" which was advertised to be 24" long, but turned out to be quite a bit longer. When I mocked it up on the passenger side it was so long it would have to stick through the hood or bunch up in the tranny tunnel. So I decided to swing it over the top of the transmission and mount it on the driver's side to take up length.
I made a simple bracket from 1-1/4"x1/8" mild steel which I drilled and bent in a vise to tilt the dipstick slightly forward. It attaches to two of the intake bolts. I will round it out later to eliminate the corners behind the dipstick.
There are a few things that sold me on this overglorified dip stick. First, it is bigger than the standard ones (about the same ID as the hard tube was) so it shouldn't be hard to fill. Second, it is locking. There are couplings at both the transmission and the dip stick handle that function much like quick connects for pneumatic lines. They keep the flexible tube and the dipstick locked to eachother. To remove, you pull back a colar. Finally, as you can see below, this tube actually has a nut underneath that "anchors" it to the transmission. Installing the tube requires removing the transmission pan, but once the lower coupling is installed, you can remove the flexible tube at the coupling external to the transmission. Lokar also includes a plug for this location for when the tube is out or if you were racing and had a spare tranny.
I also picked up some bits and pieces to make the spark plug wires. I'm going to wait until I have the rear harness figured out before I make these, but I had some giftcards from Christmas and went for it.
What I have above are:
- Tayler 46069 ls1 coil boots, 135deg black
- Tayler 135* plug boots
- MSD 34014 8.5mm superconductor wire (25ft)
- MSD 3508 spark plug wire crimper dies
- Harbor Freight 97420 ratcheting wire crimpers
I have made about a dozen or so sets of plug wires in the last 10 years either for myself or for friends and until now I have always stripped the wire using a razer blade and crimped using vise-mounted dies and a hammer. I knew there had to be a better way and I finally put some well spent money into these crimping/stripping dies from MSD. They sell these in their own crimper, the "Pro Crimp 2" which is actually a Palladin 8000 series ratcheting crimper. The set (die + crimper) runs around $75 while the dies alone are about $25. For $8 after coupon, I picked up some crimpers from Harbor Freight that the dies work in and seem to function pretty well for a HF tool. The dies are, IMO, a lot more important than the crimper.
Here is a practice strip & crimp. It looks a million times better than what I was doing with the vise dies (though I will also say I never had one of those fail). Funny how having the right tools is gratifying and ungratifying at the same time; you no longer have to fuss with anything, but you just spent money on something that gets used now for only a few seconds.
The cheap HF crimper is not without its shortfalls. Here is something very important to look out for:
These crimpers have a lot of side-to-side play. It's not a problem for crimping because the dies are pretty wide, but for stripping it's critical to line up the dies as you cut. This can be done just holding the dies with your fingers being careful not to get pinched. I may pony up for some better crimpers down the road, but these do work pretty well for this purpose.
I've been spending a lot of time planning and head scratching so don't expect a lot from me while I work through all the little details on this. It is great to be making progress though, however small.
Last edited by -TheBandit-; 01-09-2013 at 12:43 AM.
01-09-2013, 07:22 AM
#710

Looks good. Should be a nice custom set of wires when you're done. I know what you mean about tools. Nothing beats having the right tool, or close to the right tool using a Harbor Freight knock off. I have a Bridgeport Mill, and although I don't use it everyday, when I need it, it's a lifesaver! No more BS trying to elongate holes with a drill. Pop the end mill in and boom! Perfect slot in seconds. Need a part instead of purchasing it? Sure it'll do that too. The one thing I am starting to realize in my young 30's is that sometimes even when I can do stuff myself, it's getting to the point of a time vs. money deal. Sometimes it's just easier to have someone else do it so I can spend time doing other things. Such is life!
Doug
Doug
01-09-2013, 09:40 AM
#711

Where did you get your ends for the coil?? I found a company(I will have to get in my file) that sells them , much cheaper than Summit..Unless they have changed completely, the firewall mount Lokars are able to be shortened, though yours looks fine, I think it is still possible, I just did one last week, but not the Anchor mount as you have..All in All nice job on your build...
01-09-2013, 10:56 AM
#712
Doug - You said it man! I have a mill also and man when I need it, I need it! In fact I drilled the holes on that dipstick bracket using the mill. The dipstick needed a 7/8" hole which is hell to drill on a way-too-fast drill press. In the past I would have to use a hand drill to keep the speed down, but keeping it straight is a bear and it always ends up grabbing and twisting my arm off. Mill is the way to go!
oldngray - I ordered the coil boots through Oldies Speed Shop which is local. I had a gift certificate and they price matched Summit. Taylor sells them for slightly cheaper direct from their website. Some of the other stuff I bought through Amazon (I have a prime account so shipping is nice), Autoplicity, and others. I often use the Google shopping search function to find good pricing on parts.
oldngray - I ordered the coil boots through Oldies Speed Shop which is local. I had a gift certificate and they price matched Summit. Taylor sells them for slightly cheaper direct from their website. Some of the other stuff I bought through Amazon (I have a prime account so shipping is nice), Autoplicity, and others. I often use the Google shopping search function to find good pricing on parts.
01-10-2013, 02:12 PM
#716
Taylor 46069 includes the boots and the metal terminals that crimp on the wire to connect to the coil. You get 8 rubber boots and 8 opti-spark terminals. I think they were roughly $17, but you can get them from Taylor directly for around $14.
I looked up Kingsborne and the price for their coil boots is pretty much the same. The ones that are fairly expensive are the MSD coil boots and I'm not sure why.
I looked up Kingsborne and the price for their coil boots is pretty much the same. The ones that are fairly expensive are the MSD coil boots and I'm not sure why.
 01-24-2013, 11:38 PM
#718
I found sediment in the transmission pan. Is this likely clutch material and how concerned should I be? I haven't pulled the filter but I suppose that's the next step to see how much of this is in the system.

I got a pair of 3" v-band assemblies from the boost depot after coming across good reviews on the yellowbullet forum. These are nickel plated mild steel flanges with stainless steel v-bands. They have a male & female half that nest nicely to keep them centered and improve the seal.


Unfortunately they rob ground clearance. With the v-band in place, the lowest point is 1-1/8" below the subframe. I'm thinking about exchanging these for 2-1/2" v-bands and placing them after a 3-to-2-1/2 reducer (which I plan to use anyway), but that would only gain about 1/4" of clearance. The collectors by themselves stick down about 1/2" from the subframe. Any thoughts on this?
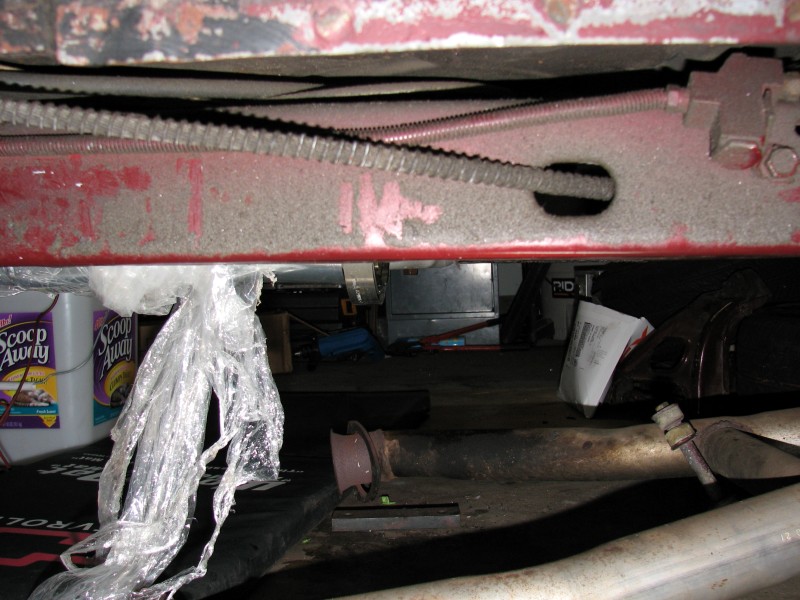
Any thoughts on running the injector wires between the intake manifold and the manifold cover like shown below? The cover has about 1/4" of foam for sound deadening between it and the manifold. I was thinking I could remove some of the foam for routing wires to the back of the engine. They would be inside loom or wrap to protect them from rubbing. It would make things a lot cleaner.

I got a pair of 3" v-band assemblies from the boost depot after coming across good reviews on the yellowbullet forum. These are nickel plated mild steel flanges with stainless steel v-bands. They have a male & female half that nest nicely to keep them centered and improve the seal.
Unfortunately they rob ground clearance. With the v-band in place, the lowest point is 1-1/8" below the subframe. I'm thinking about exchanging these for 2-1/2" v-bands and placing them after a 3-to-2-1/2 reducer (which I plan to use anyway), but that would only gain about 1/4" of clearance. The collectors by themselves stick down about 1/2" from the subframe. Any thoughts on this?
Any thoughts on running the injector wires between the intake manifold and the manifold cover like shown below? The cover has about 1/4" of foam for sound deadening between it and the manifold. I was thinking I could remove some of the foam for routing wires to the back of the engine. They would be inside loom or wrap to protect them from rubbing. It would make things a lot cleaner.
01-25-2013, 03:08 AM
#719

Not too sure about the transmission. You are however, missing a magnet in the pan. Normally you will have the same graphite looking sediment at fluid/filter service intervals but it will be stuck to the magnet and it doesnt appear as bad. If the trans was working ok before you pulled the engine then it should be working fine now. Run it till you can locate another one or you could go ahead and rebuild the one you have.
I am digging the clamps! Any type of union you put at the end of the collector is going to hang lower than itself. The only one I know of that will be semi-flush would be a band clamp. I have band clamps on my exhaust an they seem to hold up pretty darn good. I worry with the band clamps that they will eventually work loose though.
How much of a pain in the *** is it going to be to pull the intake with the wires under the intake cover? It will definately be an improvement aesthetically. You can rotate the injectors a little to hide even more of the wire.
01-25-2013, 03:14 AM
#720
The Boost Depot has some nice stuff but are pretty darn high. I found these that might be easier to weld on due to the longer flange and about $10 cheaper each. They are stainless and seem to favor the ones you have.
http://www.summitracing.com/parts/su...0/media/images
http://www.summitracing.com/parts/su...0/media/images