
'70 Nova LY6/TH400 6.0VVT


 10-11-2012, 03:58 PM
#502
UPDATE
After a bit of reading, I decided the tight clearances above were not appropriate for my build, so I ordered a set of MS-2199HX (add 0.001 clearance) main bearings. The machine shop installed the new bearings and measured the new clearances. Here are the before/after clearances (P vs. HX)
#: P/HX
1: .0015/.0026
2: .0010/.0024
3: .0010/.0025
4: .0012/.0025
5: .0011/.0026
From what I've been reading, the new clearances are spot on, so I will run them. The shop checked a number of other clearances as well. Here they are:
Rod clearance: .0021 (only checked one)
Piston to Bore: .0035 (4.0305bore/4.0270piston)
Wrist pin: .927
Wrist pin to rod ID: .0009
Wrist pin to piston ID: .0009
Deck height: 9.2240
Top ring gap: .019
2nd ring gap: .021
Oil ring: 0.010
The block is now in my possession, ready for assembly.

 10-11-2012, 11:11 PM
#507
The sleeve looks good. You can see on the deck the slight difference in color between the block and sleeve and another transition at the bottom of the bore where they left a step in the block to support it. The sleeve thickness is more than I was expecting - I'm not worried about it at all now that I've seen it. It's on the no 2 cylinder.
As always I will be posting photos, but probably wont have a chance until the weekend. Work and family have me running circles right now.
Thank you for the congratulations. Next week will mark six years since my diagnosis. It feels like a birthday every year. I am so greatful to be here and fortunate to be in continued good health. As is the tradition every year, I will try to write something thoughtful or inspirational to post and email the day of to celebrate and pay forward the kindness and support I've received. You know this project has gone on too long when you guys are helping me celebrate the passing years lol.
10-12-2012, 03:54 AM
#508
It is your money and your time, its free for you to spend as you wish! Time is the most important as a young family needs a Dad. They do not need a mechanic all the time. I spent many days days and nights in my garage, while everyone else was carrying on with life, only to regret it later. I can only imagine hearing the words you heard 6 years ago and realizing time just became priority over everything else. Take care and God bless!---Tony
PS hurry up!!!
 10-13-2012, 06:25 PM
#510
Okay so here it is, finally back after 3 months sitting at QMP. It looks good as far as I can tell by eye.


Below is the no 2 cylinder which was sleeved. You can see where the sleeve mates with the block both at the deck surface and near the bottom of the cylinder. It was machined after install and I can not feel the transition with my fingers.


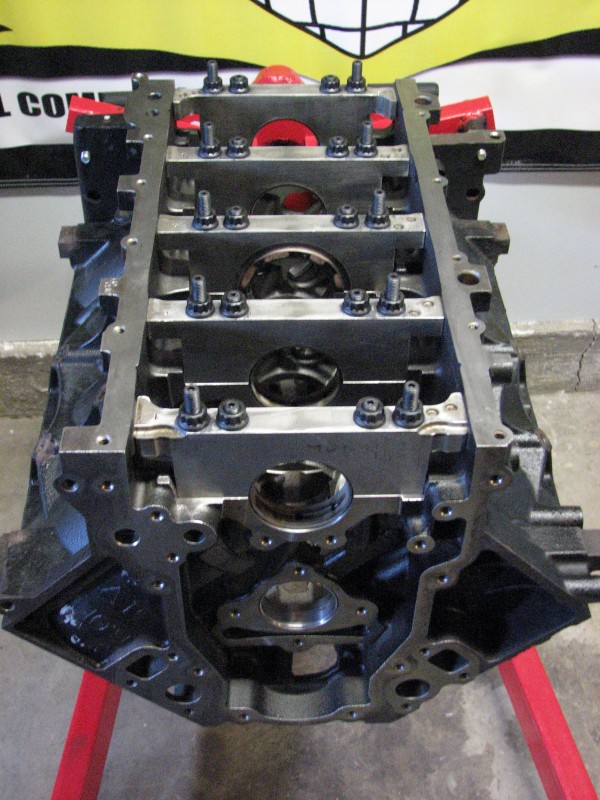
Do these mains look straight to you? The old eyecrometer just isn't accurate enough to tell, but I know cybermeasurements are trustworthy. They were line honed.

Below is the no 2 cylinder which was sleeved. You can see where the sleeve mates with the block both at the deck surface and near the bottom of the cylinder. It was machined after install and I can not feel the transition with my fingers.
Do these mains look straight to you? The old eyecrometer just isn't accurate enough to tell, but I know cybermeasurements are trustworthy. They were line honed.
10-13-2012, 06:25 PM
#511
Here is the crank which got a just a light polish and balance.


So the first thing I did was attemped to measure the main clearances. I started by measuring the crank main journals with outside micrometers. They were all between 2.5870 and 2.5875 according to my mic. Next I put the dial bore gage between the mic with the mic set at 2.5870. I tried desperately to zero it, but God help me that thing is impossible to hold steady and zero at the same time. The act of pressing the zero button is enough to move the whole thing and throw it off. Eventually I abandoned getting a perfect zero and just worked from the minimum displayed value. I measured the first main bearing and calculated a clearance of 0.0028. Then I went to do the next bearing and found the damn thing had changed it's zero somehow. I couldn't get a consistent reading, so I finally just gave up.
On to plan B, plastigage. I started by pulling all the main caps.
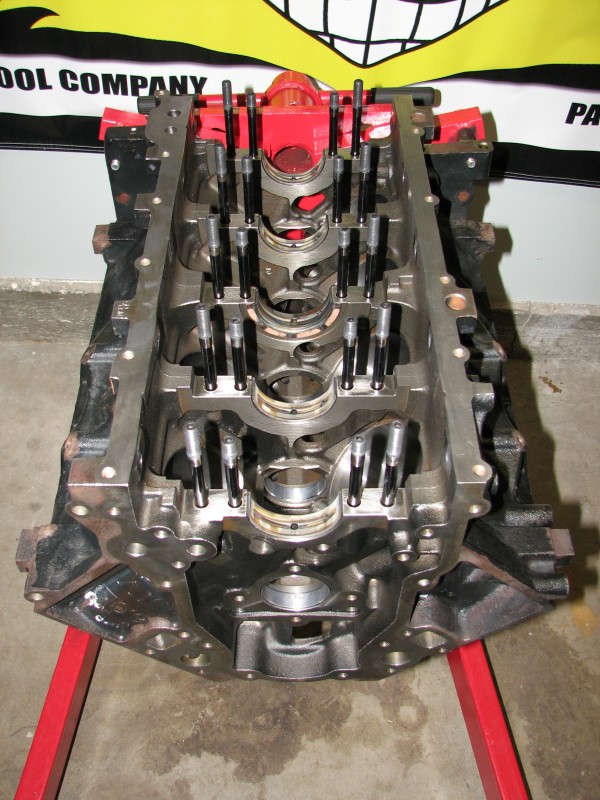
Then I laid strips of plastigage on top of each of the main journals.

And torqued the main caps on.

Then I removed the caps and here's what I saw


The plastigage is showing something between 0.0015 and 0.002, closer to 0.0015, and is consistent across all 5 mains. The machine shop said they measured between 0.0024-0.0026 using their bore gage. Now I have to decide which I trust. I think I will try my bore gage again and report back. Any thoughts?
So the first thing I did was attemped to measure the main clearances. I started by measuring the crank main journals with outside micrometers. They were all between 2.5870 and 2.5875 according to my mic. Next I put the dial bore gage between the mic with the mic set at 2.5870. I tried desperately to zero it, but God help me that thing is impossible to hold steady and zero at the same time. The act of pressing the zero button is enough to move the whole thing and throw it off. Eventually I abandoned getting a perfect zero and just worked from the minimum displayed value. I measured the first main bearing and calculated a clearance of 0.0028. Then I went to do the next bearing and found the damn thing had changed it's zero somehow. I couldn't get a consistent reading, so I finally just gave up.
On to plan B, plastigage. I started by pulling all the main caps.
Then I laid strips of plastigage on top of each of the main journals.
And torqued the main caps on.
Then I removed the caps and here's what I saw
The plastigage is showing something between 0.0015 and 0.002, closer to 0.0015, and is consistent across all 5 mains. The machine shop said they measured between 0.0024-0.0026 using their bore gage. Now I have to decide which I trust. I think I will try my bore gage again and report back. Any thoughts?
 10-13-2012, 10:22 PM
#513

Clint, It looks great. Consistent error is probably good news. I'm sure conditions affect the plastic goop. Also, try rotating the crank 180 and remeasure.
Last edited by futureuser; 10-13-2012 at 10:28 PM.
10-14-2012, 12:05 AM
#514
Okay after much frustration I figured out what was wrong with my bore gauge. Pretty much everything on it was loose. It had a plastic guard over the indicator which hid from my view the clamp meant to hold the indicator. The clamp had no screw at all! After I found a screw and tightened everything I was able to get consistent measurements.
First l set my mic up lightly clamped in my vice and adjusted it to the crank journal diameter, locking it in place. My mic only reads to .001 and I was reading .0005 by eyeballing the half way mark, so id guess my measurements are at best accurate to +/-.00025 and that may be pushing it. Next I recorded a reference reading on the bore gauge when placed in the micrometer. Finally after torquing the main caps into place, I measured the bearing ID and calculated my clearance. All of the bearings were round within .0002. Here is what I got for main clearances:
1: .00245
2: .00260
3: .00255
4: .00240
5: .00230
I think that agrees pretty well with the shops measurements, just not with the plastigage. I feel more confident with the measured values over the plastigage, but I'd like to know what others think.
10-14-2012, 12:35 AM
#515
Looks like these guys had a similar experience with plastigage being significantly off from their Mic measurements.
http://www.carcraft.com/techfaq/116_...r/viewall.html
I think I will trust the mic!
http://www.carcraft.com/techfaq/116_...r/viewall.html
I think I will trust the mic!
10-15-2012, 12:00 PM
#517
Did you also measure yours with a bore gauge or did the shop measure it for you?
I got a few more hours into this yesterday and measured the rod journals and bearings. I am getting more confident in my bore gauge measurements because I was able to get very repeatable measurements: journals all measured 2.0990 time after time (shop measured 2.0989), setting the mic to that reference, I got repeatable measurements of the mic with the bore gauge and when measuring the rod bearings I got repeatable measurements too, all within .0002 when remeasuring. However I am measuring looser rod bearing clearances than the machine shop. I got four rods torqued down with bearings in them and measured 0.0034, 0.0035, 0.0036 and 0.0036 clearance. The machine shop measured only one rod and got 0.0021. I can't explain the discrepancy. For the rod they measured, I didn't even re-torque the cap, so I'm pretty sure I'm measuring the same physical bore as them. I'm not sure if it's my tool, my technique, or if I really have loose clearances.
I got a few more hours into this yesterday and measured the rod journals and bearings. I am getting more confident in my bore gauge measurements because I was able to get very repeatable measurements: journals all measured 2.0990 time after time (shop measured 2.0989), setting the mic to that reference, I got repeatable measurements of the mic with the bore gauge and when measuring the rod bearings I got repeatable measurements too, all within .0002 when remeasuring. However I am measuring looser rod bearing clearances than the machine shop. I got four rods torqued down with bearings in them and measured 0.0034, 0.0035, 0.0036 and 0.0036 clearance. The machine shop measured only one rod and got 0.0021. I can't explain the discrepancy. For the rod they measured, I didn't even re-torque the cap, so I'm pretty sure I'm measuring the same physical bore as them. I'm not sure if it's my tool, my technique, or if I really have loose clearances.
10-15-2012, 02:22 PM
#518
So what you are basically saying at this point is, everything the machine shop told you is correct? I say have some faith in your machinist and roll with it! Quite wasting time and get the damn thing running! Sorry but all you engineers are the same. I swear you have to be related to a friend of mine(engineer). He measures and remeasures and then before you know it everything is rusted and he has to start over. Not to sound harsh or anything but come on! We (all of your friends here at LS1Tech) have been waiting a loooooooooooooong time to see this Nova move under its own power. Get your *** in the garage and don't leave till you are hoisting the engine back in the car. Send me a round trip flight and I will come over and help. You supply the beer, tools and flight I will be there.