

'70 Nova LY6/TH400 6.0VVT
 03-08-2012 | 04:26 PM
#301

Clint I think you're the first person -- aside from Mustang guys -- that I've seen in a loooooong time buy new leafs (I've been on PT a lot more lately). Congrats on doing something different. Good job on the flywheel holder -- I'm guessing it took less than $75 worth of effort to make.
03-14-2012 | 01:00 PM
#302
Thread Starter
TECH Addict
iTrader: (1)
Joined: Apr 2010
Posts: 2,816
Likes: 84
From: Instagram @chevyhotrodder
The correct answer is "TOO LONG", but I'd also accept 4 hours start to finish including the time for me to dig through my scrap pile.
That is a great idea. When I was thinking about how to do this, I looked around for my old SBC flywheel to see if it had a meshable tooth, but I guess I got rid of it. Unfortunately the only flywheel in my garage is the one bolted to the crank.
Thank you!
I don't think I'm alone in the "leafer" category. The problem with the PT forum is there seems to be a much higher income level represented on that site, thus the increased incidence of link suspensions. When I see people spending $4-6k on a bare set of wheels, I know I'm out of my league financially. If you spend time on the more pedestrian sites like team camaro, team nova, stevesnovasite, etc, you'll find a lot of folks still use leafs. It was really a decision of budget. I want to balance the car out (both in terms of rates and height), but also don't want to drop a bunch of money and time on hardware & coilovers to build a link setup. I think these will serve me well for now. I saved a bit of money buying them used. In the end I think money is much better spent on improving geometry up front and getting a decent set of tires, both on my to-do or done list.
One thing's for sure, despite this build giong on and on and on, I am having a great time.
I had an idea that could save someone some time in the future. After looking at the teeth you cut, and they look great by the way, I went down stairs to my storage cabinet and wow right there in front of me was the old flywheel off of the LQ4. I would just need to section it out to have the teeth part done.
One thing's for sure, despite this build giong on and on and on, I am having a great time.
03-15-2012 | 11:34 PM
#303
Thread Starter
TECH Addict
iTrader: (1)
Joined: Apr 2010
Posts: 2,816
Likes: 84
From: Instagram @chevyhotrodder
Not really an update, but the flywheel holder works just fine! Just felt like giving it a try tonight since I haven't had any time over the last week.


Trying to clean up the garage a bit and snapped a couple overall pictures of the frame so you can see the notches. I'm getting a bit more comfortable with this after reviewing a few other frame designs for similarly dimensioned SLA front suspensions.


Trying to clean up the garage a bit and snapped a couple overall pictures of the frame so you can see the notches. I'm getting a bit more comfortable with this after reviewing a few other frame designs for similarly dimensioned SLA front suspensions.
03-22-2012 | 11:19 PM
#304
Thread Starter
TECH Addict
iTrader: (1)
Joined: Apr 2010
Posts: 2,816
Likes: 84
From: Instagram @chevyhotrodder
Not a fun update tonight, but it is what it is, so here goes...
Decided to get started on the cam swap. First step was pulling the crank pulley. I had to use a smaller puller than I'd have liked for this job, but my next size up was contacting the inside of the pulley on the outside surfaces of the puller arms rather than just the jaws.

Here you can see where the jaws should be pulling from - there are three recessed areas cast into the pulley for this purpose.

Success - no more pulley. Loving my flywheel holder at this point!

Next off came the timing cover.

Then the oil pump.

Then I used some ribbed pliers to compress the tensioner and stuck an allen key into this hole to keep the tensioner relaxed.

Next out came the phaser hydraulic valve / solenoid / bolt. This is unique to the VVT system and through a PWM electromagnet in the timing cover, this valve directs oil to the phaser vanes to advance and retart timing. It's a really neat piece - definitely excites the engineer in me. Once again, my flywheel holder was great for resisting rotation while I torqued this off.

After that the phaser / cam gear / cam encoder can be removed. It slid right off by hand.

Decided to get started on the cam swap. First step was pulling the crank pulley. I had to use a smaller puller than I'd have liked for this job, but my next size up was contacting the inside of the pulley on the outside surfaces of the puller arms rather than just the jaws.
Here you can see where the jaws should be pulling from - there are three recessed areas cast into the pulley for this purpose.
Success - no more pulley. Loving my flywheel holder at this point!
Next off came the timing cover.
Then the oil pump.
Then I used some ribbed pliers to compress the tensioner and stuck an allen key into this hole to keep the tensioner relaxed.
Next out came the phaser hydraulic valve / solenoid / bolt. This is unique to the VVT system and through a PWM electromagnet in the timing cover, this valve directs oil to the phaser vanes to advance and retart timing. It's a really neat piece - definitely excites the engineer in me. Once again, my flywheel holder was great for resisting rotation while I torqued this off.
After that the phaser / cam gear / cam encoder can be removed. It slid right off by hand.
03-22-2012 | 11:29 PM
#305
Thread Starter
TECH Addict
iTrader: (1)
Joined: Apr 2010
Posts: 2,816
Likes: 84
From: Instagram @chevyhotrodder
At this point, I removed the cam retainer plate, which has a built in seal for the crossover "barbel" that directs oil from the driver's side lifter oil feed galley to the passenger side.

Next, I rotated the cam a few revolutions (only one is technically needed) to get all the lifters to move up and stay up in their lifter trays. I read about a trick to insert 5/16" wooden dowel down the lifter oil feed galleys as a backup method for retaining the lifters just in case they came out of the trays. Unfortunately, I could not for the life of me get the passenger side dowel all the way in, even though it seemed from inspection that the lifters were all the way up.

Since the engine is on a stand and the risk of the lifter droping wasn't as big of a deal as if it were in a car, I decided to chance the passenger side and just go ahead and pull the cam. I wiggled it out, using the phaser bolt as a tool.

The good news is all the lifters stayed put in their lifter trays. Unfortunately, that's about all the good news I can report. I inspected the old cam carefully and found a number of suspicious rust spots on some of the lobes


In all there were at least six lobes that shows some sign of rust ranging from wipeable/superficial to one that seemed pitted. All of the bearing journals, however, looked very good. So I took a flashlight and inspected down the length of the block to see what I could see. Cam bearings look good, but I noticed one of the lifter's rollers had a line of rust on it.
Next, I rotated the cam a few revolutions (only one is technically needed) to get all the lifters to move up and stay up in their lifter trays. I read about a trick to insert 5/16" wooden dowel down the lifter oil feed galleys as a backup method for retaining the lifters just in case they came out of the trays. Unfortunately, I could not for the life of me get the passenger side dowel all the way in, even though it seemed from inspection that the lifters were all the way up.
Since the engine is on a stand and the risk of the lifter droping wasn't as big of a deal as if it were in a car, I decided to chance the passenger side and just go ahead and pull the cam. I wiggled it out, using the phaser bolt as a tool.
The good news is all the lifters stayed put in their lifter trays. Unfortunately, that's about all the good news I can report. I inspected the old cam carefully and found a number of suspicious rust spots on some of the lobes
In all there were at least six lobes that shows some sign of rust ranging from wipeable/superficial to one that seemed pitted. All of the bearing journals, however, looked very good. So I took a flashlight and inspected down the length of the block to see what I could see. Cam bearings look good, but I noticed one of the lifter's rollers had a line of rust on it.
03-22-2012 | 11:43 PM
#306
Thread Starter
TECH Addict
iTrader: (1)
Joined: Apr 2010
Posts: 2,816
Likes: 84
From: Instagram @chevyhotrodder
By now I was getting worried. How bad and where is there rust? Where did it come from? I agonized the following day over what to do, mostly worried about the condition of the lifters. So tonight I decided to pull the heads and try getting to the bottom of this. Off they came and here's what I found:


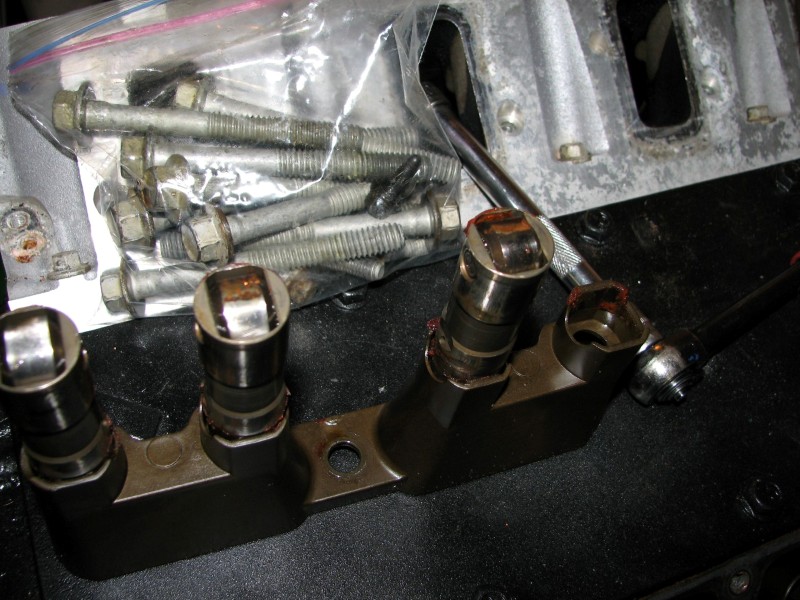


I'm not sure exactly how it got here, but there is some kind of "pool" of rust around both of the lifter areas. I can only imagine water and/or cleaner made its way in here when I was cleaning the engine last year.
At the very minimum I need to get these nasties cleaned off the block and replace the lifters. The good news is the lifter bores all look pretty good - I just don't know where else I might find rust. The cylinders all have good cross hatching showing and I don't see any rust there, but if you look in some of the other photos you can see there is very light surface rust on other areas of machined internal areas (look at the oil pump drive, front faces of the main bearing caps, etc). The crank spins freely though. I'm hoping I can get away with cleaning this carefully without rebuilding the bottom end.
03-22-2012 | 11:45 PM
#307
Clint - good write up.. for the Dowel, if you research this. Most have shaved a flat area on one side of the dowel, would end up as a "D" shaped rod .. that would allow the dowel to slide in.
But keep up the good work..
BC
But keep up the good work..
BC
03-23-2012 | 04:14 AM
#308

Sorry to hear about the rust! You can replace the lifters with some LS7's for about $140. They are a direct fit and even GM has replaced the LS1's, LS2's and 6.0 lifters with the new part number that are in actuality LS7's. I bought mine from the engine builder but here is the part number out of the 2012 GMPP catalog: 12499225. While your at it go ahead and replace the trays as they are inexpensive something like $16 for four of them the part number for them is: 12595365. I am not sure on what you plan to do with the head gaskets, but if you decide to replace them, GM actual sells them cheaper than Fel-Pro and are prolly made by Fel-Pro the part number for them is:12610046 they are around $25-$30 each where as Fel-Pros are $50-$65 each. The new head bolts are about the same at either the box stores or GM they will run you $25 a side. Depending on your year model the head bolts are different. From 1997-2003 use GM part number: 12498545 if your engine was produced after January 2004 use part number: 17800568. I am sure you know this but for some that are following your thread that may not, the bolts used in these engines are torque-to-yield and should not be reused. The only bolts I reused on my 6.0 were the front cover, rear cover, and the oil pan bolts.
I know you weren't worried about the lifters falling out of their bores since it was on the engine stand, but one way to make sure they didn't was to flip the engine over before you pulled the cam.
Best of luck to you on the cleanup! I really hate when stuff like that happens but its nothing you cant remedy in a couple of days. The costs of the replacement parts is what sucks especially when your replacing good pieces the oxidized. I am glad that you pulled it apart to further inspect it rather than "roll the dice". No telling how bad the engine could have been hurt if you took the easy route! At least when your finished you will have the piece of mind that everything is right! Of course I would never tell my wife that I was the root cause of the problem and would prolly spin the blame off onto the junkyard where I bought it, lol!!!
03-23-2012 | 10:04 AM
#309
Thread Starter
TECH Addict
iTrader: (1)
Joined: Apr 2010
Posts: 2,816
Likes: 84
From: Instagram @chevyhotrodder
bczee, that's a good tip - likely would have made it fit. Looking at the shape of the exposed portion of the lifter, I don't really see how these dowels do much, but I figured I'd buy into the myth for the 80 cents it cost me.
Thanks for the reply Tony. I've been educating myself on the subject over the last few days and as you've pointed out, this is not a cheap fix. But it is a lot better than what likely would have happend if I had just ran this the way it is. It was very tempting to ignore the issue, stab the new cam in and just continue on my way without the immediate expense of new lifters, gaskets, bolts, etc. I'm very glad I didn't go that direction.
I absolutely plan on replacing the head gaskets. The MLS layers came apart as I pulled the heads off. Oddly the dowels stayed with the heads instead of the block. I find it very strange this engine uses spring pins instead of solid dowels, but they are easy to get in and out that way. I am going to do some reading to see what the best gaskets are. I'm leaning GM replacement and the same for the bolts. I don't think ARP bolts or studs are worth the cost for this combo.
Any tips or ideas for cleaning this stuff off and what I should inspect from here? I was thinking I'd turn the engine upside down on the stand and brush this rust out in that position so as little as possible ends up in the oil galleys, spraying & flushing it out with WD40? Or should I use a sensor safe brake or carb cleaner instead?
03-23-2012 | 10:11 AM
#310
Clint - I just used the GM ones.. I also thought about the MLS too, but after researhing them. I found that you must have a perfect machined surface. I have heard and read about bad sealing if not. I would not think that any build that didn't get a fresh machined head and block be a good idea to use them MLS head Gaskets..
Just a thought. But then there are always some that have done it and had great success.
BC
Just a thought. But then there are always some that have done it and had great success.
BC
03-23-2012 | 10:21 AM
#312
If it were me I would go ahead and pull the rear cover and oil pan off, pull the barbell in the back, knock out the small freeze plug (oil galley) out of the front, pull the oil drain right above the oil filter on the block, and wire brush it slowly. I may possibly run a wire brush through the entire oil passages as these engines give full access to all of them. Do you have any Varsol? You could use an air powered sprayer (engine cleaner) and siphon some fresh varsol to flush everything out. Varsol will not or should not hurt a thing and it dries rather quickly leaving no residue. You could use a vacuum and position it above where your working while you clean up the block to limit the amount of rust traveling around. Find the smallest end available for the vacuum so that it can be positioned right where you need it. Or a better option, take the entire assembly to the machine shop and order a stroker kit, hot tank the block, and Voila!!! problem solved, lol!!!
03-23-2012 | 10:36 AM
#313
Not disputing what bczee (he is a great guy!) said but I did have success with the MLS gaskets on the 6.0. The block was left as is but I did have new heads. I would consider buying ARP head bolts though. You can get a set for $150 and it will be the last set you ever buy. Stock head bolts are going to cost approximately $30 per side and can only be used once. I have two sets I will sell you for dirt cheap, slightly used. I now own the ARP's and love them. The only thing I dont like about them is the fact they are hex rather than 12 point.
03-23-2012 | 11:06 AM
#315
Thread Starter
TECH Addict
iTrader: (1)
Joined: Apr 2010
Posts: 2,816
Likes: 84
From: Instagram @chevyhotrodder
Reusability is a good plug for the ARPs. I'll think about it. The stroker idea is tempting too, but somehow I don't think my wife would be as forgiving as yours! What is the benefit of a 12 point? I can't think of any performance benefit.
Perhaps I should disassemble the whole thing and get the block hot tanked for peace of mind. That would give me an opportunity to inspect further and decide what other parts (if any) need replacing. But then I'd have to replace the rod & main fasteners at a minimum, adding another few hundred bucks to an already balooning cost. I'm just not sure that's worth it. *EDIT* Reading around, it looks like the rod and main bolts are not torque to yield and can in fact be reused. Might not need to replace them afterall.
Perhaps I should disassemble the whole thing and get the block hot tanked for peace of mind. That would give me an opportunity to inspect further and decide what other parts (if any) need replacing. But then I'd have to replace the rod & main fasteners at a minimum, adding another few hundred bucks to an already balooning cost. I'm just not sure that's worth it. *EDIT* Reading around, it looks like the rod and main bolts are not torque to yield and can in fact be reused. Might not need to replace them afterall.
Last edited by -TheBandit-; 03-23-2012 at 11:25 AM.
03-23-2012 | 01:04 PM
#316
Reusability is a good plug for the ARPs. I'll think about it. The stroker idea is tempting too, but somehow I don't think my wife would be as forgiving as yours! What is the benefit of a 12 point? I can't think of any performance benefit.
Perhaps I should disassemble the whole thing and get the block hot tanked for peace of mind. That would give me an opportunity to inspect further and decide what other parts (if any) need replacing. But then I'd have to replace the rod & main fasteners at a minimum, adding another few hundred bucks to an already balooning cost. I'm just not sure that's worth it. *EDIT* Reading around, it looks like the rod and main bolts are not torque to yield and can in fact be reused. Might not need to replace them afterall.
Perhaps I should disassemble the whole thing and get the block hot tanked for peace of mind. That would give me an opportunity to inspect further and decide what other parts (if any) need replacing. But then I'd have to replace the rod & main fasteners at a minimum, adding another few hundred bucks to an already balooning cost. I'm just not sure that's worth it. *EDIT* Reading around, it looks like the rod and main bolts are not torque to yield and can in fact be reused. Might not need to replace them afterall.
03-23-2012 | 02:15 PM
#317
Thread Starter
TECH Addict
iTrader: (1)
Joined: Apr 2010
Posts: 2,816
Likes: 84
From: Instagram @chevyhotrodder
You are starting to take me down a long and expensive road! Are you positive the main bolts are TTY? I realize they are torque+angle, but that doesn't necessarily mean they are yielded. I don't want to get into higher-than-stock clamping forces where line honing might be necessarily.
Why would a hot tank necessitate new rings? I would hot tank the bare short block and put the original components back where they came from.
Why would a hot tank necessitate new rings? I would hot tank the bare short block and put the original components back where they came from.
Last edited by -TheBandit-; 03-23-2012 at 02:40 PM.
03-23-2012 | 10:28 PM
#318
You are starting to take me down a long and expensive road! Are you positive the main bolts are TTY? I realize they are torque+angle, but that doesn't necessarily mean they are yielded. I don't want to get into higher-than-stock clamping forces where line honing might be necessarily.
Why would a hot tank necessitate new rings? I would hot tank the bare short block and put the original components back where they came from.
Why would a hot tank necessitate new rings? I would hot tank the bare short block and put the original components back where they came from.
03-23-2012 | 10:43 PM
#319
Here is an interesting article on tty and ttt. Basically the torque to turn is the preferred method to tighten a tty bolt. Where the bolt stretches will be soley based on its design. Something I never knew. Check it out and tell me what you think.
http://www.enginebuildermag.com/Arti...uetoangle.aspx
http://www.enginebuildermag.com/Arti...uetoangle.aspx
03-23-2012 | 10:51 PM
#320
Dont feel alone with the situation your experiencing right now. My Dad called me one day and asked if it was ok if he washed the engine in his Corvette. I responded with an asnwer of "NO" as there were too many electronics to take the risk. He agreed with me for about 15 minutes and then decided to wash it anyways. After he tried to crank it and it wouldnt start he took it to the garage and spent $1200 to get it running. The Opti-spark for his year model didnt have the vent. He regretted calling me but did anyways. I just had to smile and say " well at least you have a clean engine!" of course he hung up on me.