
LY6/4L80e from rough van into rough 69 camaro


 01-13-2011, 09:05 AM
#82
I am looking into the factory style fuel line myself. I have access to all of the tools and fittings I need to complete this. Does NHRA require all cars to shed their factory fuel line to drag? Lets say you have 2002 Z/28 and laid down some good times, will tech make you change out the factory installed lines? I really dont know. The OEM line is some tough fuel line. Its easy to route and easy to affix to the chassis. I agree on the wear and tear, it would be easier to spot. If were to go with say braided line I would get the teflon lined with the steel outer core with the stainless outside. There are more than one layer inside of the stainless braided line. I used to think it was rubber hose with a stainless sleeve and never bothered to use. But recently I talked it over with a Hi-Perf shop locally and he brought out a diagram with the multilayers in each fuel line. I was amazed. Are you interested in selling some of the 3/8" OEM line? You know you can also buy the sleeve that will fit over this type of line that will aid in wear resisitance. It sort of like heat shrink but you buy it by the roll. Just a little added protection. The line in question can withstand a lot of PSI and is easily repaired if need be. Let me know on the line as I am seriously thinking oof going that route. Keep up the good work and good luck on your build.
If you came in with an older and/or modified cars, they would pretty much check everything from your carb return spring down to your fuel lines. However, while I saw plenty of guys busted for the fuel lines in the engine compartment, I have never seen one of the tech guys get on his back and scrutinize fuel system components that were not easily visible under the car.
The scrutiny of the tech guys also varied from track to track. So, what is cool at Desoto Dragway might not fly at Gainesville -etc.
01-13-2011, 03:56 PM
#83

10-4 that. I will only hit up the local 1/8th mile. Their Tech department is minimal at best. Probably not somewhere I would want to go on a regular basis. I like the OEM line for the ease of installment and the price is fair. If it is going to jeapordize my hard work I would not run it. I will see how it fairs and go from there. Maybe do my own abrasion tests and put a little heat to it, clean that is. Just to get a feel for its durability. From what I have seen, this line is tough. Especially if you purchase the sleeve that runs the length of the line. Its light, not that I am concerned with that in my lead sled but just another advantage. The circle track guys and even the drag strip fellas are running the nylon braided line which is nowhere near as strong as a good stainless braidied line. Nowhere near the protective layers in the nylon lines. I havent made up my mind as to which I will go with but I am leaning towards the OEM. It is used to repair everyday vehicles that get abused on a daily basis without any problems. It used to be you had to buy an entire factory fuel line and replace it as a whole but now technology has it so what would have cost hundreds of dollars to fix its now down to less than $25. It does seem flimpsy but thats not the case. Just my take on it no hard feelings intended.
01-22-2011, 06:52 PM
#84

Thanks for all the input. I'm going to give the dayco flex fuel line a try. It is high end stuff and should do the trick. Here are some updates:
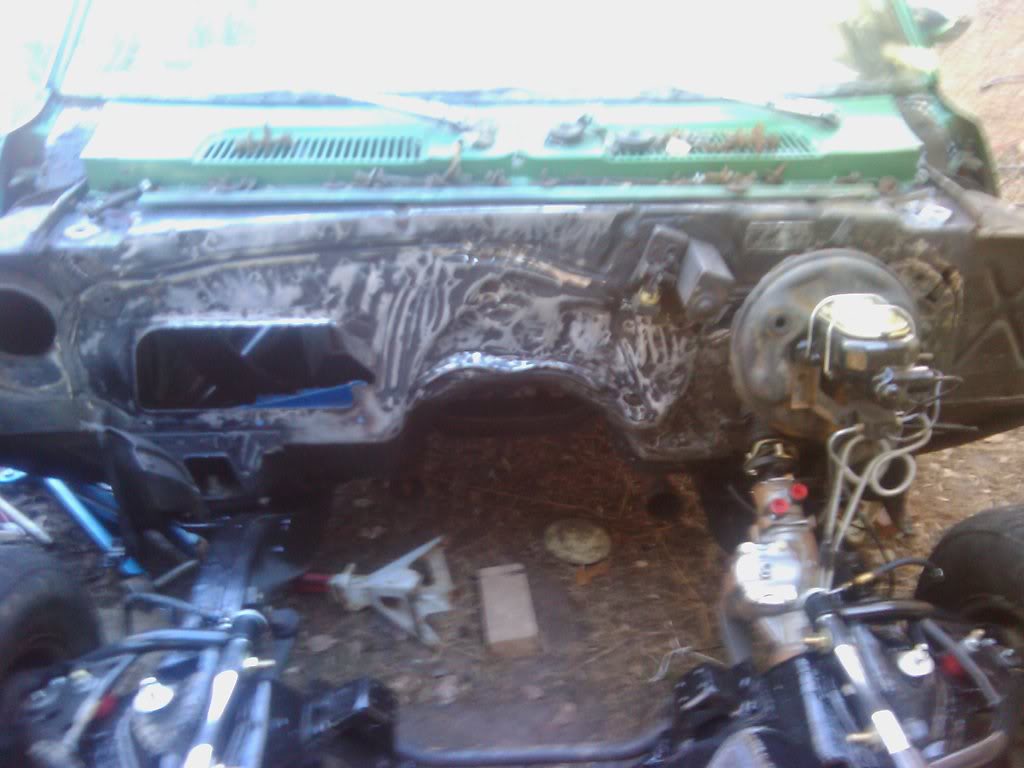
Painted and por'ed the firewall.
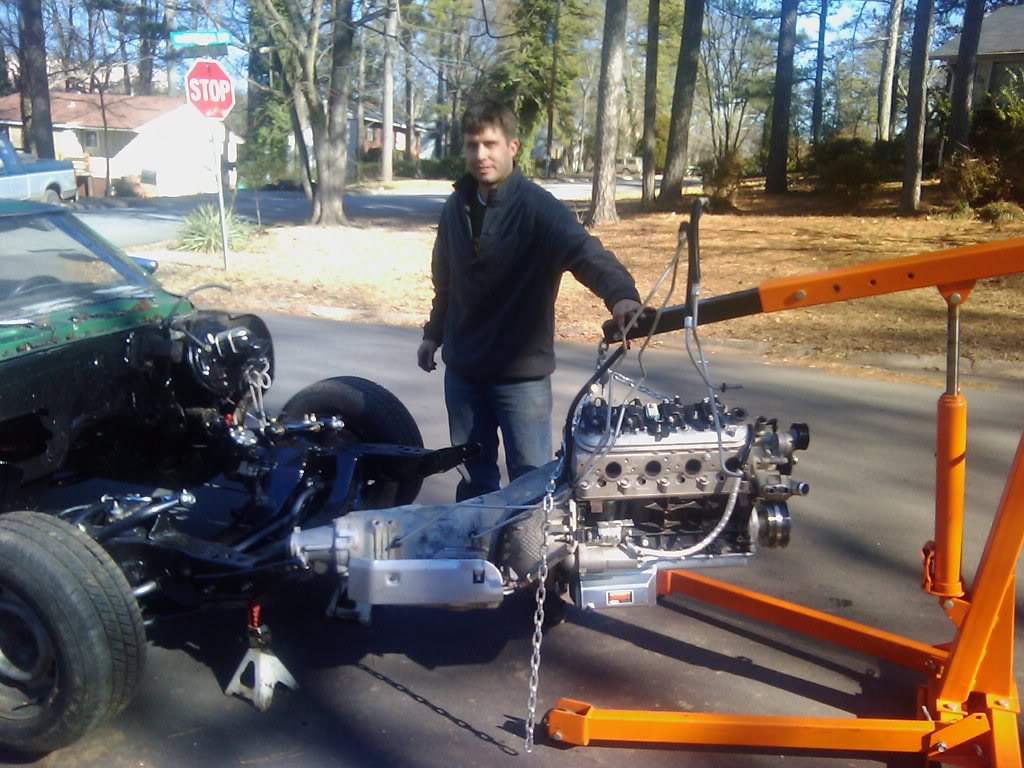
Got the motor back from Vengeance and hooked the tranny, and today was supposed to be the big day:
I moved the car out onto the street. The weather was great and the city marshall never drove by, but no luck:

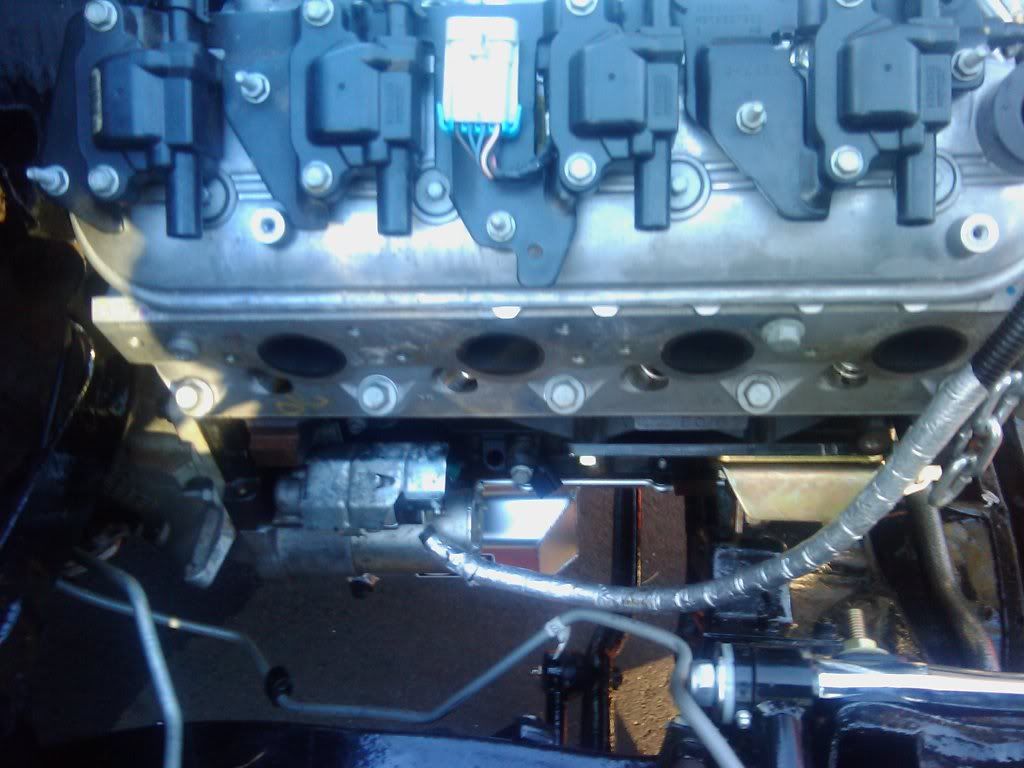
In this picture, the motor is touching the firewall and I still have to bring the motor back a half inch for it to drop in. These are car shop one inch back plates and they are a no go. Others have used them with good success, but they won't work for me. I though about adjusting the body back but I have welded in subframe connecters, so I doubt that will work. The autokraft pan has nice clearance. So I'm thinking carshop standard plates. This will move that pan a half inch closer to the center link, but they should work. I just hope they work with the dynatechs.
Painted and por'ed the firewall.
Got the motor back from Vengeance and hooked the tranny, and today was supposed to be the big day:
I moved the car out onto the street. The weather was great and the city marshall never drove by, but no luck:
In this picture, the motor is touching the firewall and I still have to bring the motor back a half inch for it to drop in. These are car shop one inch back plates and they are a no go. Others have used them with good success, but they won't work for me. I though about adjusting the body back but I have welded in subframe connecters, so I doubt that will work. The autokraft pan has nice clearance. So I'm thinking carshop standard plates. This will move that pan a half inch closer to the center link, but they should work. I just hope they work with the dynatechs.
01-22-2011, 10:14 PM
#85
In this picture, the motor is touching the firewall and I still have to bring the motor back a half inch for it to drop in. These are car shop one inch back plates and they are a no go. Others have used them with good success, but they won't work for me. I though about adjusting the body back but I have welded in subframe connecters, so I doubt that will work. The autokraft pan has nice clearance. So I'm thinking carshop standard plates. This will move that pan a half inch closer to the center link, but they should work. I just hope they work with the dynatechs.[/QUOTE]
Whats the part number on these plates. Do you want to sell them? Pm me
Whats the part number on these plates. Do you want to sell them? Pm me
01-23-2011, 09:10 AM
#86
Turns out others that had success with the 1 inch back plates may have had short and wide style stands and mounts. I'm pretty sure I have tall and narrow style stands since my tall and narrow mounts fit the stands well. Also, my body may have been too far forward when I welded the subframe connecters in. I doubt it though, since I changed the body bushings at the same time.
I am going to try the car shop standard plates or autokraft plates which appear to be the same.
I am going to try the car shop standard plates or autokraft plates which appear to be the same.
01-23-2011, 11:06 AM
#87
I had the same problem with my setup so I ended up raising the front of the car so I could shove the engine/tranny in at a sharp angle. As I lowered the engine/tranny combo I flattened it out. I still had to give her a shove to get it to clear the stand. Once over the stand it fit fine. I actually can go back an inch. Try to flatten the engine/tranny combo out a little, put the passenger side on the stand first and then swing it over the drivers side. I had to hit it just right and she went with no malfunctions. It helps to have a leveler to set this combo. They make them as cheap as $30 and are readily available at Harbor Freight. I bought the heavier one for $40. It made a world of difference putting this engine.
01-26-2011, 09:38 PM
#88
By angle you mean so that the back of the transmission is pointed down, right? And I don't know much about driveline angle. I assume that when the car is on level ground you check the angle of the driveline?
I had the same problem with my setup so I ended up raising the front of the car so I could shove the engine/tranny in at a sharp angle. As I lowered the engine/tranny combo I flattened it out. I still had to give her a shove to get it to clear the stand. Once over the stand it fit fine. I actually can go back an inch. Try to flatten the engine/tranny combo out a little, put the passenger side on the stand first and then swing it over the drivers side. I had to hit it just right and she went with no malfunctions. It helps to have a leveler to set this combo. They make them as cheap as $30 and are readily available at Harbor Freight. I bought the heavier one for $40. It made a world of difference putting this engine.
01-27-2011, 03:16 AM
#89
I moved the car out onto the street. The weather was great and the city marshall never drove by, but no luck:
In this picture, the motor is touching the firewall and I still have to bring the motor back a half inch for it to drop in. These are car shop one inch back plates and they are a no go. Others have used them with good success, but they won't work for me. I though about adjusting the body back but I have welded in subframe connecters, so I doubt that will work. The autokraft pan has nice clearance. So I'm thinking carshop standard plates. This will move that pan a half inch closer to the center link, but they should work. I just hope they work with the dynatechs.
01-27-2011, 07:50 AM
#90
Thanks. I get what you mean. In that photo, I had jacked up the rear of the trans to make it close to level. The head was butted up against the firewall. It seemed the only way it would work would be to lift the body.
I have ordered the 307/327 frame stands, the short and wide mounts and two more sets of adapters(car shop standard and autokraft). I'm hell bent on getting it in next try. Next step, I'll try stock 350 frame stands with tall/narrow mounts and standard adapters. After that, I'll change the stands, try the short/wide mounts with 1 inch set back plates. Then standard plates. Then I'm calling a welder. Then over to Fedex to return a crap load of parts.
Thanks for the driveline angle info.
01-27-2011, 10:01 AM
#91
I used the adapters from Nooks and Tranny $99.00 off of Ebay. They are 3/8" thick and are adjustable. You can use the 1"forward, standard or 1" rearward location with these. I have the 307/327 stand with Energy Suspension mounts. I flipped and reversed the adapters so the mounts would not come in contact with my headers and it allowed my bolt holes to line up. I did have to modify the lips on the mounts to clear the hump on the backside of the drivers stand. I would modify the stands first to save yourself some time. If you will go back through my thread I gave details on the entire engine placement for my car. That doesnt mean it will work on yours but may help a little. I put the engine in the standard location and it worked out fine. I have a ton of clearance behind the heads. Even with that I still had to jack the trans up against the roof of the tunnel in order to shove the mount over the stand. It would almost be easier to put the mounts on last. Have you give that any consideration? It might be easier to put the mounts on the adapters and the stands on the mounts and stick it in all together. The stands shouldnt be too hard to line up especially with the engine slightly lifted. We will get that engine in one way or another.
 01-29-2011, 11:23 PM
#94
I hope to make another attempt at getting the driveline in this week. I will take photos of the new stands, adapters and mounts before I try the install again. I am working throught the weekend so I'm hoping for a good mid week update. Thanks for all the help.
01-29-2011, 11:33 PM
#95
http://www.autokraft.org/products/
If I could, I would have some of the ats plates available for the next install day too, but I didn't order these yet. We'll see how it goes...
a link to the ats plates:
http://store.nexternal.com/shared/St...unt2=799552559
Last edited by futureuser; 01-29-2011 at 11:59 PM.
01-30-2011, 05:17 PM
#96
Don't mean to distract from the current dilema, but would you mind walking me through how you got your front suspension apart? Did you use a coil spring compressor or were you able to get things apart with just the weight of the vehicle and a jack? I need to pull just my upper control arms and after putting a jack under the lower, the weight of the disassembled vehicle (no engine, no front sheet metal) doesn't seem to be enough to compress the coil spring.
01-30-2011, 11:05 PM
#98
Don't mean to distract from the current dilema, but would you mind walking me through how you got your front suspension apart? Did you use a coil spring compressor or were you able to get things apart with just the weight of the vehicle and a jack? I need to pull just my upper control arms and after putting a jack under the lower, the weight of the disassembled vehicle (no engine, no front sheet metal) doesn't seem to be enough to compress the coil spring.
Last edited by futureuser; 01-30-2011 at 11:12 PM.