
1967 GTO LQ4 (L92/LS3) swap
 04-09-2015, 08:33 AM
#181
Launching!
Thread Starter

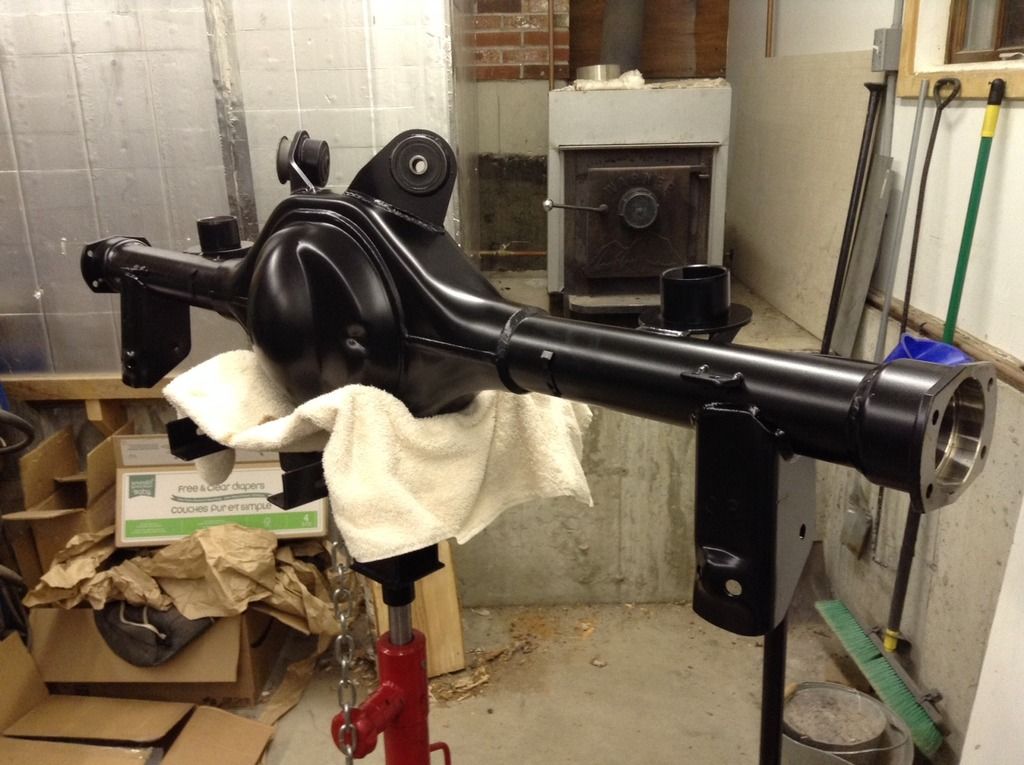
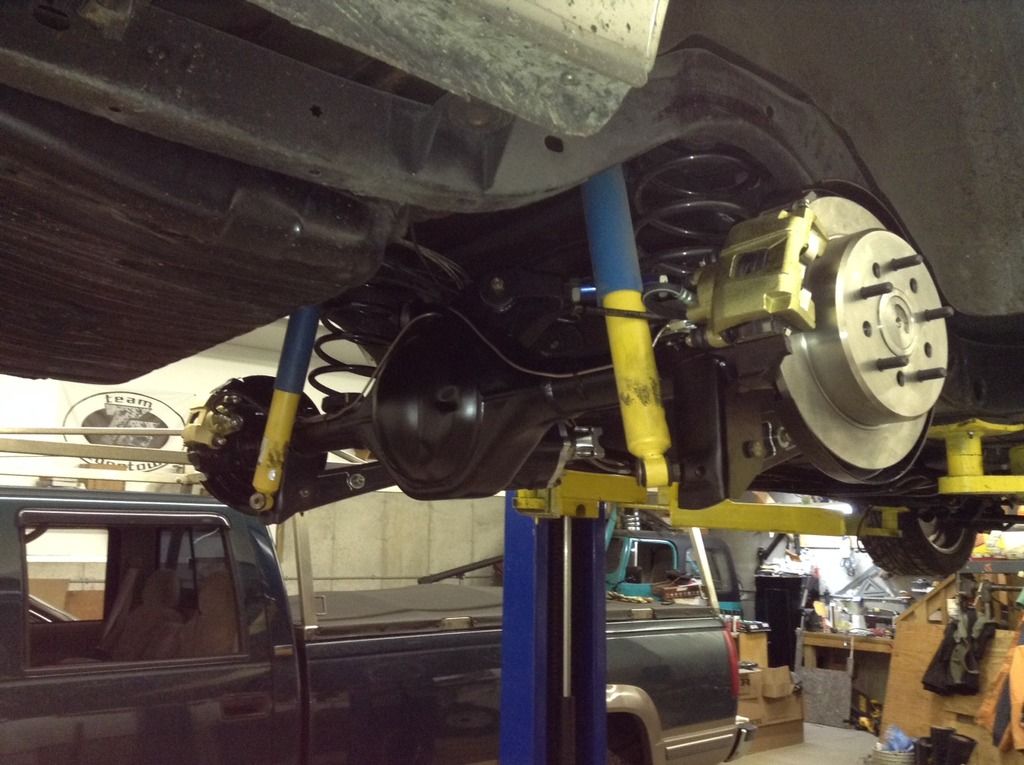
Picked up the rear end housing from powder coat yesterday. I really like how the semi-gloss black came out. It's perfect. Hopefully it holds up like it's supposed to. Now I just need to assemble the center section, axles and brakes. Only fab work left is a simple bracket for the center brake line, and then the hard lines over to the caliper flex lines. Hopefully a few more nights and it'll be ready to bolt in!

 04-13-2015, 09:24 AM
#182
Launching!
Thread Starter
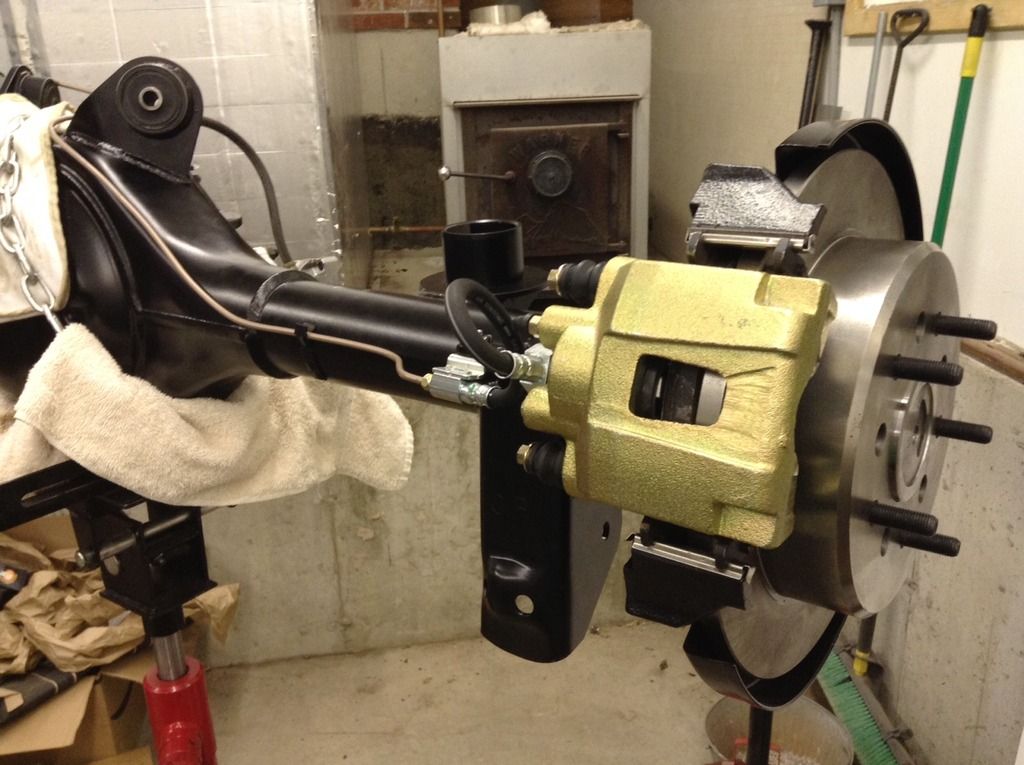
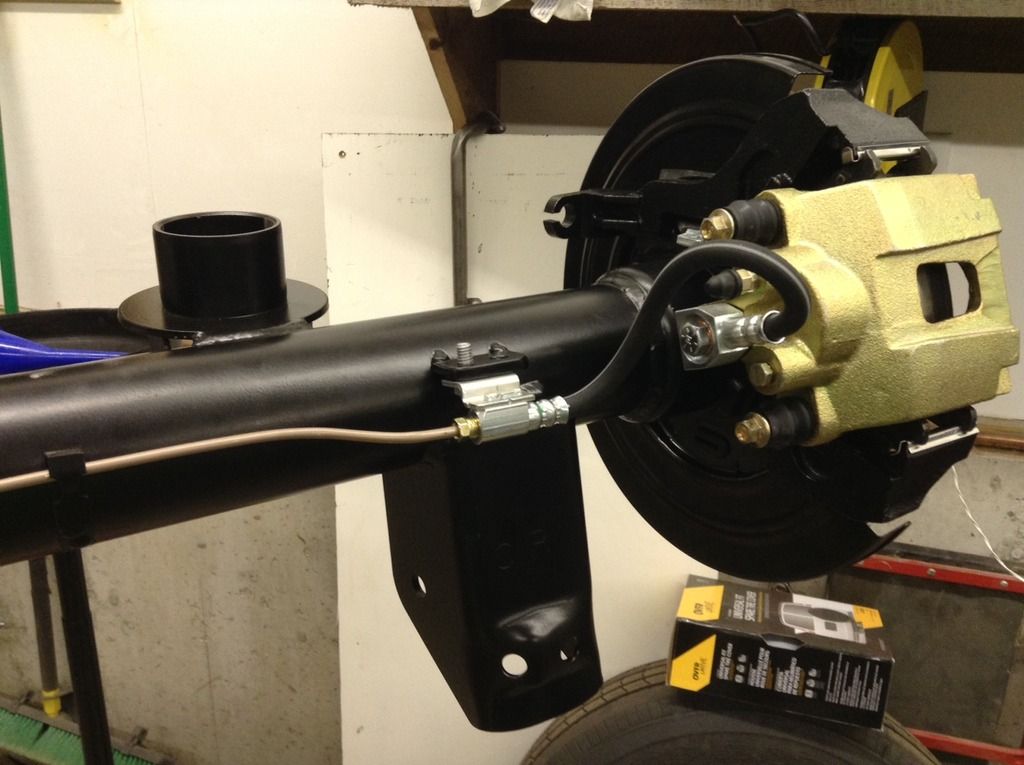
Rear is almost ready to go in. Just need to finish the hard brake lines and do a little touch up paint and she's ready. I'm not crazy about the rubber hose loop from the hard line to the caliper, but I couldn't think of a better way. I saw a couple other people do this. It's not terrible, but it's not elegant either. Don't worry about that super long bolt sticking thru the bracket......I've got the correct length SS bolts to replace. That was temporary until I got the right bolts.


 HAHA!
04-14-2015, 11:54 AM
HAHA!
04-14-2015, 11:54 AM
#185
Launching!
iTrader: (1)
Join Date: Apr 2006
Location: Bergen Co. NJ
Posts: 214
Likes: 0
Received 0 Likes
on
0 Posts

A lot of times its called "Ni-cop" Its a nickle copper alloy. With a very similar burst strength as steel line. But its mush easier to bend and doesnt corrode like raw steel line.
04-14-2015, 12:14 PM
#187
TECH Senior Member
iTrader: (7)

https://ls1tech.com/forums/conversio...l#post18729510
I used NiCopp lines for bot brake and fuel line. Super easy to bend and flare.
Andrew
04-14-2015, 12:18 PM
#188
Launching!
iTrader: (1)
Join Date: Apr 2006
Location: Bergen Co. NJ
Posts: 214
Likes: 0
Received 0 Likes
on
0 Posts
Its very cool. Quite a bit more expensive but worth every penny when it comes to ease of use. Makes bends and flares a breeze. I used to use it at a shop I worked at. We would run complete fullsize trucks with it. It was great!
 04-15-2015, 06:41 AM
#191
Launching!
Thread Starter
And regarding the Copper Nickel brake line....as others have said, it's expensive but worth every penny in my opinion. It flares and bend so easy. It's the only thing I'll run from now on. I'd be curious on long-term corrosion resistance though vs. Stainless Steel. It doesn't matter on this car, since it never sees salt, but brake lines are a constant battle here in New England. I replace lines with SS generally, but this might be an even better option!
04-17-2015, 11:06 AM
#192
Launching!
Thread Starter
 04-17-2015, 11:10 AM
#193
Launching!
Thread Starter
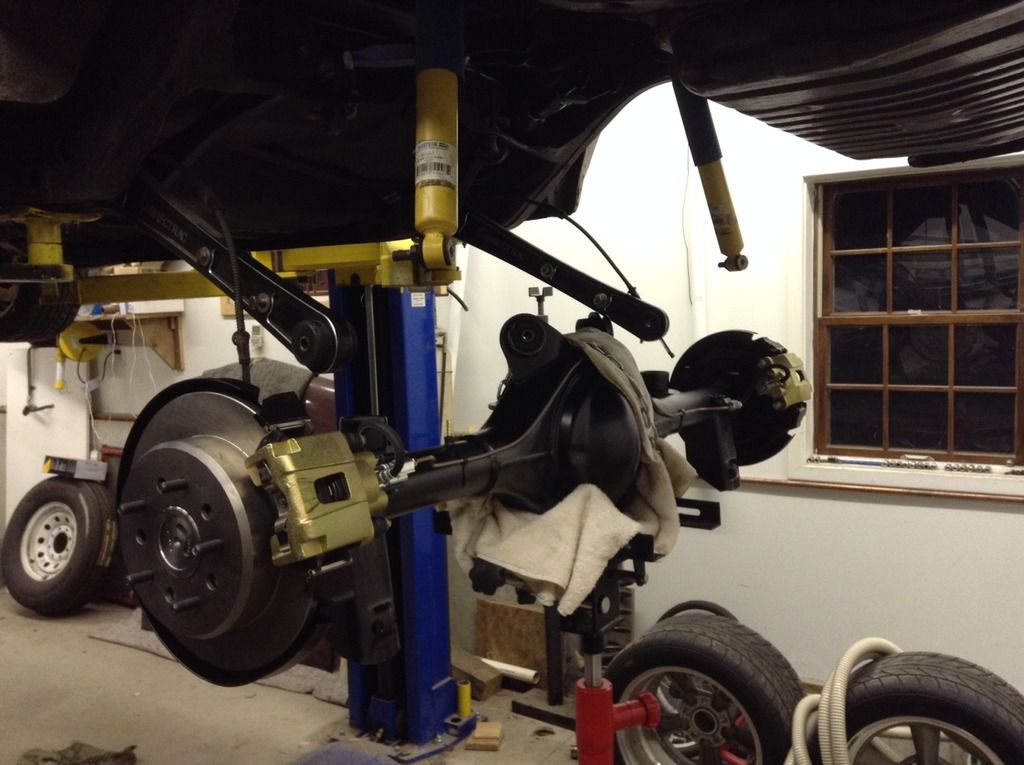
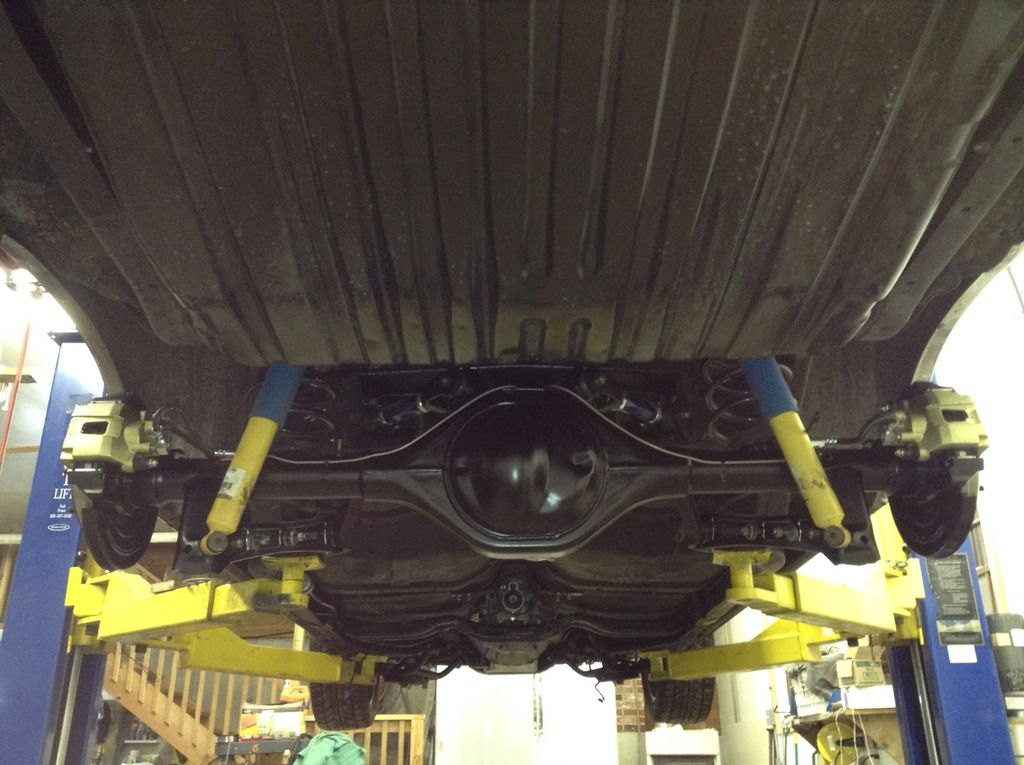
Got the rear installed last night! Pretty uneventful except for a potential disaster with the shocks interfering with the brake lines. I had to reposition the flex line on the bracket, which was easier said than done, but I made it work. The driver's side I bent the bracket (on the brake line itself) 180 degrees so I could mount it inboard instead of outboard.
Now I just need to install the sway bar, exhaust, and shifter. Then top off fluids, and bleed the slave cylinder and rear brakes. I think that's pretty much it and she'll be on the road again. 500 mile break-in on the clutch......bummer.
Now I just need to install the sway bar, exhaust, and shifter. Then top off fluids, and bleed the slave cylinder and rear brakes. I think that's pretty much it and she'll be on the road again. 500 mile break-in on the clutch......bummer.


 04-17-2015, 07:24 PM
#194
Teching In

Join Date: Oct 2014
Posts: 6
Likes: 0
Received 0 Likes
on
0 Posts
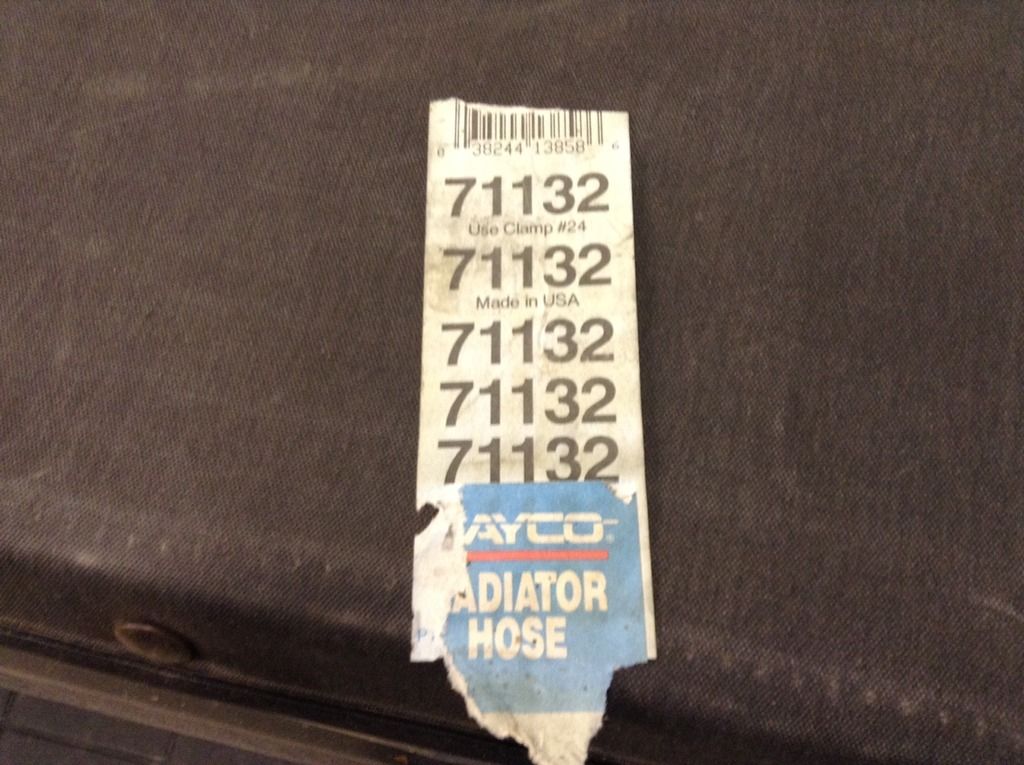
Unfortunately I couldn't find the tag or P/N for my lower hose. I did find the P/N for the upper hose (Dayco 71132), which I know doesn't help, but I guess I'm posting it just to prove I made a solid effort to find it. I might look a little more tonight, but I didn't see it in my folder of receipts, which is where it would be. Sorry I couldn't help. I wish the number was inked onto the hose itself.

 04-27-2015, 02:51 PM
#196
Launching!
Thread Starter
I would love to go, but the car won't be ready. Well, not unless I can put 500 miles on the clutch for break-in by then. (it's really 1200 cycles that they want). Plus I won't have my Toyo R888s mounted by then.....I'm waiting for some new rear wheels with revised backspacing.
But you're welcome to stop by my house in Bow if you want! But it's a bit out of the way.
Small chance I'd take a ride down there just to watch, but it'd be late (after my kids go to bed). We'll see what the weather does....maybe I'll take a cruise. I need to break-in the clutch anyway, right?! Unfortunately, it's mostly highway.
04-29-2015, 09:52 AM
#197
Teching In

Join Date: Jun 2013
Location: Dublin, Georgia
Posts: 40
Likes: 0
Received 0 Likes
on
0 Posts
I have been following your post for some time with a great deal of interest. I am in the process of putting and LS3 525 hp crate engine with a T 56 Magnum trans from American Powertrain into my 1967 GTO convertible. I have ditched the GM muscle car oil pan in favor of the Holley 301-1 oil pan. I am still worried about the tie rod clearance issues. What all did you have to do with the trans support cross member? Have you changed the fuel supply set up? I am looking at the in-tank fuel pump setup from Tanks, Inc. Thanks for keeping up your post! Dublin GTO
04-30-2015, 05:46 AM
#198
Launching!
Thread Starter
I have been following your post for some time with a great deal of interest. I am in the process of putting and LS3 525 hp crate engine with a T 56 Magnum trans from American Powertrain into my 1967 GTO convertible. I have ditched the GM muscle car oil pan in favor of the Holley 301-1 oil pan. I am still worried about the tie rod clearance issues. What all did you have to do with the trans support cross member? Have you changed the fuel supply set up? I am looking at the in-tank fuel pump setup from Tanks, Inc. Thanks for keeping up your post! Dublin GTO
I'm running the stock transmission cross member, but I have a TKO-600, not a T56. I don't see why you couldn't use yours though. My car has multiple holes in the frame to move the cross member forward and back. I would assume some, if not all of those holes are factory for different transmission options. Not that I'd hesitate to drill a set of new ones if necessary. But who knows if the cross member height even works with the T56. I'm no help there, sorry.
As for fuel, I was running an external Walbro, which was fine except for the normal less-than-1/2-tank fuel starvation issue when accelerating or cornering hard. The Tanks Inc setup is popular and probably a solid choice. I have since switched to the Aeromotive Phantom in-tank system. I'm happy with it. The benefit is that you only have to drill holes and not weld on an existing gas tank. I filled mine with water when I did it, just to be safe. I'm not convinced it completely eliminates fuel starvation at lower gas levels, but it's pretty good. I think they might offer an entire gas tank for our cars now and I think it's more competitively priced compared to a Rick's or Rock Valley tank. Granted, I don't think it's stainless.
http://aeromotiveinc.com/phantom-fuel-system/
04-30-2015, 07:25 AM
#199

I have been following your post for some time with a great deal of interest. I am in the process of putting and LS3 525 hp crate engine with a T 56 Magnum trans from American Powertrain into my 1967 GTO convertible. I have ditched the GM muscle car oil pan in favor of the Holley 301-1 oil pan. I am still worried about the tie rod clearance issues. What all did you have to do with the trans support cross member? Have you changed the fuel supply set up? I am looking at the in-tank fuel pump setup from Tanks, Inc. Thanks for keeping up your post! Dublin GTO
04-30-2015, 07:34 AM
#200
What headers did you settle on? I have the Doug's D3336R headers on my GTO and they fit right to the floor. I opted for the non coated headers because the idiots at Pertronix put the O2 bungs in the wrong spot on the collectors. I welded a set of binge on the inside of the collector so I did not have to cross over the header with wiring. They are getting coated as I write this.