
79 Cutlass Wagon, 5.3 G machine


 10-31-2011, 05:57 PM
#82
On The Tree
Thread Starter
Join Date: Aug 2010
Location: Eagle Mountain, Utah
Posts: 143
Likes: 0
Received 0 Likes
on
0 Posts
Thanks everyone!
If you're really considering that, because Utah Valley University is a 4 year accredited state funded university and not a private school tuition is only around $2400/ semester. The school started like over 30 years or so ago as a technical school I believe based mostly on the automotive trades and has grown and grown since then. It's a great school with an unfortunately not very well known hot rod program.
If you're really considering that, because Utah Valley University is a 4 year accredited state funded university and not a private school tuition is only around $2400/ semester. The school started like over 30 years or so ago as a technical school I believe based mostly on the automotive trades and has grown and grown since then. It's a great school with an unfortunately not very well known hot rod program.
11-01-2011, 09:29 PM
#83
On The Tree
Thread Starter
Join Date: Aug 2010
Location: Eagle Mountain, Utah
Posts: 143
Likes: 0
Received 0 Likes
on
0 Posts
Now on with the box and the well, sort of sounds like a Disney movie, lol!
Here's a shot of the pattern I used for my battery box. It will be cut and folded from .063 aluminum. I wanted a nice smooth look so the sides will fold around and meet in the middle of the back, having only one vertical weld rather than one at each corner. I've also provided flanges on the top and bottom of each side. The top will be folded completely over and create a smooth perimeter top while providing extra strength. On the bottom the flanges will mate to the floor of the box...
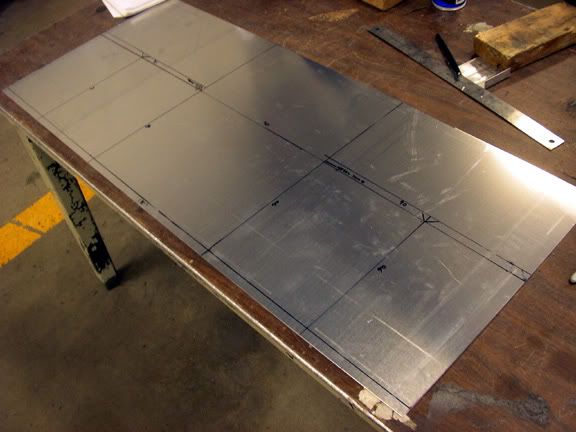
Still working on the box lid but you can see the box put together on the right of the next two shots. Jumping on to the tire well...
Here's a shot of the pattern I used for my battery box. It will be cut and folded from .063 aluminum. I wanted a nice smooth look so the sides will fold around and meet in the middle of the back, having only one vertical weld rather than one at each corner. I've also provided flanges on the top and bottom of each side. The top will be folded completely over and create a smooth perimeter top while providing extra strength. On the bottom the flanges will mate to the floor of the box...
Still working on the box lid but you can see the box put together on the right of the next two shots. Jumping on to the tire well...
11-01-2011, 09:31 PM
#84
On The Tree
Thread Starter
Join Date: Aug 2010
Location: Eagle Mountain, Utah
Posts: 143
Likes: 0
Received 0 Likes
on
0 Posts
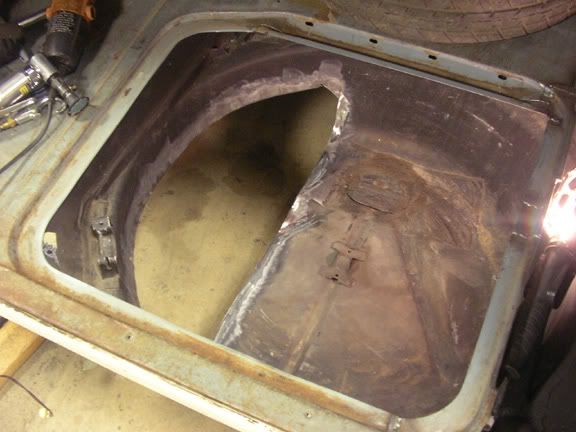
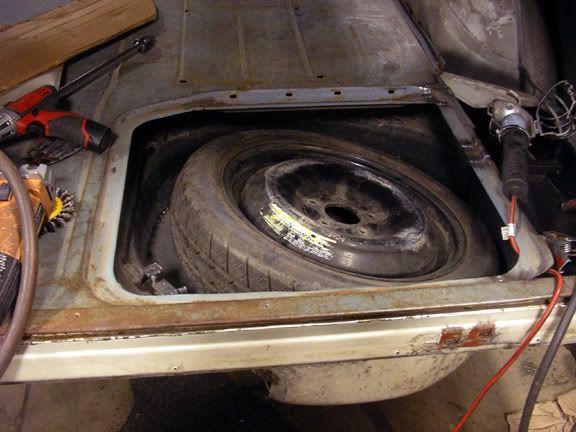
Currently I run a single 3" exhaust that exits behind the passenger rear tire. I want to keep the single 3" but wanted to do something different- have it appear to be duals as folks will expect a performance car to have and exit somewhere else. In keeping with the overall design of the car I decided to run dual rectangle tips and have them exit below the center of the rear bumper. Only problem is that my gas tank and spare well are right in front of the bumper and there's no room to plumb exhaust. As you can see the spare tire takes up the whole well so some more mods are in order to create a passage way for the pipe to run through. See the beginnings of the battery box on the right...

So I marked out an area to remove, trimmed it out and prepped for welding.
Using the sheet metal brake I bent up a piece of 18ga steel, here tacked in place, to create a "shelf" for the spare to rest on.
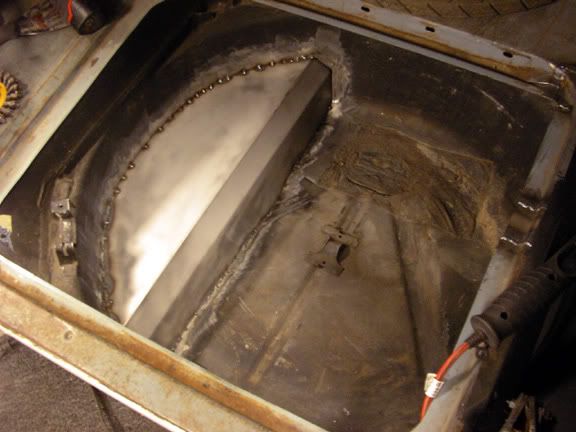
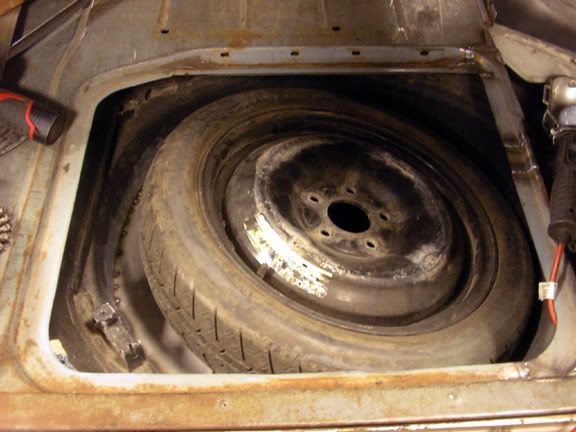
Now the tire rests at an angle and although I removed a large chunk of the well I actually created better space management. Under the tire I now have storage room for a small tool kit, tow rope and jumper cables and the lid closes with room to spare. I also have created a large open area to run the exhaust pipe.
I recently picked up a pair of Flowmasters and tips from a friend that's changing the exhaust on his 91 Corvette. I'll save the mufflers for my son's Nova build that will start next year and the tips will go on my car. They're each about 7.5" wide and should look great nestled under the rear bumper. My car will be anti-chrome so the tips will be getting a makeover as well.

So I marked out an area to remove, trimmed it out and prepped for welding.
Using the sheet metal brake I bent up a piece of 18ga steel, here tacked in place, to create a "shelf" for the spare to rest on.
Now the tire rests at an angle and although I removed a large chunk of the well I actually created better space management. Under the tire I now have storage room for a small tool kit, tow rope and jumper cables and the lid closes with room to spare. I also have created a large open area to run the exhaust pipe.
I recently picked up a pair of Flowmasters and tips from a friend that's changing the exhaust on his 91 Corvette. I'll save the mufflers for my son's Nova build that will start next year and the tips will go on my car. They're each about 7.5" wide and should look great nestled under the rear bumper. My car will be anti-chrome so the tips will be getting a makeover as well.


 I love the wagon builds, I will def be subscribing to this thread.................
 11-09-2011, 07:40 PM
#88
On The Tree
Thread Starter
Join Date: Aug 2010
Location: Eagle Mountain, Utah
Posts: 143
Likes: 0
Received 0 Likes
on
0 Posts
Some new updates from the last coupla days.
First off I got the front bumper finished up. I sectioned it 1" on the pass side as well as sectioned the turn signal opening from the donor bumper. I then cut out the area on my bumper, tacked in the donor piece and welded it all up.
I learned something new as I did this. Monday my professor and I were talking about weld "prettiness" and where I need to be at with my welding to be at a level where a decent shop will be impressed and hire me. I asked about mig welding and which was a better weld - a nice continuous bead or "stacking pennies"? We discussed the possibility that stacking pennies, although it looks great, wouldn't heat the metal enough to get decent penetration on thicker metal. So to run a test to answer my question I welded the passenger half with short continuous stitch weld beads. I used the paint shop side 120V MIG with the heat cranked all the way. If the stitches were too long or too slow it would blow a hole, so after finding a decent speed I got pretty nice welds. On the driver side I stacked pennies.
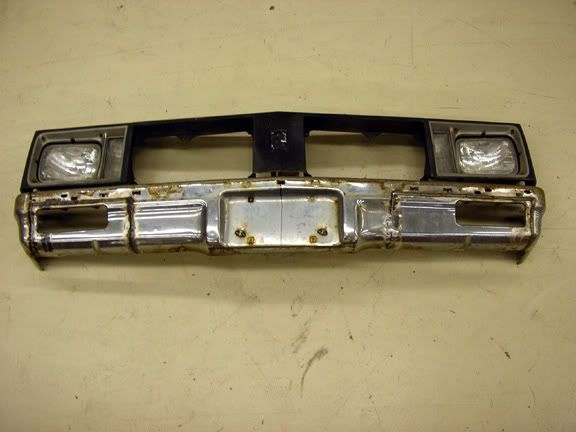
When I flipped it over I found that with that smaller welder on a thick bumper it had trouble penetrating very well either way, but to my surprise the stacking pennies actually got better penetration overall. It also had a smaller heat zone around the weld and looked a ton better :twothumbs. Too bad it's all going to get ground flat anyway, lol!

First off I got the front bumper finished up. I sectioned it 1" on the pass side as well as sectioned the turn signal opening from the donor bumper. I then cut out the area on my bumper, tacked in the donor piece and welded it all up.
I learned something new as I did this. Monday my professor and I were talking about weld "prettiness" and where I need to be at with my welding to be at a level where a decent shop will be impressed and hire me. I asked about mig welding and which was a better weld - a nice continuous bead or "stacking pennies"? We discussed the possibility that stacking pennies, although it looks great, wouldn't heat the metal enough to get decent penetration on thicker metal. So to run a test to answer my question I welded the passenger half with short continuous stitch weld beads. I used the paint shop side 120V MIG with the heat cranked all the way. If the stitches were too long or too slow it would blow a hole, so after finding a decent speed I got pretty nice welds. On the driver side I stacked pennies.
When I flipped it over I found that with that smaller welder on a thick bumper it had trouble penetrating very well either way, but to my surprise the stacking pennies actually got better penetration overall. It also had a smaller heat zone around the weld and looked a ton better :twothumbs. Too bad it's all going to get ground flat anyway, lol!
11-09-2011, 07:44 PM
#89
On The Tree
Thread Starter
Join Date: Aug 2010
Location: Eagle Mountain, Utah
Posts: 143
Likes: 0
Received 0 Likes
on
0 Posts
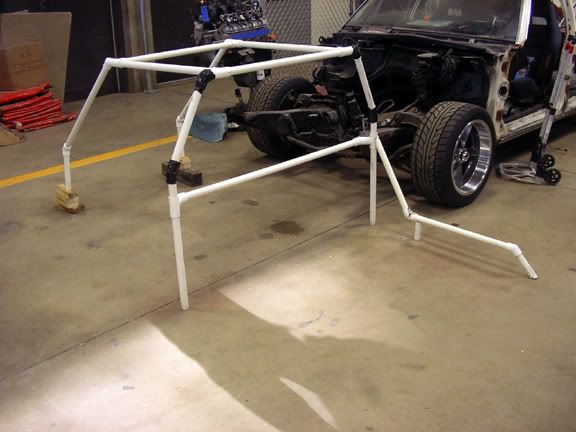
Everything I've been doing so far in the rear of the car was to get everything situated so I can install a roll cage. After researching kits I found nothing fit the wagon the way I wanted. So I checked into just getting just a main hoop and building off that. I got a price from Jegs, I think it was like $45, very reasonable. What wasn't reasonable was the $99 shipping shaft, er, charge. So I decided to just build the whole thing from scratch. Because I've never done anything even remotely close to this I decided to do a mock up first before bending steel. Using PVC pipe, a few homemade brackets and some duct tape I got one put together.
Please note that my cage won't be "legal" for any serious racing venues, it's main design purpose was to add stiffness and safety without sacrificing comfort and streetability at all. Some features will be- A snug overall fit contoured to the interior. There is recessed main hoop cross bar behind the front seats so I have plenty of seat adjustability. I will also be building a camera stand off this bar. I have fairly long legs so I sat in the back seat with the mock up in the car just to make sure there was plenty of "get in" room and clearance for knees. The rearward bars make up the "cage" portion, similar to a 10 point cage turned backwards. I did this mostly because I didn't want to cut up the dash for front bars and that's probably overkill anyway. I also want to keep the versatility of the wagon's back storage area so the diagonal brace will be above the rear seat area. The rear bars will hit right after the rear wheel wells. I want to keep the stock lower half of the front door panels so I had to make the front bar fairly low to clear the armrest mold. The front bars are more for chassis stiffness than anything and are similar to a tiger cage.
With doing the PVC mockup I was able to test fit and try different options before bending and possibly wasting metal tubing. It's rough and pretty ugly, but when it was in the car it fit great and placement looked decent as I envisioned the real bar in there. The interior will be black with a splash of orange and silver accents. I plan on painting the cage silver too.
11-09-2011, 07:46 PM
#90
On The Tree
Thread Starter
Join Date: Aug 2010
Location: Eagle Mountain, Utah
Posts: 143
Likes: 0
Received 0 Likes
on
0 Posts
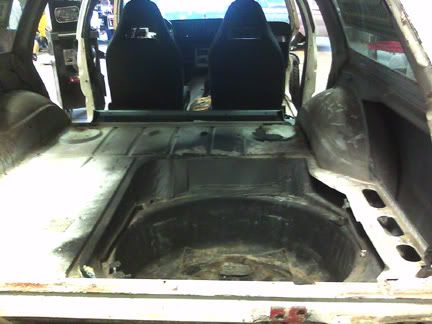
The last thing I needed to do before the cage is the rear wheel tubs. If you rememeber the passenger side had some gnarly rot on it.
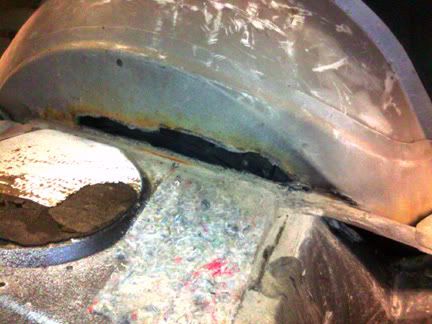
I don't much like the plastic rear interior panels and this side now gets in the way of the battery...

...and I think the shape of the factory tubs are too doofy to have exposed.
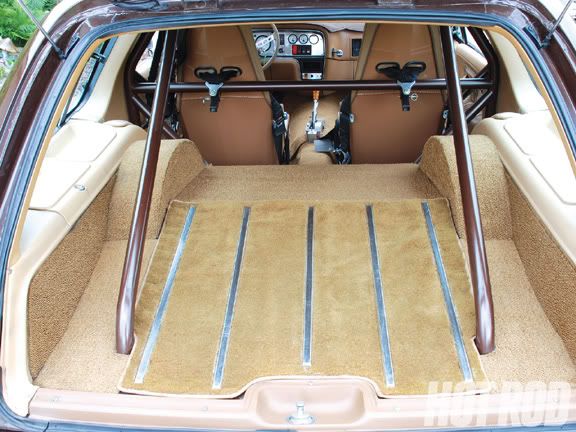
I saw this photo the other day looking at roll bars in wagons and thought the squared off wheel tubs and fairly flat and plain panels made the car look kinda mean so I decided to go for that look.
I started cutting today using a plasma cutter. I will be extending the wheel tubs in about 1" and the red arrow points to the frame rail that will get notched to match the tub. I don't need to do this now but I'm getting it set up for later. I maxed out my budget on rims and tires for right now so when the 275's are worn out I will be getting 11.5" rims and 315-35s out back.
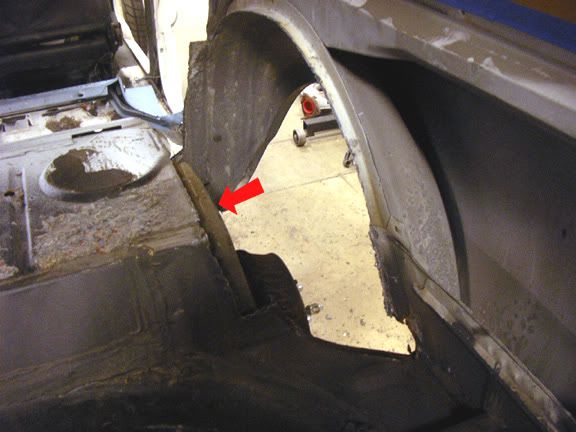
I'll be cutting out the driver's side tomorrow and then start building the tubs.
I don't much like the plastic rear interior panels and this side now gets in the way of the battery...
...and I think the shape of the factory tubs are too doofy to have exposed.
I saw this photo the other day looking at roll bars in wagons and thought the squared off wheel tubs and fairly flat and plain panels made the car look kinda mean so I decided to go for that look.
I started cutting today using a plasma cutter. I will be extending the wheel tubs in about 1" and the red arrow points to the frame rail that will get notched to match the tub. I don't need to do this now but I'm getting it set up for later. I maxed out my budget on rims and tires for right now so when the 275's are worn out I will be getting 11.5" rims and 315-35s out back.
I'll be cutting out the driver's side tomorrow and then start building the tubs.
11-09-2011, 07:49 PM
#91
On The Tree
Thread Starter
Join Date: Aug 2010
Location: Eagle Mountain, Utah
Posts: 143
Likes: 0
Received 0 Likes
on
0 Posts
Finally for now is the big parts delivery for this past week, my 5.3 LS motor. It's not the one I originally thought I was getting but it will do. I sold my rebuilt original 305 (that was in the car when I bought the whole car for $300), for $450 to a fellow classmate for his '54 GMC project. This 5.3 cost me $480.xx including sales tax so I guess I did o.k. for $30 out of pocket  lol!
lol!
It's from a 2000 Tahoe with a little over 106,000 miles. Unfortunately it came as you see it, luckily it did have the power steering pump but is missing most everything else such as ecm, wiring, alternator, starter, etc... Let me know if you have spare parts that can help me get it together.
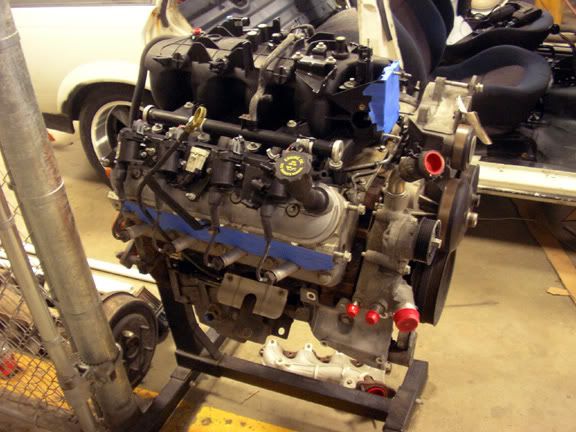
Despite I have to piece it together, I'm totally stoked to have an LS motor powering my car. I'm gearing up for the Holley LS fest, woohoo!!!
lol! It's from a 2000 Tahoe with a little over 106,000 miles. Unfortunately it came as you see it, luckily it did have the power steering pump but is missing most everything else such as ecm, wiring, alternator, starter, etc... Let me know if you have spare parts that can help me get it together.
Despite I have to piece it together, I'm totally stoked to have an LS motor powering my car. I'm gearing up for the Holley LS fest, woohoo!!!
11-09-2011, 08:25 PM
#93
On The Tree
Thread Starter
Join Date: Aug 2010
Location: Eagle Mountain, Utah
Posts: 143
Likes: 0
Received 0 Likes
on
0 Posts
I'm also very open to anyone's off hand performance suggestions, especially those that are fairly inexpensive as I'm on a student's budget. I've heard good things about a company in TX that makes a couple good cams for the 5.3s, all ears for thoughts on those or anything else that can get me to my goal of 400 flywheel hp. Thanks!!
11-09-2011, 09:37 PM
#94
I'm pretty new to the whole LS scene, what'd ya mean by "shaved"? I also have a pretty good line on a TB and possibly a wiring harness too.
I'm also very open to anyone's off hand performance suggestions, especially those that are fairly inexpensive as I'm on a student's budget. I've heard good things about a company in TX that makes a couple good cams for the 5.3s, all ears for thoughts on those or anything else that can get me to my goal of 400 flywheel hp. Thanks!!
I'm also very open to anyone's off hand performance suggestions, especially those that are fairly inexpensive as I'm on a student's budget. I've heard good things about a company in TX that makes a couple good cams for the 5.3s, all ears for thoughts on those or anything else that can get me to my goal of 400 flywheel hp. Thanks!!

 11-16-2011, 05:03 PM
#97
On The Tree
Thread Starter
Join Date: Aug 2010
Location: Eagle Mountain, Utah
Posts: 143
Likes: 0
Received 0 Likes
on
0 Posts
Wow! That intake looks 100% better! I'd be interested but I'm modifying a 2010 Camaro SS engine cover for mine.
Hey JT, what motor did you end up getting??
Hey JT, what motor did you end up getting??
