
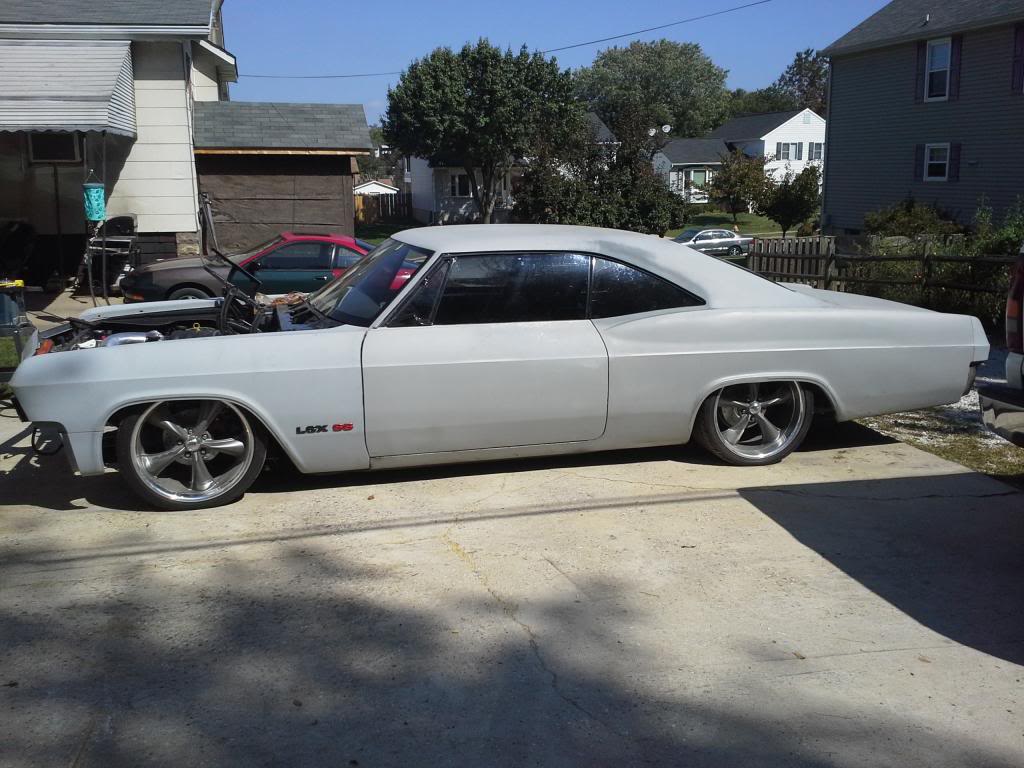
Superdave's 65 Impala SS 5.3 Swap
 01-25-2014, 09:58 PM
#241
TECH Resident
Thread Starter
 01-25-2014, 10:25 PM
#242
On The Tree
iTrader: (2)
Join Date: May 2011
Location: Smyrna, TN
Posts: 152
Likes: 0
Received 0 Likes
on
0 Posts

Flames look awesome. I wish I was closer so I could swing by and do that wiring for you. The wiring was my favorite part of building my Saturn. Well, that and building the Megasquirt. Good luck with it man. I think if you just take your time and double check everything, you should be good.
James
James
01-26-2014, 11:30 AM
#243
TECH Resident
Thread Starter
Flames look awesome. I wish I was closer so I could swing by and do that wiring for you. The wiring was my favorite part of building my Saturn. Well, that and building the Megasquirt. Good luck with it man. I think if you just take your time and double check everything, you should be good.
James
James
I think I'll be ok. I bought a stock GTO fan setup, so all I have to do for that is plug it in. That should wrap up everything that is "engine related" and the car can more or less be driven at that point. Next most important thing is the gauges so I can see what's going on. The radio, power windows, etc are not so important. I DO need my brake lights and headlights and turn signals though. Since I used the stock GTO dash harness, most of that stuff is already laid out and I just need to figure out which wire does what.
01-26-2014, 03:17 PM
#244

Yeah I'll cough up a pair and post a thread on mine soon.
Have the rims at the shop getting mounted, turns out my buddy had two 245/35R20's laying around so I'm going to try them out and see today.
Badass airbrushing on that chevelle!
Have the rims at the shop getting mounted, turns out my buddy had two 245/35R20's laying around so I'm going to try them out and see today.
Badass airbrushing on that chevelle!
02-01-2014, 07:31 PM
#246
TECH Resident
Thread Starter
But, as you can see, my car won't lay frame. I have seen other Impalas that have like 1/2" between frame and asphalt, but my control arms hit the bump stops before it can get that low. Theoretically I could modify the cups or bump stops, but then my exhaust would hit for sure.
 02-01-2014, 08:35 PM
#247
Ok. Before I put the 20's on the front I could lay the frame on the ground with the front and the exhaust. With the 20's I hit wheel well at about the same height as you it sounds like.
I think I'll just try the engine at regular height, now I just have to determine if I need to move the engine forward.
I think I'll just try the engine at regular height, now I just have to determine if I need to move the engine forward.
02-01-2014, 08:50 PM
#248
TECH Resident
Thread Starter
Ok. Before I put the 20's on the front I could lay the frame on the ground with the front and the exhaust. With the 20's I hit wheel well at about the same height as you it sounds like.
I think I'll just try the engine at regular height, now I just have to determine if I need to move the engine forward.
I think I'll just try the engine at regular height, now I just have to determine if I need to move the engine forward.
There is another option for header which might be a better fit than the Dynatech. I can't remember the brand though. They were like $950 so I laughed and moved on.
02-01-2014, 09:23 PM
#249
I plan on the Holley pan so that will help. Thanks for the info, going to buy the motor mount adapter plates tonight from hooker.
What outlet on the header did you run? 2 1/2?
Yeah at $950 I would be clicking past it fast.
What outlet on the header did you run? 2 1/2?
Yeah at $950 I would be clicking past it fast.
02-01-2014, 09:52 PM
#250
TECH Resident
Thread Starter
The end of the header is 3", but they come with adapters to reduce it to 2.5". which is what I used.
02-07-2014, 03:43 PM
#251
TECH Resident
Thread Starter
Oh this is so exciting for me! I know most of you won't care but I just think this is so cool....
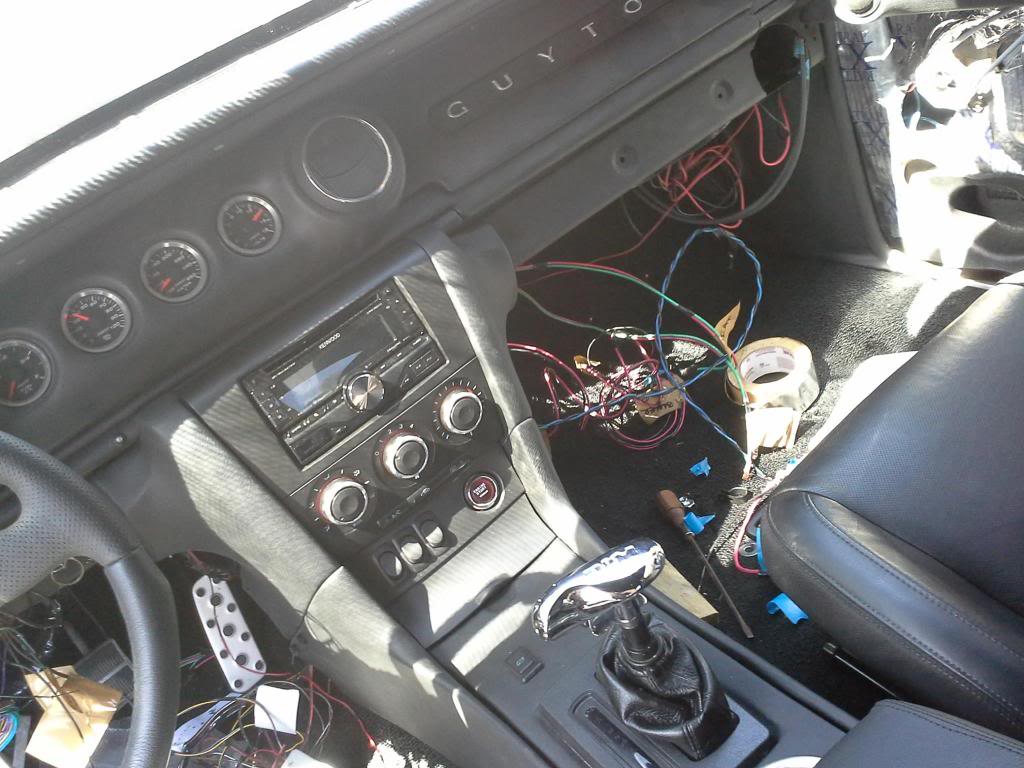
So, I got the wiring MOSTLY done. Need to clean a lot of it up and finish up some interior things like the windows and radio, seats, etc. Blinkers too, which will be hard. Anyway, that's not the cool part...
I decided since it is getting close to the time to get the radio in, I would look into options for a console. If you have been reading along, you have seen the "dummy plate" I made to cover the old cable controls that came with the car. It was a cool little mechanism and I would have been happy to put it in the car.
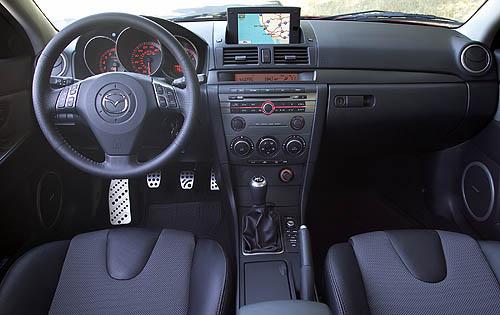
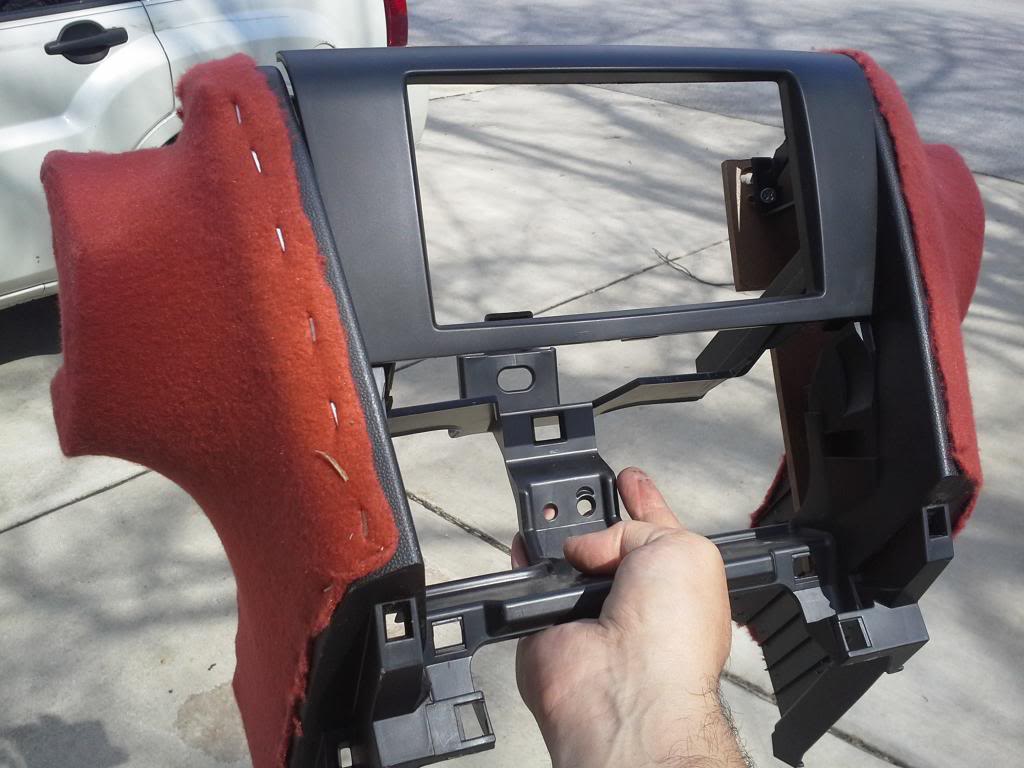
But the console was going to be hard to make. I thought that if I had another console to start with, I could modify it and get the results I want with OEM quality. Of course, there's a LOT of modifying to do, but I found a good one online for cheap. It's got the basic shape I want, and I can easily make it into what I need. It will be covered in leather once it has been cut up and fit to the car. It's out of a 2007 Mazda 3. I was SHOCKED at how nice it is when I got it. I thought it would be made of brittle, cheap plastic, but man, it's high quality stuff. Very solid.
Here's a look at a stock Mazda 3 for reference. I am not using anything but the console though:
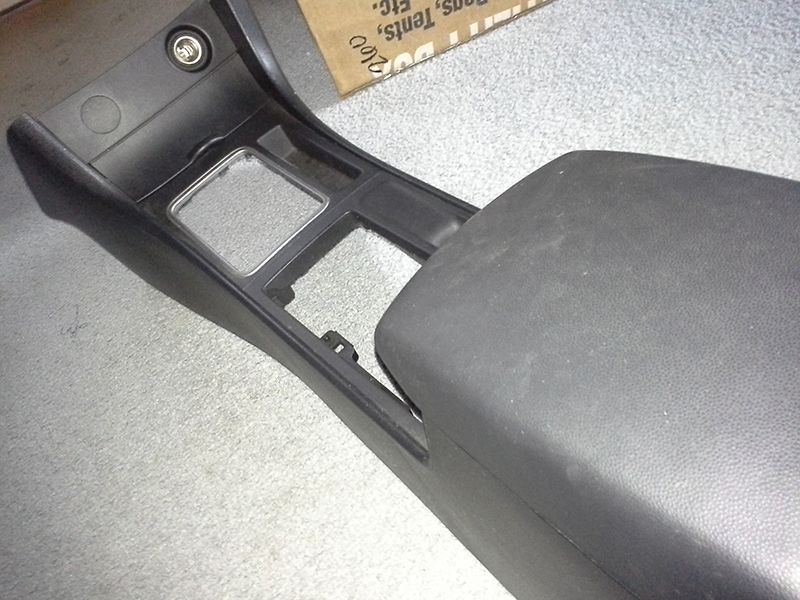
The console I got didn't have the upper part that holds the heater controls and radio. But I did buy it. Waiting on UPS. The upper part will be modified with fiberglass and meet up with the underside of my Impala dash. It won't be flat along the bottom of the dash as is typical in old cars, but it will round under, more like a new car. It will also be done in red leather.
Here is a look at mine:
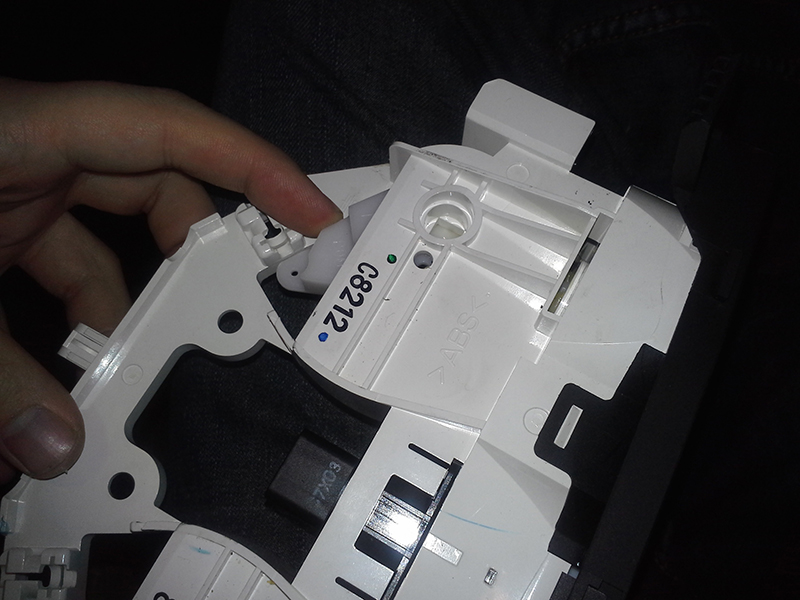
I also bought a heater control unit to make a new dummy plate to cover the old slider controls:

(I bought some nicer, round ***** for it that will match my interior much better)
But HERE IS THE COOL PART! I was trying to take the screws out of the heater controls to get started on the dummy plate and I couldn't budge them. I was getting really mad...and then I looked at the unit. I suddenly realized that the Mazda controls are ALSO controlled by cable. I can do a little fabricating and hook this thing up to the old cables already in the car. No need for a dummy plate at all...it will look stock and perform just like a new car! Oh I was so pleased to discover this!
Anyway, in other news, the car has been wired for the most part, as I mentioned above. I went over there today to try to get it on a trailer and take it home so I can work on it....but there is another car on the trailer and it's too muddy back there for my friend to get is 2WD truck over to it. We thought the ground would be frozen enough to do it, but no dice. I don't know when I will be able to get it home but it's happening soon. Maybe this weekend.
Once the wiring is cleaned up and tucked away, the wiring guy will wrap up the last few things, I'll drive it around the neighborhood a few times to make sure it doesn't spew oil or explode or anything. Then it's down to the alignment shop and I am on the road!
So, I got the wiring MOSTLY done. Need to clean a lot of it up and finish up some interior things like the windows and radio, seats, etc. Blinkers too, which will be hard. Anyway, that's not the cool part...
I decided since it is getting close to the time to get the radio in, I would look into options for a console. If you have been reading along, you have seen the "dummy plate" I made to cover the old cable controls that came with the car. It was a cool little mechanism and I would have been happy to put it in the car.
But the console was going to be hard to make. I thought that if I had another console to start with, I could modify it and get the results I want with OEM quality. Of course, there's a LOT of modifying to do, but I found a good one online for cheap. It's got the basic shape I want, and I can easily make it into what I need. It will be covered in leather once it has been cut up and fit to the car. It's out of a 2007 Mazda 3. I was SHOCKED at how nice it is when I got it. I thought it would be made of brittle, cheap plastic, but man, it's high quality stuff. Very solid.
Here's a look at a stock Mazda 3 for reference. I am not using anything but the console though:
The console I got didn't have the upper part that holds the heater controls and radio. But I did buy it. Waiting on UPS. The upper part will be modified with fiberglass and meet up with the underside of my Impala dash. It won't be flat along the bottom of the dash as is typical in old cars, but it will round under, more like a new car. It will also be done in red leather.
Here is a look at mine:
I also bought a heater control unit to make a new dummy plate to cover the old slider controls:
(I bought some nicer, round ***** for it that will match my interior much better)
But HERE IS THE COOL PART! I was trying to take the screws out of the heater controls to get started on the dummy plate and I couldn't budge them. I was getting really mad...and then I looked at the unit. I suddenly realized that the Mazda controls are ALSO controlled by cable. I can do a little fabricating and hook this thing up to the old cables already in the car. No need for a dummy plate at all...it will look stock and perform just like a new car! Oh I was so pleased to discover this!
Anyway, in other news, the car has been wired for the most part, as I mentioned above. I went over there today to try to get it on a trailer and take it home so I can work on it....but there is another car on the trailer and it's too muddy back there for my friend to get is 2WD truck over to it. We thought the ground would be frozen enough to do it, but no dice. I don't know when I will be able to get it home but it's happening soon. Maybe this weekend.
Once the wiring is cleaned up and tucked away, the wiring guy will wrap up the last few things, I'll drive it around the neighborhood a few times to make sure it doesn't spew oil or explode or anything. Then it's down to the alignment shop and I am on the road!
Last edited by superdave84; 02-07-2014 at 03:51 PM.
 02-10-2014, 01:55 PM
#253
TECH Resident
Thread Starter
Whew...even though it snowed, I was able to get the car home today. It's still COLD out, and I have to do all the work in the driveway, but at least it's here at the house now and not 40 minutes away. I need to get all the wiring cleaned up (and there's a lot of it), fix a power steering fluid leak, and align it a little better, and it's ready for some test laps around the neighborhood.
Console...haha gonna be tricky. Not quite the fit I expected. I'll be sure to post pics of that progress.
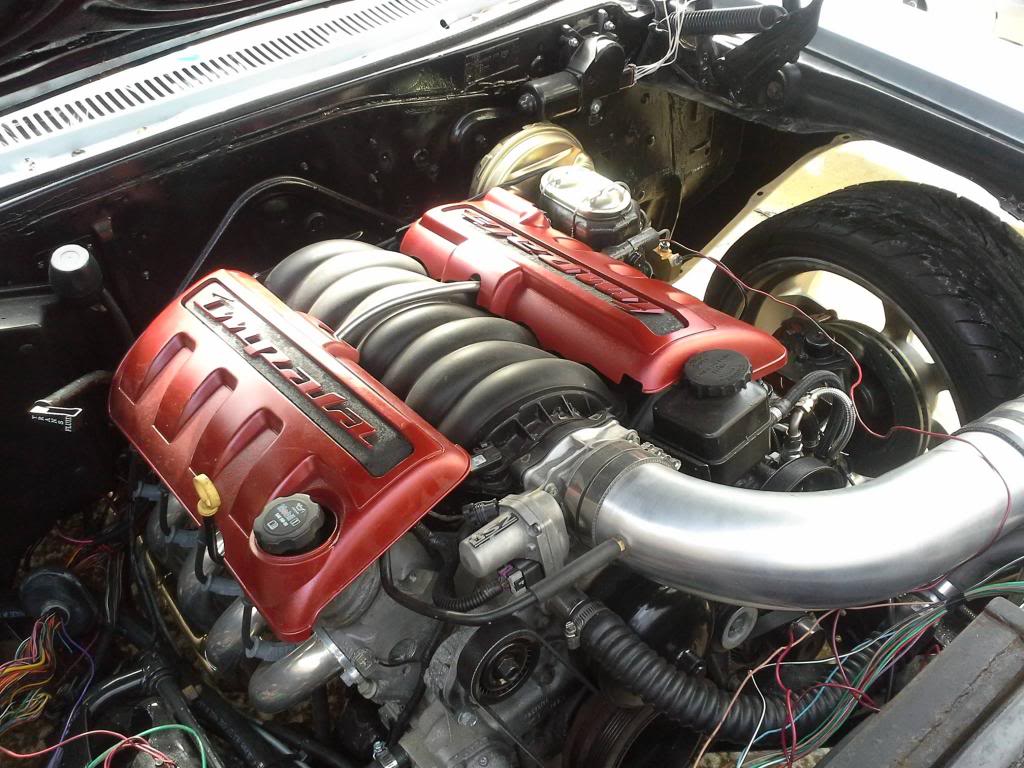
I know posts without pics are boring, so check out my engine covers! Ohhh ahhhhh
Console...haha gonna be tricky. Not quite the fit I expected. I'll be sure to post pics of that progress.
I know posts without pics are boring, so check out my engine covers! Ohhh ahhhhh
02-20-2014, 01:20 PM
#254
Teching In

Join Date: Dec 2012
Location: Nor Cal
Posts: 9
Likes: 0
Received 0 Likes
on
0 Posts
I still am amazed at your creativity!
Would you mind sharing with me what wiper motor you are using? Did it fit in the stock location? I would love to upgrade mine! I also noticed your new headlight switch! Great touch! I've looked at your thread countless times and I always find new details.
Would you mind sharing with me what wiper motor you are using? Did it fit in the stock location? I would love to upgrade mine! I also noticed your new headlight switch! Great touch! I've looked at your thread countless times and I always find new details.
02-20-2014, 08:00 PM
#255
TECH Resident
Thread Starter
I still am amazed at your creativity!
Would you mind sharing with me what wiper motor you are using? Did it fit in the stock location? I would love to upgrade mine! I also noticed your new headlight switch! Great touch! I've looked at your thread countless times and I always find new details.
Would you mind sharing with me what wiper motor you are using? Did it fit in the stock location? I would love to upgrade mine! I also noticed your new headlight switch! Great touch! I've looked at your thread countless times and I always find new details.
Why thank you! I don't have a part number for the wiper motor but it's from a 2002 Silverado. I got it to match the turn signal/wiper switch I put on the steering column (which I am now going to change). There are several different ones for that model year...3 or 4 I think. You have to be careful though, as many of them are on the INSIDE of the firewall, meaning they turn the opposite direction. I still don't know if I have it right or not...we'll see if they wipers work when it's all wired up. Also, I modified it a bit to accept the Impala wiper arm (the little arm that connects the motor to the wiper rigging behind the firewall) That way the wiper throw remains correct. Had to modify the firewall a little but to get it in there, but it's in the stock location, yes.
The headlight switch is from a new GTO. Since I have the entire body harness for a GTO, everything just plugs into it. That's the reason I am switching the wiper and blinker controls over to the GTO stuff too. I imagine you could still use a switch like it on your car...I just wouldn't know how to wire it up to work right.
A small update for y'all since I am posting anyway.....
I bought a GTO steering column hoping to be able to use it but I think it's broken. It came locked, so I removed the lock cylinder and now it spins freely without turning the shaft. When I take it apart, none of the parts inside the column or the shaft spin at all. I can't figure the thing out. I might end up just taking parts off of it and integrating them into my Impala column. Need to do something to hold the blinker/wiper controls and the shroud.
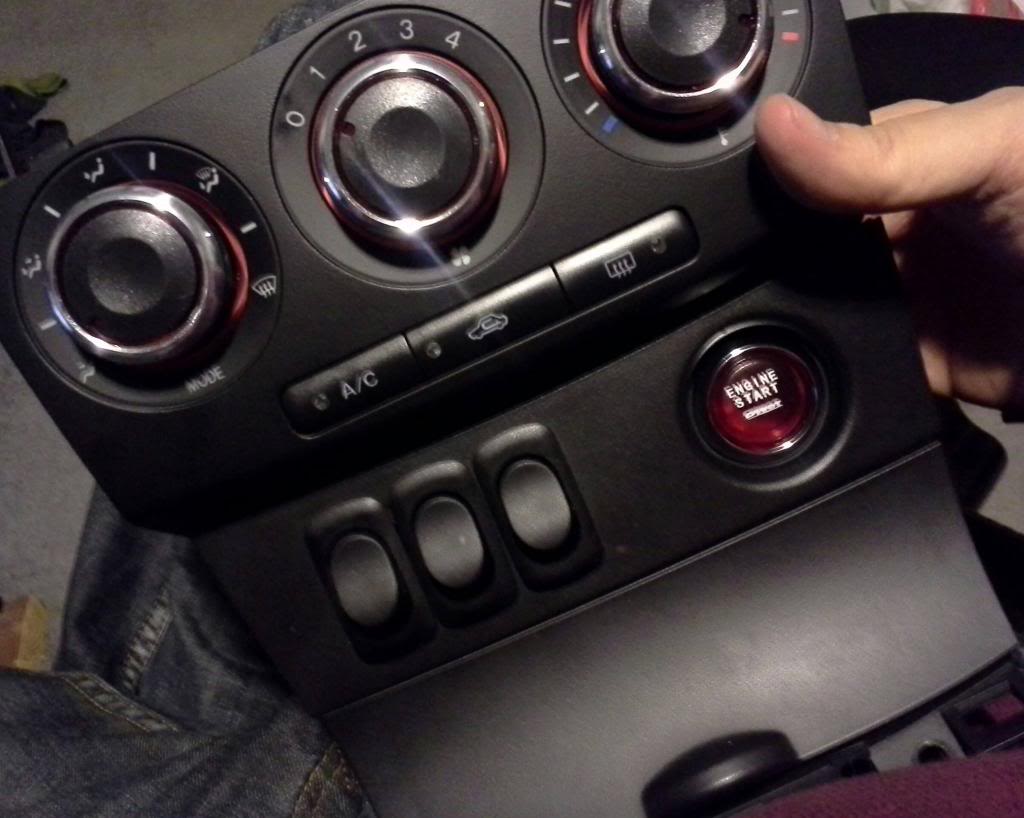
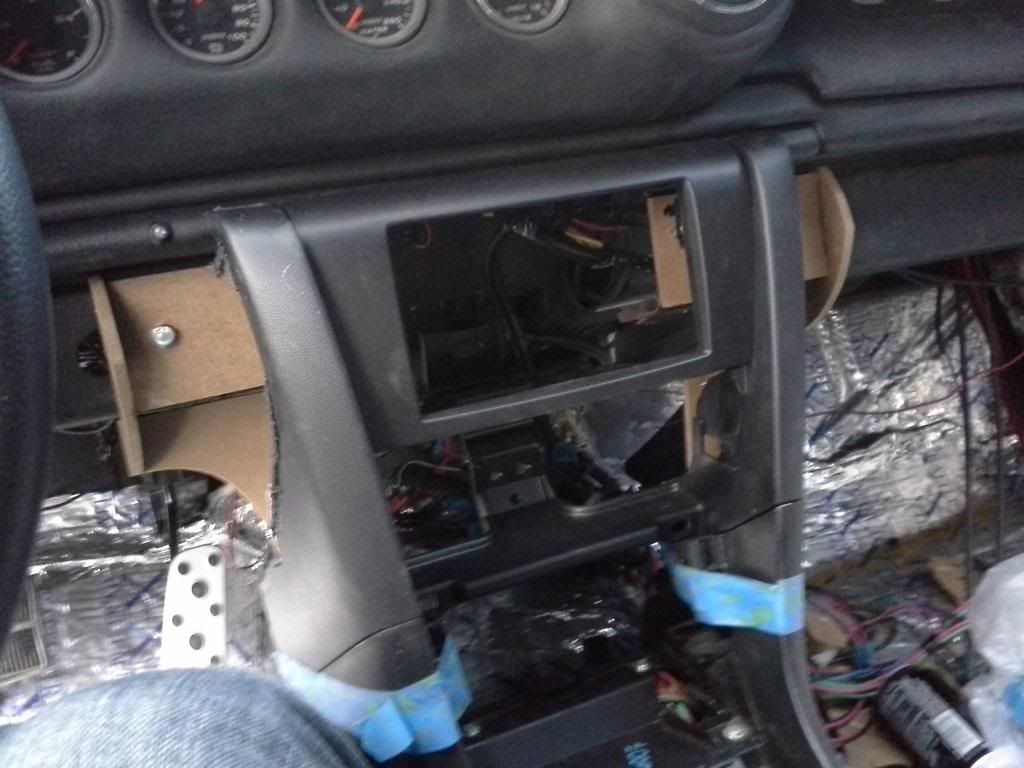
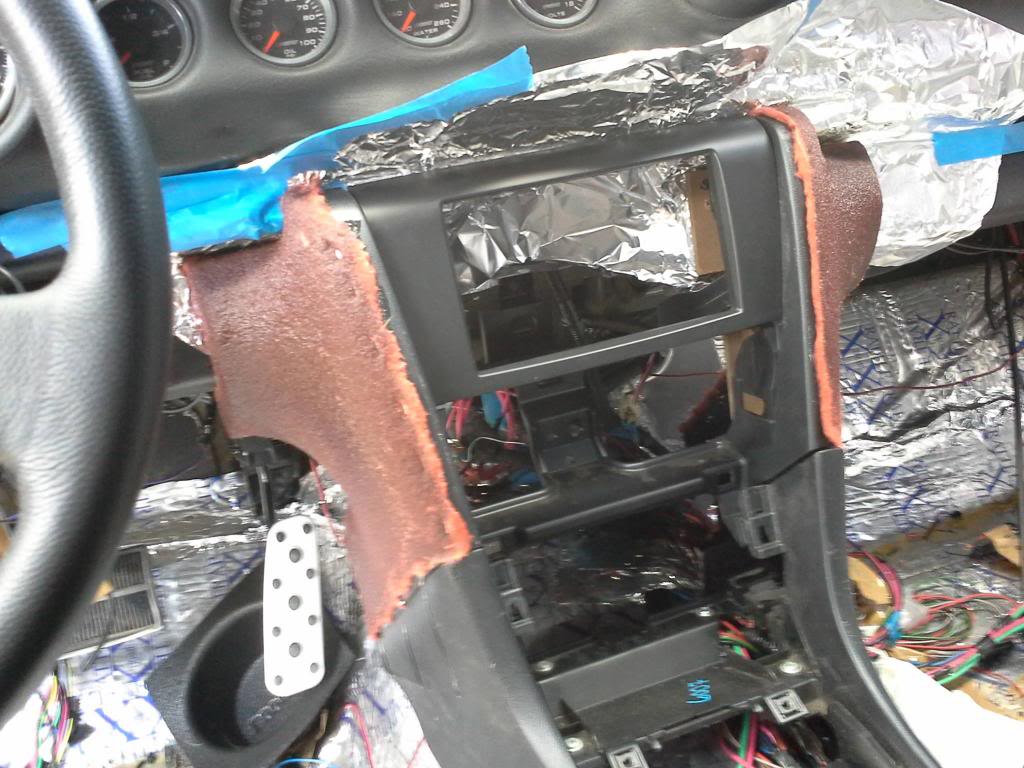
The upper portion of the Mazda console arrived today. I was totally expecting to have ordered the wrong part but I got lucky. Even luckier was the fit into the Impala. I just stuck it in there to see what I was going to be up against, and it almost fits perfectly already. I still need to make brackets and cut a few pieces, and modify the upper console to blend into the Impala dash...but overall I am extremely happy.

Here's the console stuff that goes under the radio. I added the new ***** and all the switches and button. Start button is only for looks (needed something to fill the hole). Switches will open doors and maybe the trunk, I dunno. I'm not getting rid of my door handles or anything, but I think it would be cool top have a button too.
I also cleaned up the wiring in the engine bay and got it all hidden away. Mounted the underhood fuse box. Gonna work on the interior wiring this weekend. Forgot to take pics of that, sorry. Got some really cool ideas for headlights. Gonna make a video tutorial of that I think.
04-02-2014, 07:38 PM
#256
TECH Resident
Thread Starter
Another small update so y'all don't forget about lil' ol' Dave and his clunker.
Car has been running for a while but I have had to deal with lots of little issues. Mainly water leaks. Water is evil, evil, evil. I also have to reset the back glass again because I didn't clean the tint gunk off the glass well enough and it came unstuck. That's not the source of my leak though...it was coming in at the door frame, riding the wiring into the cabin.
I spent the last 5 or 6 weeks putting headlights together in my spare time. I did an HID conversion into the 5 3/4" headlights. If you have way too much money in your pockets, and way too much free time, I suggest you attempt the upgrade. If you're a sane person, and want to remain that way, I suggest you DON'T do it.


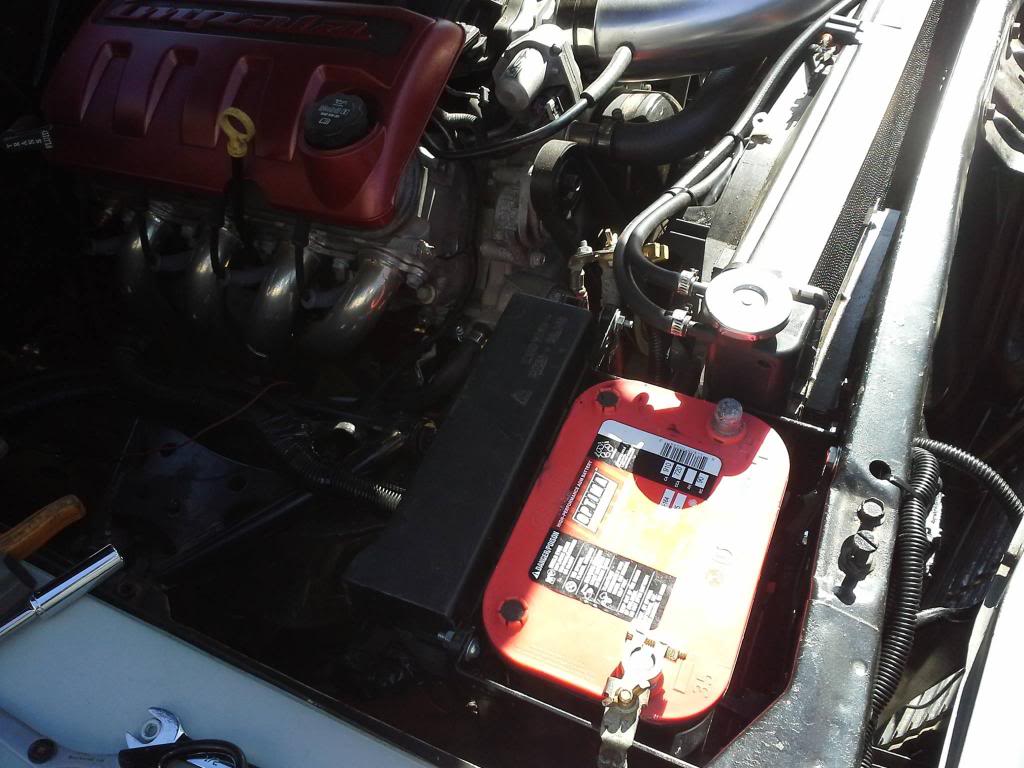
Got my engine bay all cleaned up and the wires hidden. Fuse box mounted with some simple brackets behind battery. Still have to figure out the fan wiring ('04 fans operating off '05 harness...and yes, they are different)
GTO fans and radiator fit like a glove (pic before wiring cleanup)

Here's some interior stuff. Trying to fit the console to the car so I can make brackets before putting the carpeting in (IF my water leaks are finally fixed). Radio is not mounted, just stuck in there for looks.

And here's a pic of her, just because she's awesome

And here's the main reason for the lack of updates. Trying to get my 4th book written. Coming along though.

Car has been running for a while but I have had to deal with lots of little issues. Mainly water leaks. Water is evil, evil, evil. I also have to reset the back glass again because I didn't clean the tint gunk off the glass well enough and it came unstuck. That's not the source of my leak though...it was coming in at the door frame, riding the wiring into the cabin.
I spent the last 5 or 6 weeks putting headlights together in my spare time. I did an HID conversion into the 5 3/4" headlights. If you have way too much money in your pockets, and way too much free time, I suggest you attempt the upgrade. If you're a sane person, and want to remain that way, I suggest you DON'T do it.
Got my engine bay all cleaned up and the wires hidden. Fuse box mounted with some simple brackets behind battery. Still have to figure out the fan wiring ('04 fans operating off '05 harness...and yes, they are different)
GTO fans and radiator fit like a glove (pic before wiring cleanup)
Here's some interior stuff. Trying to fit the console to the car so I can make brackets before putting the carpeting in (IF my water leaks are finally fixed). Radio is not mounted, just stuck in there for looks.
And here's a pic of her, just because she's awesome
And here's the main reason for the lack of updates. Trying to get my 4th book written. Coming along though.
 04-21-2014, 02:55 PM
#258
TECH Resident
Thread Starter
I drove the car for the first time over the weekend. Something isn't right...feels sluggish. Gotta trace it down and see what's wrong. Also had an oil leak at the sender....not an easy place to work.
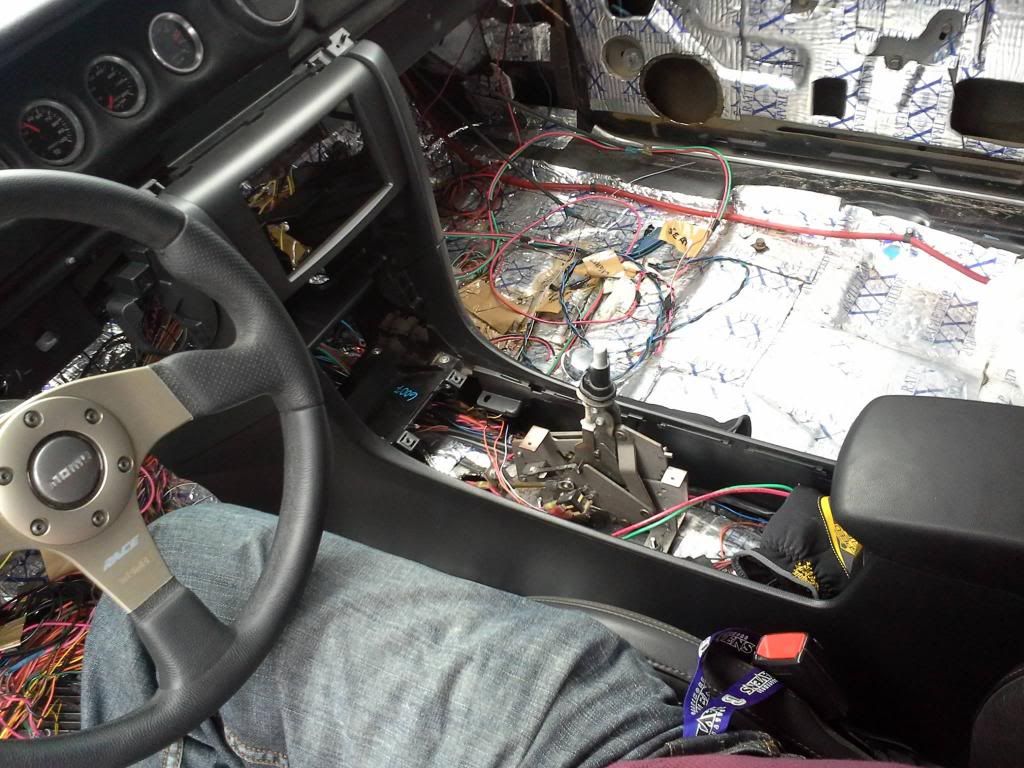
Here's some interior pics for those of you who are interested:


There will also be additional trim panels that go along the bottom of the dash and transition into the door panel design. Also going to redesign my TV "mirror" pods in the door panels because I don't like how they flow.
Had a lot of hiccups with fitment but all in all I'm pretty happy with it.
Here's some interior pics for those of you who are interested:
There will also be additional trim panels that go along the bottom of the dash and transition into the door panel design. Also going to redesign my TV "mirror" pods in the door panels because I don't like how they flow.
Had a lot of hiccups with fitment but all in all I'm pretty happy with it.
