

Superdave's 65 Impala SS 5.3 Swap


 04-24-2014, 02:01 PM
#262
TECH Resident
Thread Starter
All of the parts that will be touched a lot, like the seats, steering wheel, arm rests, etc, will be genuine leather.
 04-24-2014, 09:32 PM
#264
How is that monitor and camera setup working for you? It looks to me that the drivers side one is going to be hard to actually see since it doesn't look like you are looking at it from a perpendicular angle. I was thinking of something similar, but maybe putting a monitor in the center console that would be used for the door mirror and have it switchable to a backup camera.
Also, how did that a/c and heating control end up working on your cables? Does it move it the full range?
Definitely going to steal some of these ideas for the Cadillac.
Also, how did that a/c and heating control end up working on your cables? Does it move it the full range?
Definitely going to steal some of these ideas for the Cadillac.
04-25-2014, 12:18 AM
#265
TECH Resident
Thread Starter
Well I have only dared to drive it around the block so far, so I have very little feedback to give about the cameras. The drivers side (and passenger side, too, actually) are not sitting flat against the door panel, they are angled in towards the driver. The driver's side is a little harder to see because of the angle, but both sides can be seen fairly clearly. I am thinking of trying to find LED screen instead of LCD, as the LED ones should be brighter and have a better viewing angle. I only really use the side mirrors to change lanes (I back up while looking out the back window)....and I do have a traditional mirror mounted to the windshield.
Mounting screens somewhere else in the car more visible is certainly a good option. The only reason I opted against it is because I naturally look to the general area of the side mirrors when changing lanes, and I didn't want to have to train my brain to look somewhere else instead.
I am going to redesign my TV "pods", and I might actually jump up one size just to make doubly sure I don't crash into a Lexus or something.
As for the heater controls....I modified the Mazda controls to accept the Impala cables, but I have not hooked them into the Impala yet. A lot of my ducting was missing or damaged when I got the car, so I have to reroute some things. I am probably only going to use the dash vents and the defroster, and I have no A/C, so the temperature controls will just really be outside temp to hot. The cables have just about full pull/push when controlled with the Mazda controls, so I am confident I can hook it up to do pretty much whatever I want.
04-25-2014, 12:30 AM
#266
Overall, you have done some amazing work. I will be interested to see where you end up on the monitors and cameras. I was also thinking about doing something where the A pillar and dash meet, some sort of pod there. How wide is the view on the camera? Do you catch the side of the car and the road or what?
But then I start thinking crazy things like a camera mounted up front to look down the car, kind of a curb camera set up so you can see how much room there is to the curb, I know I could go overboard with this.
Looking at some of the modern cars, like BMWs, they have six or 8 cameras that cover everything. That's all a little down the road, need to get the L96 into the Cadillac first and then go from there.
Like I said, phenomenal work and I do plan on stealing some of your ideas.
04-25-2014, 01:02 AM
#267
TECH Resident
Thread Starter
Haha feel free to steal them! That's one of the reasons I post this stuff.
If you mean like how wide I can see, that's hard to answer. There's no "fish eye" effect with the cameras I bought. The camera angle was carefully set when I built the camera pods. It has some of the quarterpanel in the view for reference. Really you can aim it however you want, but once you set it and build a pod, that's it. I suppose you could build a larger pod with some adjustments built into the design, but that could get really clunky real quick.
The main issue is not the cameras; it's the monitors. Not quite sure how to convey the viewing angle of the monitors to you. I would say if you imagine a 45 degree angle, and then cut that in half to roughly 22ish, that's probably the angles mine are. As I said, the passenger side one is fine (although much further away) and the driver's side one, although closer, is not facing directly at me. I am going to do my best in my pod redesign to aim them a little better, however I am limited in space and design. If I was starting from scratch with cameras/monitors I would have worked them into the dash instead of the door panels. If you are starting from scratch, or you're willing to hack up your dash, that might be the best place for them. I have grown so fond of my dash that I just couldn't imagine cutting it up again. A Pillar area is a good idea too if you can fit it. Just be alert to any cops. They will think you are watching TV while driving if they can see the monitor. I built a switch into mine to black them out when I need to.
05-10-2014, 10:00 AM
#268
TECH Resident
Thread Starter
Had my wiring guy come by today and finally got the fans wired up correctly. He also brought a scan tool and the engine threw some codes. I knew it was running rough when I drove it around the block though.
Here are the codes:
P0300 Engine Misfire
P0532 Oil Pressure Low (this is because I have the Speedhut sender plugged in place. Oil Pressure is fine.)
P0532 A/C Press Low (No A/C, so that solves that one)
P0650 Mil Control Circuit Problem
P0654 Engine Speed Output
He's supposed to be looking them up....but can anyone tell me what I should be looking for? Hopefully these are fairly simple fixes Engine is 2005 GTO LS2, E40 ECM
05-11-2014, 05:19 AM
#269
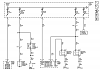
DTC P0654
Circuit Description
The powertrain control module (PCM) creates the engine speed output signal by pulsing the circuit to ground at a predetermined hertz rate. The PCM pulses the circuit at the same rate as the engine speed signal input. The PCM monitors the voltage on the engine speed output circuit. If the PCM determines the voltage is out of the normal operating range, a DTC sets.
The PCM supplies a voltage to the engine speed output circuit. The PCM creates the engine speed output signal by rapidly grounding this circuit via an internal switch called a driver. The other components on this circuit recognize the voltage being pulled to ground as an indication of engine speed. The PCM driver supplies the ground for the component being controlled. Each driver has a fault line which the PCM monitors. When the PCM commands a component ON, the voltage of the control circuit should be LOW (near 0 volts). When the PCM commands the control circuit to a component OFF, the voltage potential of the circuit should be HIGH (near battery voltage). If the fault detection circuit senses a voltage other than what is expected, the fault line status changes, causing DTC P0654 to set.
Conditions for Running the DTCThe engine speed is greater than 400 RPM.The ignition voltage is greater than 6 volts, but less than 18 volts.Conditions for Setting the DTCThe PCM detects that the commanded state of the driver and the actual state of the control circuit do not match.All of the above conditions exist for a minimum of 5.0 seconds.Action Taken When the DTC SetsThe PCM stores the DTC information into memory when the diagnostic runs and fails.The malfunction indicator lamp (MIL) will not illuminate.The PCM records the operating conditions at the time the diagnostic fails. The PCM stores this information in the Failure Records.Conditions for Clearing the MIL/DTCA last test failed (current DTC) clears when the diagnostic runs and does not fail.A History DTC clears after forty consecutive warm-up cycles, if this or any other emission related diagnostic does not report any failures.Use a scan tool in order to clear the MIL/DTC.Diagnostic Aids
Important:dumRemove any debris from the PCM module connector surfaces before servicing the PCM. Inspect the PCM connector gaskets when diagnosing/replacing the PCM. Ensure that the gaskets are installed correctly. The gaskets prevent contaminate intrusion into the PCM.
For an intermittent, refer todumTesting for Intermittent Conditions and Poor Connectionsdumin Wiring Systems.
Test Description
The number below refers to the step number on the diagnostic table.
Further circuit diagnosis may require instrument panel cluster (IPC) removal. Test the circuit from the PCM to the tachometer for being open, shorted to ground or, voltage. If you can not find any trouble, follow the appropriate IPC diagnostic procedure.DTC P0654
Step
Action
Values
Yes
No
Schematic Reference:dumInstrument Cluster Schematics
1
Did you perform the Diagnostic System Check – Vehicle?
—
Go todumStep 2
Go todumDiagnostic System Check - Vehicle
2
With the engine running, does the vehicles tachometer indicate engine RPM?
—
Go todumTesting for Intermittent Conditions and Poor Connectionsdumin Wiring Systems
Go todumStep 3
3
Turn the ignition OFF.Disconnect the powertrain control module (PCM) connector located on the same side as the manufacturer's logo. Refer todumEngine Control Module Replacementdumin Engine Controls.Install thedumJ 33431-CdumSignal Generator Tester between the engine speed signal circuit and a good ground.Turn the ignition ON.Set thedumJ 33431-CdumSignal Generator Tester to generate a tachometer signal.
Does the tachometer indicate a RPM?
—
Go todumStep 5
Go todumStep 4
4
Test the engine speed signal circuit for an open, high resistance, or a short to ground. Refer todumCircuit TestingdumanddumWiring Repairsdumin Wiring Systems.
Did you find and correct the condition?
—
Go todumStep 9
Go todumStep 7
5
Inspect for poor connections at the PCM connector. Refer todumTesting for Intermittent Conditions and Poor ConnectionsdumanddumConnector Repairsdumin Wiring Systems.
Did you find and correct the condition?
—
Go todumStep 9
Go todumStep 6
6
Inspect for poor connections at the harness connector of the Instrument panel cluster (IPC). Refer todumTesting for Intermittent Conditions and Poor ConnectionsdumanddumConnector Repairsdumin Wiring Systems.
Did you find and correct the condition?
—
Go todumStep 9
Go todumStep 8
7
Important:dumProgram the replacement PCM.
Replace the PCM. Refer todumEngine Control Module Replacement.
Did you complete the replacement?
—
Go todumStep 9
—
8
Replace the IPC. Refer todumInstrument Cluster Replacement.
Did you complete the replacement?
—
Go todumStep 9
—
9
Use the scan tool in order to clear the DTCs.Operate the vehicle within the conditions for running the DTC.
Does the DTC reset?
—
Go todumStep 2
System OK
05-11-2014, 05:48 AM
#270
That's right off gm service info. Issue with the tach signal wire. Have not seen that one before. Tach signal should go right to a tach. And when its tuned you can make it work with any tach. Changing the correct pulse output or put the tach on 4 cylinder.
Its a brown and red wire engine rpm output to the cluster. What is that connected to?

The p0650 is concerning the check engine light wire.
The wire from the PCM grounds internally to turn the light on. Power comes from the IPC to the lamp and the pcm grounds it. Do you know if and how your check engine light is wired up?
The other one that concerns me is the p0300 random misfire code. Its a generic code that tells you its missing I'd put a tech2 or snap on scanner and see which cylinder(s) is actually missing while its running rough like you said. if it missed long and and bad enough it might actually set a p0301-p0308 depending on which cylinder it is. Which would narrow it down. But there are no injector or coil codes so you probably have them plugged in correctly. Possibly the plug wire is not snapped on all the way. Not enough fuel pressure or hose or line on the intake is not plugged in creating a vacuum leak. Which could make all of the cylinders miss. How do u have the evap stuff plugged? I'd also look at fuel trim and see if your running lean or rich. And double check the engine and PCM ground are tight. And grounds from engine to body and engine to frame.
Its a brown and red wire engine rpm output to the cluster. What is that connected to?
The p0650 is concerning the check engine light wire.

The wire from the PCM grounds internally to turn the light on. Power comes from the IPC to the lamp and the pcm grounds it. Do you know if and how your check engine light is wired up?
The other one that concerns me is the p0300 random misfire code. Its a generic code that tells you its missing I'd put a tech2 or snap on scanner and see which cylinder(s) is actually missing while its running rough like you said. if it missed long and and bad enough it might actually set a p0301-p0308 depending on which cylinder it is. Which would narrow it down. But there are no injector or coil codes so you probably have them plugged in correctly. Possibly the plug wire is not snapped on all the way. Not enough fuel pressure or hose or line on the intake is not plugged in creating a vacuum leak. Which could make all of the cylinders miss. How do u have the evap stuff plugged? I'd also look at fuel trim and see if your running lean or rich. And double check the engine and PCM ground are tight. And grounds from engine to body and engine to frame.
05-11-2014, 10:52 PM
#271
TECH Resident
Thread Starter
Thanks 450r
I don't know what the tach wire is hooked to, as I am an idiot with anything electrical and I am having someone else do it. When I first started the engine, it appeared to be working, but then we realized it didn't move when I hit the gas. It's a Speedhut gauge, so it's programmable. I followed the instructions from Speedhut and now it just shoots to 5k and holds there at idle (just the tack, not actual RPMs). I have a feeling I didn't program it properly and I will try again. I have a similar issue with the fuel gauge (it's programmable too).
The miss, I THINK I have figured out. We did have it plugged into a scanner and the miss was on #5 (although there were 2 or 3 of them on other cylinders too) But #5 was really bad. Enough that you could feel it making the idle lumpy. The problem, I think, is my Dynatech headers. To clear the steering box, the #3 tube crosses over the vicinity of where the #5 plug wire goes
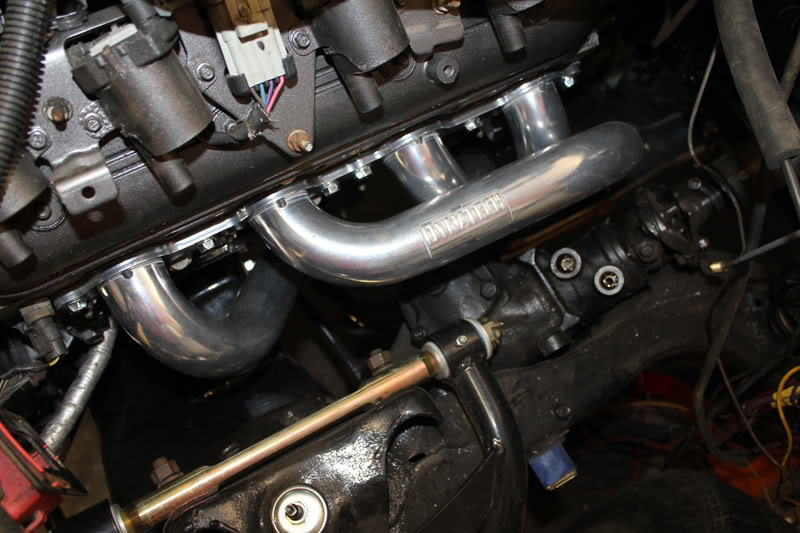
No plug wires in the shot but you can see what I mean. I bought the MSD adjustable boot wires so that I could try to make it work, but there was still arcing on the header. I bent the boot a little more and cut off a little sliver of the boot for clearance, and I THOUGHT I had fixed it. However it looks like I didn't. To fix it this time, hopefully for good, I have ordered a single MSD wire that I can cut to a custom length. I think this SHOULD solve the issue.
The CEL light makes sense. I do have a light, but he has not wired it into the harness.
About a vacuum leak...I don't think it's the case this time, but when I drove it, I had an oil leak at the sender. As I was fixing the leak, I noticed there was a rotted vacuum cap on one of the little nubs on the back of the intake. I replaced it that day, but haven't driven the car since. Also, like a moron, I just placed the positive terminal on the battery without tightening it before the test drive. That may or may not have been a problem, I dunno.
I am hoping that all of these small issues are why the car feels like a pig. I have to swap out the plug wire and also change the rear trans seal before i can drive it again. Once again I will be driving UPHILL for my test drive haha.
I don't know what the tach wire is hooked to, as I am an idiot with anything electrical and I am having someone else do it. When I first started the engine, it appeared to be working, but then we realized it didn't move when I hit the gas. It's a Speedhut gauge, so it's programmable. I followed the instructions from Speedhut and now it just shoots to 5k and holds there at idle (just the tack, not actual RPMs). I have a feeling I didn't program it properly and I will try again. I have a similar issue with the fuel gauge (it's programmable too).
The miss, I THINK I have figured out. We did have it plugged into a scanner and the miss was on #5 (although there were 2 or 3 of them on other cylinders too) But #5 was really bad. Enough that you could feel it making the idle lumpy. The problem, I think, is my Dynatech headers. To clear the steering box, the #3 tube crosses over the vicinity of where the #5 plug wire goes
No plug wires in the shot but you can see what I mean. I bought the MSD adjustable boot wires so that I could try to make it work, but there was still arcing on the header. I bent the boot a little more and cut off a little sliver of the boot for clearance, and I THOUGHT I had fixed it. However it looks like I didn't. To fix it this time, hopefully for good, I have ordered a single MSD wire that I can cut to a custom length. I think this SHOULD solve the issue.
The CEL light makes sense. I do have a light, but he has not wired it into the harness.
About a vacuum leak...I don't think it's the case this time, but when I drove it, I had an oil leak at the sender. As I was fixing the leak, I noticed there was a rotted vacuum cap on one of the little nubs on the back of the intake. I replaced it that day, but haven't driven the car since. Also, like a moron, I just placed the positive terminal on the battery without tightening it before the test drive. That may or may not have been a problem, I dunno.
I am hoping that all of these small issues are why the car feels like a pig. I have to swap out the plug wire and also change the rear trans seal before i can drive it again. Once again I will be driving UPHILL for my test drive haha.
05-11-2014, 11:34 PM
#272
TECH Resident
Thread Starter
Actually, now that you mention the EVAP stuff, I wonder if that's a problem too. I have all the emissions tuned out of the computer, and I removed the little sensor at the front of the passenger head, along with the hard plastic line. The corresponding nubs on the intake have been capped.
But after reading more about EVAP deletes people have done, I am seeing info about canisters and vents and filters etc....I don't have anything like that. Can you tell me what I should have in place for that?
But after reading more about EVAP deletes people have done, I am seeing info about canisters and vents and filters etc....I don't have anything like that. Can you tell me what I should have in place for that?
05-12-2014, 12:28 PM
#273
The #5 plug wire is probably your misfire issue once u get that fixed all the misfires will go away. The other miss on the other cylinders are just sympathy misfires it's seeing because the crank slowing down on 5 and when the other cylinders fire its still not turning as fast as the computer is expecting.
If the evap is plugged at the intake port you should be OK. Since your not running evap you don't need to worry about the other evap system parts.
The speed hut fuel gauge. I programmed mine with the sending unit and fuel pump removed and then installed it. You push and hold the little black button and it should start flipping full empty full empty move the sender to full and push the black button when the needle is on full and then sender to empty and push the button again when the needle lands on empty. Id have to look up how to set their tach.
05-12-2014, 01:15 PM
#274
TECH Resident
Thread Starter
The #5 plug wire is probably your misfire issue once u get that fixed all the misfires will go away. The other miss on the other cylinders are just sympathy misfires it's seeing because the crank slowing down on 5 and when the other cylinders fire its still not turning as fast as the computer is expecting.
If the evap is plugged at the intake port you should be OK. Since your not running evap you don't need to worry about the other evap system parts.
The speed hut fuel gauge. I programmed mine with the sending unit and fuel pump removed and then installed it. You push and hold the little black button and it should start flipping full empty full empty move the sender to full and push the black button when the needle is on full and then sender to empty and push the button again when the needle lands on empty. Id have to look up how to set their tach.
If the evap is plugged at the intake port you should be OK. Since your not running evap you don't need to worry about the other evap system parts.
The speed hut fuel gauge. I programmed mine with the sending unit and fuel pump removed and then installed it. You push and hold the little black button and it should start flipping full empty full empty move the sender to full and push the black button when the needle is on full and then sender to empty and push the button again when the needle lands on empty. Id have to look up how to set their tach.
For the fuel gauge, I knew it was possible to program it that way, but was avoiding removing the sender. I programmed it to 0-90 ohms, which is what the stock sender should be. It read nearly full, and the tank was nearly empty, so I was like, ok, 90-0 ohms then. It read empty, so I got 5 gallons of gas and added to what was already in the tank (should have been 2 or 3 gallons at least). It still read empty.....should have been more than 1/4 tank. I'll try it one more time using the Speedhut data sheet, and if it's still wrong, I'll pull the sender as you suggest.
Tach has similar options to the fuel gauge. It even has a setting specifically for cars with individual coils on plugs. I set it to what I thought was right, but I will have to look at the paperwork and see for sure.
05-12-2014, 04:55 PM
#275
TECH Enthusiast

Join Date: Feb 2002
Location: chicago
Posts: 551
Likes: 0
Received 0 Likes
on
0 Posts

Very cool!!! Going to start on My 65 Belair wagon this summer. I read through a lot of this but didn't see which oil pan you used. I got a CTSV pan swap kit and transdapt conversion mounts. Love how the headers fit too bad on the #5 wire and header interference.
05-12-2014, 07:34 PM
#276
TECH Resident
Thread Starter
Very cool. I used the GMPP (Hummer) pan. It hangs low though. CTSV pan is probably a much better option.
05-13-2014, 12:02 PM
#278
Do you have to drop the tank to get to your sender? It might be worth a try to get another sending unit. just the level sensor part that's 0-90 and program with it then plug it back into the tank. There are tools that can simulate 0-90 but the ones I've seen are not that accurate. Maybe the cheapest way would be to buy 2 resistors. One for full and one for empty. Then plug it in and you should be good.
05-13-2014, 01:10 PM
#279
TECH Resident
Thread Starter
Honestly I have not even really looked at the sender. I'll have to get under the car and look....but today is all yard work, nothing in the car. I hate yard work. HATE it.
