

L33 Valkyrie, 1800 LBS 310 horse 330 FPT death machine
 07-19-2012, 05:43 PM
#101
On The Tree
Thread Starter

Join Date: Jun 2012
Posts: 191
Likes: 0
Received 0 Likes
on
0 Posts
LOL, "kids" I was referring to are 17 and 18. I never have trouble with the younger two. Other then wanting to help after Ive told them no.
Just got in from work, stopped by the tree in the yard (where I keep the car )
)
Found the starter, its in ROUVH shape, may get a new one. Compressor for the AC looks good though it needs to be scraped and painted, I think I am going to go ahead and use it so I can be cool, and fast.
Just got in from work, stopped by the tree in the yard (where I keep the car
)Found the starter, its in ROUVH shape, may get a new one. Compressor for the AC looks good though it needs to be scraped and painted, I think I am going to go ahead and use it so I can be cool, and fast.
 07-20-2012, 02:00 PM
#103
On The Tree
Thread Starter
Join Date: Jun 2012
Posts: 191
Likes: 0
Received 0 Likes
on
0 Posts
Ok, so the recent hot weather put a wild hair up my butt and I decided I had to have air.
Motor came with a compressor so I can just put it back on, no big deal right?
while wire brushing the compressor my nephew turned the wheel on the compressor, causing the junkyard supplied cap to fly off, hit me just above the eye, I was sitting two feet away, it bounced off my head and landed an additional 10 feet away. Took about 15 minutes to find the cap.
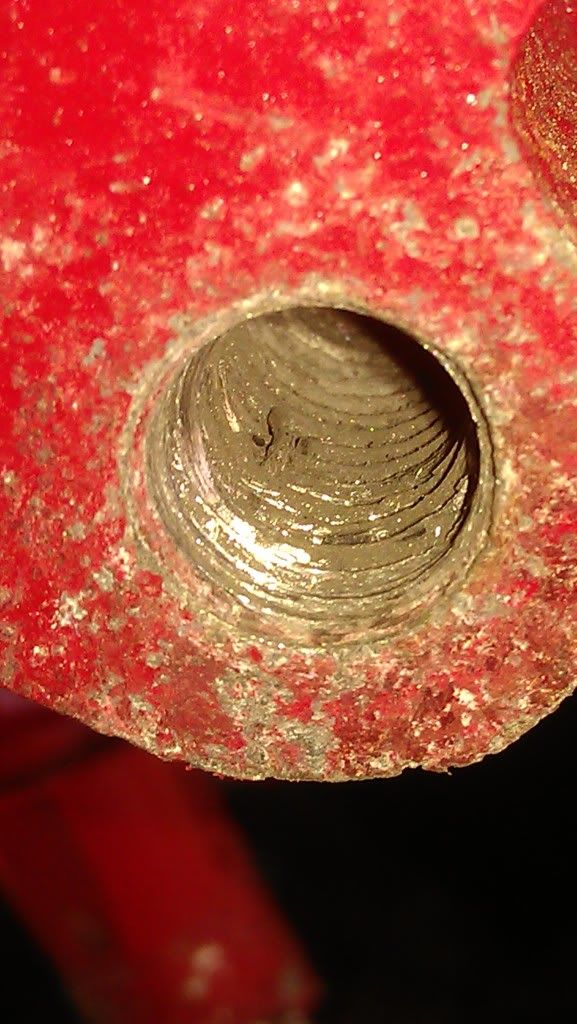
So we get it all brushed and take the alternator off, he holds the tensioner and I take out the bolts, With the top right bolt 90% removed he lets up on the tensioner and I do not notice for two or three turns of the ratchet until the bolt starts turning hard and I am like WTF? so now about the first two or four millimeters of the threads in the block are toast.
I shrug it off, NOT the end of the world.
In order to get the compressor in I had to raise the motor a little. I THOUGHT id be able to just lower it back down, but as it turns out, it doesn't clear. I am going to have to clearance it, and I think I am going to have to pull the motor al lthe way back out (for like the 20th time) to make the cut.
I gave up and went inside for the day.
Motor came with a compressor so I can just put it back on, no big deal right?
while wire brushing the compressor my nephew turned the wheel on the compressor, causing the junkyard supplied cap to fly off, hit me just above the eye, I was sitting two feet away, it bounced off my head and landed an additional 10 feet away. Took about 15 minutes to find the cap.
So we get it all brushed and take the alternator off, he holds the tensioner and I take out the bolts, With the top right bolt 90% removed he lets up on the tensioner and I do not notice for two or three turns of the ratchet until the bolt starts turning hard and I am like WTF? so now about the first two or four millimeters of the threads in the block are toast.
I shrug it off, NOT the end of the world.
In order to get the compressor in I had to raise the motor a little. I THOUGHT id be able to just lower it back down, but as it turns out, it doesn't clear. I am going to have to clearance it, and I think I am going to have to pull the motor al lthe way back out (for like the 20th time) to make the cut.
I gave up and went inside for the day.
07-20-2012, 02:18 PM
#105

Before you spend a lot of time modifying your frame, etc, you might want to check with the folks at classic air about the compatibility of the compressor you're using with an aftermarket system.
Classic Auto air does seem to have a lot of experience with combined systems and modified older setups than most other manufactuers.
Classic Auto air does seem to have a lot of experience with combined systems and modified older setups than most other manufactuers.
07-21-2012, 12:54 PM
#108
On The Tree
Thread Starter
Join Date: Jun 2012
Posts: 191
Likes: 0
Received 0 Likes
on
0 Posts
A little research has indicated its not a good idea to thread chase in aluminum, but that I might be able to get away with it in just the very end if I am careful.
I might try it if I can find a cheap chaser, but will cal laround and se what they want in this area to helicoil it without me pulling the motor back out.
I might try it if I can find a cheap chaser, but will cal laround and se what they want in this area to helicoil it without me pulling the motor back out.
07-21-2012, 09:40 PM
#109
On The Tree

Join Date: Apr 2011
Location: Vancouver, WA
Posts: 129
Likes: 0
Received 0 Likes
on
0 Posts

From what I have read Vintage Air will work with the stock compressors for awhile. Then they die. Alan Grove makes a nice bracket to use with the Sanden 508 compressor. I also understand that he is waiting for additional orders to make a bracket for the Sanden SD7 compressor that is even smaller than the 508.
JMO I would do more research before I started chopping the frame to make the stock stuff clear.
JMO I would do more research before I started chopping the frame to make the stock stuff clear.
07-23-2012, 11:14 AM
#111
On The Tree
Thread Starter
Join Date: Jun 2012
Posts: 191
Likes: 0
Received 0 Likes
on
0 Posts
After waiting two full weeks for my friend with the welder, and now needing a helicoil, I think I am just going to find a machine shop to do the welding and the helicoil.
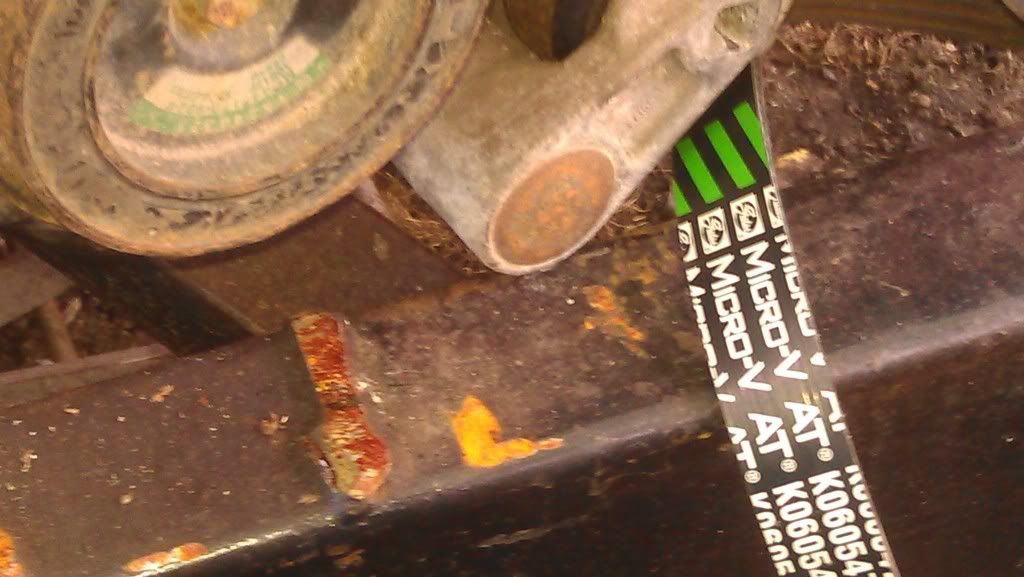
As far as clearancing the frame, it only needs to be notched jsut a little under the tensioner, the motor would have to be unbolted and jacked up on the passenger side to change the belt without cutting it a lot more.
As far as clearancing the frame, it only needs to be notched jsut a little under the tensioner, the motor would have to be unbolted and jacked up on the passenger side to change the belt without cutting it a lot more.
07-23-2012, 02:01 PM
#112
On The Tree
Thread Starter
Join Date: Jun 2012
Posts: 191
Likes: 0
Received 0 Likes
on
0 Posts
OK, paint is wet, and I have no talent, (I have already stripped them back to bare metal cus they needed more smoothing)
I got my new mostly smooth valve covers today. one was painted back and I thought it would look cool with red stripes. so since i was goign to strip it anyhow I decided to try it..
what do you think?
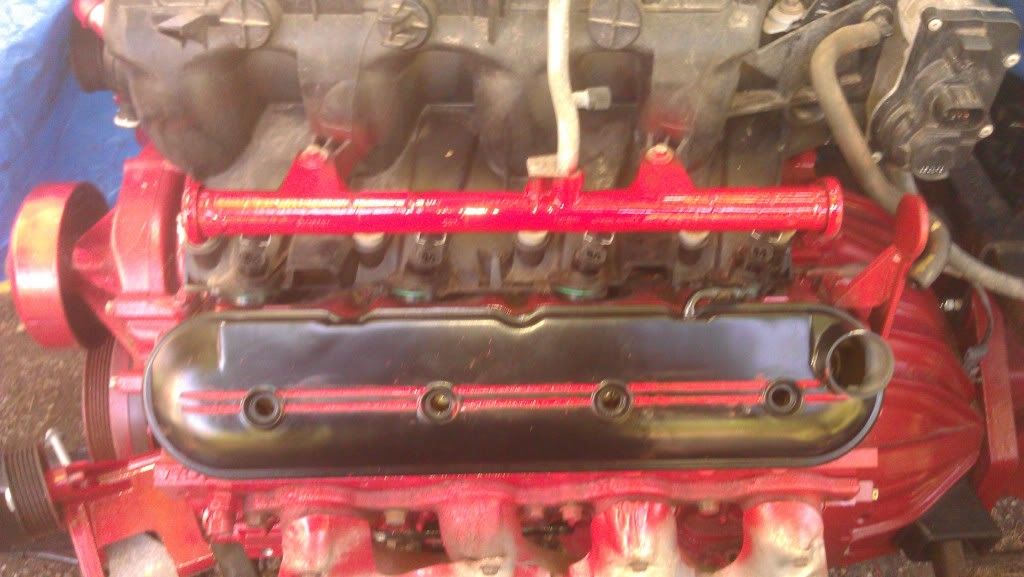
"edit" man the picture looks even worse then the reality, but Imagine if it was done well.
I got my new mostly smooth valve covers today. one was painted back and I thought it would look cool with red stripes. so since i was goign to strip it anyhow I decided to try it..
what do you think?
"edit" man the picture looks even worse then the reality, but Imagine if it was done well.
07-23-2012, 10:38 PM
#113
On The Tree
Thread Starter
Join Date: Jun 2012
Posts: 191
Likes: 0
Received 0 Likes
on
0 Posts
After stripping all the paint off I notice a lot of "tool marks" in other places on the covers, I am not sure if I just didn't notice them before or if the primer just filled them in that well?
plan had been to go get some JB weld and finish filling in the dimples, but a lot of these scrapes are up near the bolt holes and I am not sure I can effectively sand them if I try to fill them, or at least not without a lot more hassle then I originally intended.
anyone have much luck with crinkle paint? was thinking if I crinkle pained the valve covers, wouldnt it look silly next to the flat black intake?
07-24-2012, 09:08 AM
#114
Launching!
Join Date: May 2012
Location: Mobile, Alabama
Posts: 205
Likes: 0
Received 0 Likes
on
0 Posts
I have enjoyed following your build.
My valve covers were fairly rough, even some porosity in the castings. You can sand most of it out. The wrinkle paint will hide a lot.
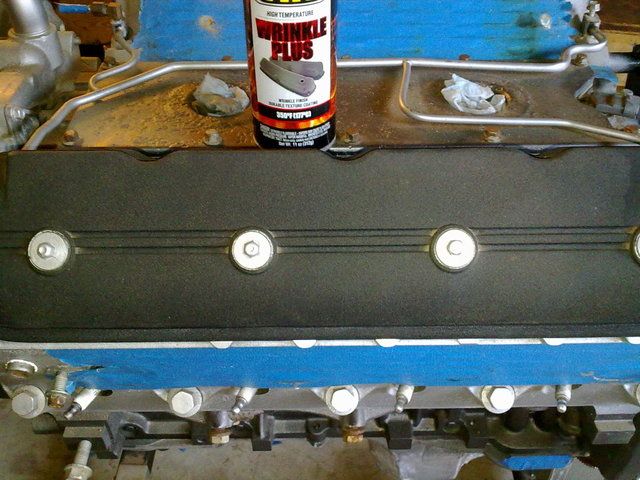
Follow the can instructions -It is heavily applied from different angles. I used a heat gun and it makes the wrinkle more even, but smaller wrinkles. I know people who used their wife's oven - don't tell her it was my idea! And sometimes just out in the hot sun is good enough. I have seen others who went over the wrinkle with a different color (light coats) and it looked OK. The intake could be painted another color as well. Clean very well and use an adhesion promoter (plastic primer) before paint.
My valve covers were fairly rough, even some porosity in the castings. You can sand most of it out. The wrinkle paint will hide a lot.
Follow the can instructions -It is heavily applied from different angles. I used a heat gun and it makes the wrinkle more even, but smaller wrinkles. I know people who used their wife's oven - don't tell her it was my idea! And sometimes just out in the hot sun is good enough. I have seen others who went over the wrinkle with a different color (light coats) and it looked OK. The intake could be painted another color as well. Clean very well and use an adhesion promoter (plastic primer) before paint.
07-24-2012, 01:31 PM
#116
TECH Senior Member
iTrader: (7)

OK, paint is wet, and I have no talent, (I have already stripped them back to bare metal cus they needed more smoothing)
I got my new mostly smooth valve covers today. one was painted back and I thought it would look cool with red stripes. so since i was goign to strip it anyhow I decided to try it..
what do you think?
"edit" man the picture looks even worse then the reality, but Imagine if it was done well.
I got my new mostly smooth valve covers today. one was painted back and I thought it would look cool with red stripes. so since i was goign to strip it anyhow I decided to try it..
what do you think?
"edit" man the picture looks even worse then the reality, but Imagine if it was done well.
Andrew
 07-24-2012, 09:00 PM
#117
On The Tree
Thread Starter
Join Date: Jun 2012
Posts: 191
Likes: 0
Received 0 Likes
on
0 Posts
uh, they were off the engine? the valve cover doesn't even have bolts in it?
My hands shake to bad for things like painting in the lines on the valve covers free hand, when i do it for real it will take me probably an hour or two to mask the lines out, I am good at masking, it is just time consuming and I didn't wish to spend two hours masking a part to try something and then strip it off five minutes later.
I think I like the effect though, black LS1 intake, black valve covers, red stripes and red fuel rails.
I will probably also buy paint-able wire loom/cover, or maybe try the red ones from cableorganizer.com
Plan is to have nothing under the "hood" that is not black or red, no aluminum, no chrome, not even stainless steel lines.

 07-26-2012, 08:54 AM
#119
On The Tree
Thread Starter
Join Date: Jun 2012
Posts: 191
Likes: 0
Received 0 Likes
on
0 Posts
In those pics the body was just sitting on the frame, no weight to compress the springs. Once everythinbg is bolted in the rear should drop significantly, but the front will only drop a little, as the radiator and fuel tank are about all thts up there.
I plan a two inch drop spindle for the front, but I haven't had the cash for it (200 for s10 drop spindles 175 for machine work, ouuuuch) and I am trying to think of more things I can move from the middle to the front to try for that 50/50 split, but even with it being rear engined I dont think i am going to get anywhere close, maybe 60/40
I plan a two inch drop spindle for the front, but I haven't had the cash for it (200 for s10 drop spindles 175 for machine work, ouuuuch) and I am trying to think of more things I can move from the middle to the front to try for that 50/50 split, but even with it being rear engined I dont think i am going to get anywhere close, maybe 60/40
07-26-2012, 11:20 AM
#120
Haha, makes sense. Where is the battery at? Move that to the front. Put a sub up there too. Should get you closer. You building the car for any specific goals? Or just a unique street cruiser?