When you click on links to various merchants on this site and make a purchase, this can result in this site earning a commission. Affiliate programs and affiliations include, but are not limited to, the eBay Partner Network.
Yeah I've heard about using the blazer front spindles. I have a set of 2" drop spindles on the elky already and I like the stance they give it. Plus the new rear end will have 1/2"-20 studs and the blazer fronts are metric (my stock elky ones are 7/16) So while I have my rotors whittled down I'm having 1/2" studs pressed in so that they will all match There is a method to my madness even if I don't always explain myself completely. I'm just glad to see that I get a ton of great info thrown my way just by being on this forum! Its been a huge help along the way.
Now for the fun stuff.
I really want to clean and sell this stuff, but at the same time I think I may end up buying another hot rod after the elky...but then I would probably do an LS swap on it too.
Current state of the truck-car
All hoodless and ready to go! I'm going to wait for a second set of hands to help me pull the engine in such a tight space.
And I had to pick this guy up ($20) used so I'd have some place to put the 305 because my LS is on my engine stand.
If everything works out I should have the trans dropped and the engine lifted out this week (if it doesn't all come together it may be the weekend).
Was really busy all week so I didn't get much done until tonight. I'm really excited that it is on the way to being put back together
This little gremlin is a life saver. I couldn't have gotten the trans out without dropping it on my head without it.
There is the old turbo 350. I'd really love to keep it because its a great trans and has a nice shift kit and converter but it is missing over drive
Then I told myself I'd just get things ready to pull the engine tomorrow with my Dad....
But it was just so easy to pop out the two bolts on the motor mounts.
I had to lower the truck a few inches and put it on smaller jack stands to clear the fender but I got it out and didn't hit anything!
15 great years with this little 305, it never left me stranded.
So there is going to be a lot of cleaning to do.
Luckily there is a ton of oil and grime to keep things looking black right now.
Now I can easily fix the hole in the heater box the tall valve covers and mushy rubber engine mounts caused. Plus I can maybe clearance it to fit with the coil packs.
If I'm not too busy I'll start the cleaning process this weekend
Jessica
Awesome job getting the engine out by yourself when you said you were going to wait haha. Sub'd
Yeah it was kind of funny I got started assembling the trans jack at 7 and before 8 I had the trans out and texted my Dad to tell him I'd get things ready for the next day. Then as I was getting ready and digging the engine hoist out of the pile of junk I just decided to go for it. I was done a little before 9 and I'm just glad nothing went wrong! I'd never live that down
On another great note, my hubs and brackets for the front brakes are done and should be back to me next week.
I'm still trying to figure out the best time to get my rear end so it'll arrive when I'm not traveling or something but at least I'm at the rebuilding phase.
Your where I was at last week are builds are similar. I used some paint thinner from Home Depot to clean frame worked pretty well.i ended up taking whole nose off. Was way easier putting new motor in, mounts , front drive etc . Great progress so far!
Your where I was at last week are builds are similar. I used some paint thinner from Home Depot to clean frame worked pretty well.i ended up taking whole nose off. Was way easier putting new motor in, mounts , front drive etc . Great progress so far!
Thanks for the heads up, I am still trying to decide how to proceed. I might take more apart or start cleaning and painting so I can just get things back together.
I got fed up with tripping over all the old accessories I had lying on the floor and also got annoyed with bumping int a completely disgusting engine this morning. So that got me started on cleaning up the old parts and the engine.
Even after a good scrub and bath the engine was looking pretty sad. Especially because I last rebuilt it in the bay and never painted the rest of the block orange!
Going to try the aluminum foil next time, not even duct tape sticks to cast iron well.
But I do love Chevy Orange, and I must have at least 3 cans of this stuff on the shelf, so I'm not out a whole ton of money making the little 305 a bit appealing.
Everything looks better now, except the balancer is still blue. I may fix that later.
I figure if someone is interested in the 305 then they will be more likely to pay for it if it looks nice. If I keep it because no one is interested it will at least look really tough sitting on the engine stand
As for the truck I've started to clean some of the engine bay but nothing worth taking a picture of yet; I'm going to start the front brake swap next week; and I've been selling off the old parts which is kind of a nice bonus (its like a drop in the bucket compared to what I've spent ).
I noticed after taking all the stuff off the engine and cleaning it up that the steel clamshell that bolts to the engine for the engine mount is cracked. So I'll have to find a new set that aren't so beat up. I guess the little 305 was a real bruiser
Also I got my hubs and brackets for the brake swap so I'm in good shape now. Maybe I'll get the spindles modified this week or weekend and get the wheels back on the car.
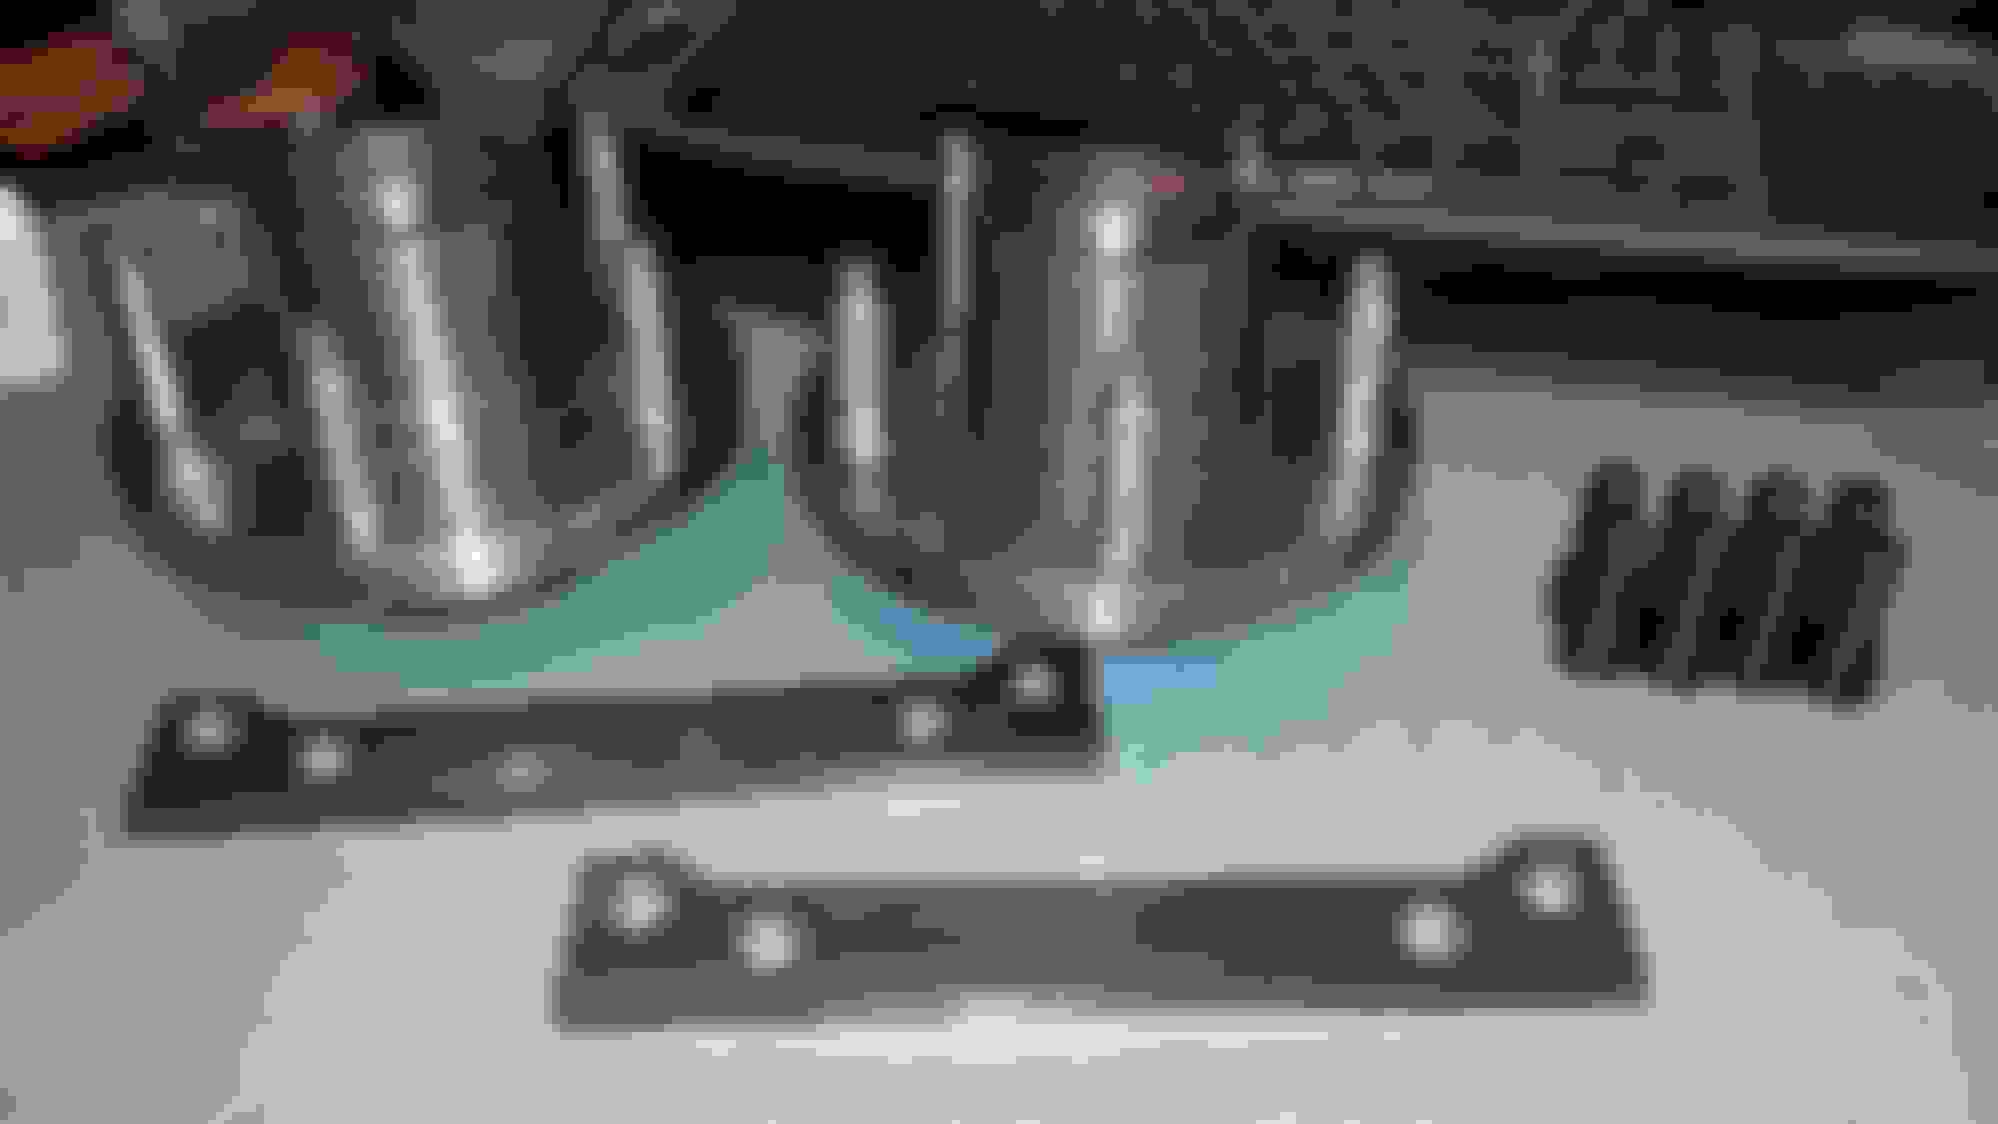
Hubs and brackets
Decided to paint them the same as all my other parts
I'm a little nervous doing the brake swap because it requires so much modification but I think it'll be worth it to be able to stop the car better.
Jessica
Drill and tap out the dust shield bolt holes for the adapter bracket.
The new bracket need to fit in this general area.
Everything to the right of the line needs to be cut off.
All the pieces and dust and its about cut off enough.
Then a little tidying up and ready for some paint so it won't rust.
Once its dry I can install the brakes.
I only got the drivers side done last night (didn't want to be such a bad neighbor grinding in the night) so I'll tackle the other tonight and maybe finish the first one while the paint dries.
Also the rear end is being assembled, so someday (maybe next week) it'll be shipped!
I got the second spindle modified and painted, and I got the second hub installed.
I also ordered new clips and hardware for the calipers and have new pads already for the front still need to order the rears. I should have it all assembled this week sometime.
I also ordered some lug nuts from ebay that are spline drive so they will fit in the wheels and one came with buggered up threads and one has no threads cut in it at all.
Also I got word the rear end is done and will be shipped in the next day or so
So all the brake parts I have lying around should find a home on the car soon and I can get the rear assembled so I can reorganize and clean up the garage!
I'm thinking of replacing the body mounts now that I've had a chance to look at them and also the floor pans so this project just took a turn for the long haul. It means buying a good MIG welder and some more parts but seeing as how the truck is mostly apart it would be a great time to do this. Once its a roller again I'll start on that (because I can roll it into my driveway and clean the bottom off with the pressure washer)
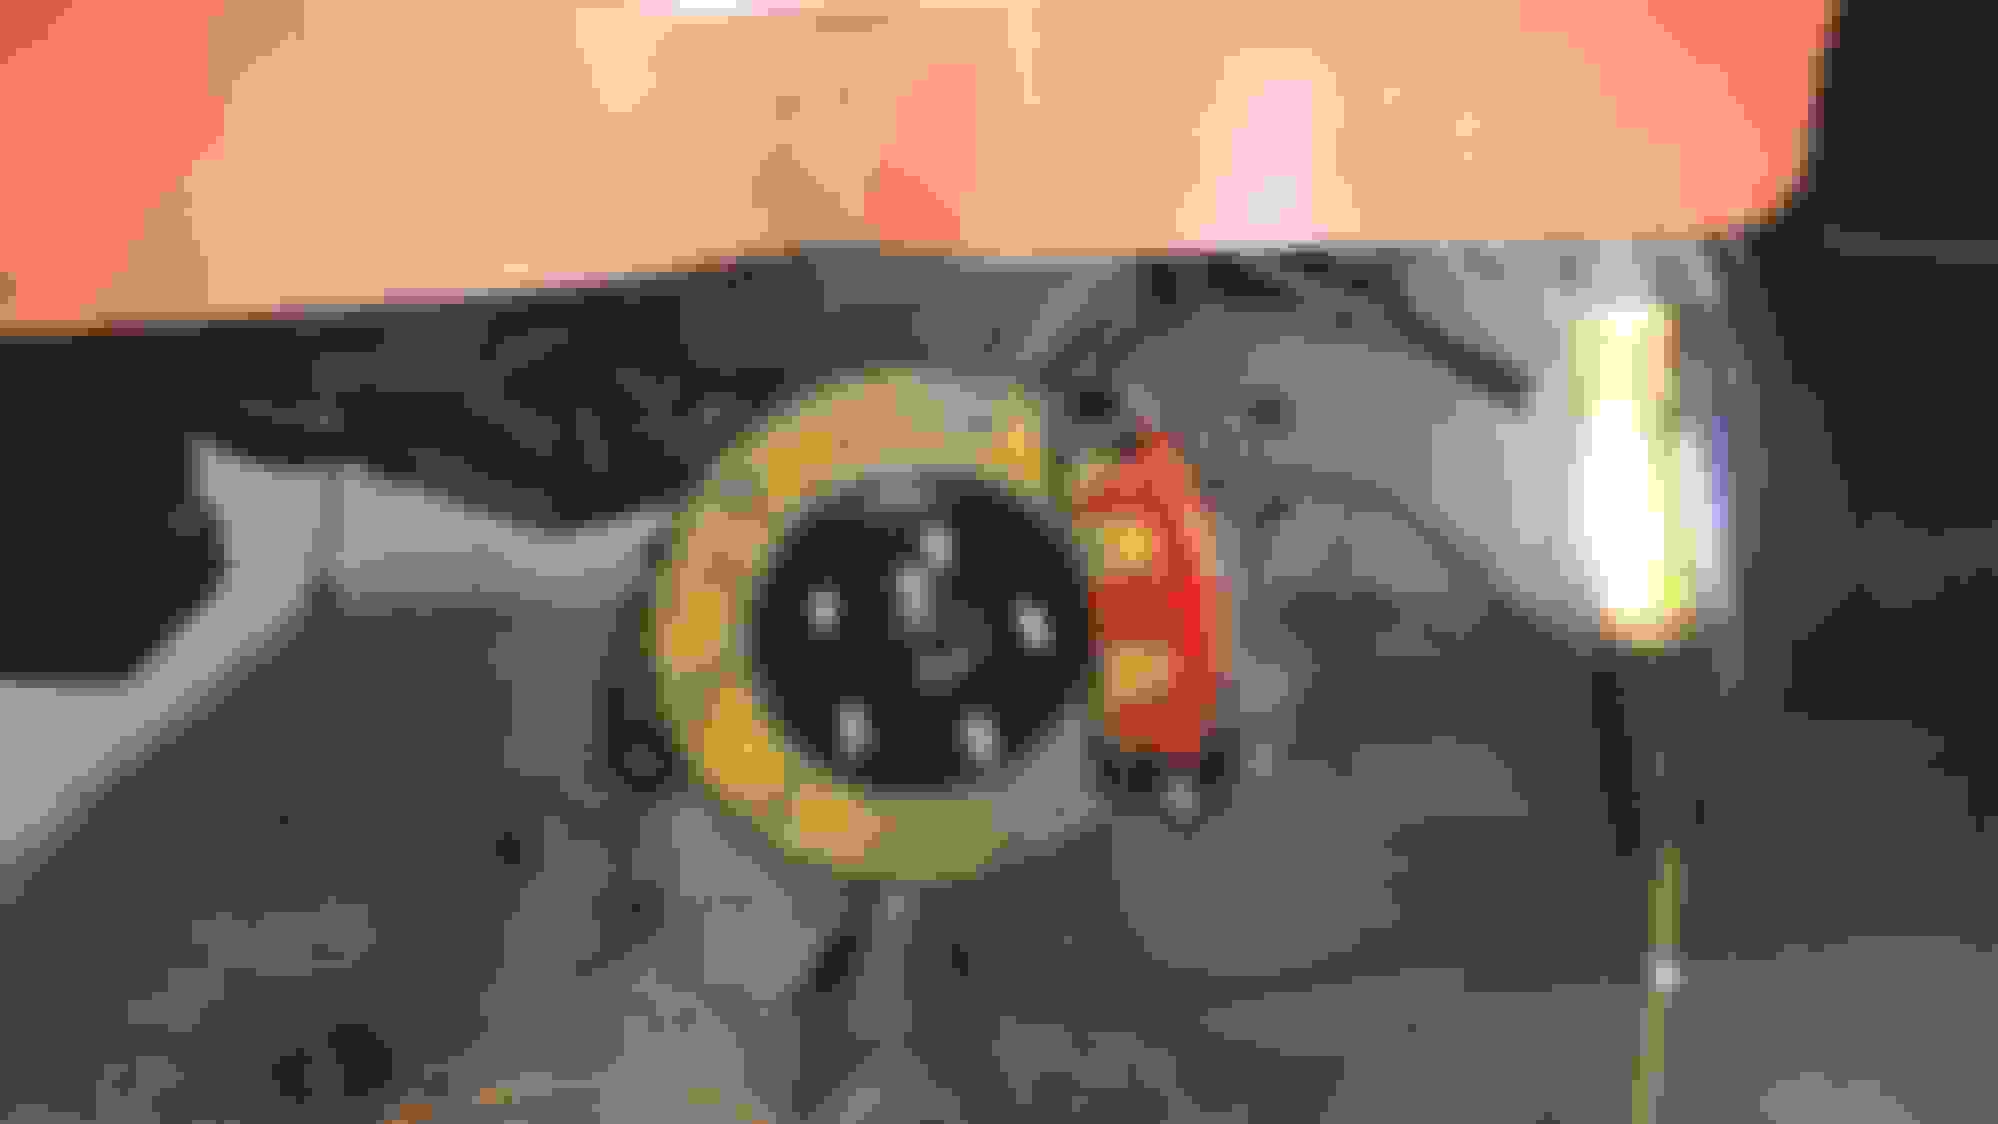
I can't believe I forgot to post up a pic of the "finished" result. I still need to get all the final things finished on these but they are pretty darn close. The rotors are used and have some surface rust but if they give me any problems in the future I'll go ahead and buy some new ones
No rear housing yet, so I will keep focusing on the front of the car and hopefully get the back together whenever the parts get here.
I got some more work done on the front brakes and it looks like I'm going to need some new hard lines because all the nuts are rounded (I've never touched them myself so I take no responsibility).
There must be 1/4" of grime on there.
The floor pans are looking like they need to be replaced while I have everything else apart.
I'm leaning towards replacing all the brake lines and the fuel line now, as well as the floor pans and body bushings. I may pull the front clip off at some point as well. There is just too much I'm finding that I really don't want to neglect when I have the car apart at this time. I'm not talking about a full on concourse restoration but a good solid refresh and maybe replacement of parts that need it.
Pretty easy so far in the front because I put a ton of that foaming degreaser on it over the last few weeks.
The project is growing in scope but I really want to do this once and do it right. Like I've said before its my first car and I've had it for 15 years and I don't mind doing a bit more than a quick job of this. The front clip is going to be pulled off and I'm going to start working on the body mounts so I can pull the body off.
Jessica
Had a few hours to kill last night so I went out to clean the frame and ended up getting really annoyed with having to climb over the fender to get in the engine bay. I took some things off to make life a little easier.
It took almost exactly 2 hours to pull it all and bag the parts and kind of organize the pieces. So now I can clean the frame easier and get started on the rest of the body mounts. The front end must have been missing 60% of the bolts it needed. The only parts that were correctly fastened were ones I've had off before and put new hardware on haha. I also only broke one bolt in the process, and it was a fender bolt the core support body mounts came right now with no problems even.
If u can remember, make a note of what shims went where on nose and it will make assembly so much easier. You can also buy a pre bent brakeline kit for cheap. Looks like you are moving right along!
If u can remember, make a note of what shims went where on nose and it will make assembly so much easier. You can also buy a pre bent brakeline kit for cheap. Looks like you are moving right along!
Trying to keep track of things is pretty high on my list Unfortunately, I ran out of baggies before I got to taking the fenders off; so I just shot the bolts with PB blaster until they were cleaned and then reinstalled them with the shims after I took the fenders off. I think I'll have a lot of work just getting things lined up again the core support was about 1" lower on one side because of a broken/collapsed body mount bushing (and all the panels were lined up well go figure).
Went out to a movie last night so I didn't get much done, but I did grab a wire brush off the shelf and tried to remove some of the crud with my drill. I think it turned out pretty good for 10 minutes of work. Now I just need a few hours to devote to this thing!
I wiped it down with paint thinner to cut some of the grease and undercoat then started with the drill. So I'll tackle this next (and also figure out where to put all the parts, some might be coming in the house).
Started to pull the interior. I rewired the car in the rain in a driveway in college over a weekend with my Dad so I think I'll be pulling the dash to tidy up the wiring we did as well as the stereo wiring. The rest of the interior should be pulled by this weekend if I don't get too busy going out.
Starting work on the floors now. I've decided to get 2 floor sections (right and left) and then clean everything else that isn't getting cut out so I can start over with a self etching primer and then bed liner over that. I'll be installing carpet in the cab but in the trunk I'll just leave it bed liner.
Jessica
Pulled the dash, and I installed some plugs so I ca now pull the cluster a lot easier in the future. I also had to pull the wire ties to get the dash off so I've got a lot of clean up to do now
First one out
Both removed, getting some used ones that aren't modified so I can go back to a stock seat bracket.
And how I left it on Sunday
I still can't get the cross brace out but I can't see any more spot welds so I think its just a matter of trying to pry it out harder or to hit the edges of the spot welds with a chisel or something to break them free. Once I get that brace off I can get some new pans in there and measure how much to cut out and start installing them.


 01-06-2015, 11:16 AM


 There is a method to my madness even if I don't always explain myself completely. I'm just glad to see that I get a ton of great info thrown my way just by being on this forum! Its been a huge help along the way.


 ).
).