Conversions & Swaps LSX Engines in Non-LSX Vehicles
Sponsored by:
Sponsored by:

Fox LQ4 S475

Thread Tools
 
Search this Thread
 
Old 09-08-2015, 06:13 PM
  #1  
Teching In
Thread Starter
iTrader: (1)
 
quickspool's Avatar
 
Join Date: Nov 2014
Posts: 36
Likes: 0
Received 0 Likes on 0 Posts
Default Fox LQ4 S475

I started this project in November. I have always wanted to build a Fox body, but never had the money. My first Fox was as a senior in high school. I have had a few since. But here is my latest.
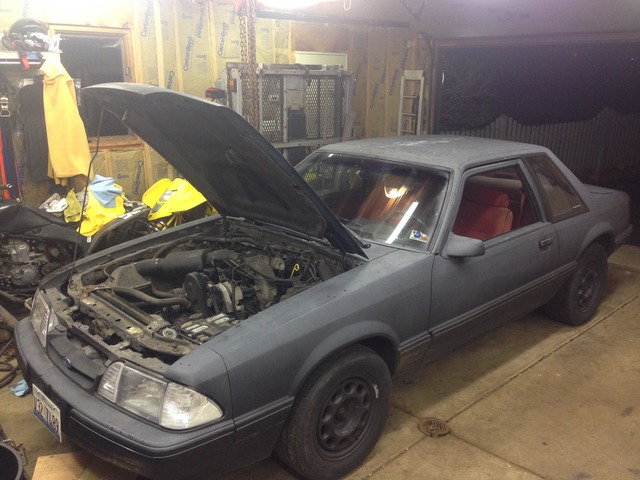
Name:  119.jpg
Views: 1040
Size:  95.1 KB
89 notch Texas car
Old 09-08-2015, 07:41 PM
  #2  
Teching In
Thread Starter
iTrader: (1)
 
quickspool's Avatar
 
Join Date: Nov 2014
Posts: 36
Likes: 0
Received 0 Likes on 0 Posts
Default

Name:  104_1.jpg
Views: 895
Size:  106.7 KB
Name:  101.jpg
Views: 903
Size:  109.3 KB

2002 LQ4 with 2WD 4L80

Further inspection came up bad. The cylinder walls were scored and the block needed to be bored .010 over minimum. This was not good news because my plans were to use a stock short block and 317 heads. I had the machine shop tumble the block and then I sold the long block to a friend of mine.

Last edited by quickspool; 09-08-2015 at 09:12 PM.
Old 09-08-2015, 07:48 PM
  #3  
Teching In
Thread Starter
iTrader: (1)
 
quickspool's Avatar
 
Join Date: Nov 2014
Posts: 36
Likes: 0
Received 0 Likes on 0 Posts
Default

Name:  120.jpg
Views: 875
Size:  112.0 KB

So I bought a 2006 LQ4. It had low miles and the later version had stronger rods and pistons.

Name:  365.jpg
Views: 1042
Size:  131.6 KB
I went through all of the bottom end replacing all bearings and rings. I ordered a custom bullet cam for use with the S475 and stock heads, installed ARP head studs, single roller timing chain, LS7 lifters, Melling oil pump, and a GM performance muscle car pan.
Old 09-08-2015, 07:54 PM
  #4  
Teching In
Thread Starter
iTrader: (1)
 
quickspool's Avatar
 
Join Date: Nov 2014
Posts: 36
Likes: 0
Received 0 Likes on 0 Posts
Default

Name:  IMG_0707.jpg
Views: 861
Size:  124.0 KB

Name:  370.jpg
Views: 848
Size:  98.5 KB

Name:  IMG_0714.jpg
Views: 867
Size:  106.3 KB


I had the 317 heads gone through. We decided to install PAC spring kit with titanium retainers and keepers. I did the trunion upgrade.
Old 09-08-2015, 08:01 PM
  #5  
Teching In
Thread Starter
iTrader: (1)
 
quickspool's Avatar
 
Join Date: Nov 2014
Posts: 36
Likes: 0
Received 0 Likes on 0 Posts
Default

Name:  IMG_0835.jpg
Views: 874
Size:  121.3 KB
Name:  image.jpg3.jpg
Views: 871
Size:  98.3 KB

Fast forward three months and it is all assembled. I decided against using the Factory ecu and went with a Holley Dominator EFI, DEKA 80lb injectors (for now), a Edelbrock pro flow intake and throttle body, Holley valve covers and as of now I am using the truck spacing on the accessories.
Old 09-08-2015, 08:09 PM
  #6  
Teching In
Thread Starter
iTrader: (1)
 
quickspool's Avatar
 
Join Date: Nov 2014
Posts: 36
Likes: 0
Received 0 Likes on 0 Posts
Default

Name:  image.jpg5.jpg
Views: 1249
Size:  89.9 KB
Name:  image.jpg4.jpg
Views: 1040
Size:  84.3 KB
Name:  image.jpg6.jpg
Views: 897
Size:  98.6 KB
I fabricated the hot side out of 2.25" 304 using V-bands on some factory manifolds. It is feeding a T6 divided flange and sitting on top is a Borg Warner S475 with a ceramic coated turbine housing.
Old 09-08-2015, 08:17 PM
  #7  
Teching In
Thread Starter
iTrader: (1)
 
quickspool's Avatar
 
Join Date: Nov 2014
Posts: 36
Likes: 0
Received 0 Likes on 0 Posts
Default

Name:  image.jpg7.jpg
Views: 836
Size:  84.8 KB
I initially installed the 4L80e because the of the Holley control feature, street ability, and coolness factor. But one quote of a built 4l80e shot that idea completely out the window. So I decided to have Finish Line Perfromance build me a TH400 with some goodies including a circle d convertor, reactor flexplate, JW ultra bell, brake, etc...
Old 09-08-2015, 08:25 PM
  #8  
Teching In
Thread Starter
iTrader: (1)
 
quickspool's Avatar
 
Join Date: Nov 2014
Posts: 36
Likes: 0
Received 0 Likes on 0 Posts
Default

Name:  159.jpg
Views: 852
Size:  100.2 KB

Name:  162.jpg
Views: 863
Size:  99.4 KB

Name:  IMG_0342.jpg
Views: 855
Size:  108.7 KB

Name:  IMG_0426.jpg
Views: 865
Size:  108.4 KB

Out back I decided to stick with an 8.8. I installed Strange 35 spline c-clip eliminator axles with a spool and 3.27 Ford Motorsport gears. I may be forgetting a few goodies.
Old 09-08-2015, 08:49 PM
  #9  
Teching In
Thread Starter
iTrader: (1)
 
quickspool's Avatar
 
Join Date: Nov 2014
Posts: 36
Likes: 0
Received 0 Likes on 0 Posts
Default

Name:  097.jpg
Views: 888
Size:  113.0 KB

Two 40mm Turbosmart wastegates

Name:  IMG_1278.jpg
Views: 857
Size:  104.0 KB

60mm Turbosmart BOV

Name:  110.jpg
Views: 867
Size:  108.4 KB

FPR2000 Turbosmart fuel pressure regulator

I dont have any pictures of the tank, but I am using a Aeromotive eliminator pump in an Aeromotive stealth fuel tank using 10an feed line into an Aeromotive Y block coming out dual 8an feeding the front of the fuel rails and ending out the back into the fpr. As many know these fittings can add up. I have have been using mostly redhorse and although chinese the quality is hands down better than most imported fittings.
Old 09-08-2015, 09:10 PM
  #10  
Teching In
Thread Starter
iTrader: (1)
 
quickspool's Avatar
 
Join Date: Nov 2014
Posts: 36
Likes: 0
Received 0 Likes on 0 Posts
Default

Name:  112.jpg
Views: 919
Size:  112.8 KB

Name:  219_1.jpg
Views: 965
Size:  111.1 KB

Name:  216_1.jpg
Views: 913
Size:  116.2 KB


As far as the cold side goes everything is vbands except for the throttle body elbow. It is 4" out of the turbo flowing through a Chiseled Performance 1500hp intercooler. The downpipe is 5" 11ga aluminum coming out in front of the right front tire. The radiator is a champion cross flow with dual Squall fans using 16an braided hose to a factory water pump.

I dont seem to have pictures of all of the intercooler piping welded out and the intercooler and radiator mounts done. But i will post them up some time soon. This is currently where the car is as of now. I have to wire the car and finish the cooling system before I can start it. but it is close. I will update this thread as I continue. Also I left out the chassis, suspension and brakes as they don't really pertain to the LS swap, but I did install full TeamZ front and rear suspension and a pre bent and notched cage that has been installed, inspected and NHRA certified for 8.50. The brakes are Aerospace Pro street all of the way around.

Name:  IMG_1221.jpg
Views: 871
Size:  98.8 KB

Name:  IMG_1236.jpg
Views: 848
Size:  78.5 KB
Old 09-08-2015, 10:25 PM
  #11  
Staging Lane
iTrader: (2)
 
chevydillan's Avatar
 
Join Date: Feb 2010
Posts: 75
Likes: 0
Received 0 Likes on 0 Posts

Default

Very nice work.
Old 09-08-2015, 10:53 PM
  #12  
Teching In
Thread Starter
iTrader: (1)
 
quickspool's Avatar
 
Join Date: Nov 2014
Posts: 36
Likes: 0
Received 0 Likes on 0 Posts
Default

Originally Posted by chevydillan
Very nice work.
Thank you
Old 09-09-2015, 10:03 PM
  #13  
9 Second Club
iTrader: (9)
 
Bowtiedford's Avatar
 
Join Date: Apr 2011
Location: Indian Rocks Beach Fl
Posts: 1,059
Likes: 0
Received 0 Likes on 0 Posts
Default

looks good!
Old 09-09-2015, 11:23 PM
  #14  
TECH Addict
iTrader: (80)
 
dmracing's Avatar
 
Join Date: Apr 2007
Location: HERE
Posts: 2,216
Received 8 Likes on 6 Posts

Default

How did you run your turbo drain?
Old 09-10-2015, 09:32 AM
  #15  
TECH Addict
iTrader: (80)
 
dmracing's Avatar
 
Join Date: Apr 2007
Location: HERE
Posts: 2,216
Received 8 Likes on 6 Posts

Default

Also could you get a pic of the turbo outlet feeding the tubing to the cooler
Old 09-10-2015, 03:44 PM
  #16  
On The Tree
iTrader: (4)
 
trey04gto's Avatar
 
Join Date: Nov 2006
Location: OKC
Posts: 192
Likes: 0
Received 0 Likes on 0 Posts
Default

Jealous of the hotside work... I have a very similar project, can you share some advice/pics of how you dealt with fitting the turbo and the oil drain?
Old 09-10-2015, 08:50 PM
  #17  
Teching In
Thread Starter
iTrader: (1)
 
quickspool's Avatar
 
Join Date: Nov 2014
Posts: 36
Likes: 0
Received 0 Likes on 0 Posts
Default

Originally Posted by dmracing
How did you run your turbo drain?
Name:  009_1.jpg
Views: 860
Size:  102.5 KB

Its a Wolfe Racecraft billet 10an turbo return. It also comes in 12an. Very nice piece and it tuck it up closer to the turbo versus a npt flange with a npt to an adapter. Its tight, I'm not going to lie...

Here is the link
http://www.wolferacecraft.com/detail.aspx?ID=844
Old 09-10-2015, 08:52 PM
  #18  
Teching In
Thread Starter
iTrader: (1)
 
quickspool's Avatar
 
Join Date: Nov 2014
Posts: 36
Likes: 0
Received 0 Likes on 0 Posts
Default

Originally Posted by dmracing
Also could you get a pic of the turbo outlet feeding the tubing to the cooler
Name:  008_1.jpg
Views: 831
Size:  103.2 KB

Name:  010_1.jpg
Views: 862
Size:  71.1 KB

Name:  011_1.jpg
Views: 853
Size:  90.9 KB

I just took these, I hope they help.
Old 09-10-2015, 09:00 PM
  #19  
Teching In
Thread Starter
iTrader: (1)
 
quickspool's Avatar
 
Join Date: Nov 2014
Posts: 36
Likes: 0
Received 0 Likes on 0 Posts
Default

Originally Posted by trey04gto
Jealous of the hotside work... I have a very similar project, can you share some advice/pics of how you dealt with fitting the turbo and the oil drain?
As far as advice with fitting the turbo. I MADE it fit, LOL. I placed the turbo in various different spots and weighed out the pro's and con's of each. Honestly I wanted the inlet to face front and center but that would KILL the street ability. This is essentially the easiest spot to mount that dumpster *** sized turbo for me at least. I will be making a 3.5" down pipe that goes dual 2.5" out the back one day.
Old 09-10-2015, 09:52 PM
  #20  
TECH Addict
iTrader: (80)
 
dmracing's Avatar
 
Join Date: Apr 2007
Location: HERE
Posts: 2,216
Received 8 Likes on 6 Posts

Default

Thank you, was wondering because...
Name:  2015-09-08_17-18-41_71_zpsb3elv5ut.jpg
Views: 870
Size:  250.0 KB


Quick Reply: Fox LQ4 S475


All times are GMT -5. The time now is 09:26 PM.