

70 Chevelle LS swap on a college budget
 08-10-2021, 03:32 PM
#1
Hey guys,
This is something I've been wanting to do for some time! I think the project is far enough along now that I have a good amount of pictures and information to share.
First a little about me and about the car. The car is a 1970 Chevelle originally from California, it was originally a Mailbu but I have since taken some steps towards making it an SS clone.
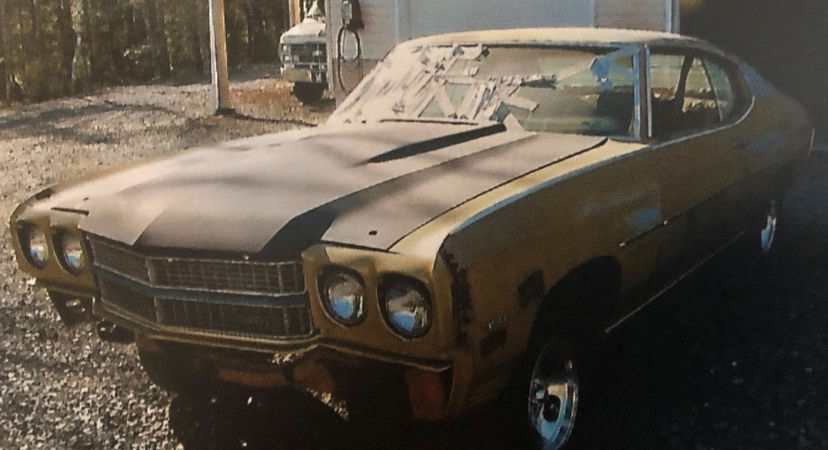
The car started out gold but is now in dark grey epoxy primer and has been for the better part of 10 years, which is about how long I have owned the car (somewhere between 10-12 years but the exact details are a bit fuzzy). Now 10-12 years might be quite a long time to own a car and I agree, but I'm sure some of you are looking at the title and thinking college budget? Owned for 10+ years? something isn't adding up. Well actually it is, I have owned the car since I was 9 or 10 and I'm now 21 just finishing my bachelors degree in university. The car was/is a father and son project that we had finished for the time I was 16. In that finished state which I'll call stage 1, the car had a 350 with some better heads, a 3/4 race cam and an edelbrock torquer 2 intake. This was all backed by a th350 trans with a shift kit and switched between a 12 bolt posi with 4.11:1 gears and a 10 bolt posi with 3.08:1 gears with mainly the 10 bolt in for the last few years for easier highway driving.
Now onto stage 2 of the build. The idea here was that I wanted a car that would be a decently fast drag car and also be able to cruise on the highway. So I started thinking about an overdrive transmission. That researching led me to the 4L80E, something strong enough to hold some power and still overdrive (no 6 speed for this car because I couldn't bring myself to cut the mint California floors). I began reading about LS swaps and I thought it would be cool to do something that is super uncommon in my area. I stumbled across a cube van (2005 GMC Savana 3500) with a 6.0L and a 4L80E for a good price and snapped it up.

After a quick test to make sure the engine ran and the trans went through all the gears, we got to work!
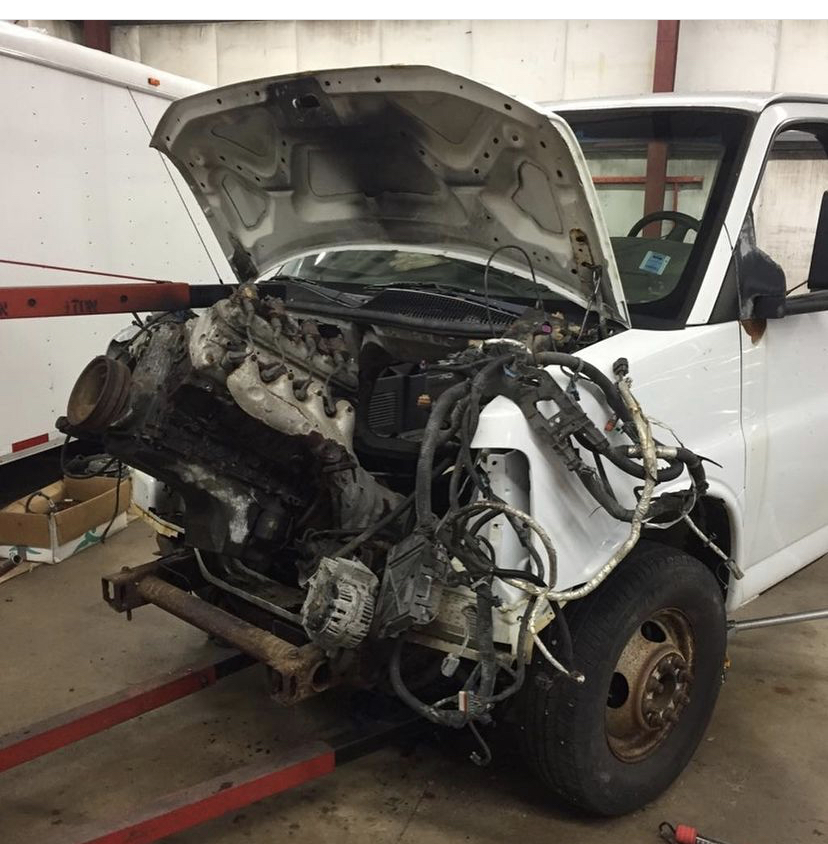
The engine, transmission, wiring harness and ECU were pulled out for the project.
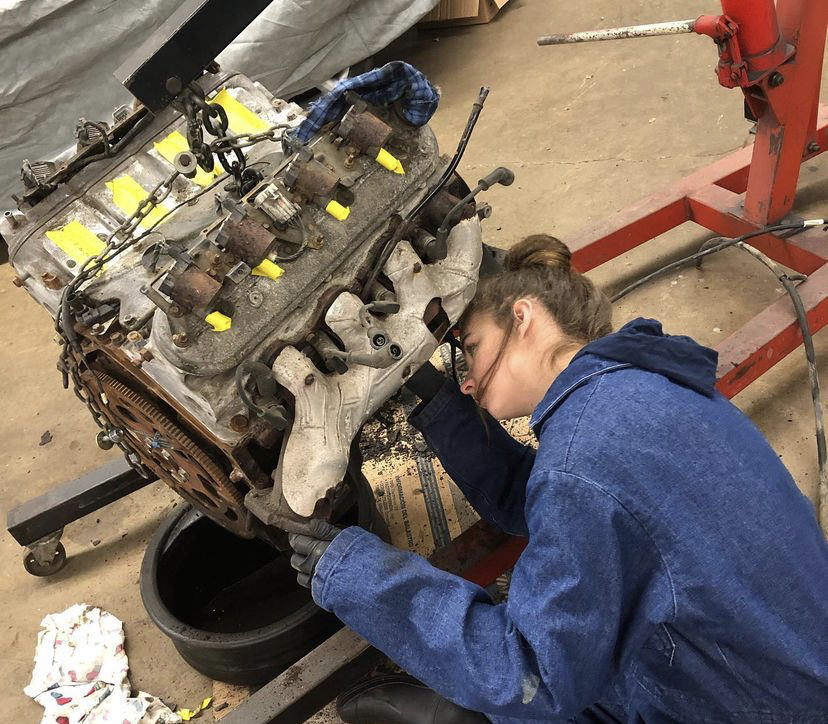
With some help from my girlfriend we got the engine cleaned up!
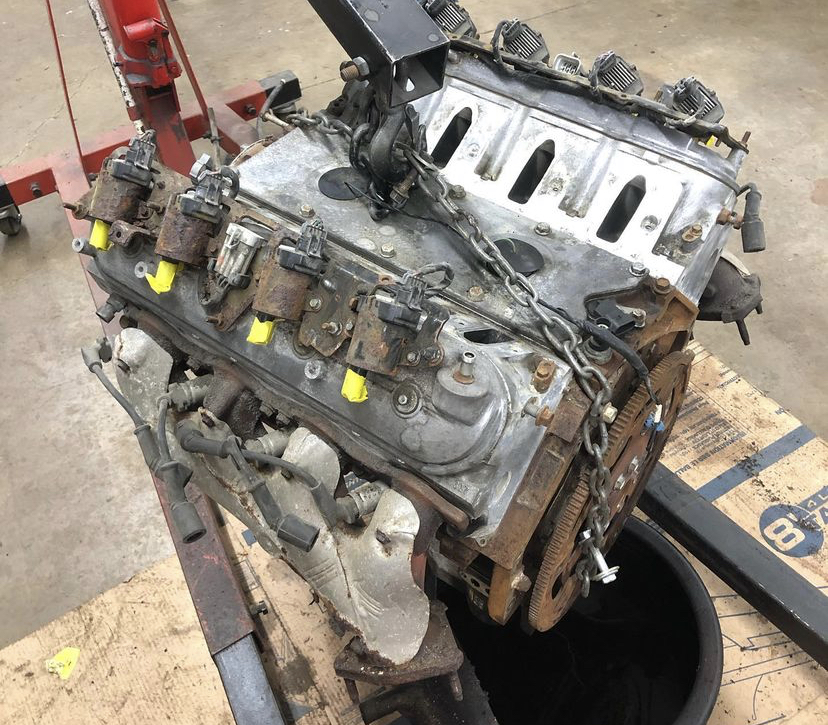
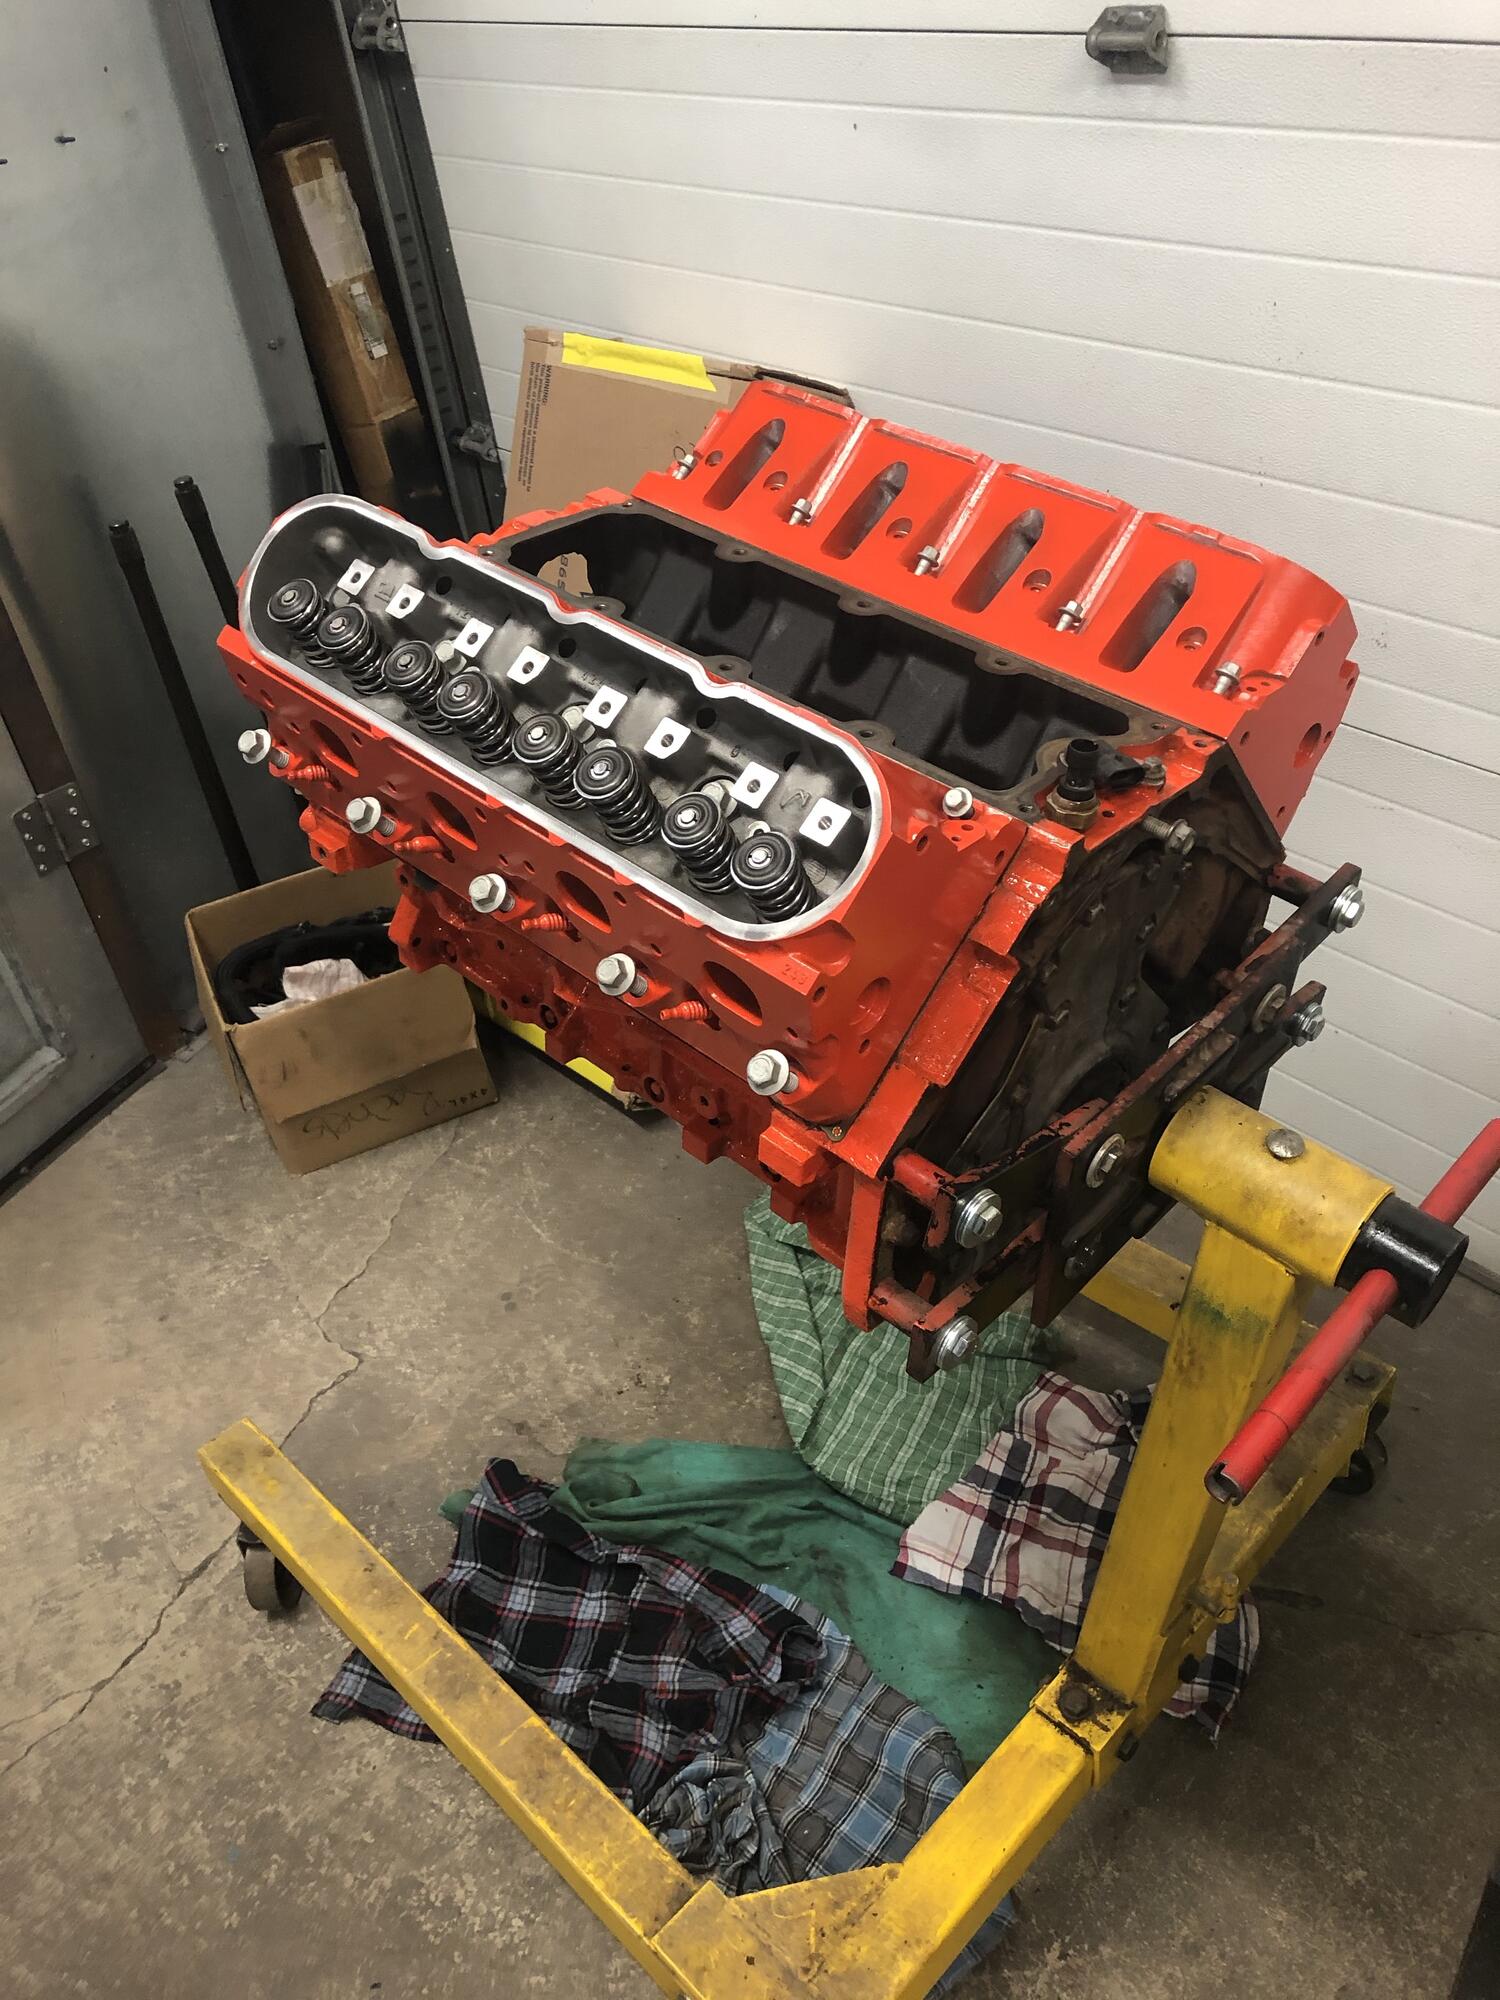
Next it was time for some upgrades. I switched from 317 heads to 243's, new main and rod bearings and a Tick Performance SNS stage 2 cam

A little more help with lapping the valves
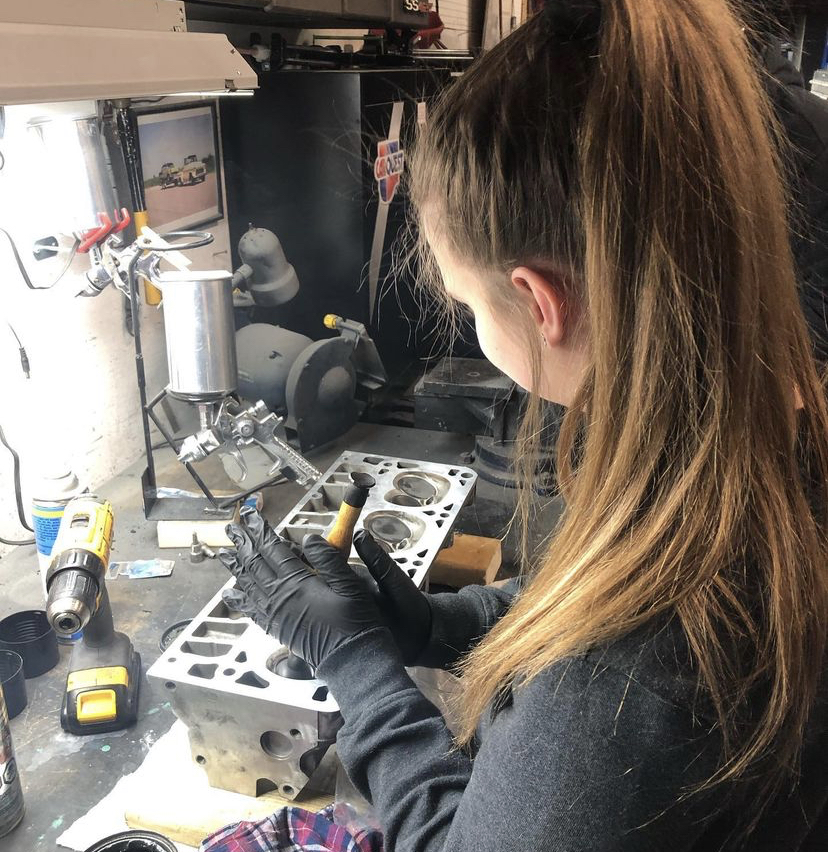
And installing the new springs

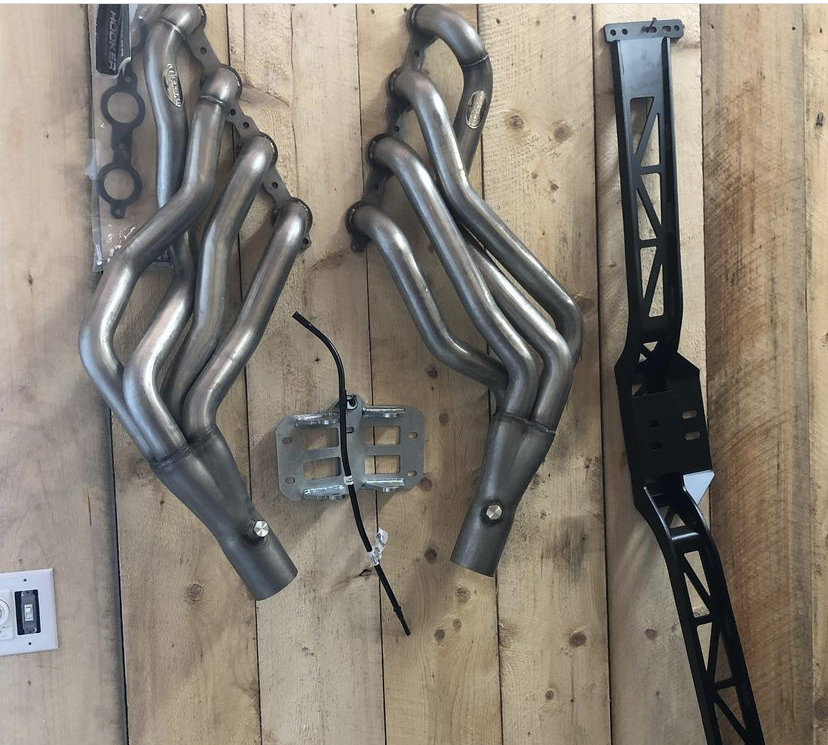
I also picked up a few pieces for later. Hooker headers, Holley/hooker motor mounts and trans crossmember
I was planning on running a trailblazer SS intake but I decided to run an Edelbrock Victor Jr intake and Holley 4150 style throttle body to try and make the engine look a little more at home in the Chevelle engine bay. The engine then got a nice coat of Chevrolet orange.
This is something I've been wanting to do for some time! I think the project is far enough along now that I have a good amount of pictures and information to share.
First a little about me and about the car. The car is a 1970 Chevelle originally from California, it was originally a Mailbu but I have since taken some steps towards making it an SS clone.
The car started out gold but is now in dark grey epoxy primer and has been for the better part of 10 years, which is about how long I have owned the car (somewhere between 10-12 years but the exact details are a bit fuzzy). Now 10-12 years might be quite a long time to own a car and I agree, but I'm sure some of you are looking at the title and thinking college budget? Owned for 10+ years? something isn't adding up. Well actually it is, I have owned the car since I was 9 or 10 and I'm now 21 just finishing my bachelors degree in university. The car was/is a father and son project that we had finished for the time I was 16. In that finished state which I'll call stage 1, the car had a 350 with some better heads, a 3/4 race cam and an edelbrock torquer 2 intake. This was all backed by a th350 trans with a shift kit and switched between a 12 bolt posi with 4.11:1 gears and a 10 bolt posi with 3.08:1 gears with mainly the 10 bolt in for the last few years for easier highway driving.
Now onto stage 2 of the build. The idea here was that I wanted a car that would be a decently fast drag car and also be able to cruise on the highway. So I started thinking about an overdrive transmission. That researching led me to the 4L80E, something strong enough to hold some power and still overdrive (no 6 speed for this car because I couldn't bring myself to cut the mint California floors). I began reading about LS swaps and I thought it would be cool to do something that is super uncommon in my area. I stumbled across a cube van (2005 GMC Savana 3500) with a 6.0L and a 4L80E for a good price and snapped it up.
After a quick test to make sure the engine ran and the trans went through all the gears, we got to work!
The engine, transmission, wiring harness and ECU were pulled out for the project.
With some help from my girlfriend we got the engine cleaned up!
Next it was time for some upgrades. I switched from 317 heads to 243's, new main and rod bearings and a Tick Performance SNS stage 2 cam
A little more help with lapping the valves
And installing the new springs
I also picked up a few pieces for later. Hooker headers, Holley/hooker motor mounts and trans crossmember
I was planning on running a trailblazer SS intake but I decided to run an Edelbrock Victor Jr intake and Holley 4150 style throttle body to try and make the engine look a little more at home in the Chevelle engine bay. The engine then got a nice coat of Chevrolet orange.

The following 5 users liked this post by 70_velle:
1964SS (11-02-2021), B52bombardier1 (08-11-2021), chevymec (08-10-2021), Chocolate Apocalypse (08-10-2021), G Atsma (08-10-2021)
08-10-2021, 04:30 PM
#2
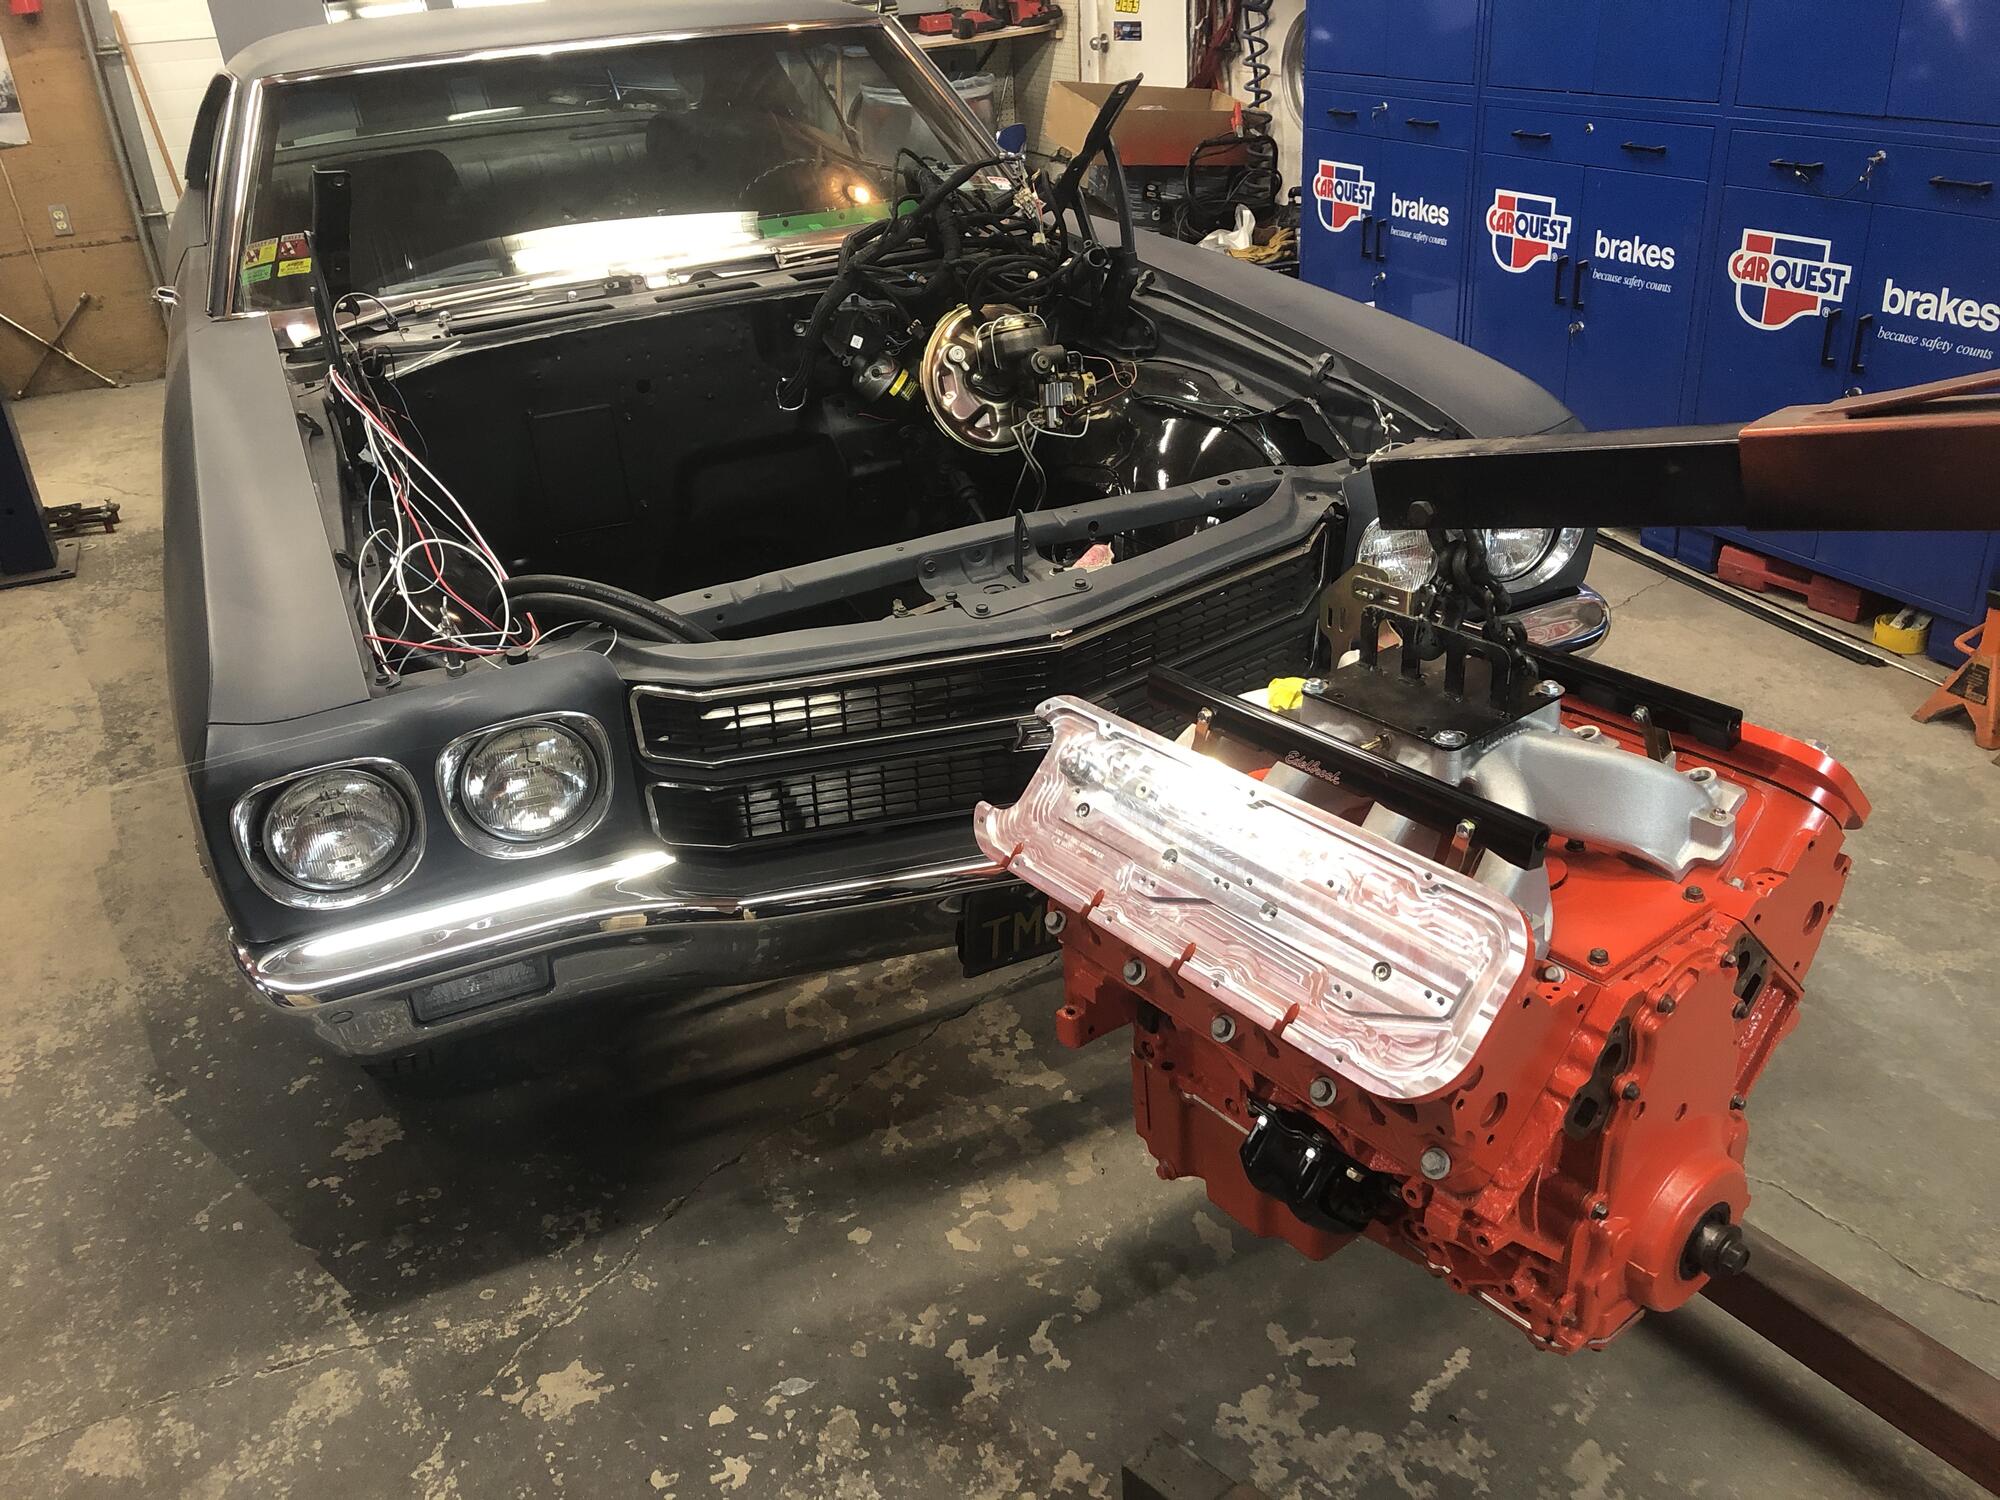
With the 6.0L prepped for install it was time to take the smallblock out of the Chevelle

the foam LS was mocked up

The firewall got a nice cleaning and a fresh coat of paint and we were ready for the LS to go in
Now somewhere between when we started and when we got to this point there was a change in the direction of this build. The original plan was to put the stock 6.0L in the Chevelle as it was and continue on our way. Somehow putting in the vintage air kit that I had for the car ended up with a dash and gauge change and a set of valve cover adapters. Basically when I was installing the vintage air kit, the dash had to come out so I took that opportunity to put an SS style dash in the car (something I had been wanting to do), along with the SS dash came a set of Dakota digital gauges because well why not?
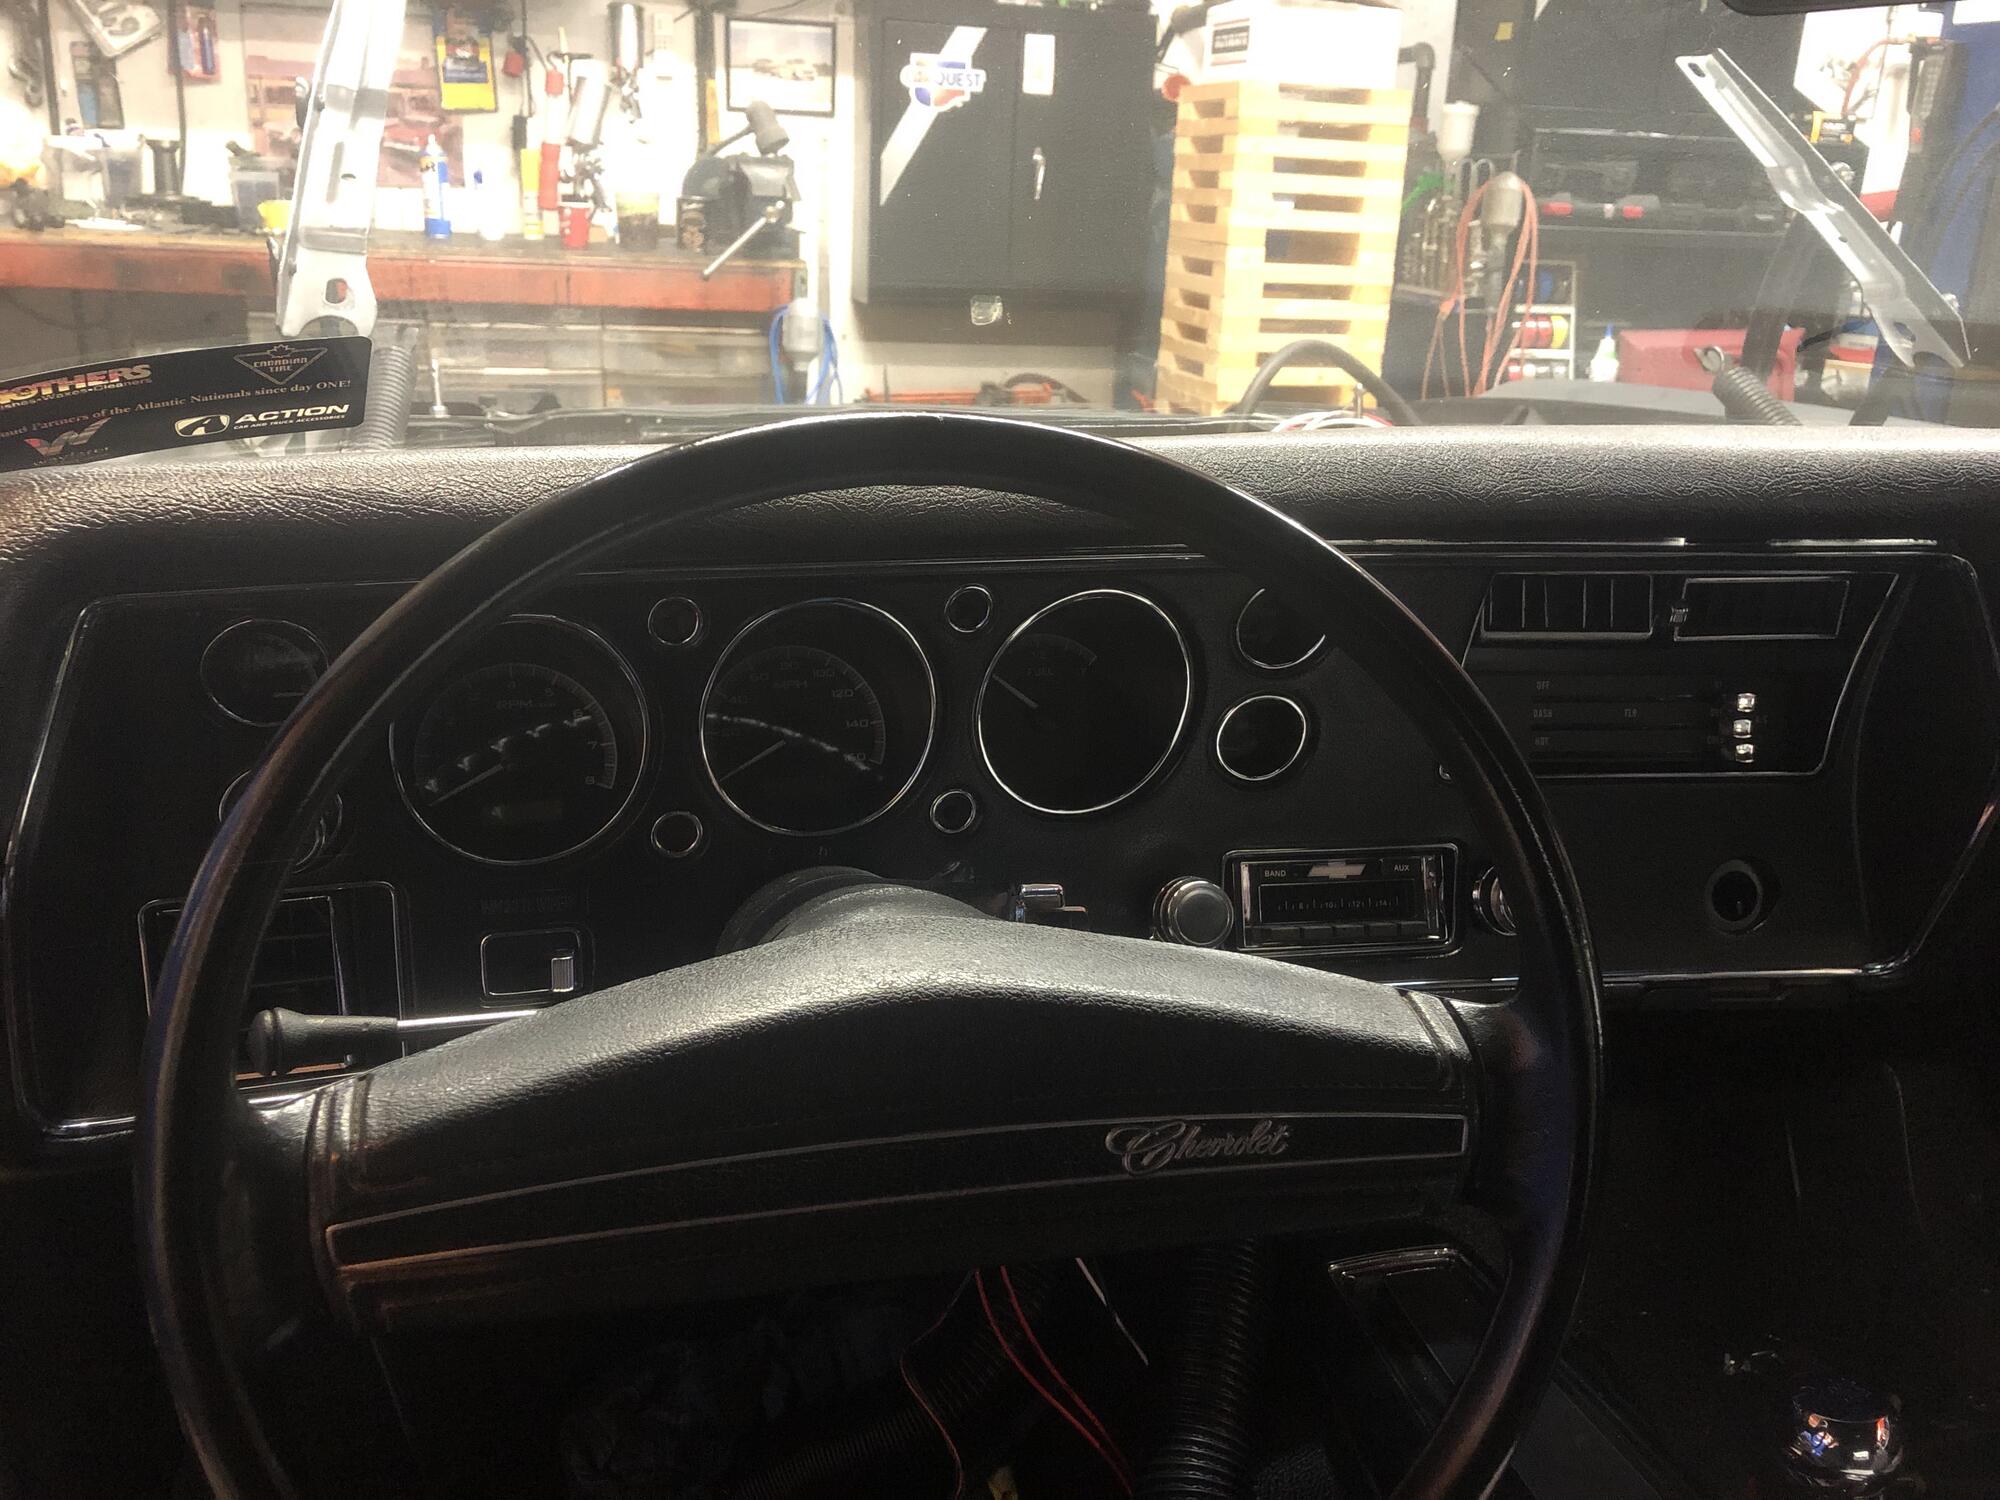
The valve cover adapters are Billet Specialties BBC to LS adapters and I guess they came from a change in views on my part. Somewhere along the way I realized I didn't want to ruin the integrity of a Chevelle and that I wanted the cleanest most classic appearing LS I could realistically make happen. This is also what sparked the SS clone because whats cooler than a 70 Chevelle SS?

I used Holley/Hooker everything (motor mounts, oil pan and headers) for the engine install and honestly it worked flawlessly, definitely one of the pricier LS swap kits but in my opinion its well worth it. The engine went in first try with no screwing around. With the test fit of the foam LS I learned that I couldn't get the drivers side header in with the engine installed so I laid it in the engine bay prior to install (I later learned the header can come of and go back on from underneath the car with the car on a lift).
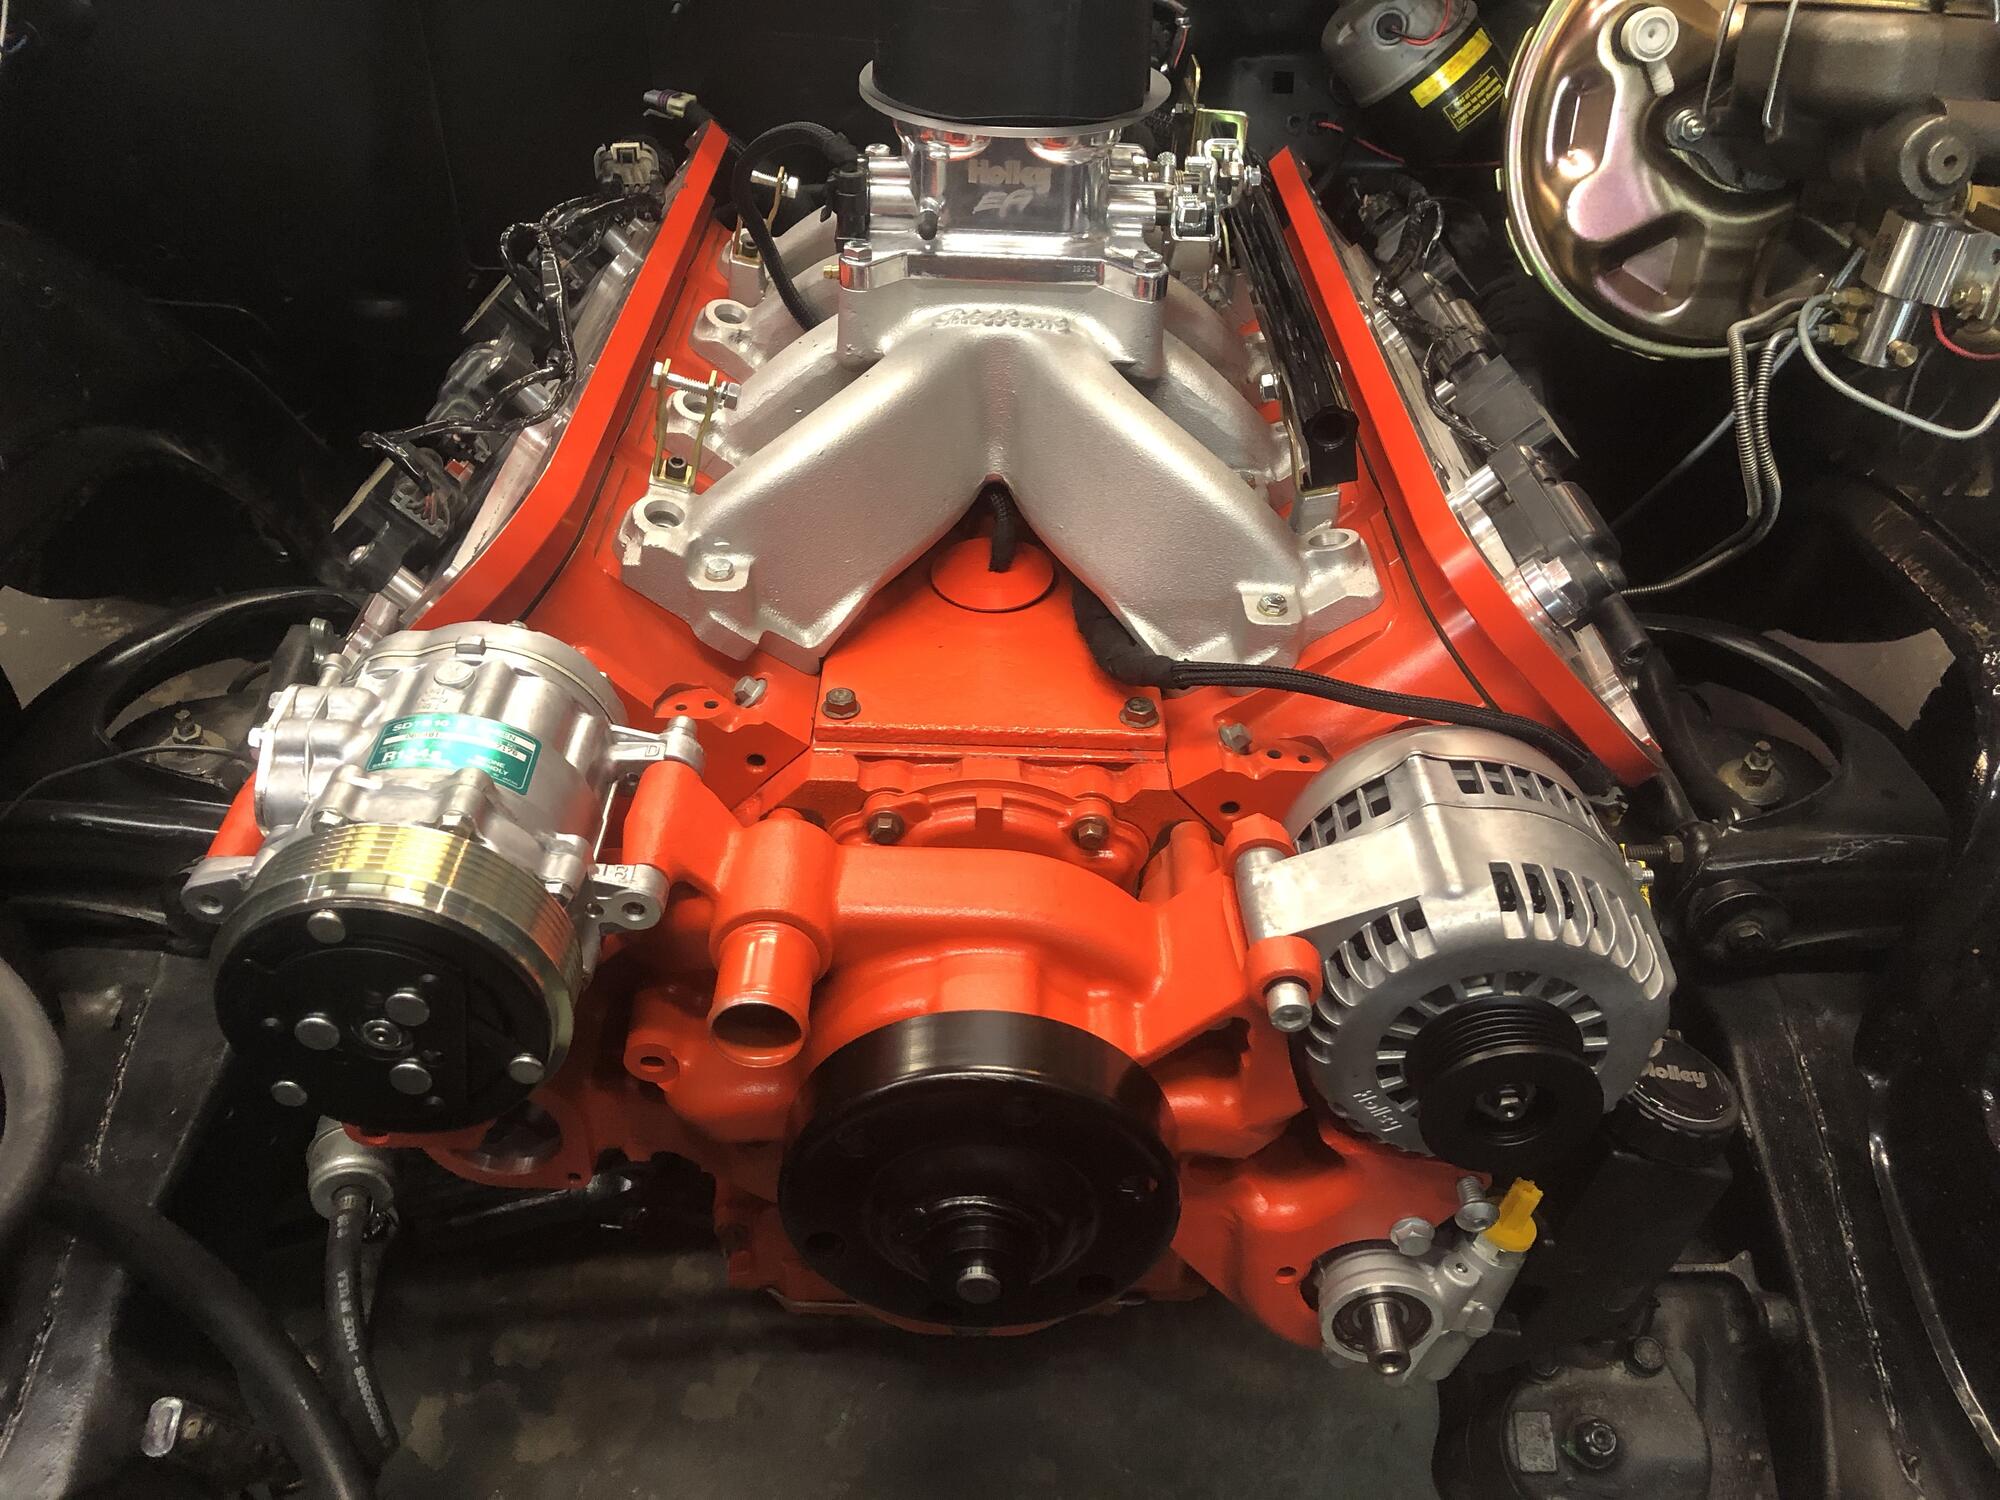
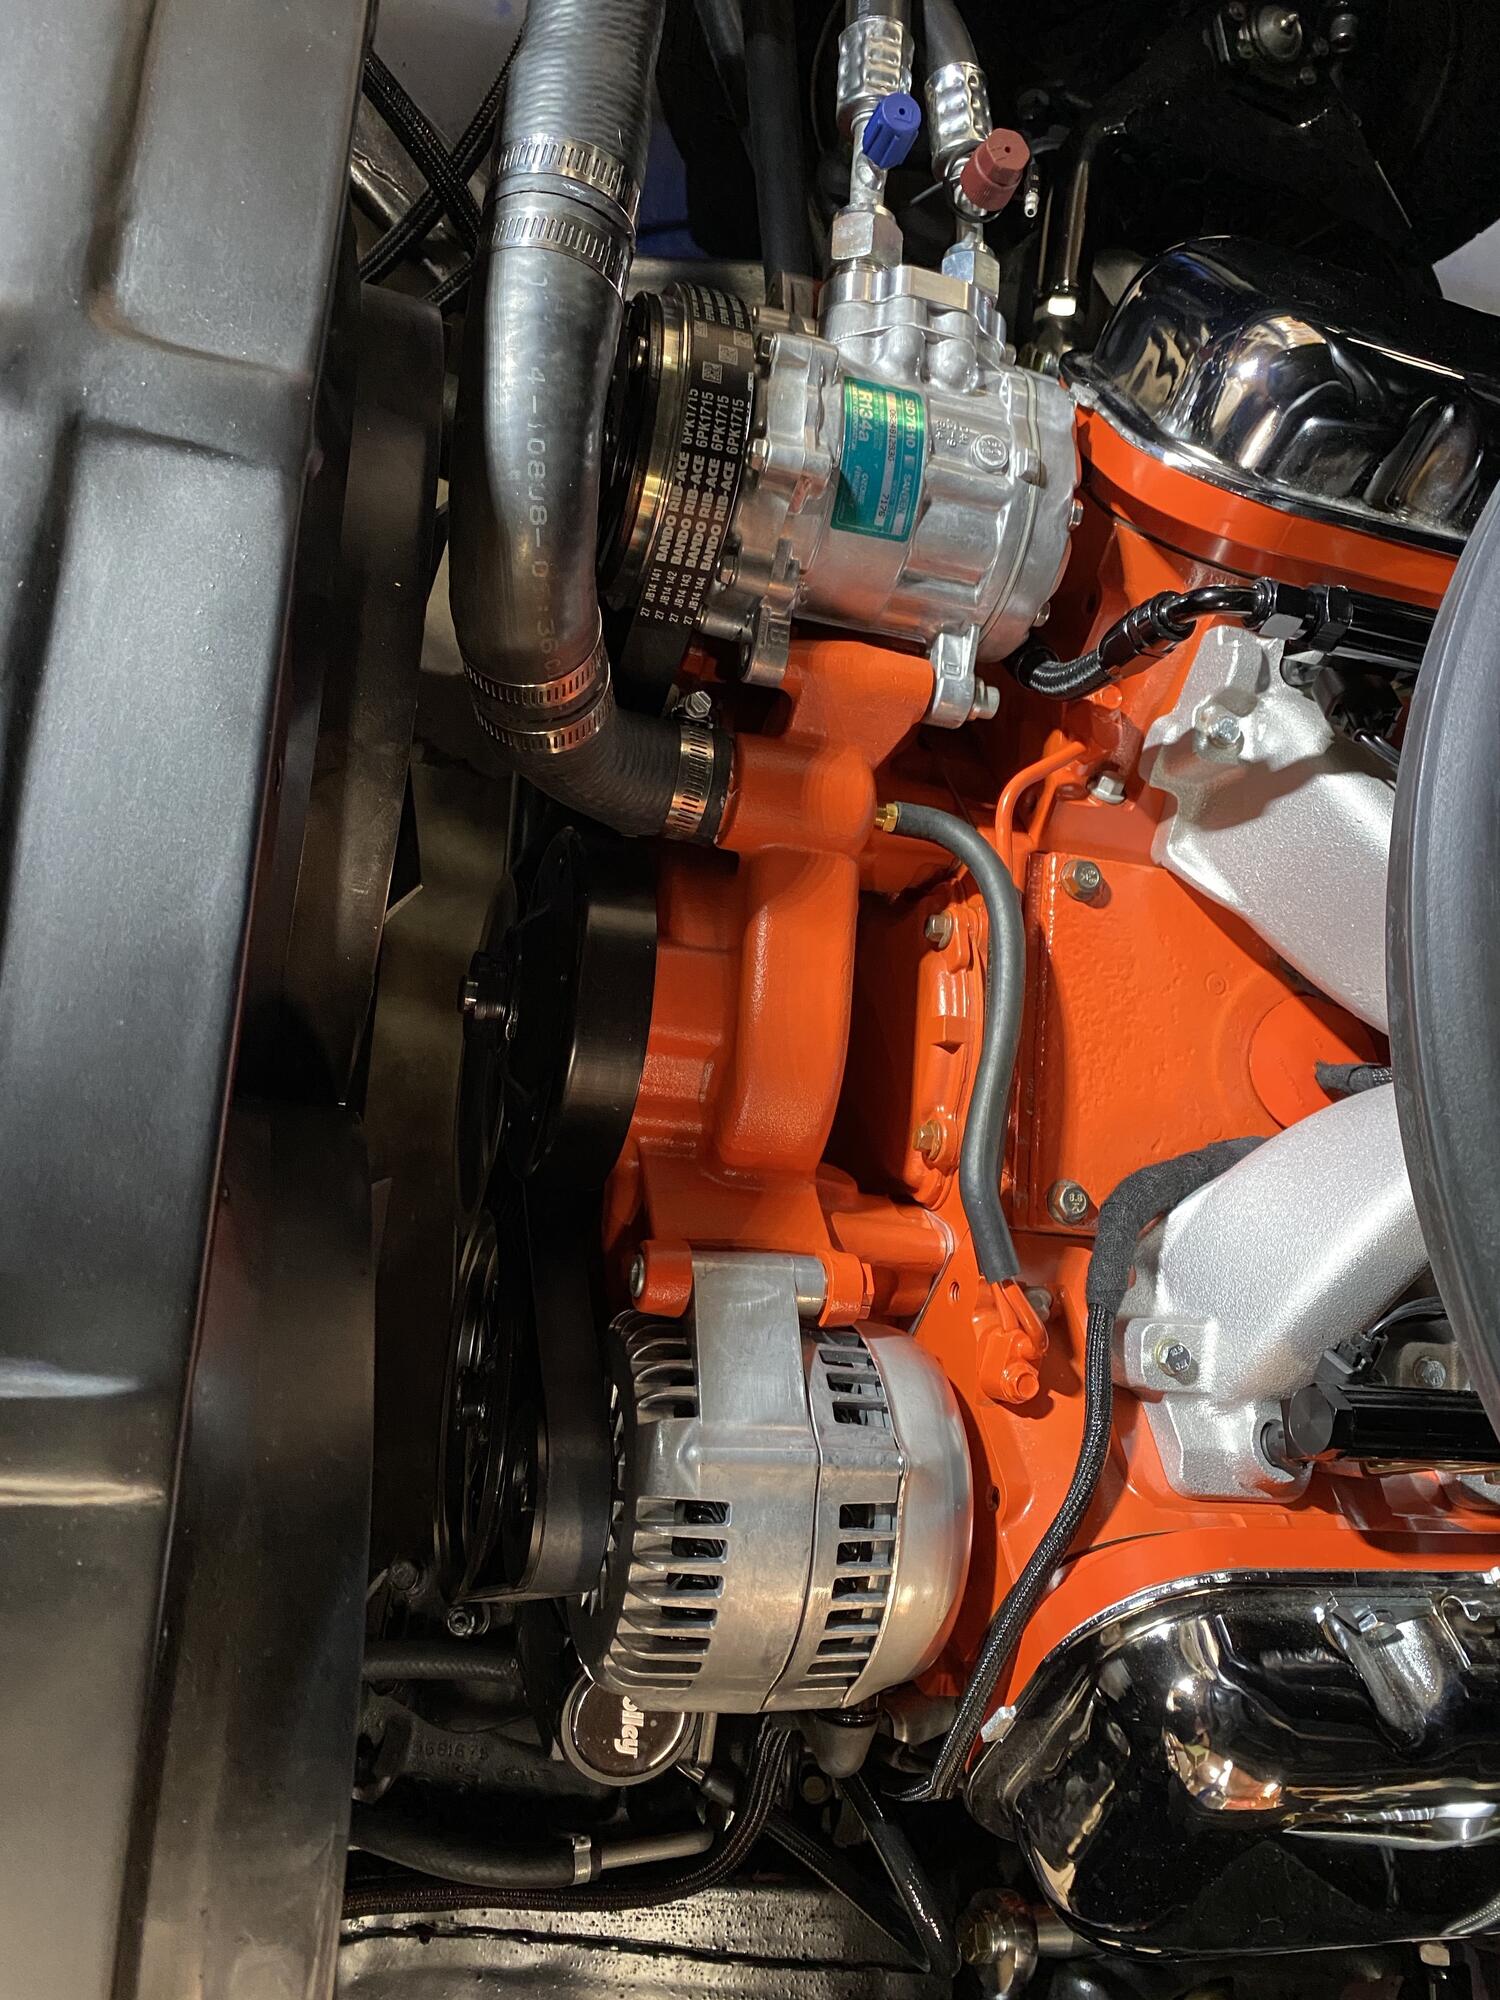
With the engine in, I began mocking up the Holley mid mount accessory drive. It tucks everything up nice and tight.
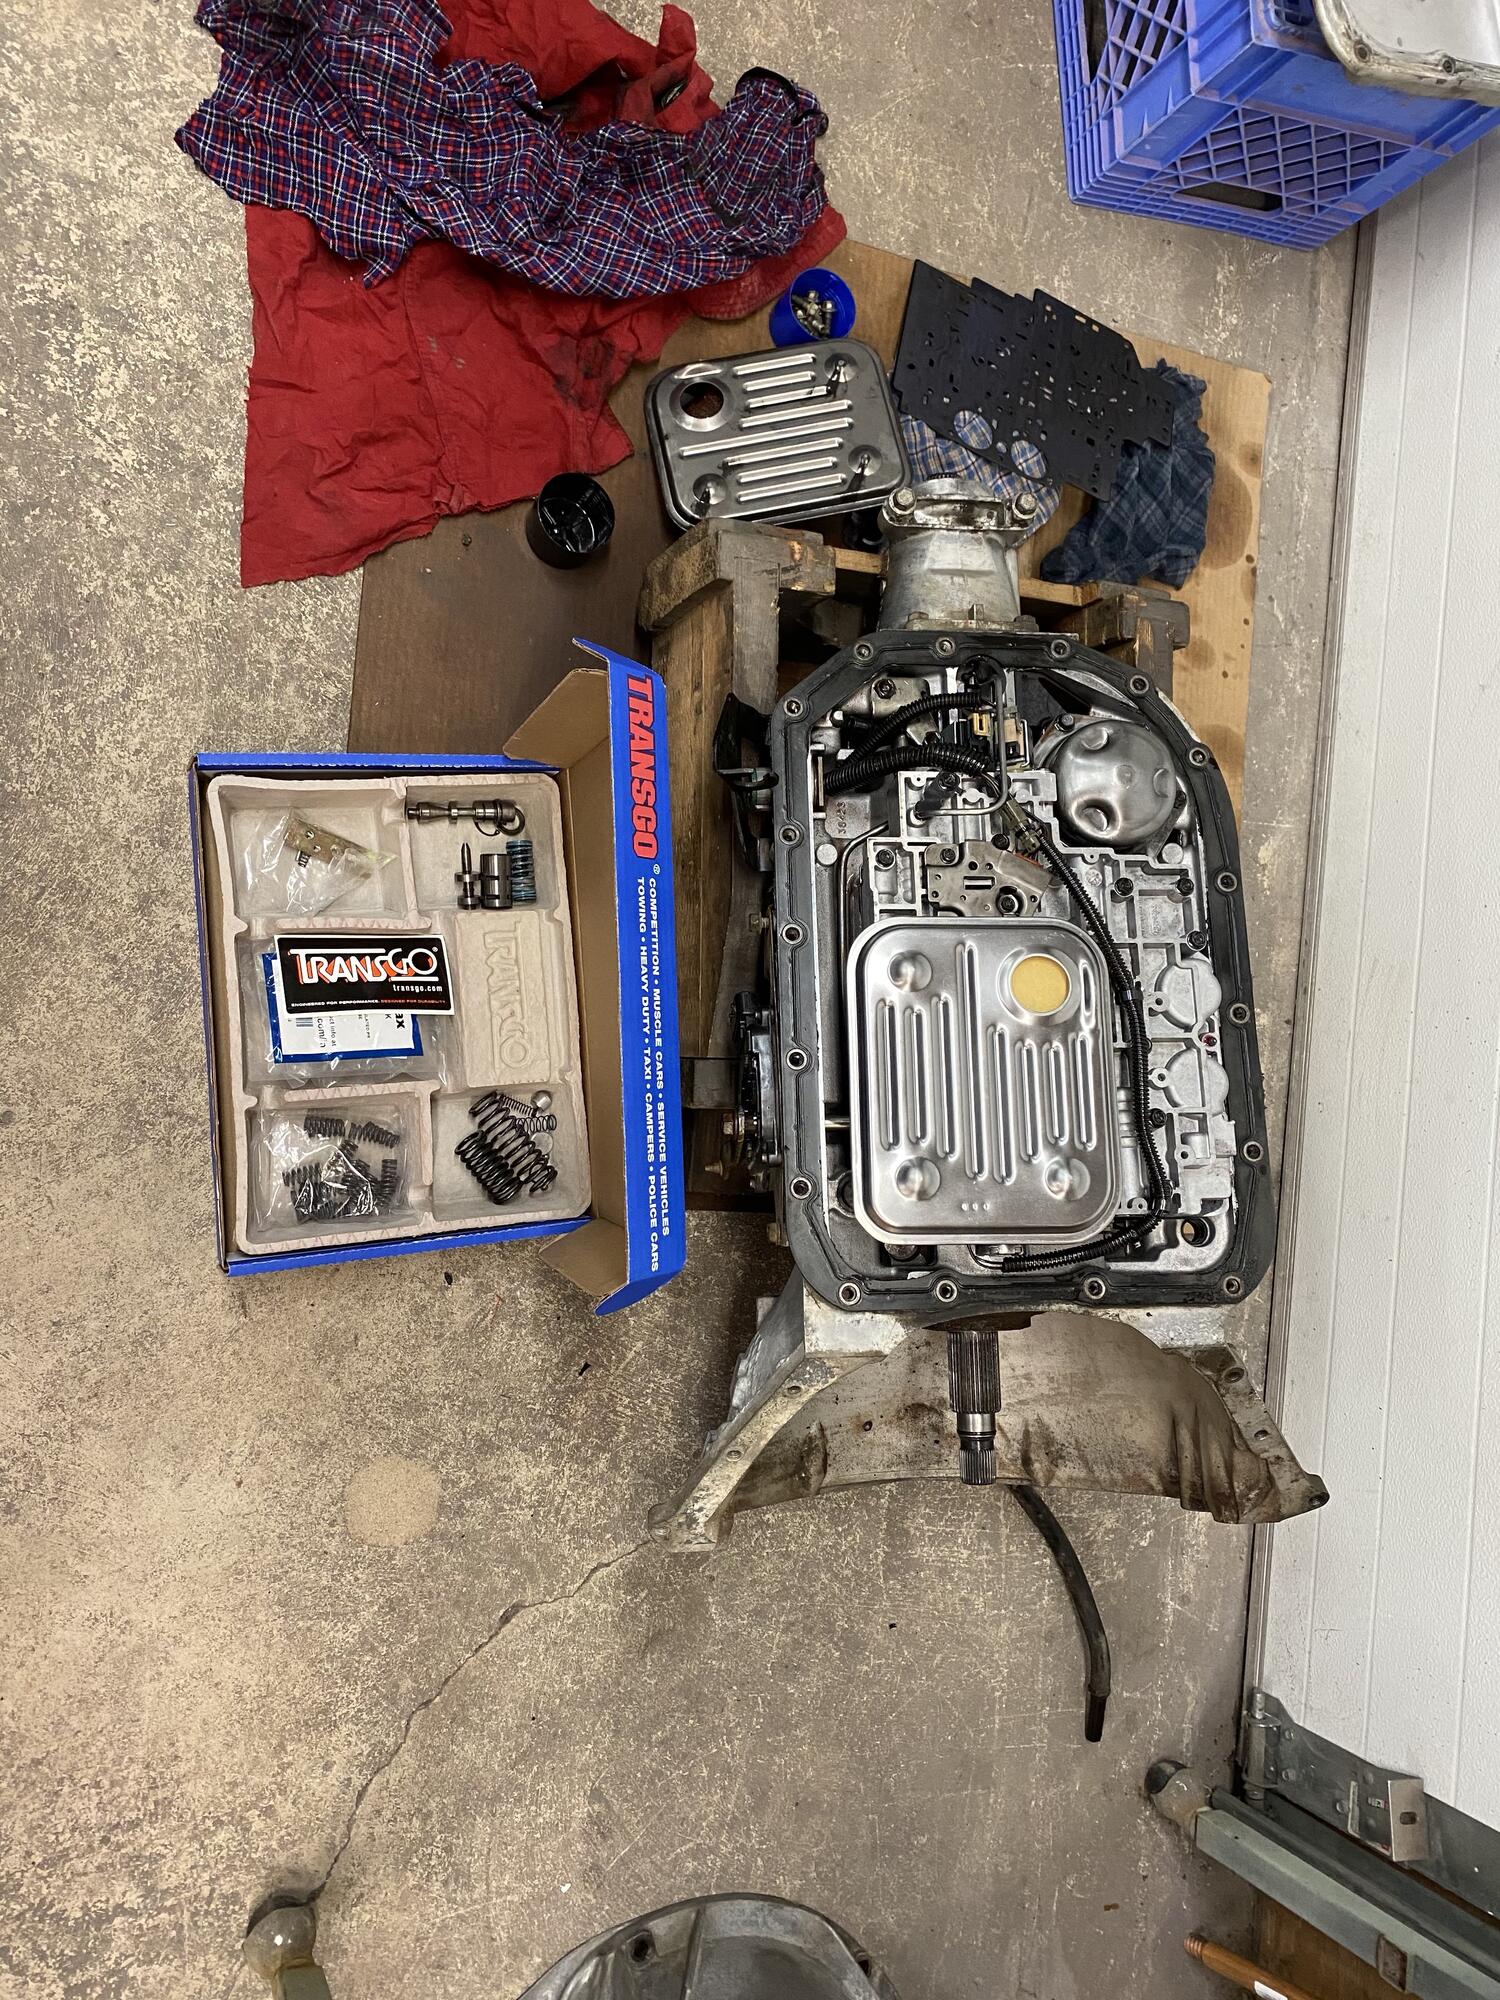
After the engine was in I started on the transmission. A nice cleaning, before the transgo shift kit was installed (I left out the pressure relief valve that is known to fail and installed a sonnax line to lube regulator valve) along with a new filter.

The trans then got a fresh coat of paint
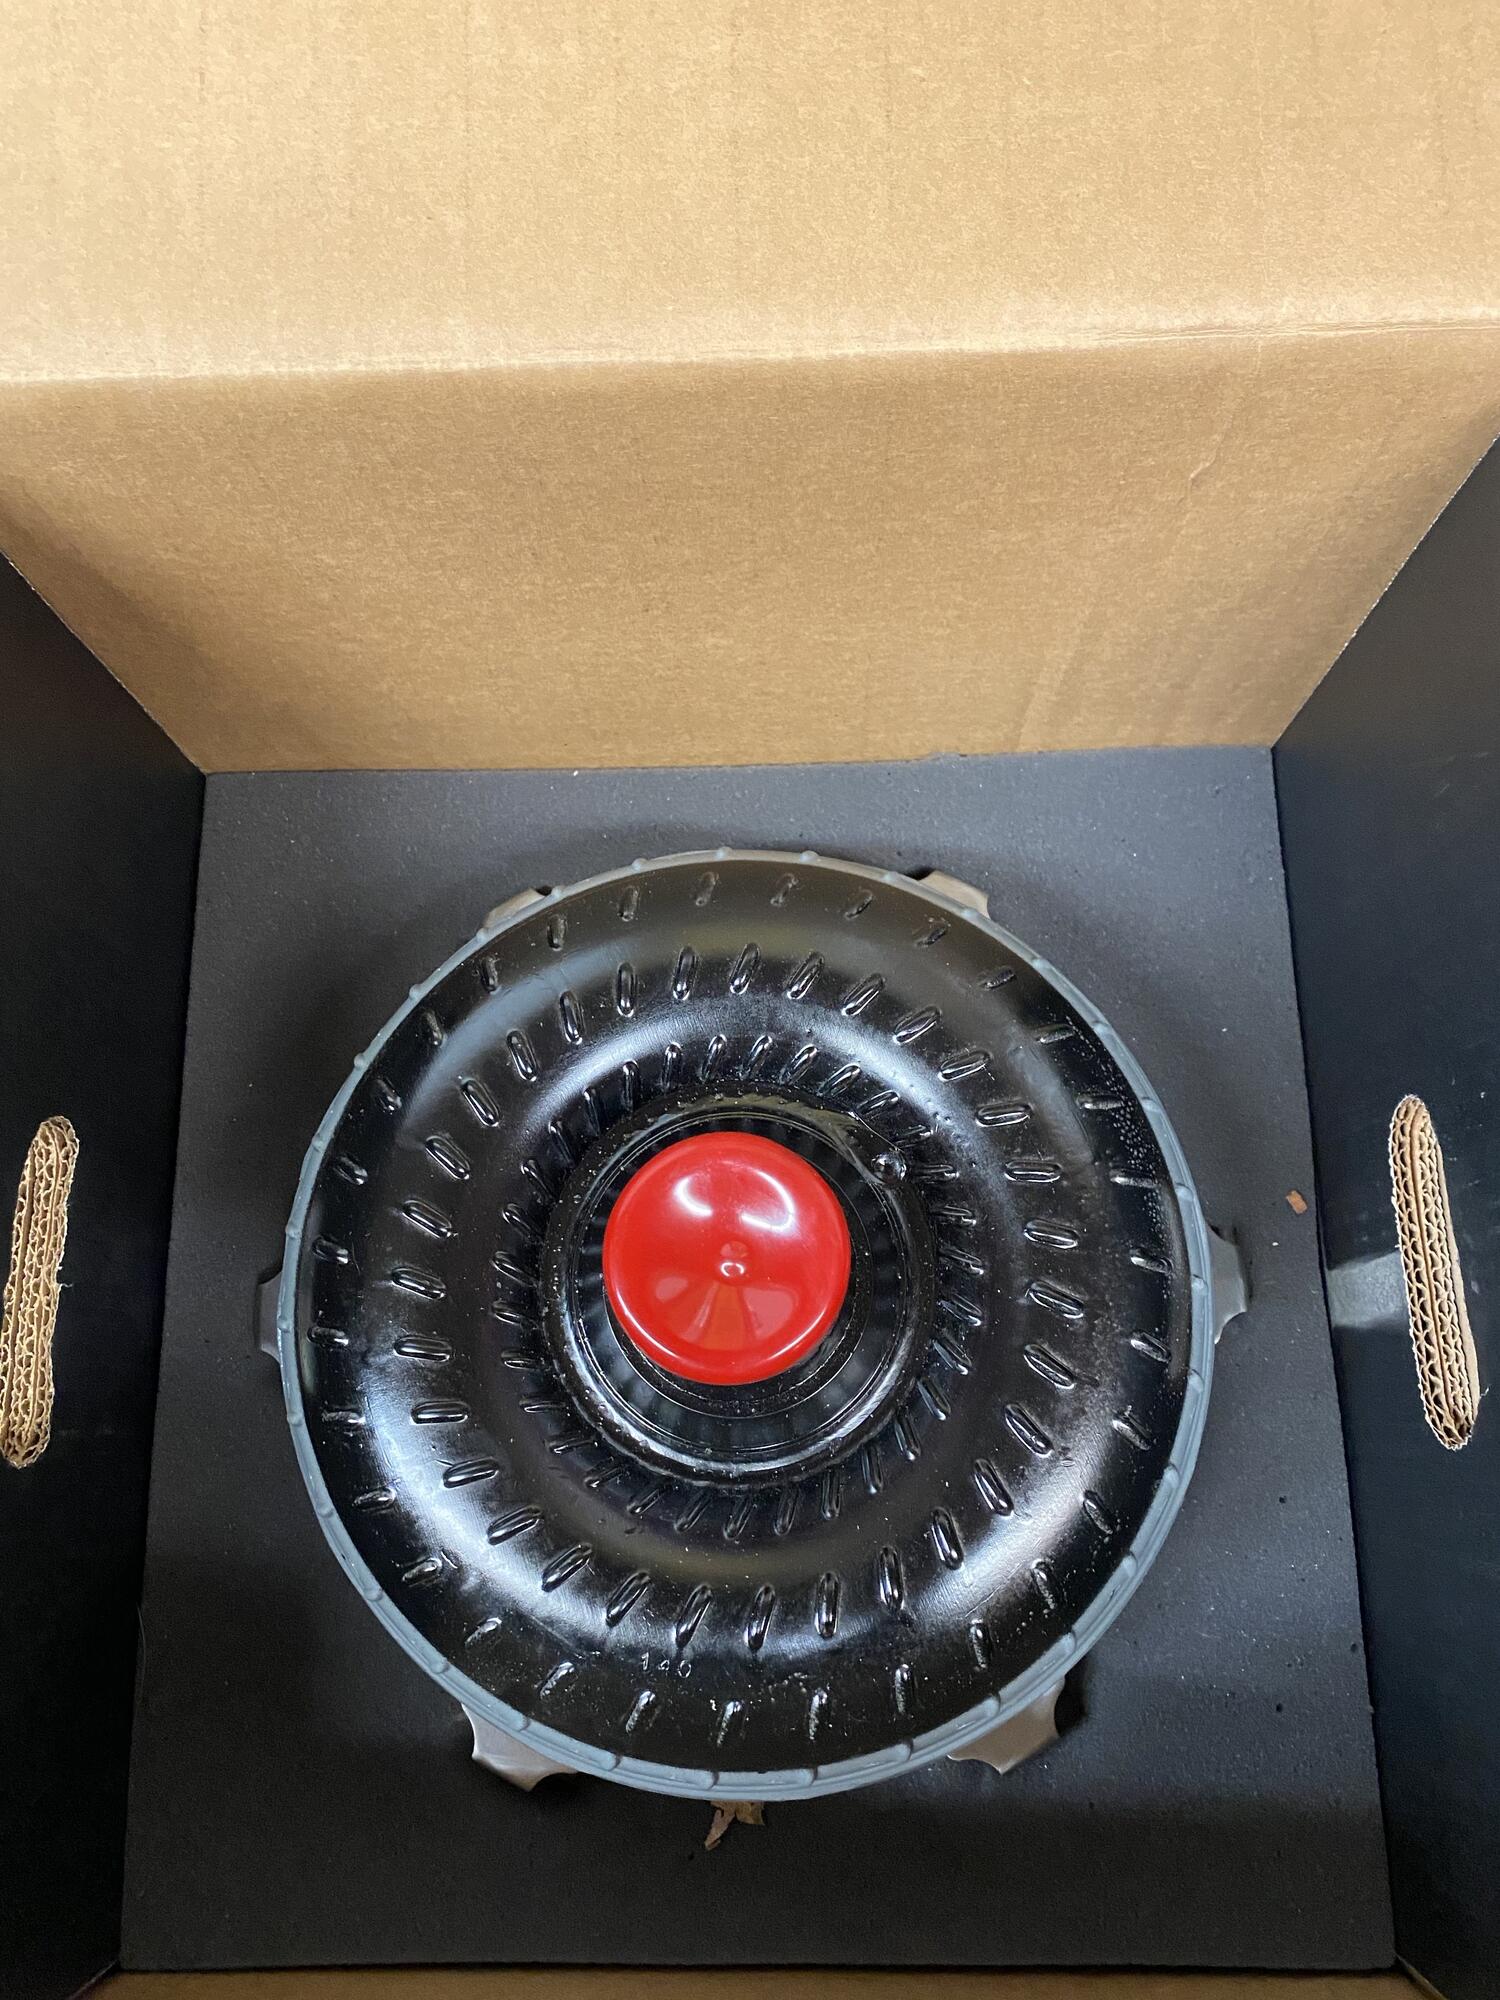
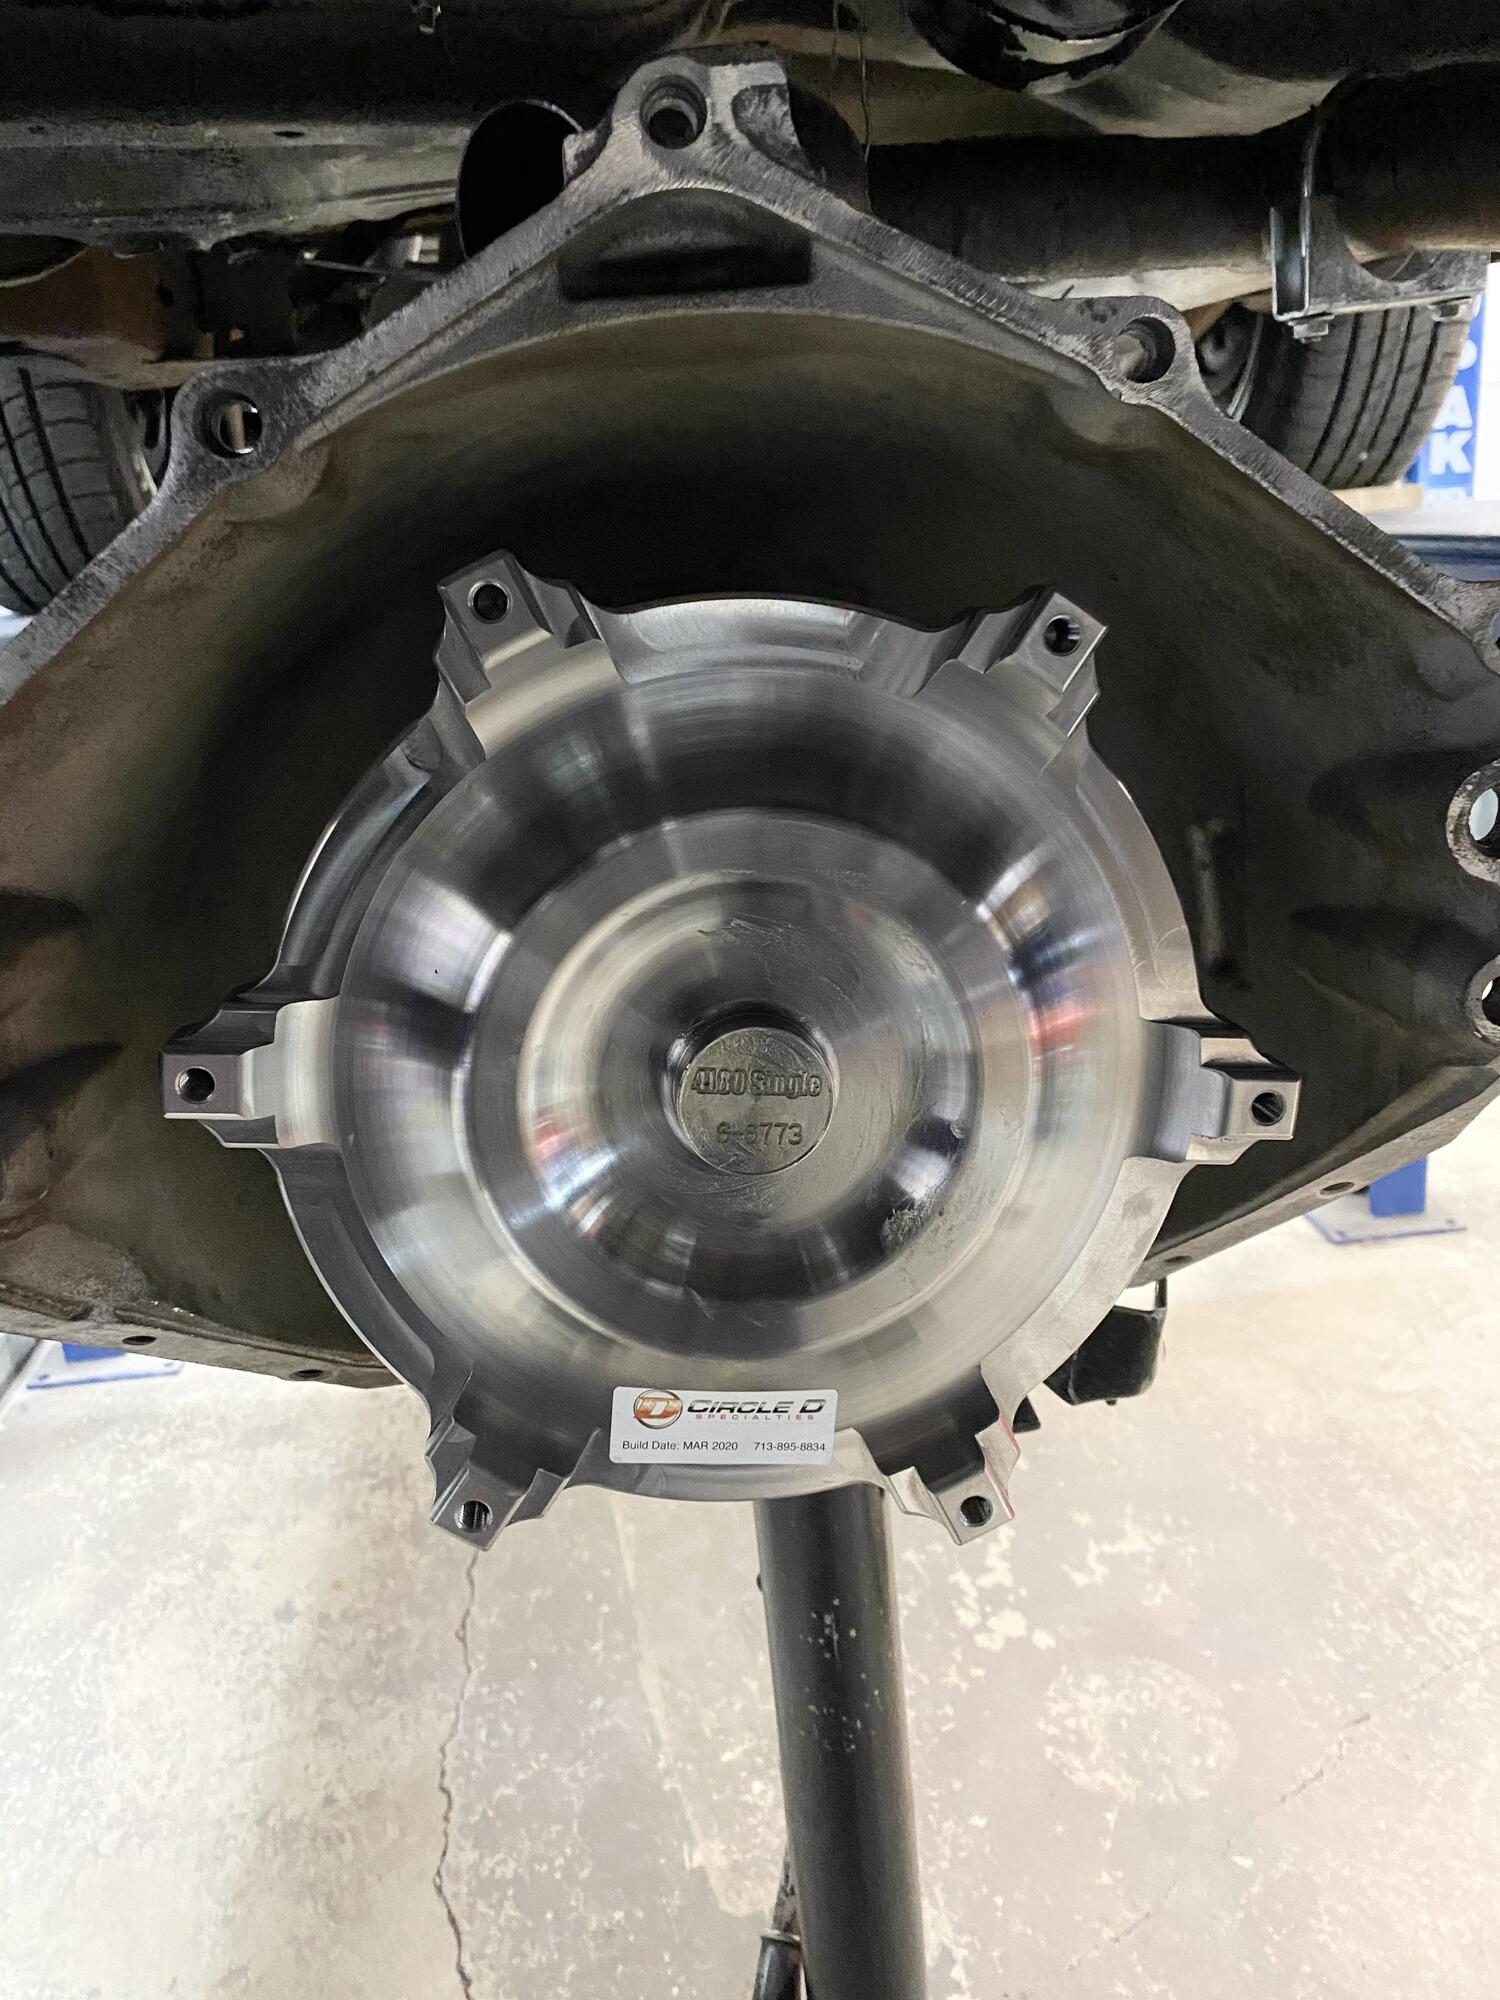
And a Circle D 3500 stall converter
the foam LS was mocked up
The firewall got a nice cleaning and a fresh coat of paint and we were ready for the LS to go in
Now somewhere between when we started and when we got to this point there was a change in the direction of this build. The original plan was to put the stock 6.0L in the Chevelle as it was and continue on our way. Somehow putting in the vintage air kit that I had for the car ended up with a dash and gauge change and a set of valve cover adapters. Basically when I was installing the vintage air kit, the dash had to come out so I took that opportunity to put an SS style dash in the car (something I had been wanting to do), along with the SS dash came a set of Dakota digital gauges because well why not?
The valve cover adapters are Billet Specialties BBC to LS adapters and I guess they came from a change in views on my part. Somewhere along the way I realized I didn't want to ruin the integrity of a Chevelle and that I wanted the cleanest most classic appearing LS I could realistically make happen. This is also what sparked the SS clone because whats cooler than a 70 Chevelle SS?
I used Holley/Hooker everything (motor mounts, oil pan and headers) for the engine install and honestly it worked flawlessly, definitely one of the pricier LS swap kits but in my opinion its well worth it. The engine went in first try with no screwing around. With the test fit of the foam LS I learned that I couldn't get the drivers side header in with the engine installed so I laid it in the engine bay prior to install (I later learned the header can come of and go back on from underneath the car with the car on a lift).
With the engine in, I began mocking up the Holley mid mount accessory drive. It tucks everything up nice and tight.
After the engine was in I started on the transmission. A nice cleaning, before the transgo shift kit was installed (I left out the pressure relief valve that is known to fail and installed a sonnax line to lube regulator valve) along with a new filter.
The trans then got a fresh coat of paint
And a Circle D 3500 stall converter

The following 4 users liked this post by chevymec:
08-11-2021, 05:22 AM
#4
although I�m doing the swap while I�m in college I do have a few advantages that allow this to be maybe a little more extensive than the average college budget. Both my parents are involved in the car hobby so I have access to a nice place to work on the car along with all the tools necessary, a hoist, paint booth and knowledge they both have. Christmas and birthdays also tend to supply the odd part or piece I�m missing. Add on that I�ve been gathering parts for a few years and that brings us to where we are now! The original plan was to put the stock 6.0L in the Chevelle but the project really snowballed. Doing all the work in house also saves on the cost, the on real expense is the parts
08-11-2021, 06:54 AM
#5
TECH Fanatic
iTrader: (27)

Very nice! I remember going through the same thing when I built my 76 T/A back in college. Keep with it and you'll be running in no time. I'd highly suggest Terminator X Max for your ECU too. Very flexible and easy to work with. Scope creep is an SOB. I went from a basic rebuild on my 6.2 to a full LSA build at some point.
08-11-2021, 07:50 AM
#6
Very nice! I remember going through the same thing when I built my 76 T/A back in college. Keep with it and you'll be running in no time. I'd highly suggest Terminator X Max for your ECU too. Very flexible and easy to work with. Scope creep is an SOB. I went from a basic rebuild on my 6.2 to a full LSA build at some point.
08-11-2021, 08:14 AM
#7
Nice work!
Two thoughts -- 1) when I was working my way through college, I was married with an 18-month-old (who was 7 before I finished). "College budget" was how we grocery shopped; the cars got only what was required to keep them going. OK, they might've gotten something for Christmas, because my wife is a good woman. Good for you! 2) Any girlfriend that will help lap valves - she's a keeper.
Two thoughts -- 1) when I was working my way through college, I was married with an 18-month-old (who was 7 before I finished). "College budget" was how we grocery shopped; the cars got only what was required to keep them going. OK, they might've gotten something for Christmas, because my wife is a good woman. Good for you! 2) Any girlfriend that will help lap valves - she's a keeper.
The following 4 users liked this post by Michael Yount:
Trending Topics
The following users liked this post:
1964SS (11-02-2021)

The following users liked this post:
1964SS (11-02-2021)
08-12-2021, 05:30 AM
#11
Nice work!
Two thoughts -- 1) when I was working my way through college, I was married with an 18-month-old (who was 7 before I finished). "College budget" was how we grocery shopped; the cars got only what was required to keep them going. OK, they might've gotten something for Christmas, because my wife is a good woman. Good for you! 2) Any girlfriend that will help lap valves - she's a keeper.
Two thoughts -- 1) when I was working my way through college, I was married with an 18-month-old (who was 7 before I finished). "College budget" was how we grocery shopped; the cars got only what was required to keep them going. OK, they might've gotten something for Christmas, because my wife is a good woman. Good for you! 2) Any girlfriend that will help lap valves - she's a keeper.

it�s a little rough around the edges but it�s a good car overall. It�s running and driving with a 350 and th350 combo.
 her and I had a good laugh reading all this, she also helped me assemble the heads which was cool
Thank you sir! I appreciate it
08-12-2021, 05:31 AM
#12
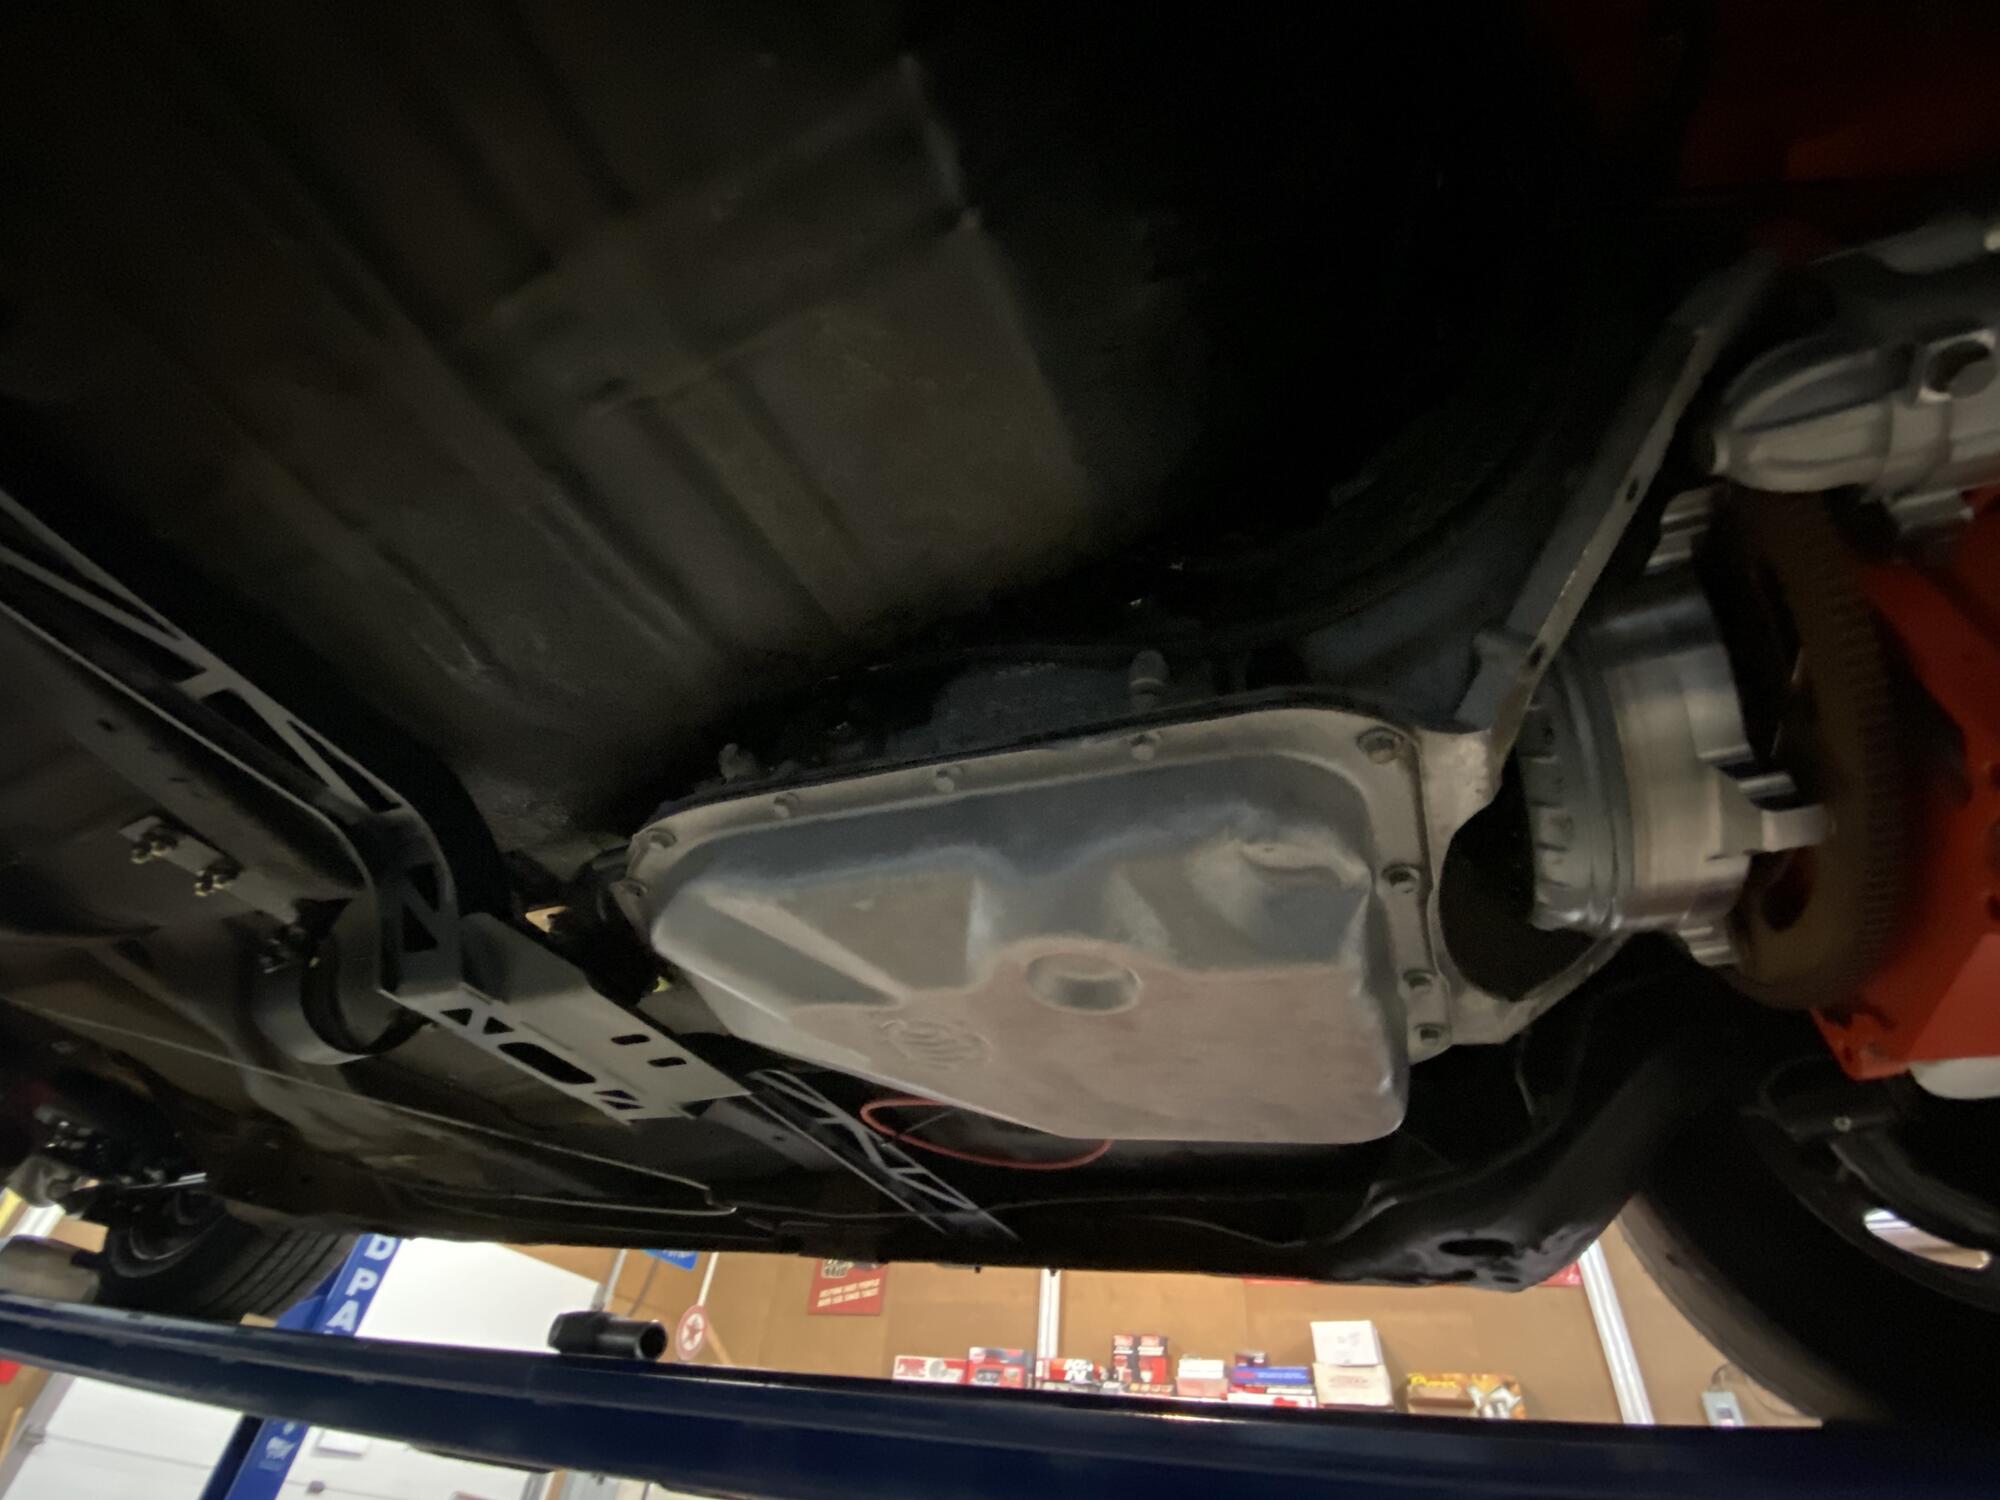
With the transmission ready for install it was jacked up and checked for clearance. We did some slight clearancing to the floor but nothing major and nothing visible on the inside of the car. We then ran into a slight snag with the trans crossmember and some old body mount bushings. The solution was to replace the old bushings with a new set from energy suspension. Once the new bushings were installed it was time to put the transmission in.


Once the trans was in it was on to the fuel system. I used a Tanks inc. fuel injection tank and in tank pump.
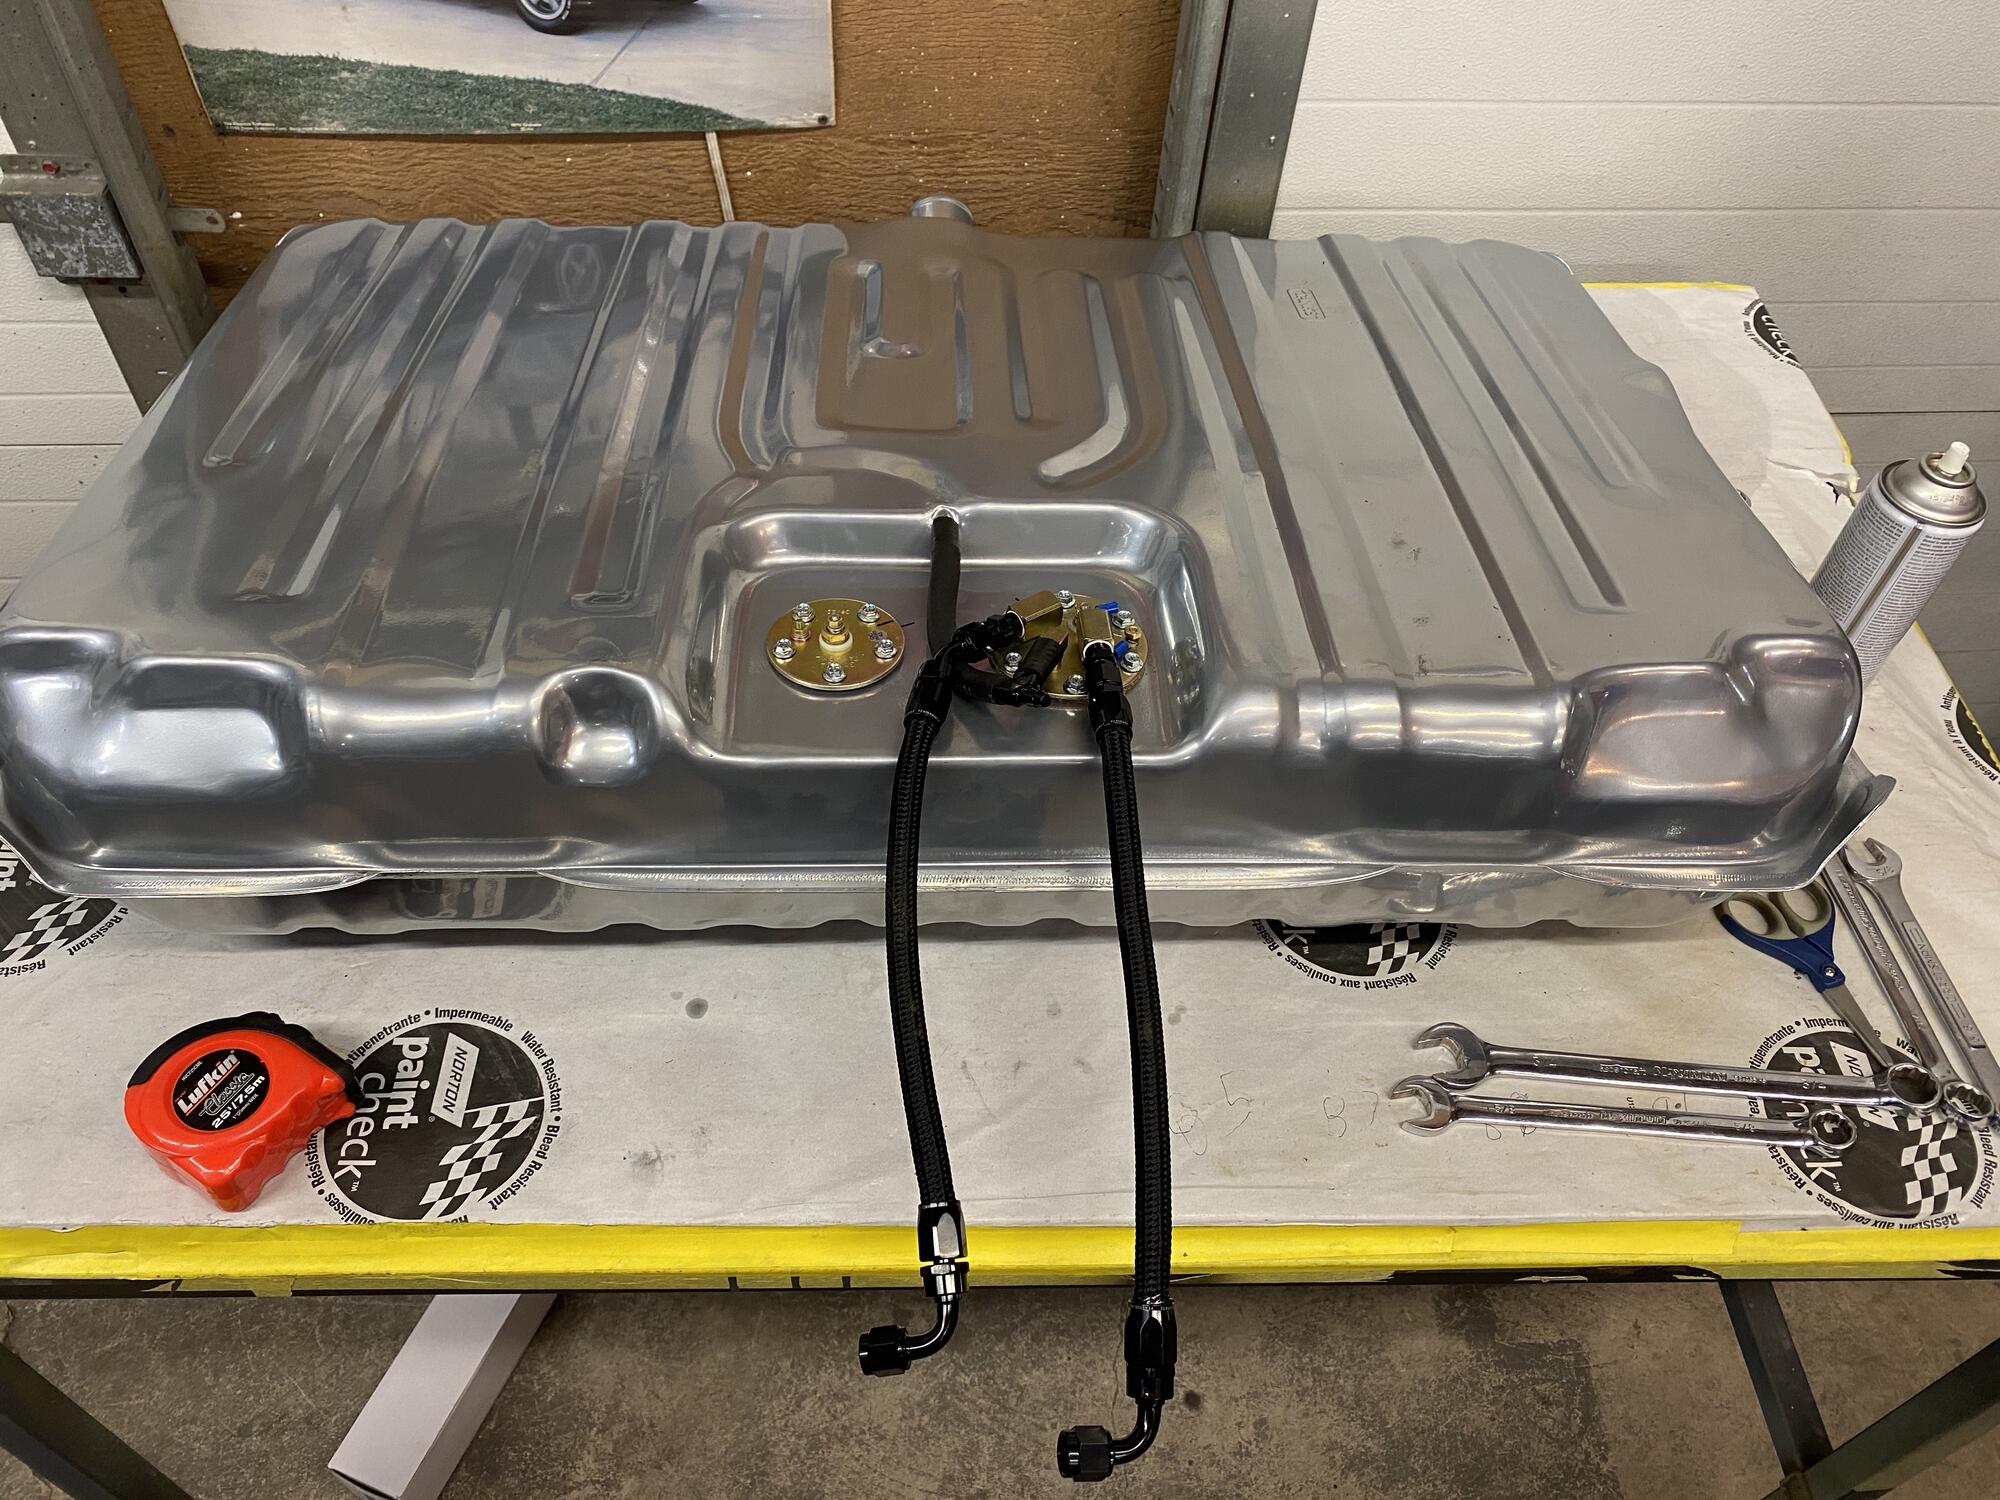
along with a corvette style regulator which is mounted to the original gas tank vent mount.

I used the existing 3/8" hard line for the majority of the fuel line along with some AN lines to finish it off.
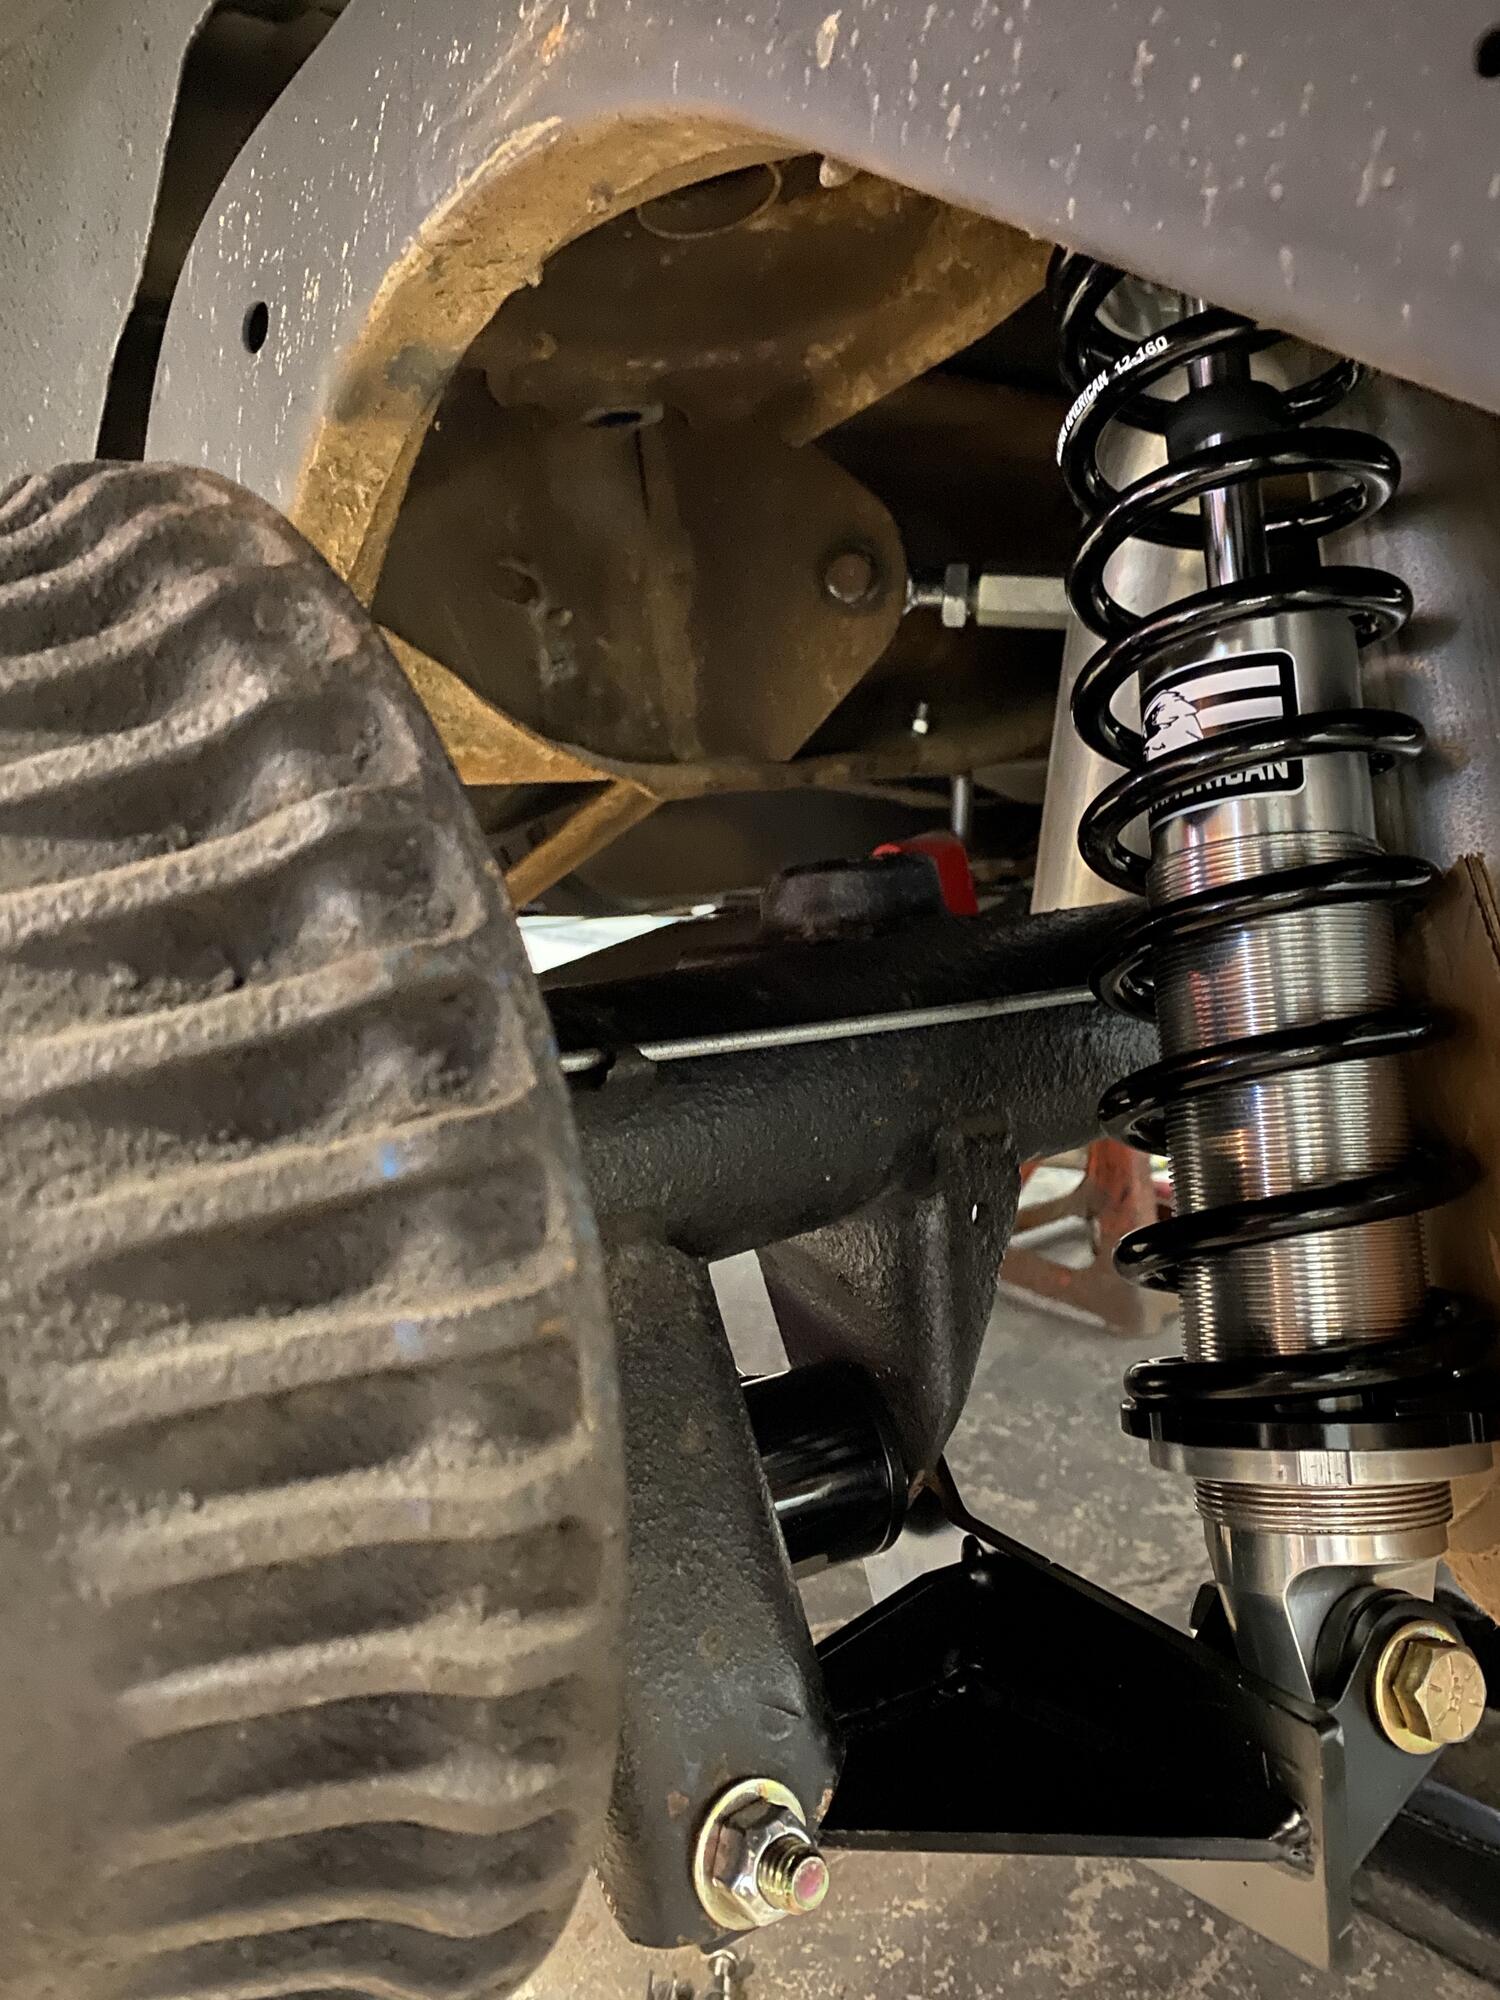
One of the problems with stage 1 of the car was the tire on the front. I switched the car to 18" Ridler wheels a few years back and ended up having some rubbing issues on the top of the inner fender. My plan to solve the problem was to stiffen up the front spring rate. To accomplish this I decided to switch the car to coil-overs. I picked up a front and rear coil-over conversion from Aldan American. Before I got to installing the coil-overs I decided to go a bit further with the suspension and ordered front control arms from UMI along with rear upper and lower control arms and a rear sway bar. In the front I'm also running 0.5" taller lower ball joints and 0.9" taller uppers along with my existing 2" drop spindle.

front installed

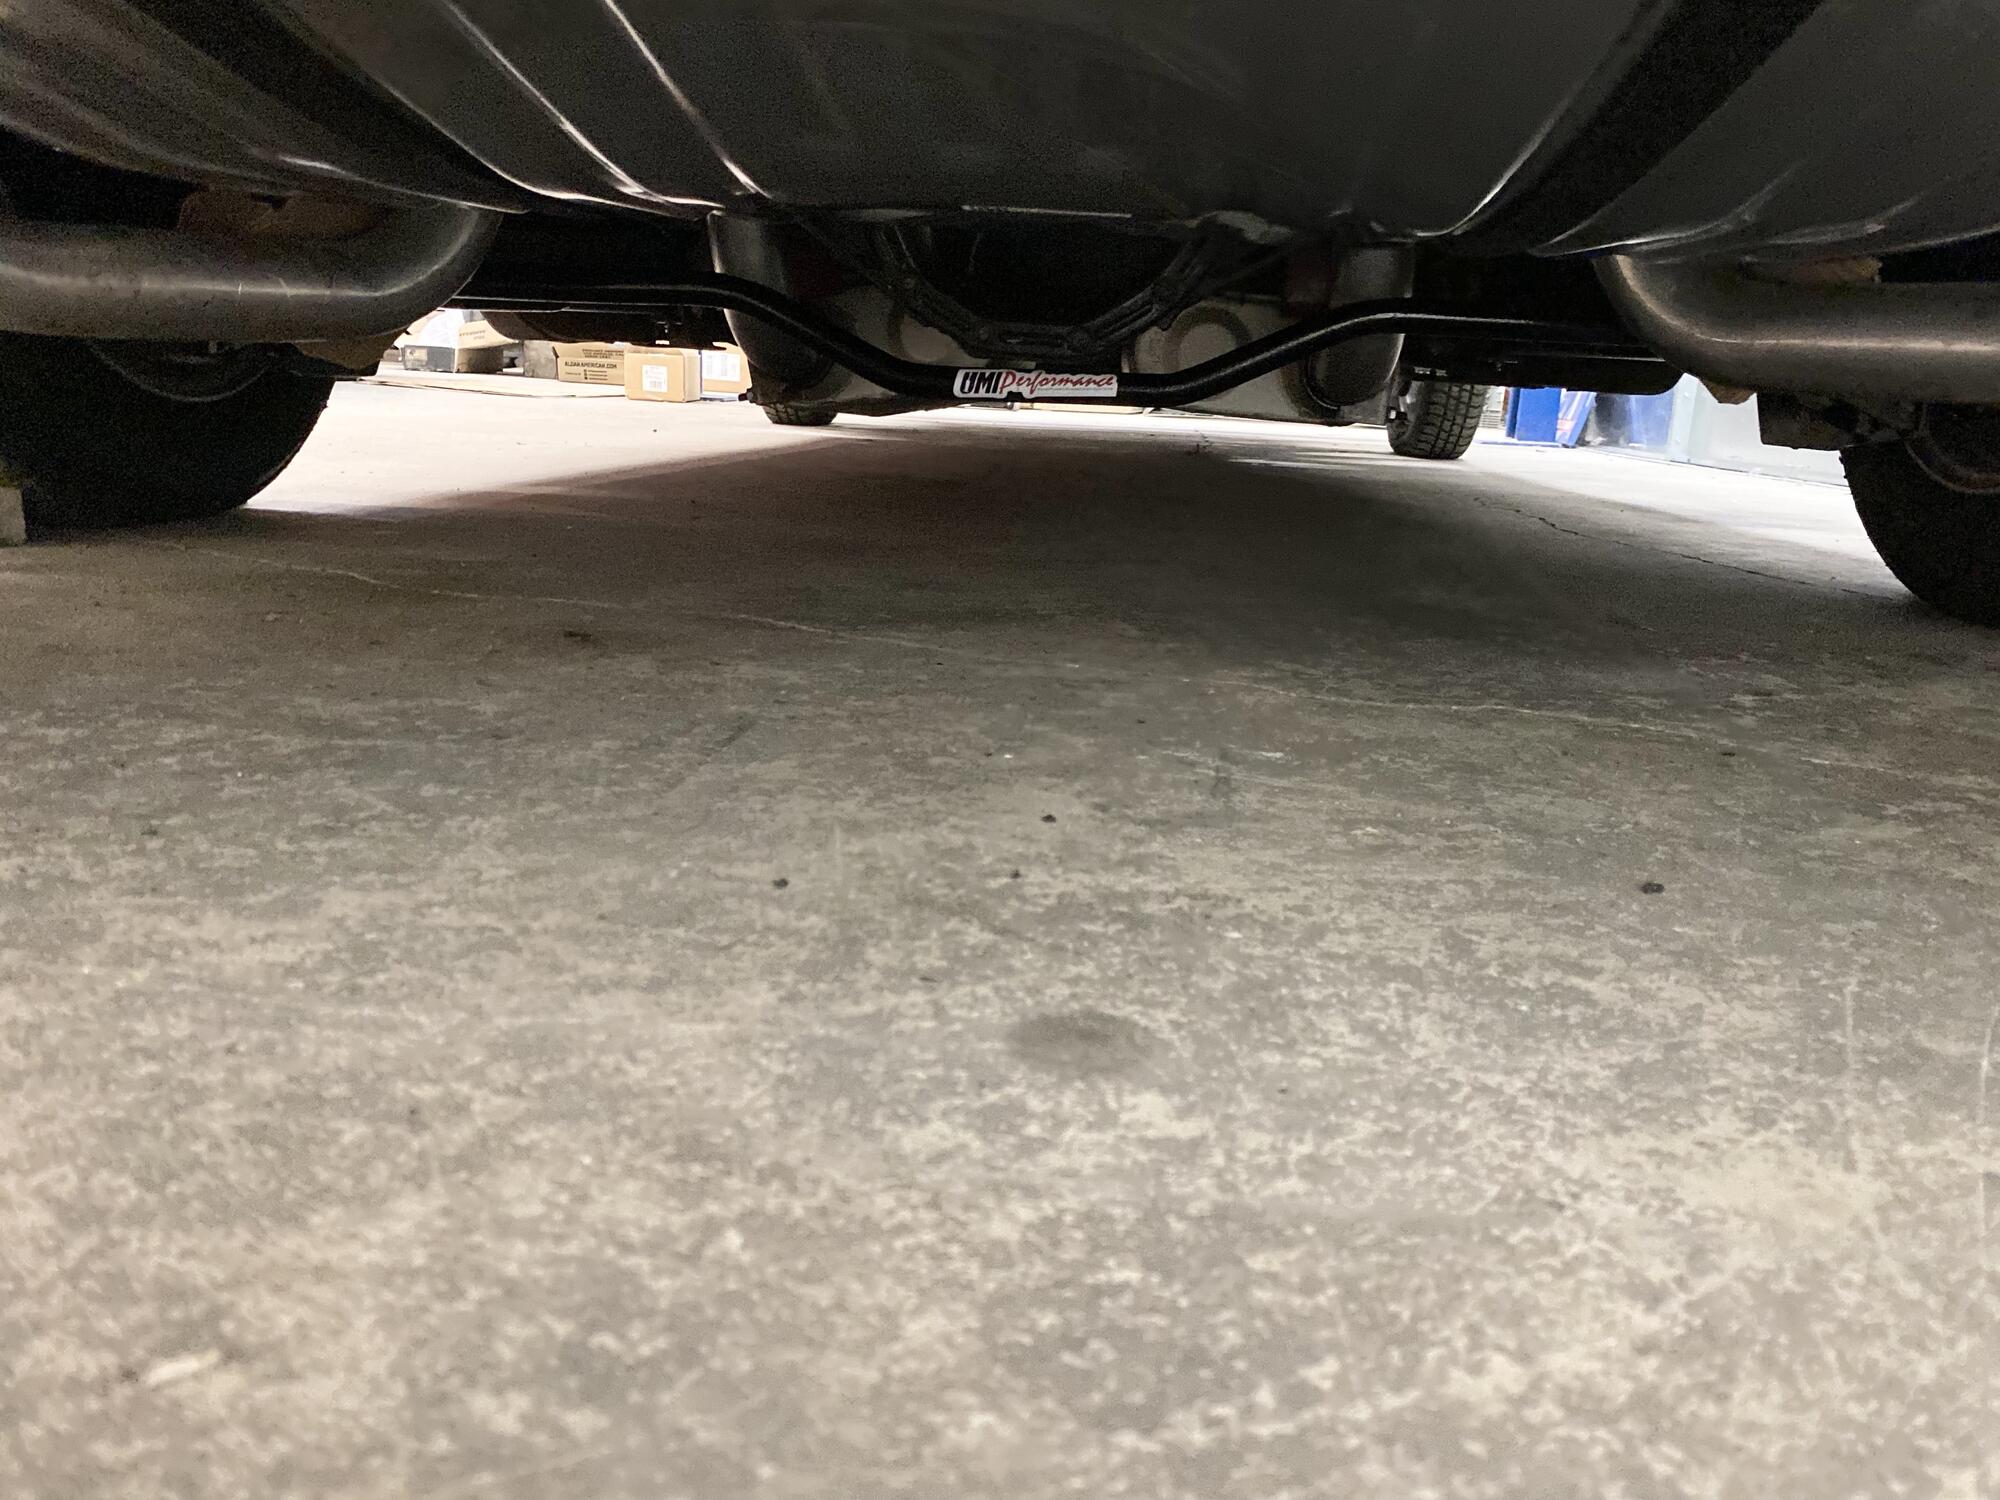
and the rear, which also included a swap from the 10 bolt back to the 12 bolt
Once the trans was in it was on to the fuel system. I used a Tanks inc. fuel injection tank and in tank pump.
along with a corvette style regulator which is mounted to the original gas tank vent mount.
I used the existing 3/8" hard line for the majority of the fuel line along with some AN lines to finish it off.
One of the problems with stage 1 of the car was the tire on the front. I switched the car to 18" Ridler wheels a few years back and ended up having some rubbing issues on the top of the inner fender. My plan to solve the problem was to stiffen up the front spring rate. To accomplish this I decided to switch the car to coil-overs. I picked up a front and rear coil-over conversion from Aldan American. Before I got to installing the coil-overs I decided to go a bit further with the suspension and ordered front control arms from UMI along with rear upper and lower control arms and a rear sway bar. In the front I'm also running 0.5" taller lower ball joints and 0.9" taller uppers along with my existing 2" drop spindle.
front installed
and the rear, which also included a swap from the 10 bolt back to the 12 bolt
The following users liked this post:
G Atsma (08-12-2021)
08-12-2021, 08:46 PM
#13
A couple more shots of the rear suspension
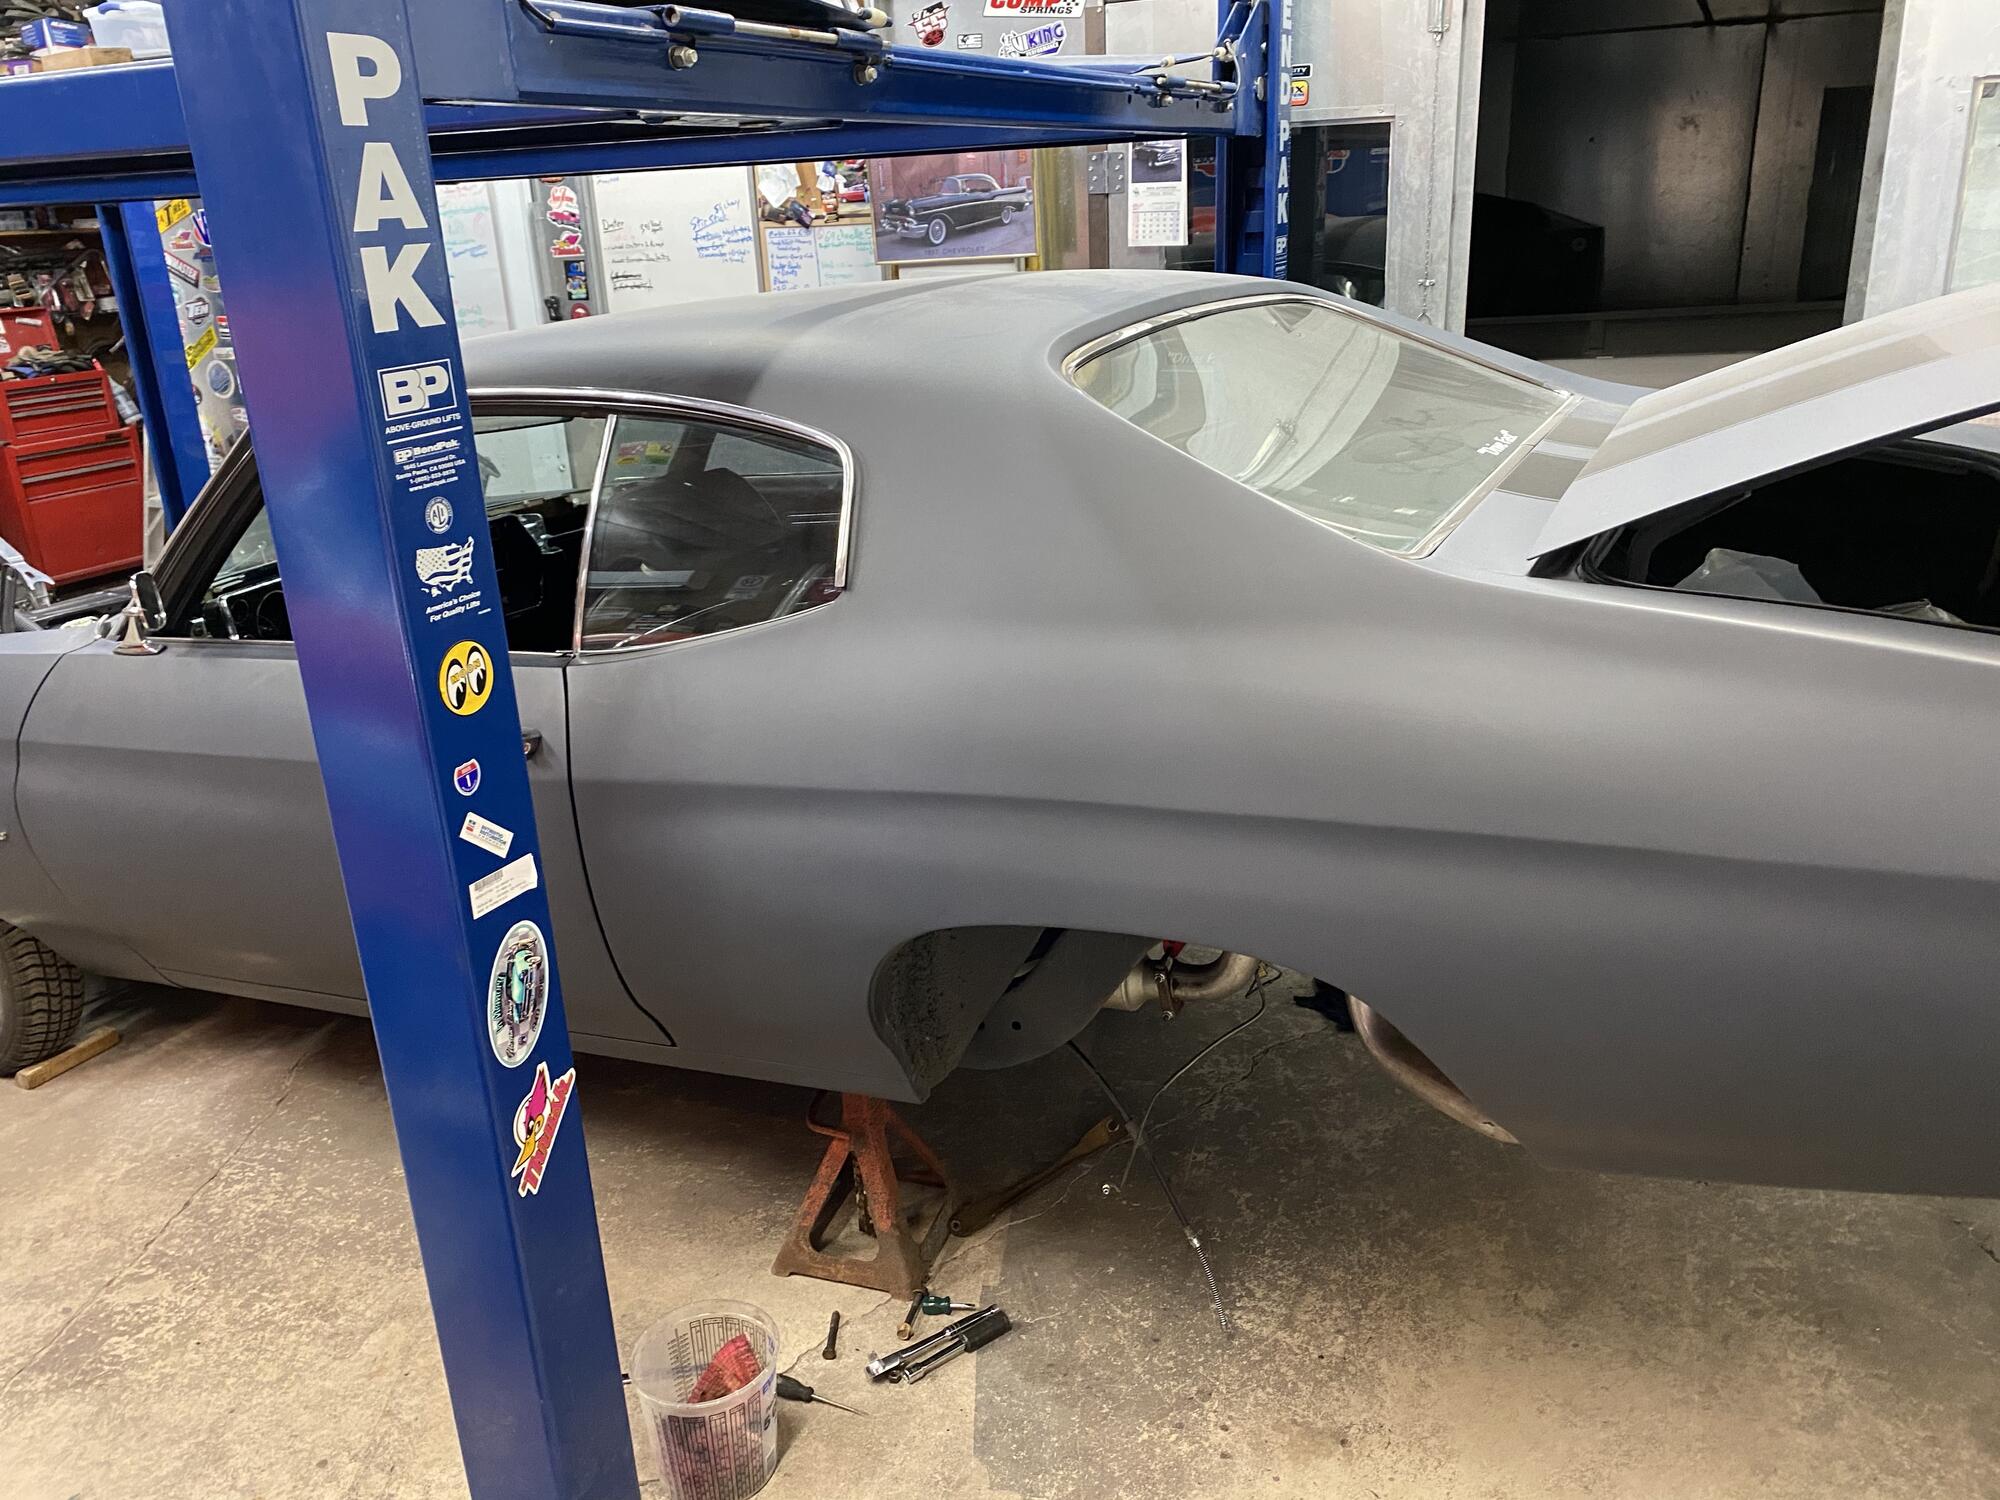
A couple shots of the car back on the ground after some coilover adjustment
Now for a bit about the wiring side of the swap. The harness is a takeout from the donor that I modified. I removed everything following LT1swap including the rear O2 sensors. I used split loom to cover the whole harness. The fans, fuel pump and starter are all run off relays that are hidden in whats left of the glove box (it has to be cut to fit the vintage air unit in the cab). Along with the relays in the glovebox are my switches for the digital dash and my wideband afr gauge. which allows me to open the door while driving and see the gauge and then close it at a show or when parked and have the gauge hidden.
I mounted the OBD2 port in the ash tray so it can also be hidden
The ECM is mounted under the dash pad. My plan with everything was to have either hidden or able to be hidden to keep the clean stock appearing interior
On the engine side of the wiring everything is tucked up as tight as it can be and hidden if possible. I won't be running a MAF sensor because of the intake setup, so the car will be run on a speed density tune. I plan on doing all or most of the tuning myself (I don't have access to a dyno to accurately set the timing tables so I'm still figuring that part out). I will be doing the tuning using HPtuners. I have only tuned one other swap which was a stock ls3 from a camaro that we put into a 70 C10, which meant the tuning was much simpler than this swap will be considering I changed much more (heads, cam, intake, injectors, throttle body). I also had some practice time tuning both MAF and speed density on a 2005 avalanche, so I know the process once I actually get the car to start and run (and figure out the idle tuning), I'm definitely excited to get the car dialed in and I enjoy doing as much of the build myself as possible.
Back to the engine bay! To go along with the classic look I got my hands on an original style cowl induction air cleaner for the car along with some stock style BBC valve covers.
Because of the new radiator and dual fan setup I started modifying the rad cover. Using a second original rad cover I added enough length to cover the rad and the fans
 08-13-2021, 10:42 AM
#16
its not the heat that I'm was concerned about its more of a clearance question as I have close to the rear suspension setup and where my stock exhaust used to go there just isn't enough room between coil over and tank so I'm just trying to see what other guys are doing
The following users liked this post:
Michael Yount (08-13-2021)
08-13-2021, 04:30 PM
#17
ModSquad
iTrader: (6)
Just seeing this build. Nice job sir!
08-13-2021, 09:13 PM
#18
its not the heat that I'm was concerned about its more of a clearance question as I have close to the rear suspension setup and where my stock exhaust used to go there just isn't enough room between coil over and tank so I'm just trying to see what other guys are doing
Thank you sir! You actually gave me some pointers a few years back before I started the project!
08-13-2021, 09:15 PM
#19
More progress incoming
When the front suspension upgrades were going on I pulled the inner fenders out and decided to give them a makeover as well
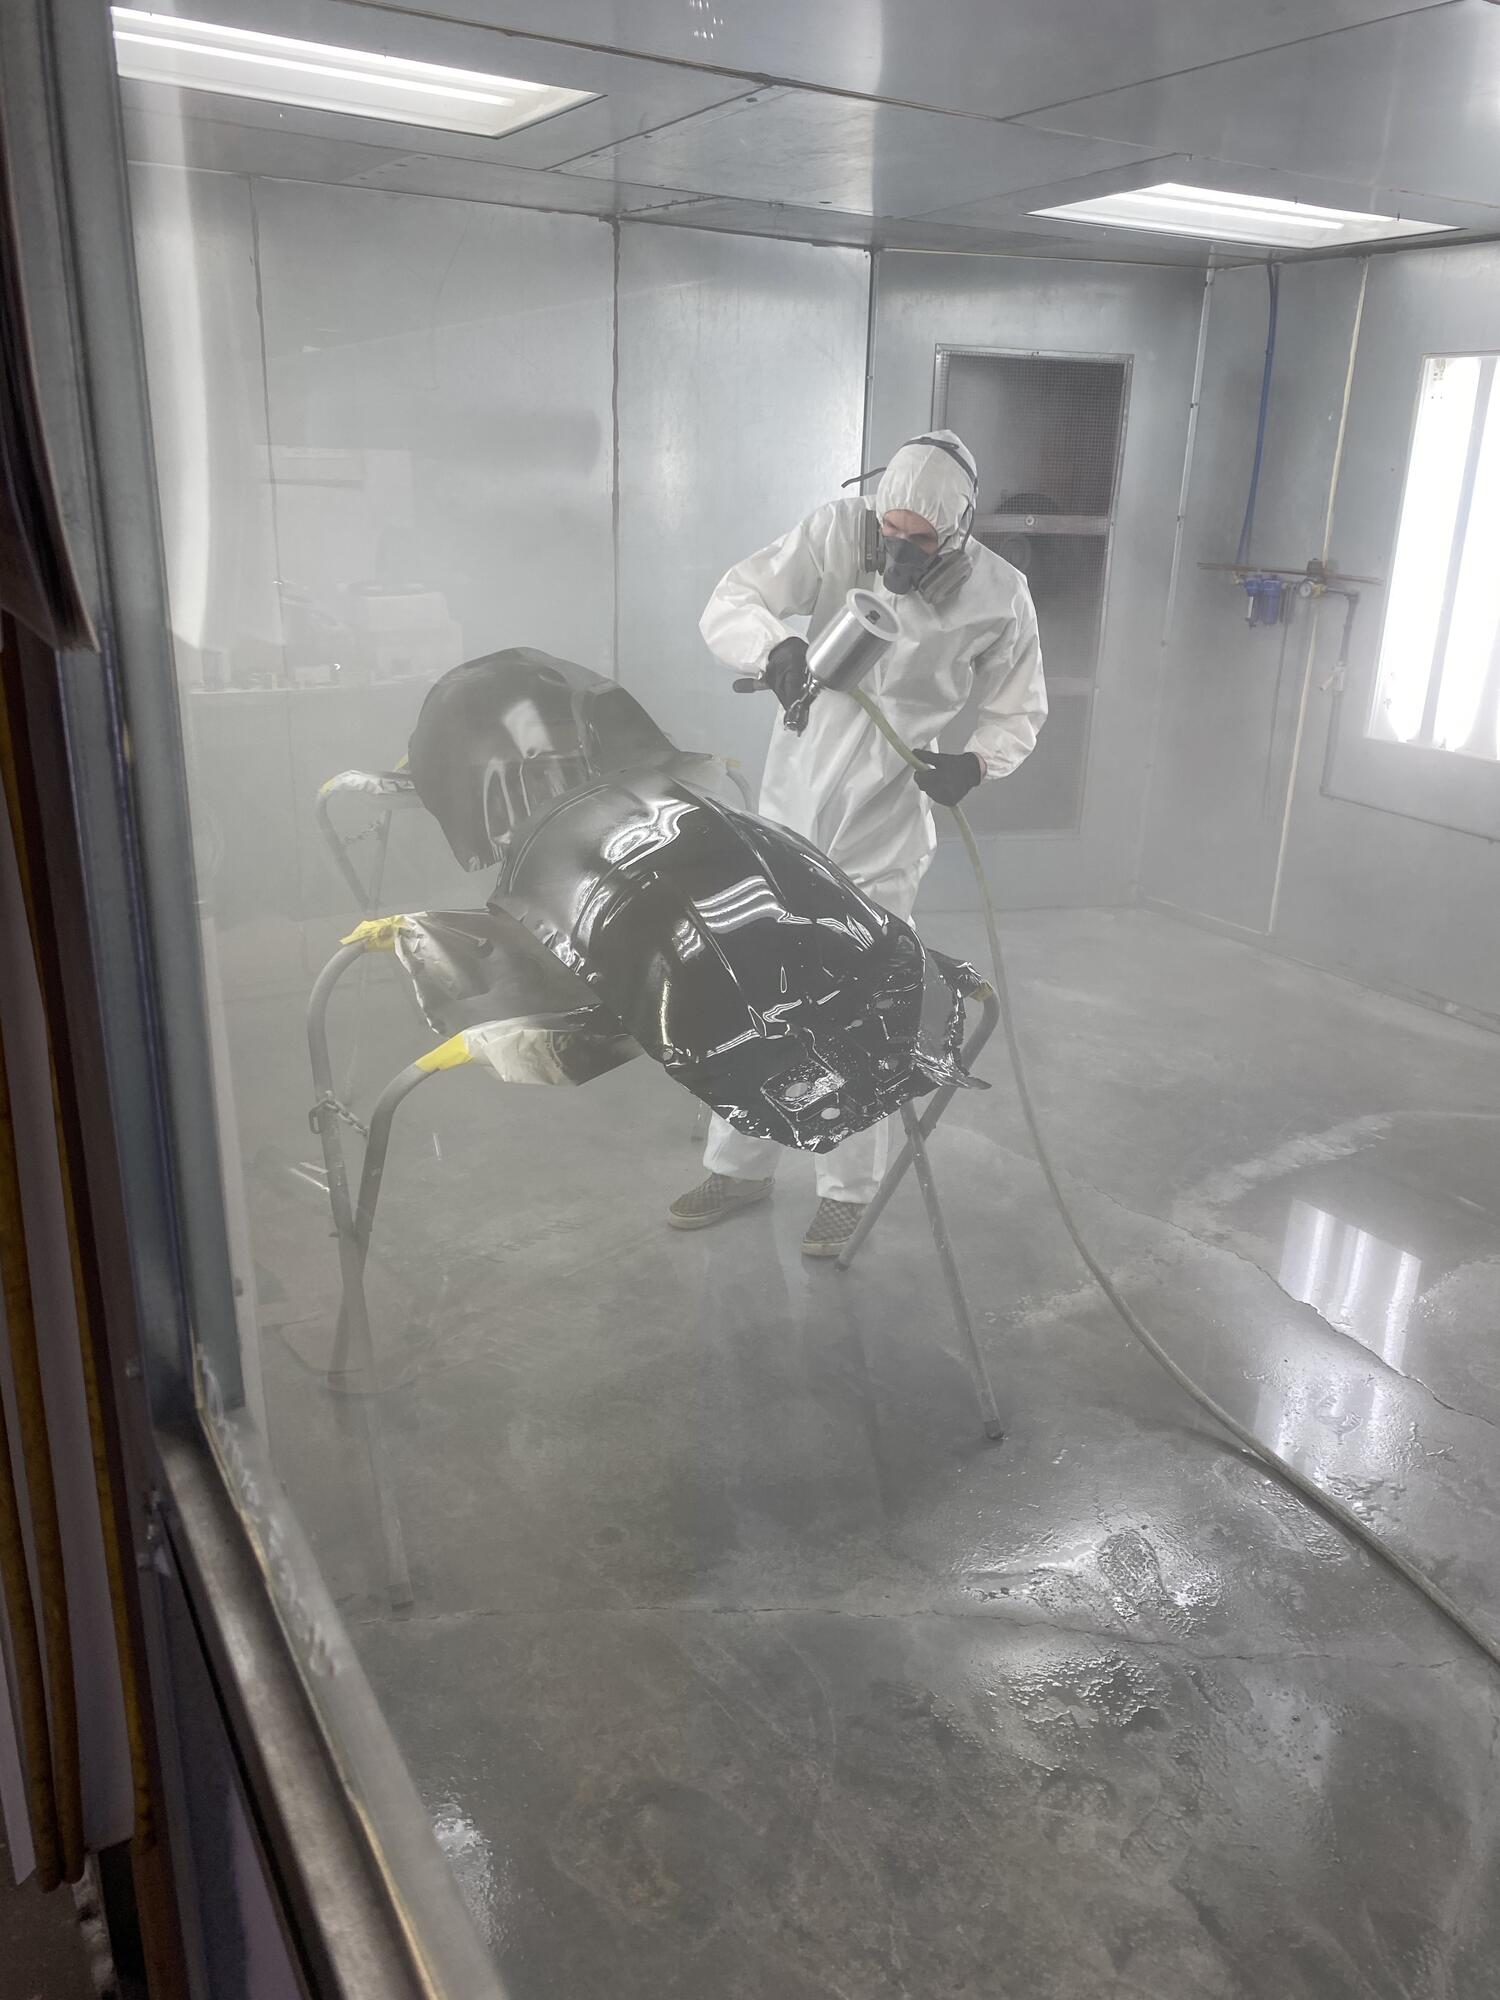
We have a paintbooth in one of the bays in the shop so it makes spraying pieces like this less of a hassle. These are sprayed base clear with GM black
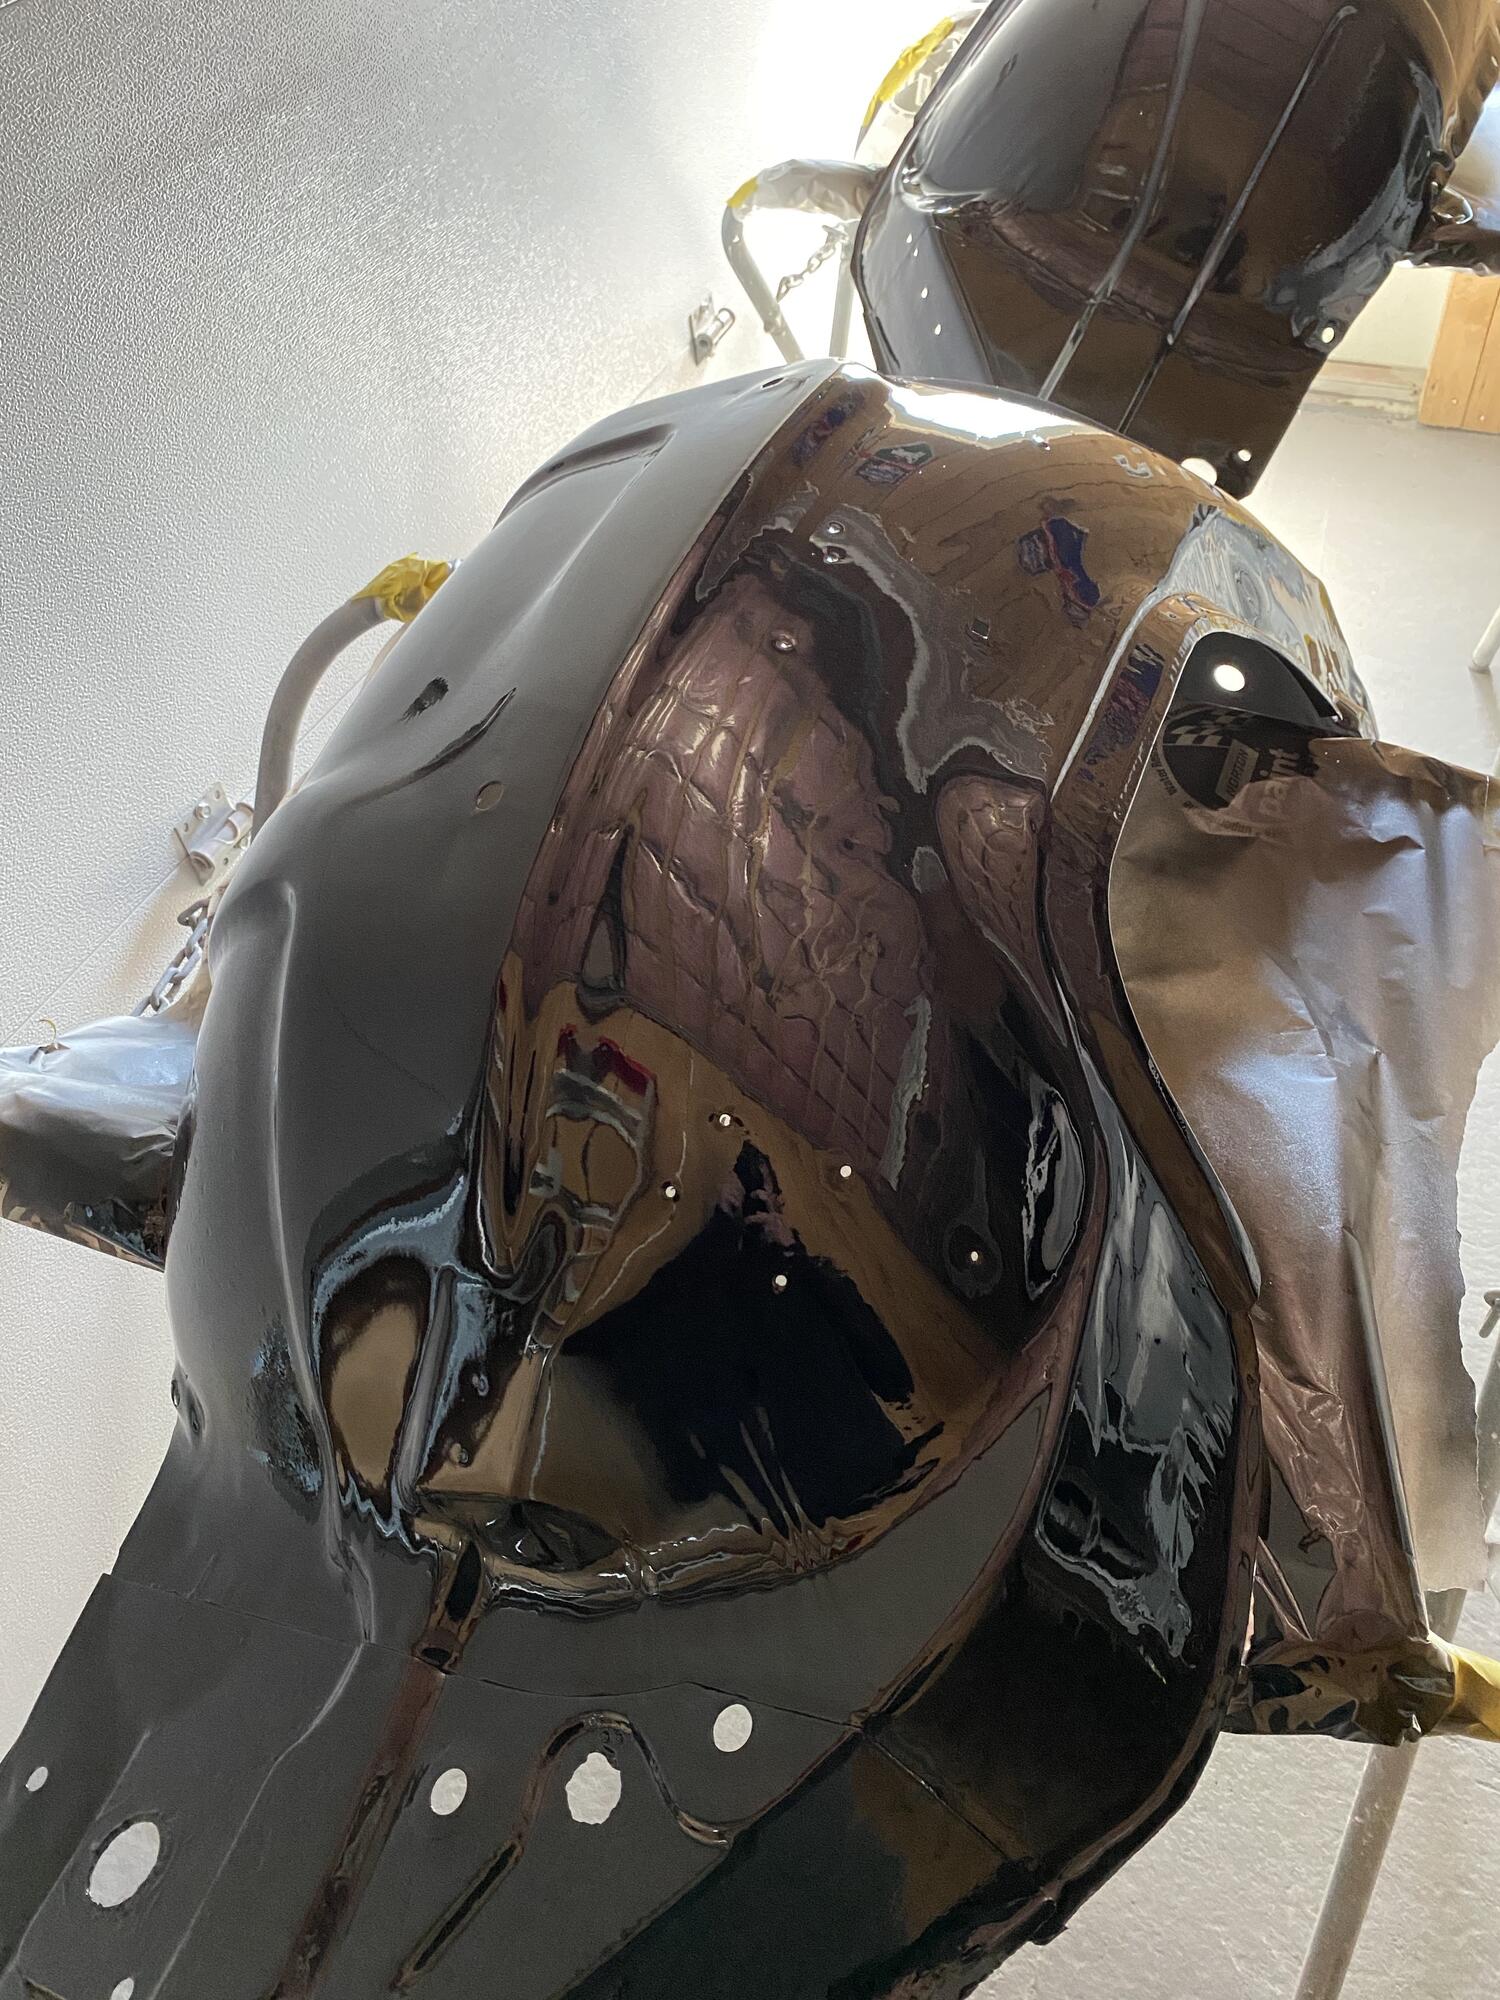
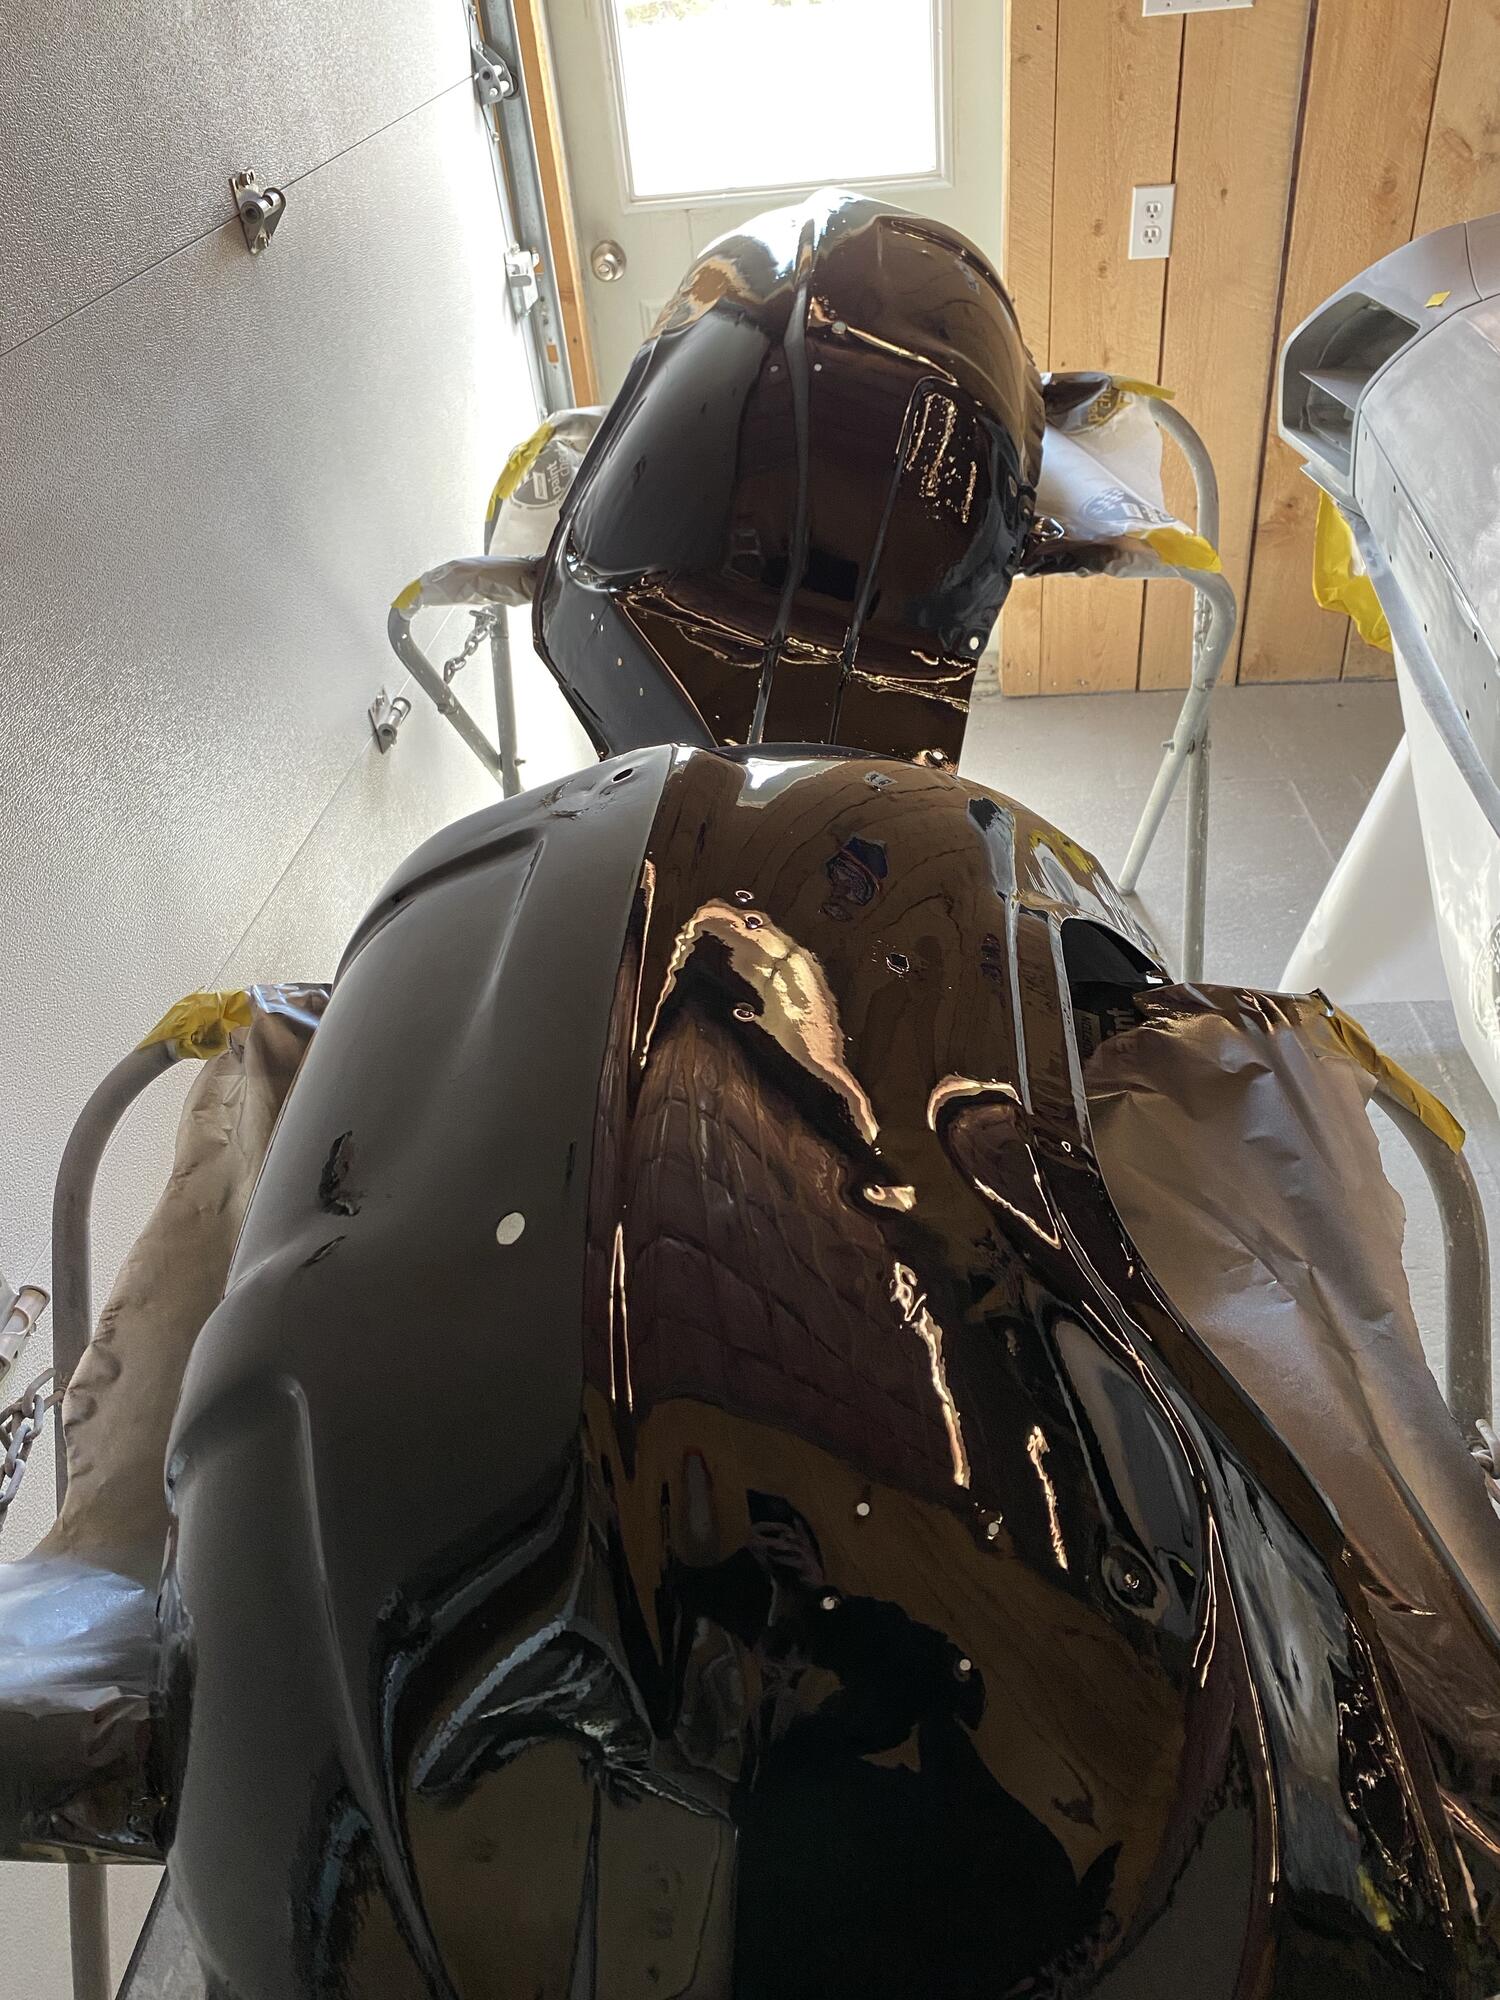
I think they turned out pretty well for my first time spraying clear. This is just out of the gun with no cut/buff and I don't think I will.
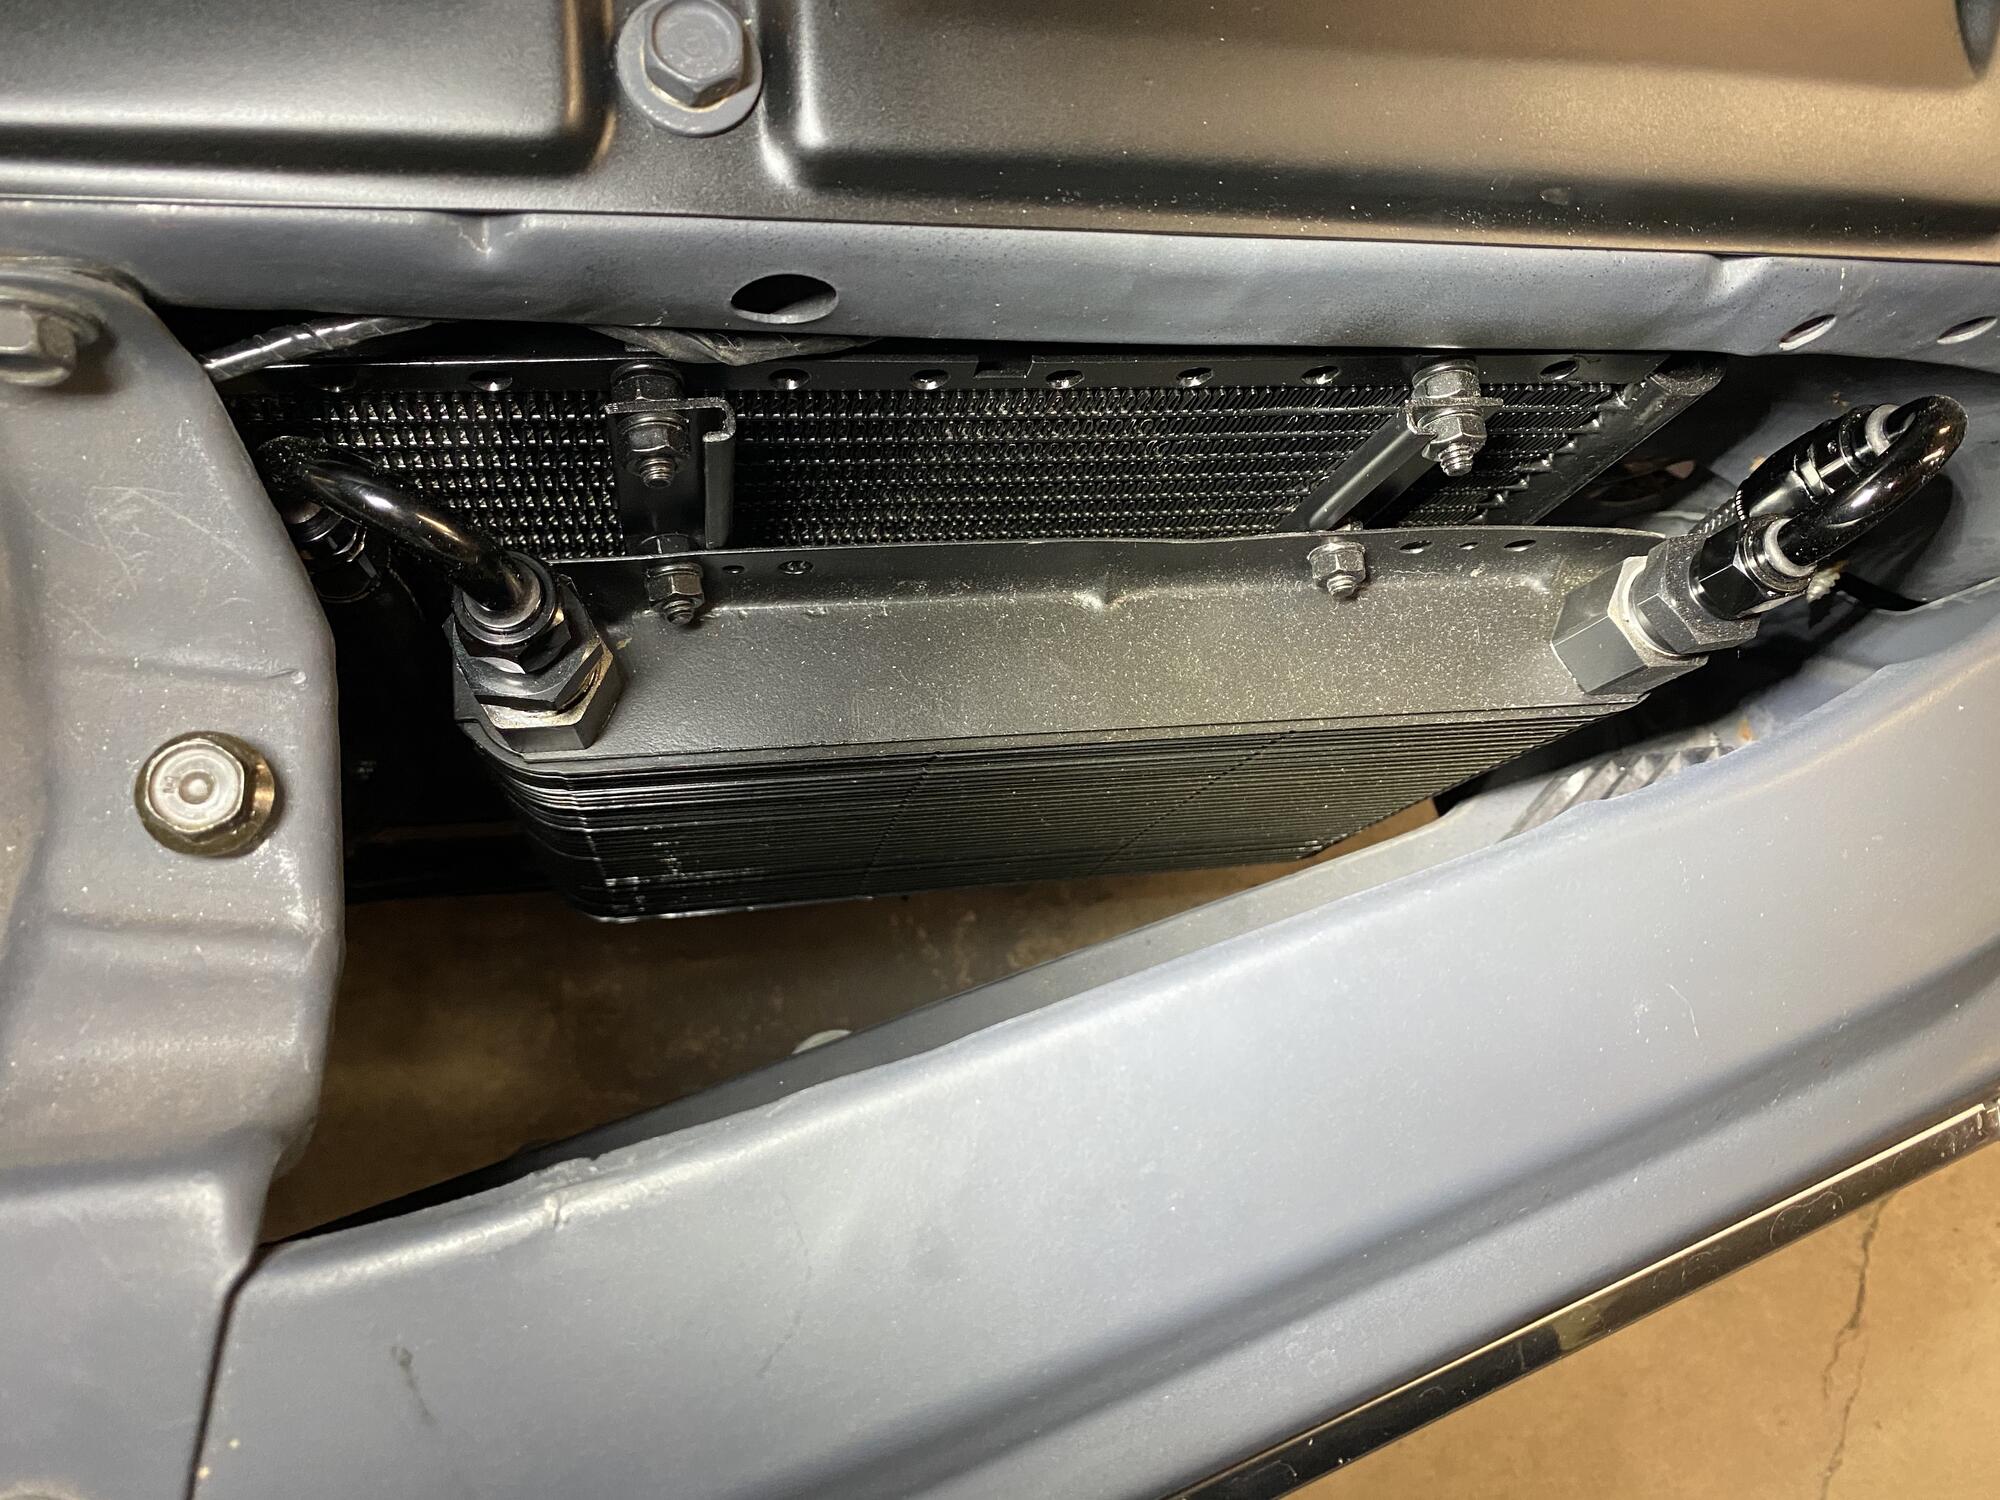
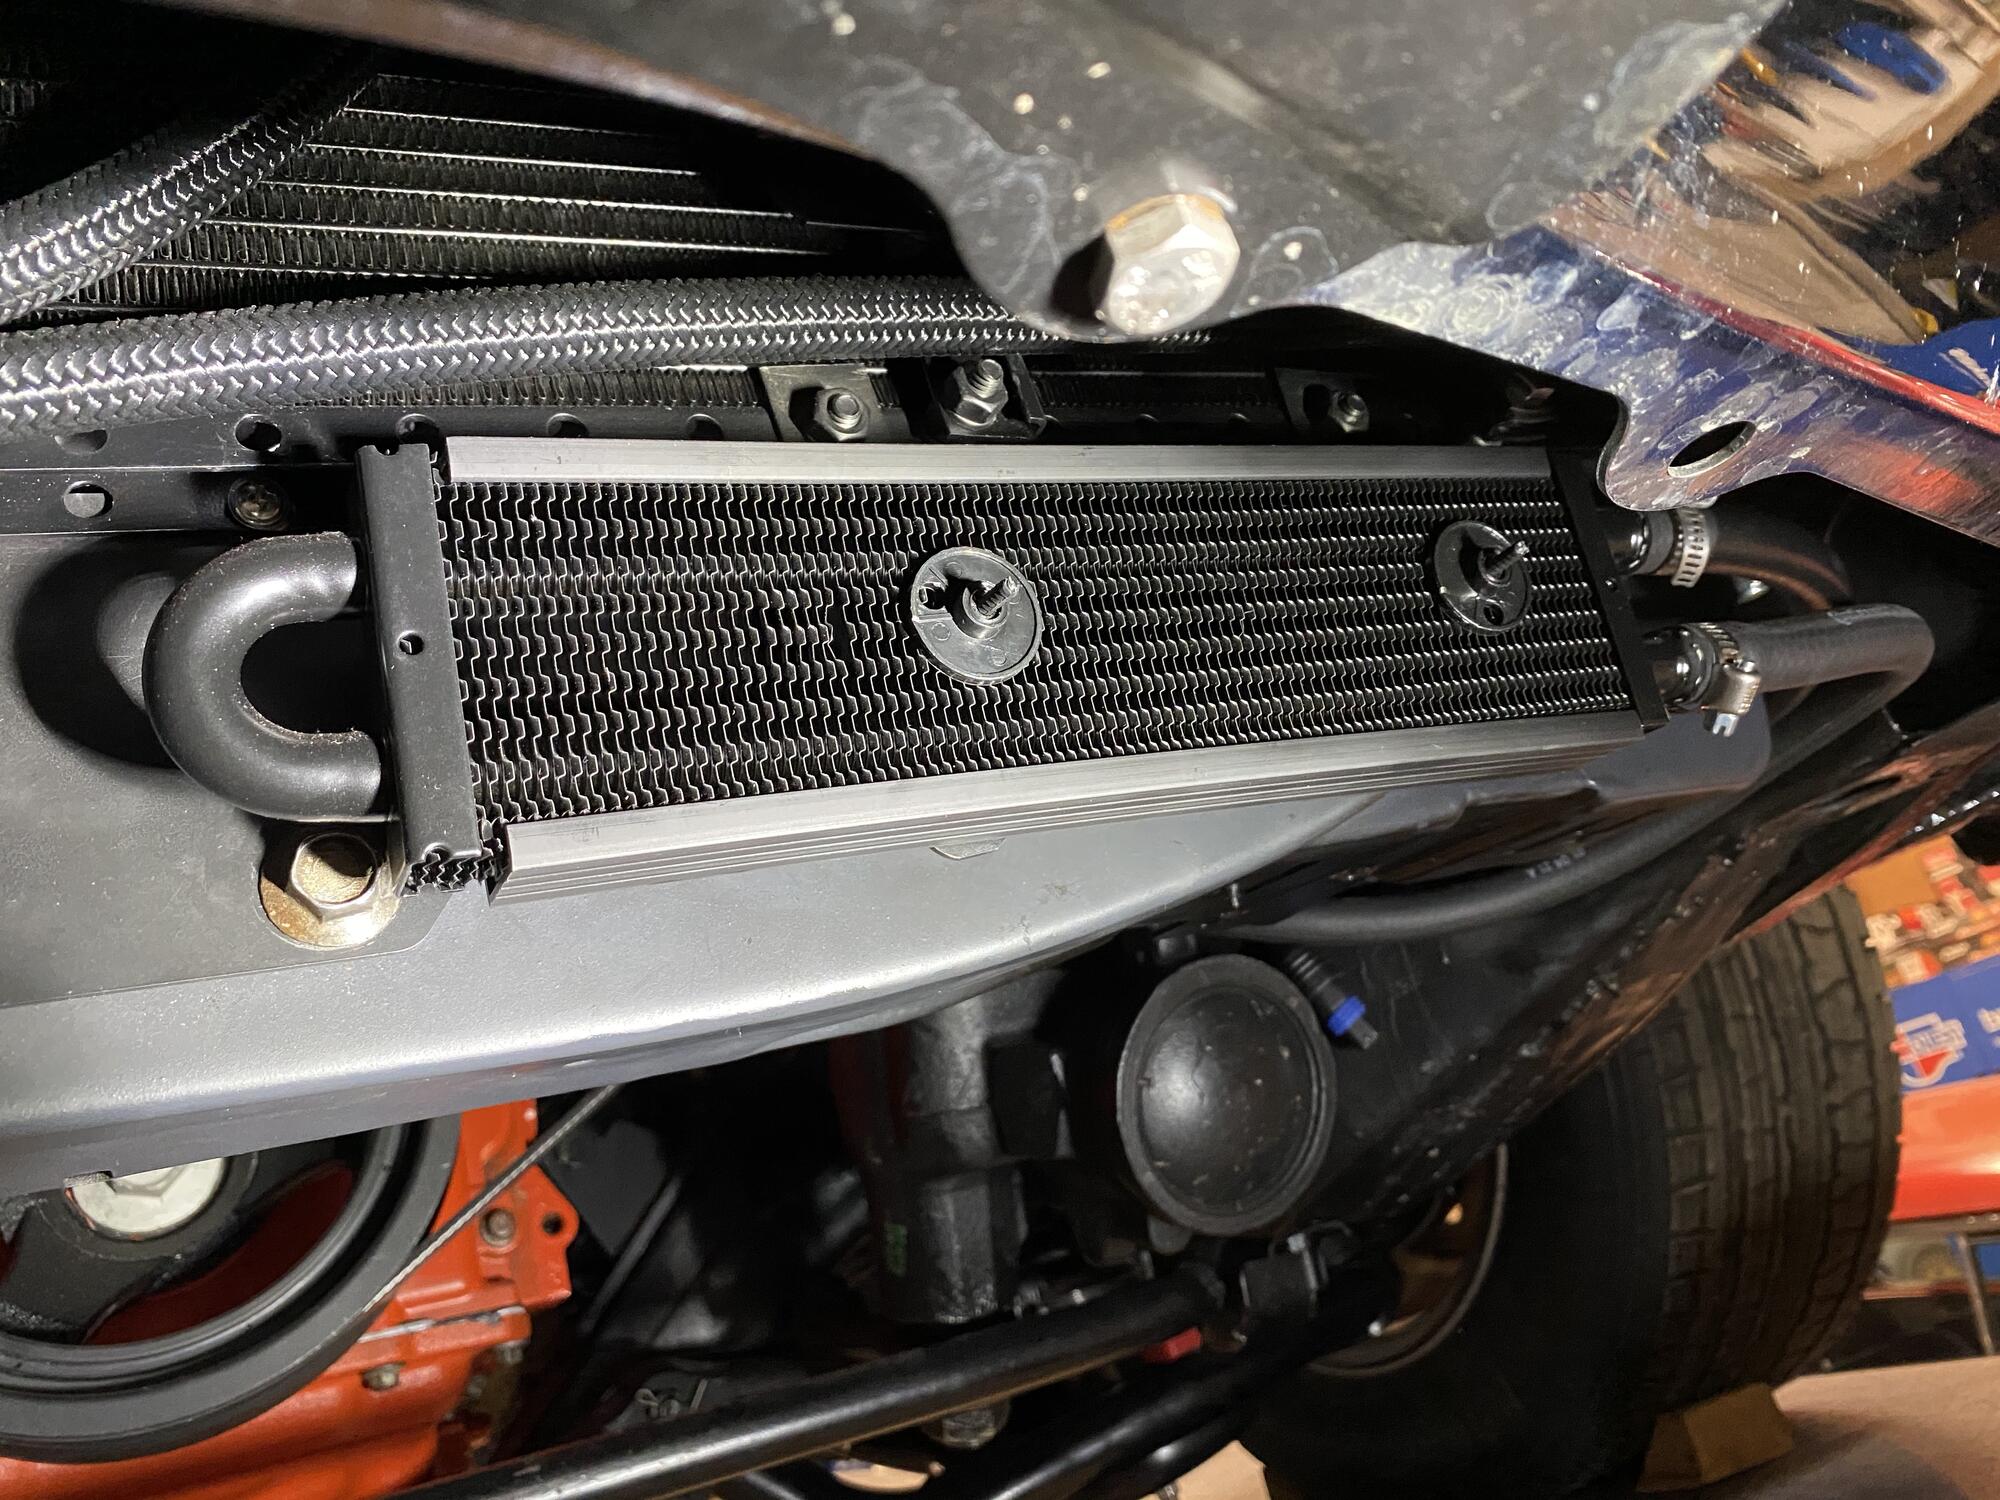
I am running both a transmission cooler and power steering cooler. The trans cooler is a B&M supercooler and the power steering cooler is a Derale unit
I also made some progress on the A/C, all that's left now is to figure out how to wire it to allow the ECM to know when the A/C is on or off so it can bump the idle and turn the fans on
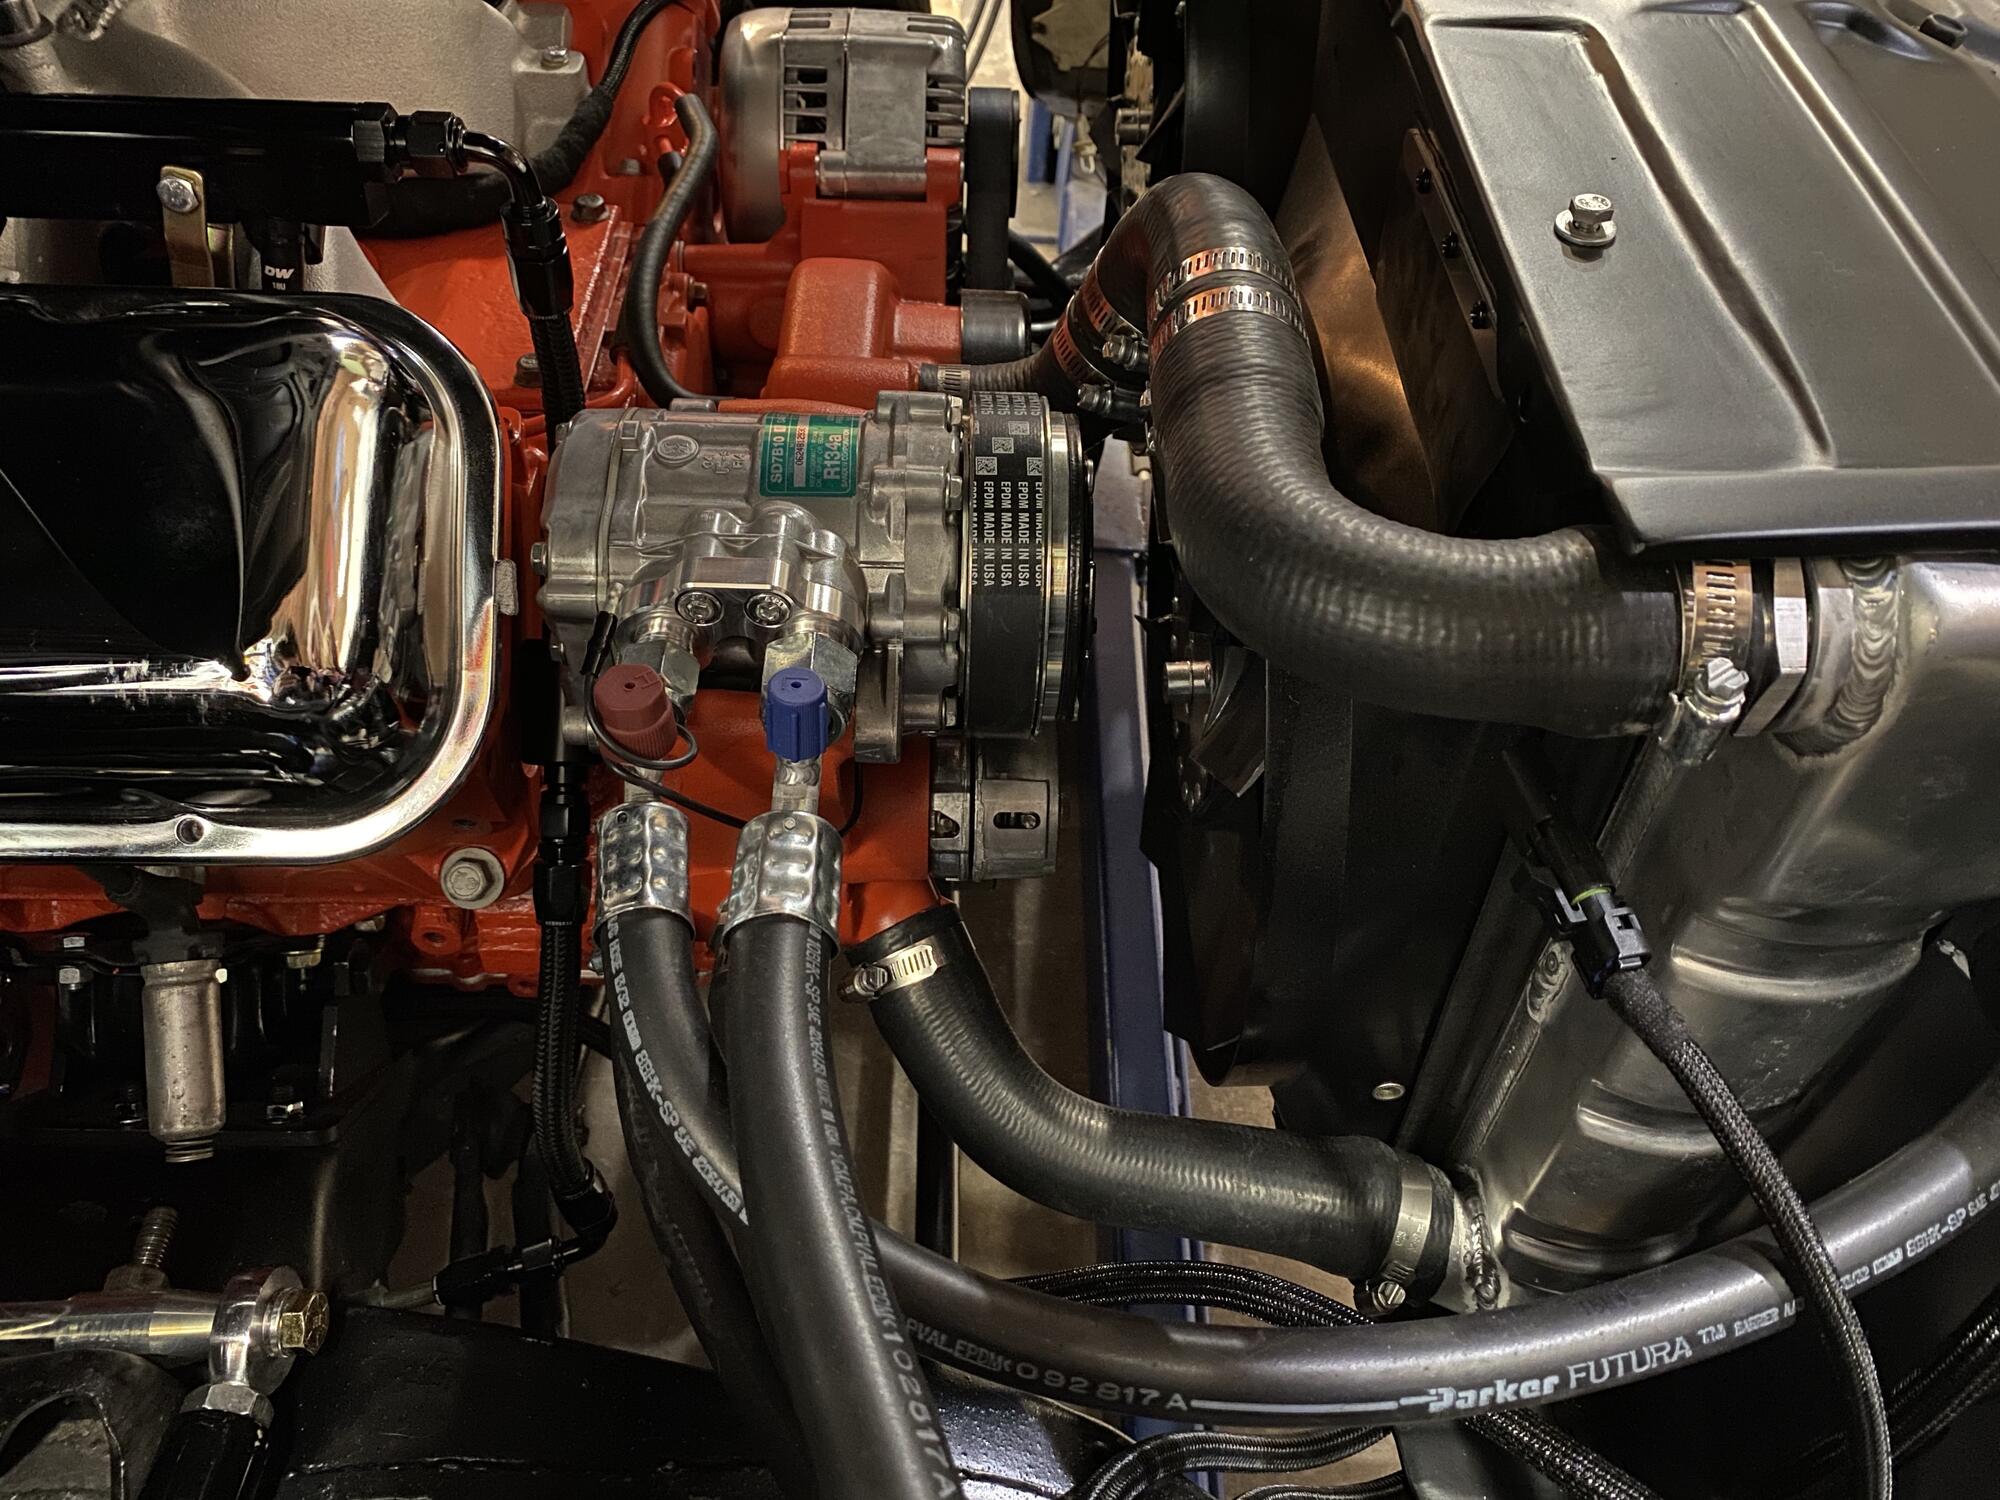
The rad and fans are also in and I made a rad hose to clear everything. The rest of the front drive is also buttoned up
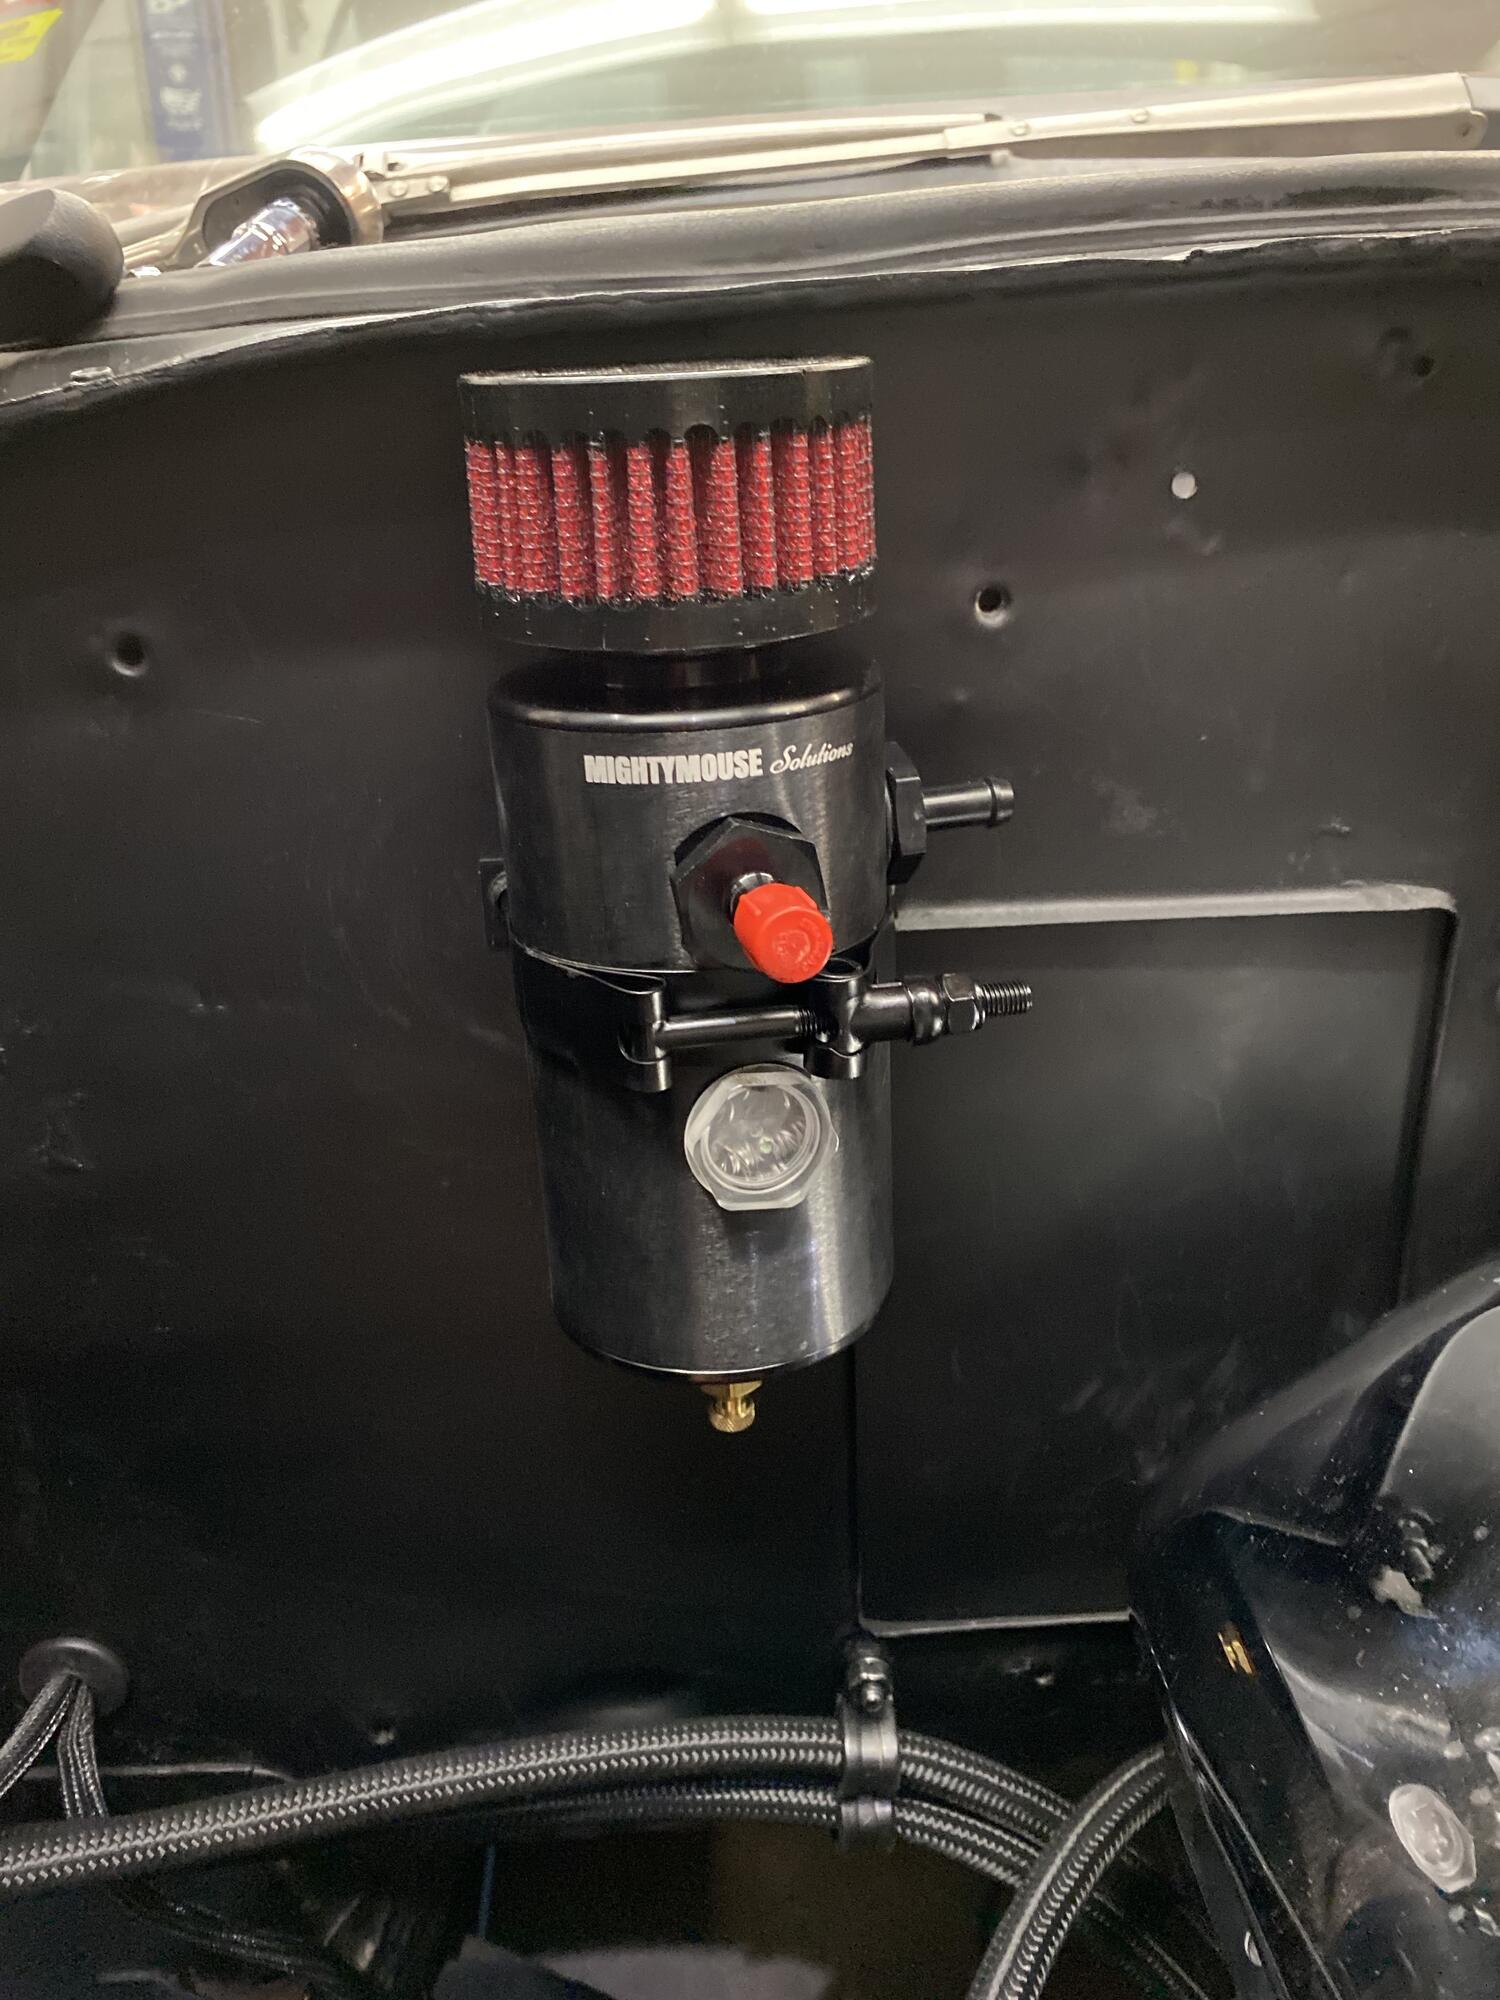
Catch can is installed. It's a mighty mouse unit, a little pricier than I would've liked but it is a really nice piece.
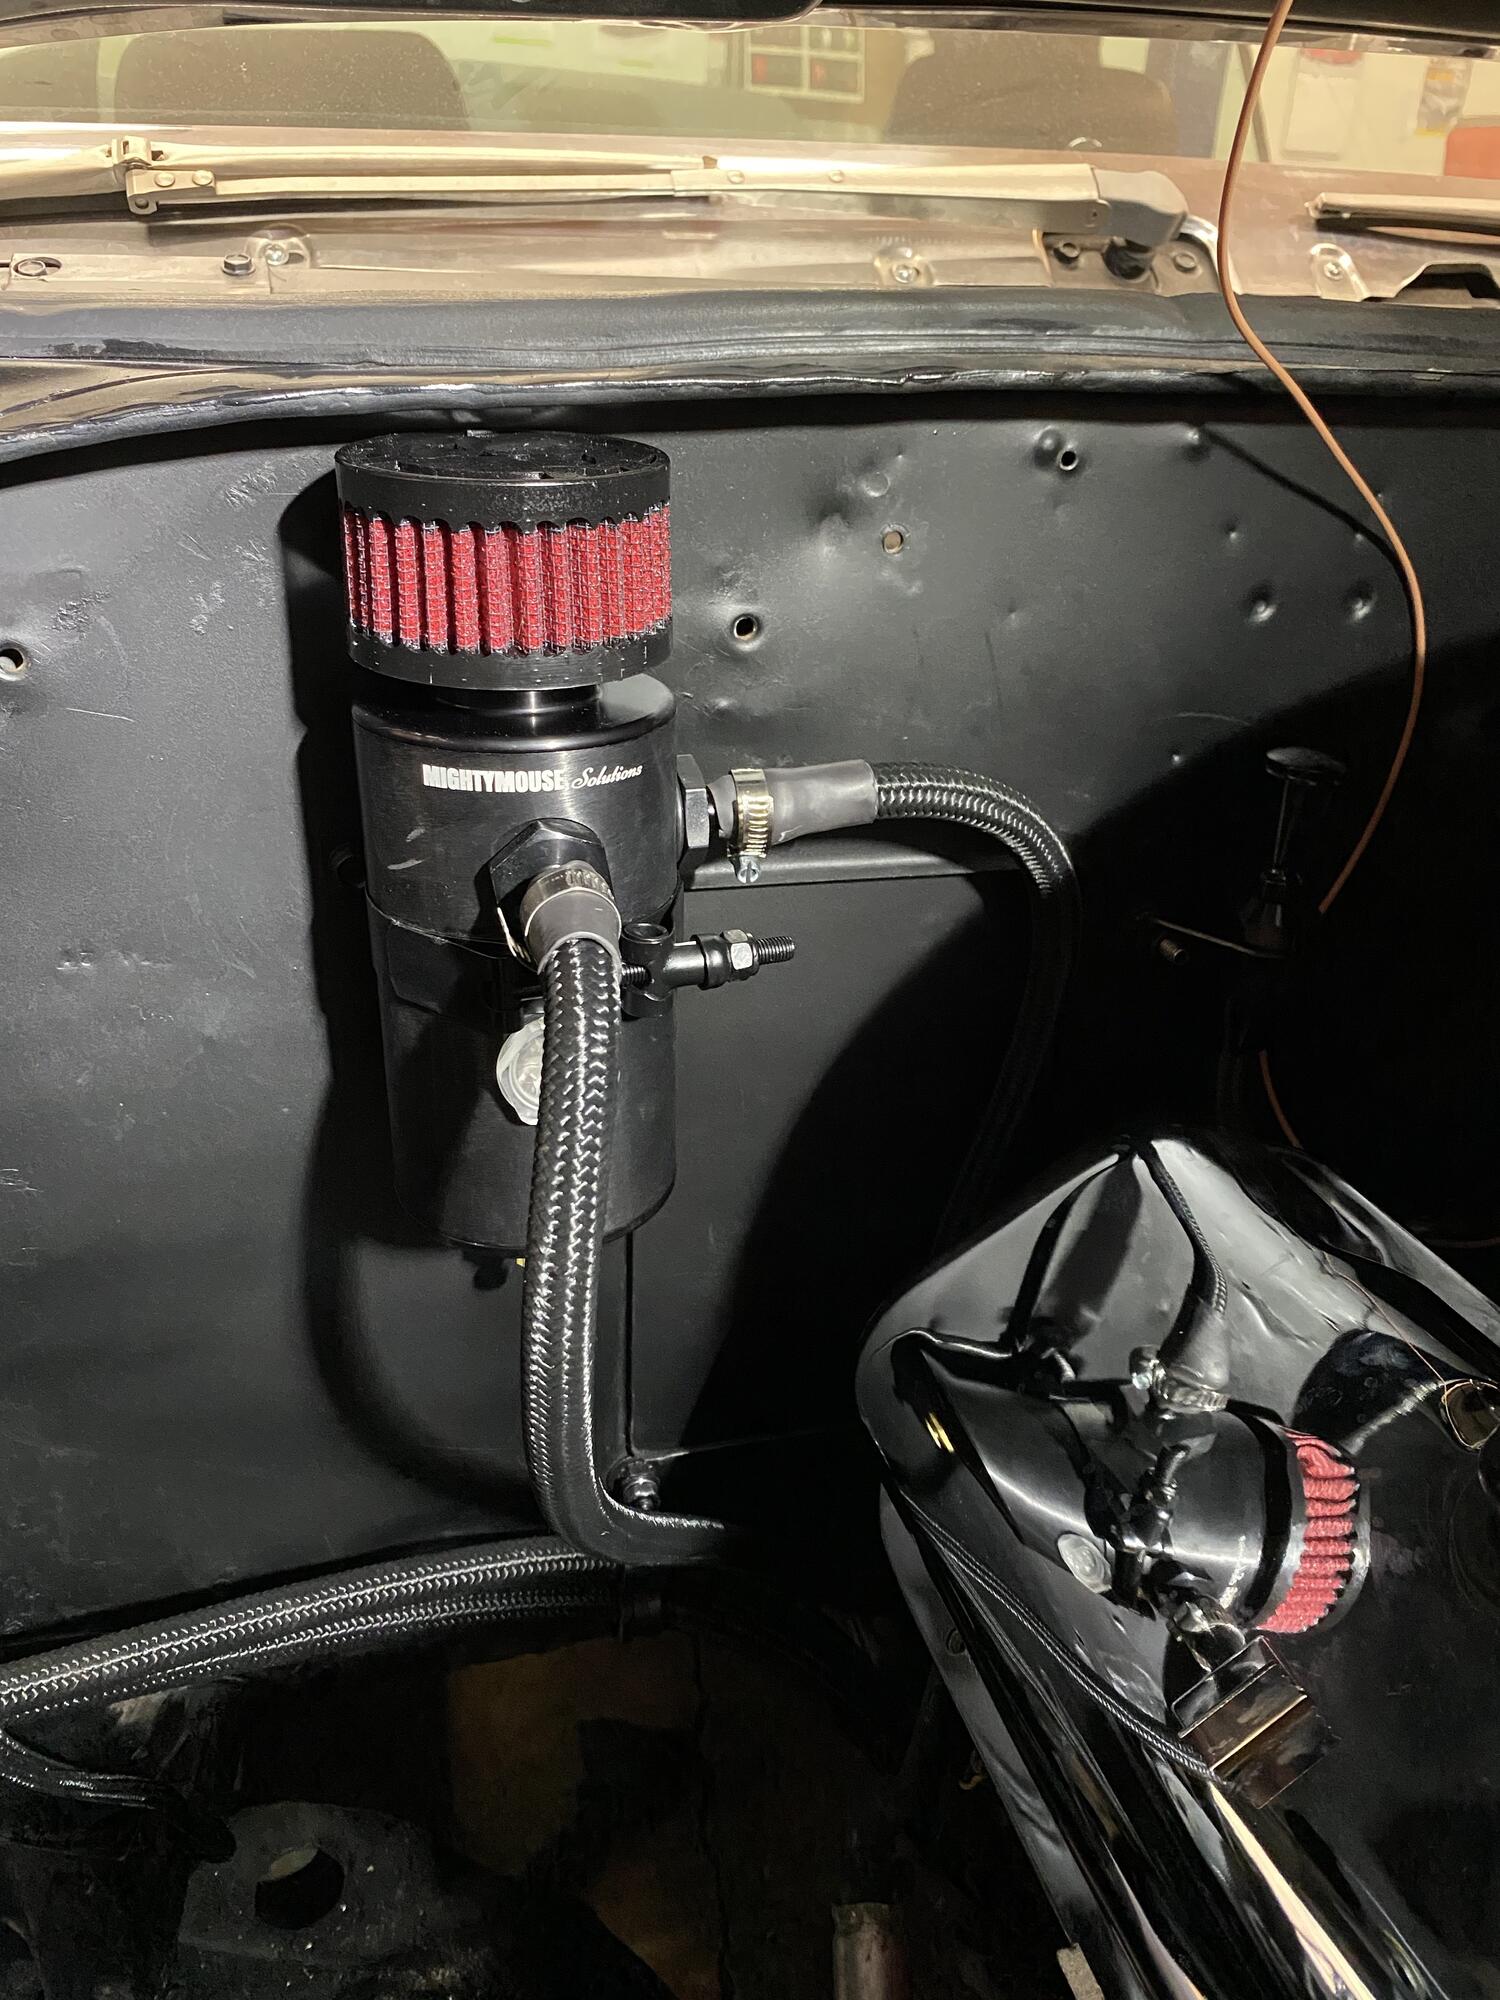
I ran what I think is a pretty trick fresh air side of the PCV but I'll get to that later. The next step while the hood was off was to make the cowl induction function
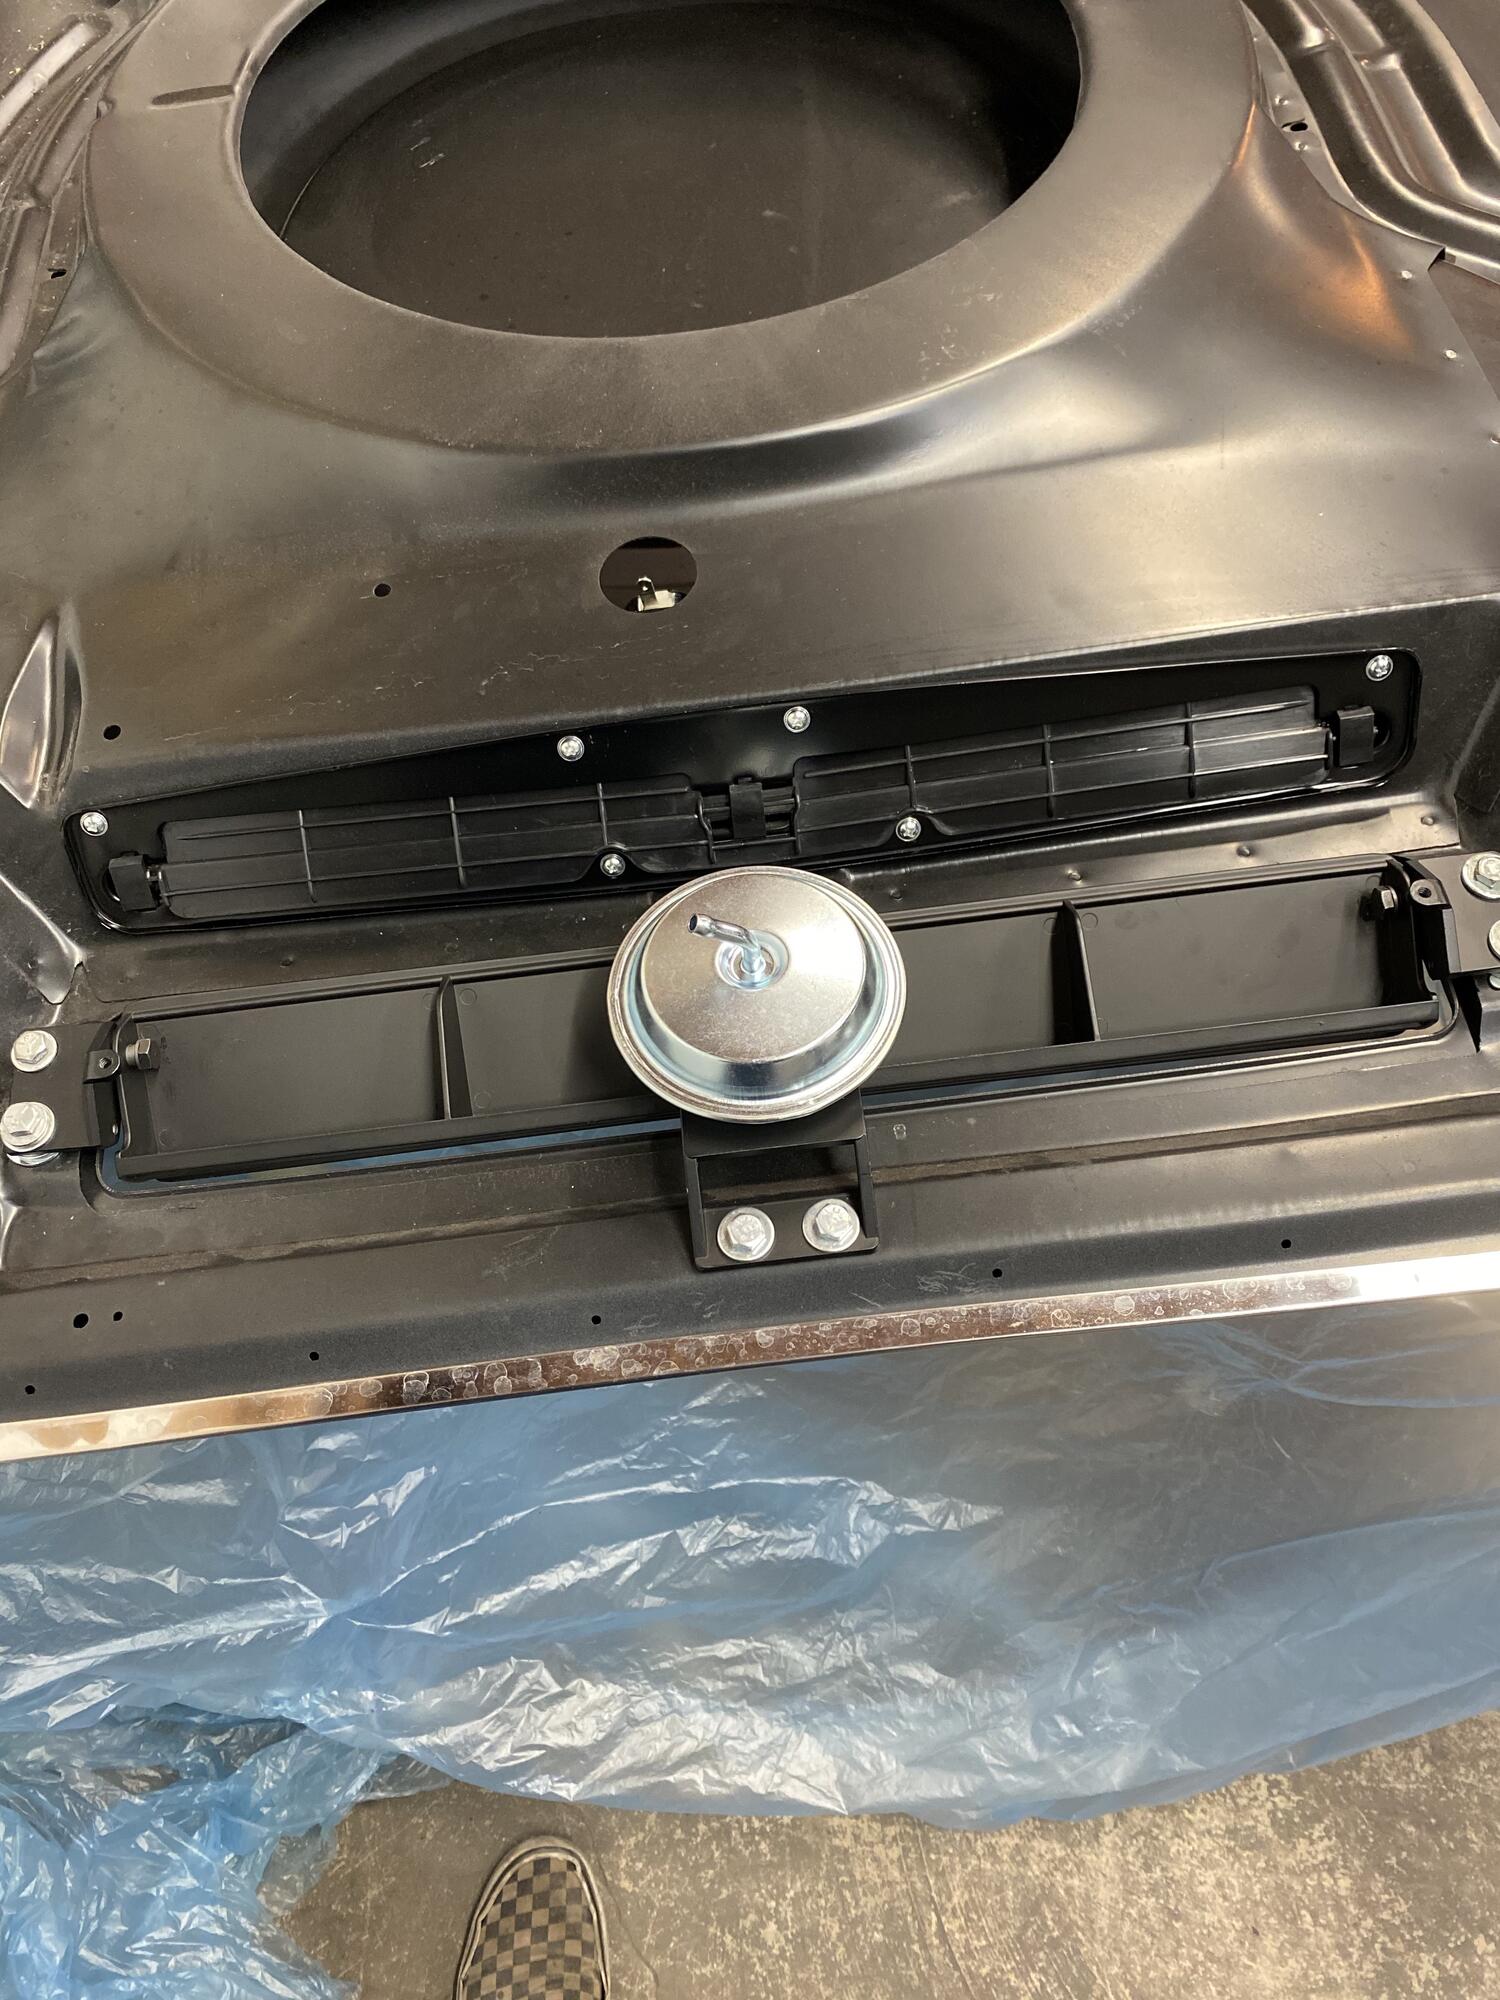
The car has had a cowl hood basically since I've had it, but the flapper door was just propped open. Christmas brought a proper cowl induction kit so I was good and ready to have that door working.
When the front suspension upgrades were going on I pulled the inner fenders out and decided to give them a makeover as well
We have a paintbooth in one of the bays in the shop so it makes spraying pieces like this less of a hassle. These are sprayed base clear with GM black
I think they turned out pretty well for my first time spraying clear. This is just out of the gun with no cut/buff and I don't think I will.
I am running both a transmission cooler and power steering cooler. The trans cooler is a B&M supercooler and the power steering cooler is a Derale unit
I also made some progress on the A/C, all that's left now is to figure out how to wire it to allow the ECM to know when the A/C is on or off so it can bump the idle and turn the fans on
The rad and fans are also in and I made a rad hose to clear everything. The rest of the front drive is also buttoned up
Catch can is installed. It's a mighty mouse unit, a little pricier than I would've liked but it is a really nice piece.
I ran what I think is a pretty trick fresh air side of the PCV but I'll get to that later. The next step while the hood was off was to make the cowl induction function
The car has had a cowl hood basically since I've had it, but the flapper door was just propped open. Christmas brought a proper cowl induction kit so I was good and ready to have that door working.

