

My 240sx / S14 LS1 Swap - Progress *56k beware*
 02-07-2007, 05:44 PM
#61
Teching In

Join Date: Nov 2006
Posts: 36
Likes: 0
Received 0 Likes
on
0 Posts
Originally Posted by mmdb
Also, as for motor mounts, is the bottom of the x-member level with the bottom of the oil pan? I want to get a guesstimate of how I high I need my motor mounts to be made. I plan to get a set fabbed up before dropping in the motor. Although it's tricky, I think if I can get a general idea where everything lines up it'll then be a matter of massaging the firewall/transmission tunnel enough to get everything to fit.
my oil pan is level with the bottom of the crossmember . if your using the same mounts as i am , two pices of 2.5x2.5 1/8th steel tubing is what i used to mount the engine . drill a hole for the chevy style mounts . pritty straight foward .
 02-07-2007, 10:41 PM
#62
TECH Regular
iTrader: (1)
Join Date: Jun 2006
Location: Beaumont TX
Posts: 426
Likes: 0
Received 0 Likes
on
0 Posts
Originally Posted by ls1neezy
my oil pan is level with the bottom of the crossmember . if your using the same mounts as i am , two pices of 2.5x2.5 1/8th steel tubing is what i used to mount the engine . drill a hole for the chevy style mounts . pritty straight foward .
02-15-2007, 11:55 PM
#63
On The Tree
Thread Starter
iTrader: (1)

Join Date: Jul 2006
Posts: 184
Likes: 0
Received 0 Likes
on
0 Posts
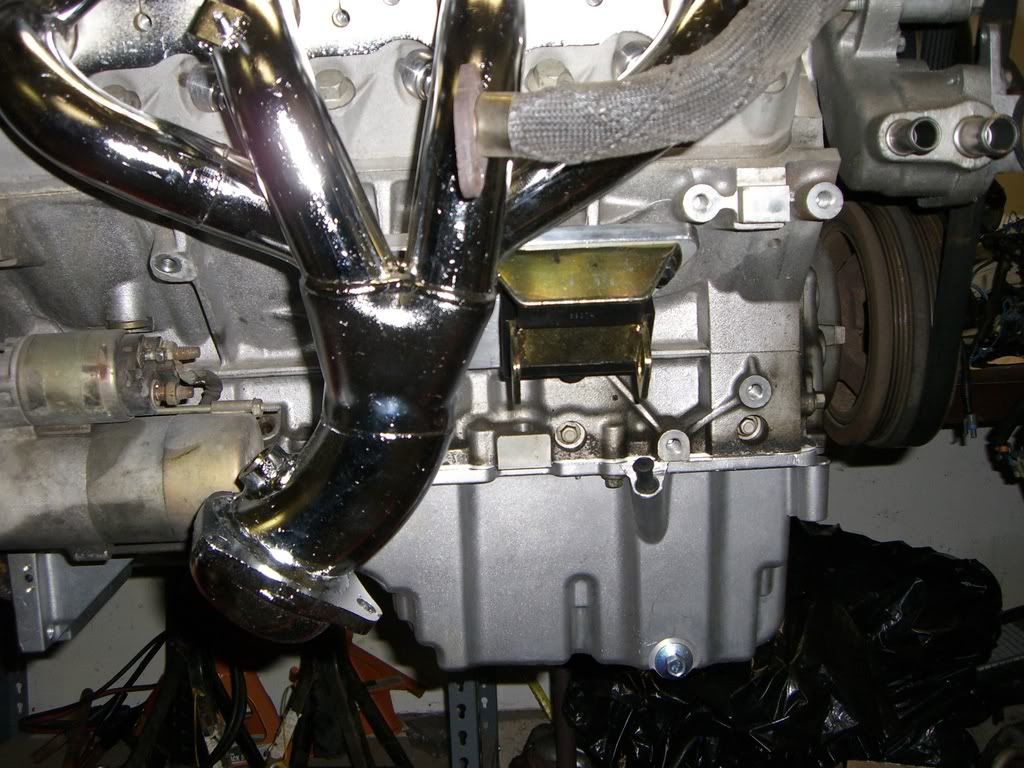
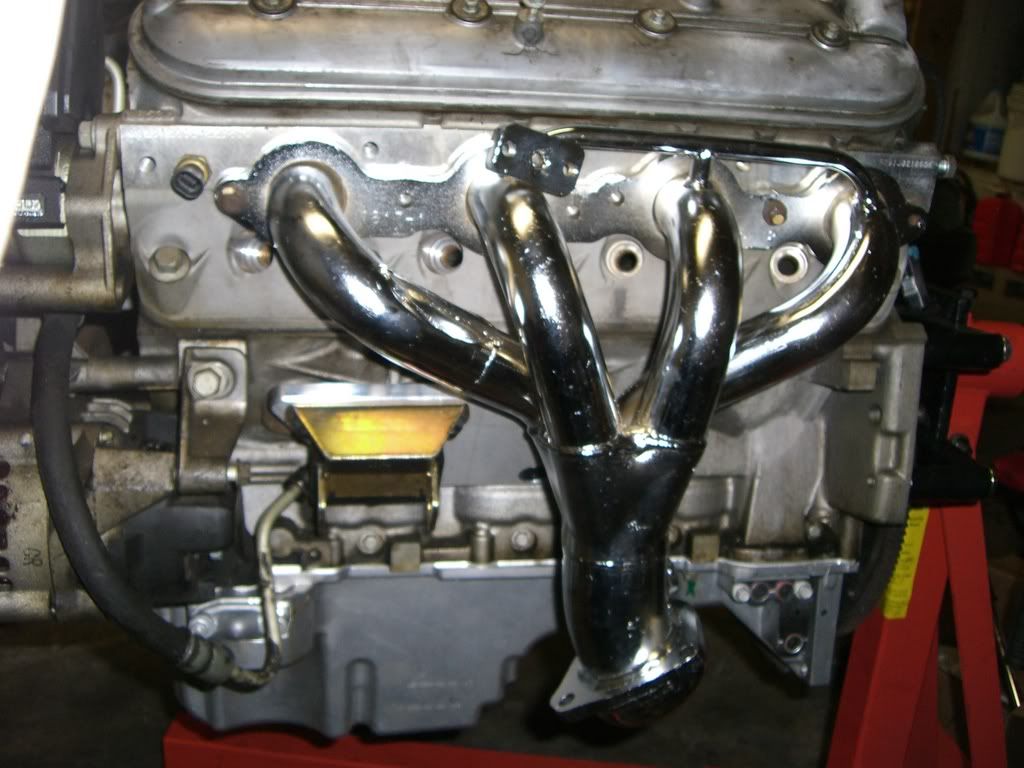
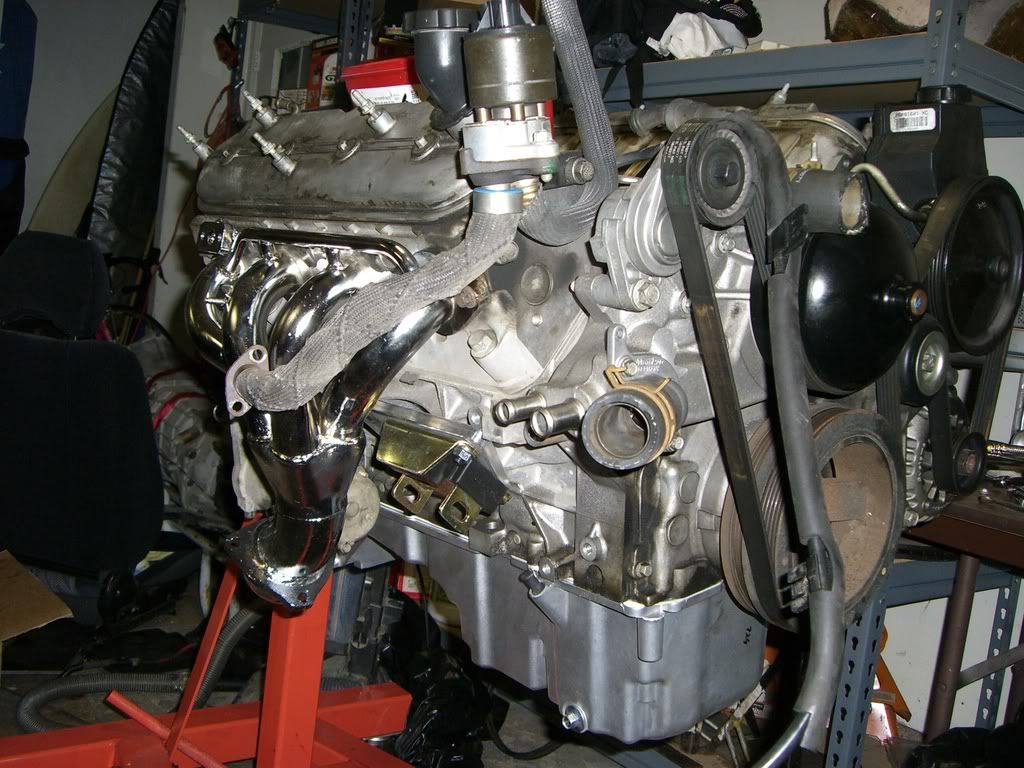
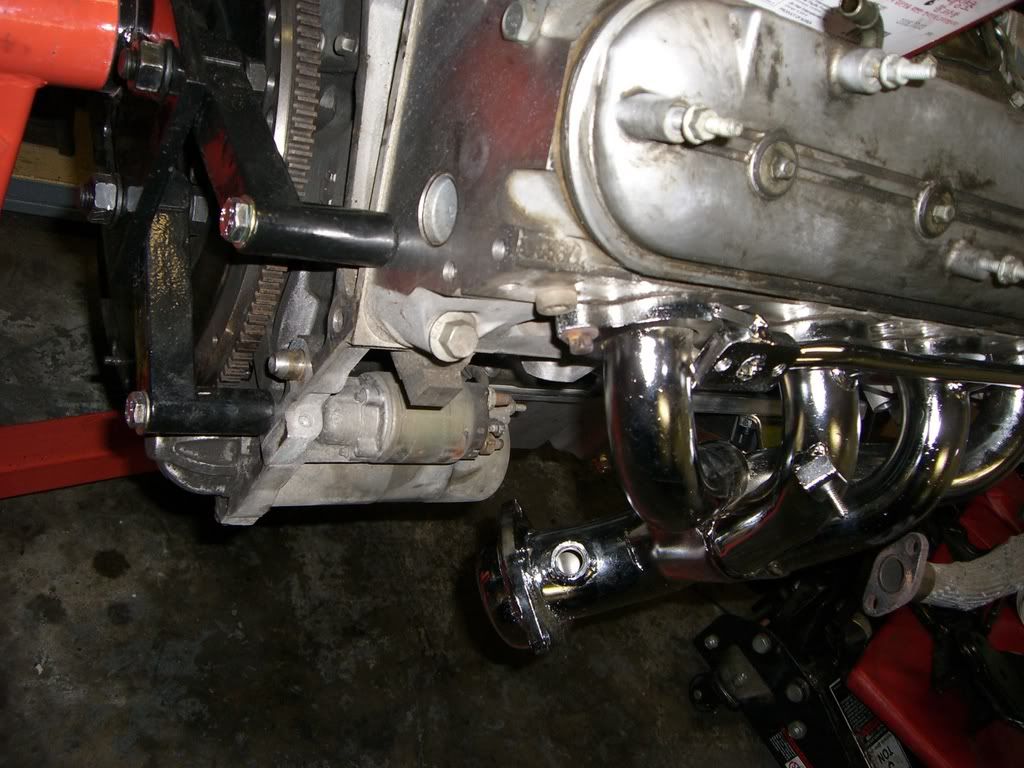
Just got my JBA headers in. Here's some test fit pictures. They're from a c5 corvette with a 1 and 5/8" piping and 2" collector outlet.
Last edited by mmdb; 03-01-2007 at 12:58 AM.
02-23-2007, 01:35 AM
#64
Teching In

Join Date: Apr 2006
Posts: 7
Likes: 0
Received 0 Likes
on
0 Posts
Nice, are those CARB legal? Too bad for the damn steering shaft huh?
Originally Posted by mmdb
Just got my JBA headers in. Here's some test fit pictures. They're from a c5 corvette with a 1 and 5/8" collector outlet.
02-23-2007, 01:47 AM
#65
On The Tree
Thread Starter
iTrader: (1)
Join Date: Jul 2006
Posts: 184
Likes: 0
Received 0 Likes
on
0 Posts
Originally Posted by fwdsucks
Nice, are those CARB legal? Too bad for the damn steering shaft huh?
02-23-2007, 02:33 AM
#66
On The Tree

Join Date: Oct 2006
Posts: 123
Likes: 0
Received 0 Likes
on
0 Posts
god those headers are nasty! i mean for the money you would think they would be off he hook!! i wana see how it fits in car.. wha you have to do to make header fit! cut an go around im guessin like that one guy had to do. good luck wit swap! mine kicks *** and cant wait to hit the track to drift!!
02-23-2007, 06:31 AM
#67
TECH Enthusiast
iTrader: (4)

Join Date: Nov 2001
Location: Atlanta, GA
Posts: 527
Likes: 0
Received 0 Likes
on
0 Posts

Originally Posted by daftdrifting
god those headers are nasty! i mean for the money you would think they would be off he hook!! i wana see how it fits in car.. wha you have to do to make header fit! cut an go around im guessin like that one guy had to do. good luck wit swap! mine kicks *** and cant wait to hit the track to drift!!
On the passengers side, again depending on engine placement, it looks like the collect is going to be to far out and hit the frame rail. Just guessing from looking at the pics and from what slo_240... had to do with his JBA headers and also how my manifolds turned out and how close I ended up being to the starter and still being pretty close to the frame rail at the same time.
02-24-2007, 10:37 PM
#69
On The Tree
Thread Starter
iTrader: (1)
Join Date: Jul 2006
Posts: 184
Likes: 0
Received 0 Likes
on
0 Posts
Minor update. Someone asked the question of how we plug up the dip stick hole on the block since the GTO oil pan has its own. Well I threaded it using a 10 x 1.25 mm threader.... thing... and plugged it up with a bolt. Pretty simple.
Also, I changed the front cover gasket and front pulley seal for preventative measure. I must say this engine is REALLY easy to work on (Thanks GM) compared to some Japanese motors.
Also, I changed the front cover gasket and front pulley seal for preventative measure. I must say this engine is REALLY easy to work on (Thanks GM) compared to some Japanese motors.
 02-28-2007, 09:51 PM
#71
On The Tree
Thread Starter
iTrader: (1)
Join Date: Jul 2006
Posts: 184
Likes: 0
Received 0 Likes
on
0 Posts
Got my intake going. It's a 3.5" inlet and 9" long filter from AEM. I can post up a part number if you guys want it. It looks mean! I also changed my front cover gasket, intake gasket, crank front seal, and water pump gasket (not sure if i mentioned those already).
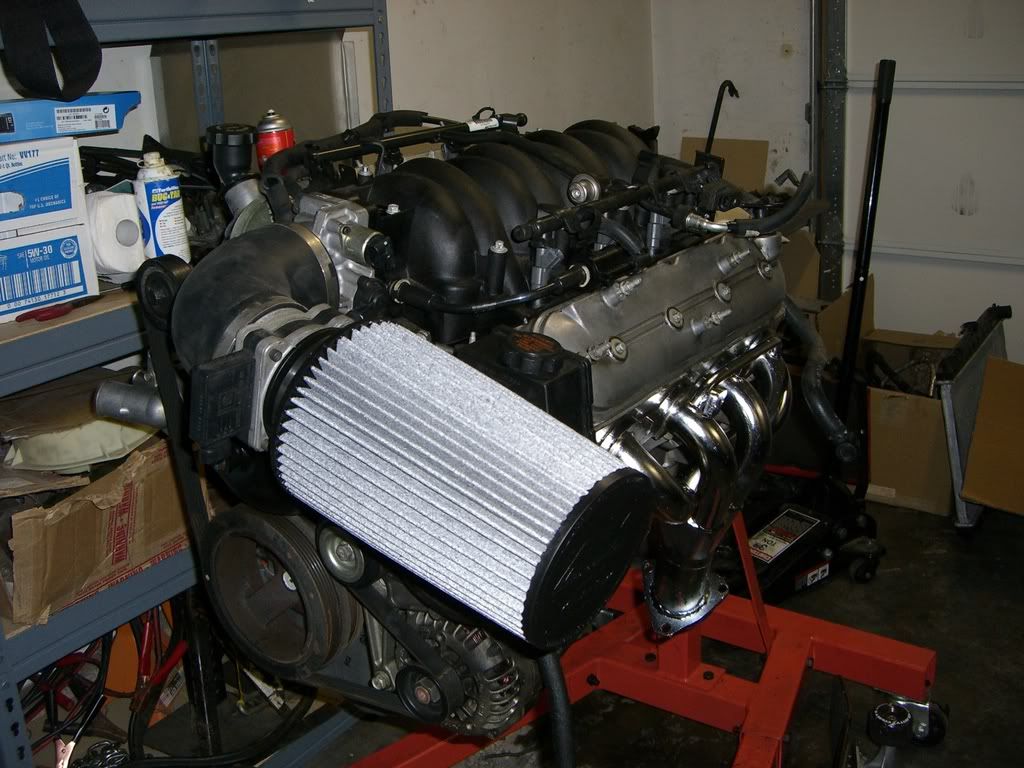
Last edited by mmdb; 03-01-2007 at 12:59 AM.
03-01-2007, 04:42 PM
#73

With a intake like that you really need to watch you intake air temps. With the RX7 stuff we have found that anything less then a 4" tube just robs HP, and also the is needs to get some colder air rather then just sucking in all the hot air from right behind the radiator. Just letting you know what has been beat to death over on TC and some of the other forms.
03-01-2007, 10:51 PM
#74
On The Tree
Thread Starter
iTrader: (1)
Join Date: Jul 2006
Posts: 184
Likes: 0
Received 0 Likes
on
0 Posts
Originally Posted by Sabre002
With a intake like that you really need to watch you intake air temps. With the RX7 stuff we have found that anything less then a 4" tube just robs HP, and also the is needs to get some colder air rather then just sucking in all the hot air from right behind the radiator. Just letting you know what has been beat to death over on TC and some of the other forms.
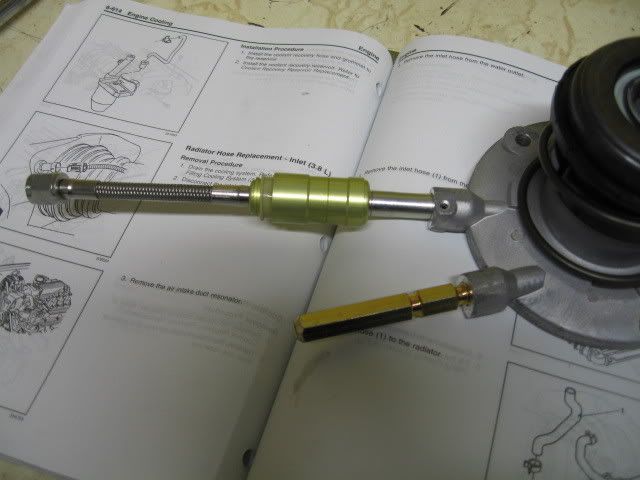
About the clutch line. I searched around and found that a manufacturer MCLEOD Industries make a quick connect fitting to the clutch slave cylinder and to a -4 AN fitting. Now you can make your hardlines or braided lines with a -4AN! That's it!
 I believe I paid 50-70 dollars. I'll have to double check but expect to pay around there. But any of the Mcleod's dealers could get it for your. Just mention what you've seen here (A male quick disconnect to a -4AN line for the slave cylinder. The braided line is about 3"). Here's some pix.
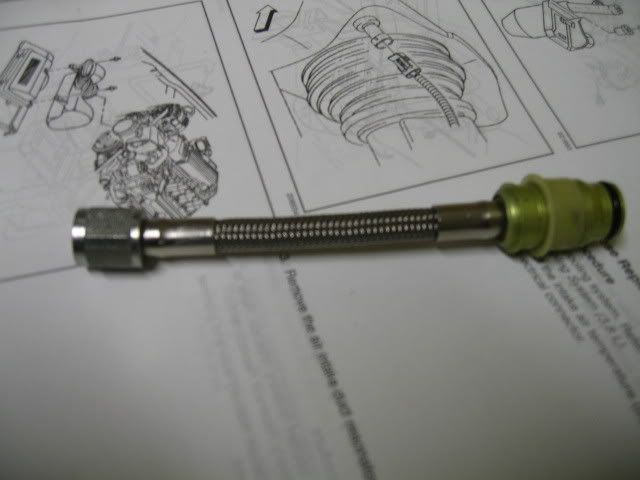
 03-02-2007, 06:32 AM
#75
TECH Enthusiast
iTrader: (4)
Join Date: Nov 2001
Location: Atlanta, GA
Posts: 527
Likes: 0
Received 0 Likes
on
0 Posts
Originally Posted by mmdb
Thanks for the heads up. Since the inlet/outlet of the MAF sensor is 3.5" what're you guys doing to get around that? Are they using bigger MAFs for new cars?
About the clutch line. I searched around and found that a manufacturer MCLEOD Industries make a quick connect fitting to the clutch slave cylinder and to a -4 AN fitting. Now you can make your hardlines or braided lines with a -4AN! That's it! I believe I paid 50-70 dollars.
About the clutch line. I searched around and found that a manufacturer MCLEOD Industries make a quick connect fitting to the clutch slave cylinder and to a -4 AN fitting. Now you can make your hardlines or braided lines with a -4AN! That's it!
I believe I paid 50-70 dollars.
03-02-2007, 10:22 AM
#76
On The Tree
iTrader: (3)
Join Date: Jun 2006
Location: Westminster, MD
Posts: 164
Likes: 0
Received 0 Likes
on
0 Posts
Ted,
Where is that part number? How much slack did you have with the 4' line? Did you have a lot of extra line to deal with? As always, nice job.
Thanks, Ken.
Where is that part number? How much slack did you have with the 4' line? Did you have a lot of extra line to deal with? As always, nice job.
Thanks, Ken.
03-02-2007, 10:37 AM
#77
TECH Enthusiast
iTrader: (4)
Join Date: Nov 2001
Location: Atlanta, GA
Posts: 527
Likes: 0
Received 0 Likes
on
0 Posts
Originally Posted by the.erinyes
Ted,
Where is that part number? How much slack did you have with the 4' line? Did you have a lot of extra line to deal with? As always, nice job.
Thanks, Ken.
Where is that part number? How much slack did you have with the 4' line? Did you have a lot of extra line to deal with? As always, nice job.
Thanks, Ken.
Here is the clutch line. I haven't mesured how long it actually is yet but it is pretty long. On the extra line, I am going to run the clutch line along the lip towards the passengers side and run it over the top of the brake booster and then go down to the transmission along the firewall to take up the extra slack. Might still have some extra to deal with though, haven't checked to see if it's going to be an issue or not. I think it's suppose to be 48" long according to the part number but don't know that for a fact yet since I haven't mesured it yet:
http://store.summitracing.com/partde...5&autoview=sku
Here is the union adapter I went with:
http://www.jegs.com/webapp/wcs/store...52560_-1_10019
Part number: 555-100210
Desc: -3 AN to -4 AN Flare Reducer - Blue
Male Threads
And this is the MC I went with:
http://store.summitracing.com/partde...5&autoview=sku
I used a dremel to machine down the output of the MC around 3/16" of an inch or so. Did that so the union adapter would fit and the flare was able to be the part that bottomed out and made a good seal. Ended up taking just a little bit to much off but it doesn't matter since the flare is where the sealing is being made at.