


LQ4 into a 3rd Gen/1972 Nova
I've been wondering if all this effort will be worth it, and you all probably think this is extreme, but with my size 13 feet I've never found a car that I could heel-toe in because of the trans tunnel, not to mention the stock Nova pedals were way too far out from the firewall making my long legs feel cramped. Anyways it was totally worth it! all pedals are exactly where I want them, laterally, vertically, and depth-wise 

Isn't going from the 4" pipe down to two 2.5" pipes going to make a restriction point?
Each 2.5" pipe is 4.9"in^2 of cross sectional area.
The 4.0" pipe is 12.56"in^2 of cross sectional area.
This means you will have a pressure build-up at this point causing turbo back pressure.....just checking because this was one thing that I was battling when building my turbo set-up.
Each 2.5" pipe is 4.9"in^2 of cross sectional area.
The 4.0" pipe is 12.56"in^2 of cross sectional area.
This means you will have a pressure build-up at this point causing turbo back pressure.....just checking because this was one thing that I was battling when building my turbo set-up.
Thread Starter
Joined: May 2007
Posts: 1,806
Likes: 46
From: Vancouver BC, Canada
Isn't going from the 4" pipe down to two 2.5" pipes going to make a restriction point?
Each 2.5" pipe is 4.9"in^2 of cross sectional area.
The 4.0" pipe is 12.56"in^2 of cross sectional area.
This means you will have a pressure build-up at this point causing turbo back pressure.....just checking because this was one thing that I was battling when building my turbo set-up.
Each 2.5" pipe is 4.9"in^2 of cross sectional area.
The 4.0" pipe is 12.56"in^2 of cross sectional area.
This means you will have a pressure build-up at this point causing turbo back pressure.....just checking because this was one thing that I was battling when building my turbo set-up.
A 3" downpipe seems way too small to me, and a 3.5" dia. downpipe would have been about perfect, but try finding mandrel bends of 3.5"... not possible. And better to go bigger so stepped it up to 4". I wanted to re-use the previous exhaust for now because I plan to do a full 3" dual exhaust later, but I really want to drive the car, so right now spending the money and time to do a full (likely SS) 3" exhaust with Magnaflow mufflers is just not in the books.
Also there is probably 36" or slightly more of 4" pipe before the y-pipe split, and the exhaust gases will expand a bit as well as cool, so I'm not too worried about this somewhat-temporary 2.5" setup.
Thread Starter
Joined: May 2007
Posts: 1,806
Likes: 46
From: Vancouver BC, Canada
Thread Starter
Joined: May 2007
Posts: 1,806
Likes: 46
From: Vancouver BC, Canada
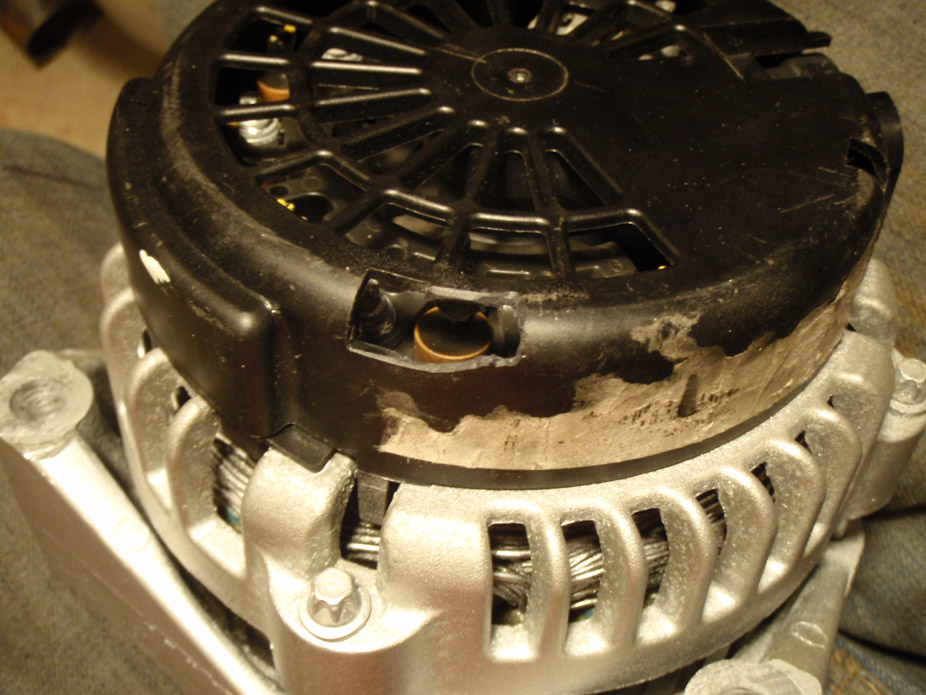
It turns out when I was mocking up my panels and adjusting the cowl support, it has to be modified and that meant the hood would close at a lower height to close properly, and there ended up being interference between the alternator and the hood.
And I needed to find a way to bolt up an idler pulley between the alt & p/s pump to give them both more belt wrap, so why not kill two birds with one stone...
Two belt wrap options are possible with the alternator relocation bracket I came up with, but I will be going with option #2. The two circles at the top right are the alternator pulley before & after, ended up moving down 1.5" and over 1"
Option #1:

Option #2:
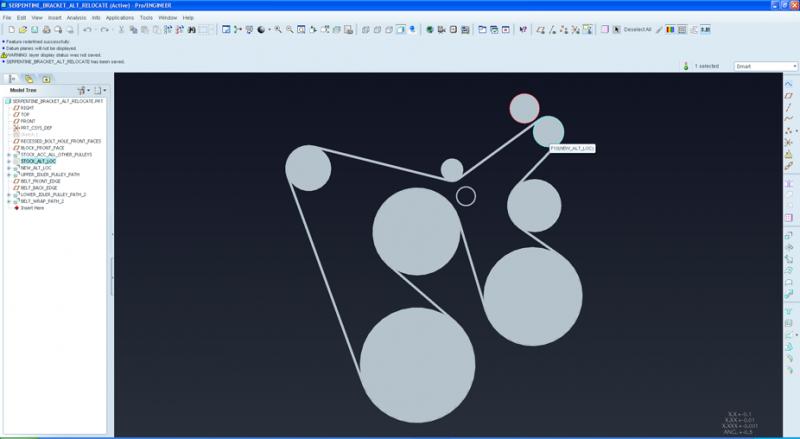


Wanted to reuse the stock bracket mainly to reduce the amount of stuff I had to make (extra fab'd bracket for p/s pump) and also to retain the location of the stock truck accessory idler pulley (top left).

The reason the main relocation bracket is two 1/4" thick pieces and not one 1/2" thick piece is that a) had 1/4" lying around but no half, and b) 1/4" is the exact depth difference between the bracket front bolt face and the inner face of where the alternator bolts to.


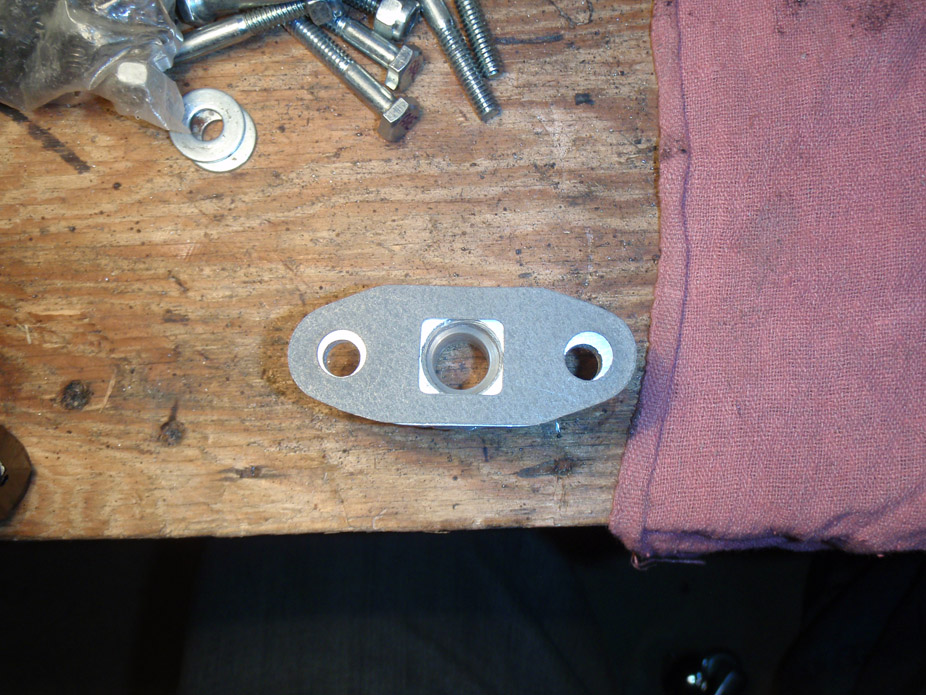
Alternator "back support" plat bolts to the head, and the two alternator bolts as well as the idler pulley all thread into this plate.

Alternator "front support" bolts thru the stock bracket into the head.

Turned a stepped standoff spacer for the stock LQ4 idler pulley.

And I needed to find a way to bolt up an idler pulley between the alt & p/s pump to give them both more belt wrap, so why not kill two birds with one stone...
Two belt wrap options are possible with the alternator relocation bracket I came up with, but I will be going with option #2. The two circles at the top right are the alternator pulley before & after, ended up moving down 1.5" and over 1"
Option #1:
Option #2:
Wanted to reuse the stock bracket mainly to reduce the amount of stuff I had to make (extra fab'd bracket for p/s pump) and also to retain the location of the stock truck accessory idler pulley (top left).
The reason the main relocation bracket is two 1/4" thick pieces and not one 1/2" thick piece is that a) had 1/4" lying around but no half, and b) 1/4" is the exact depth difference between the bracket front bolt face and the inner face of where the alternator bolts to.
Alternator "back support" plat bolts to the head, and the two alternator bolts as well as the idler pulley all thread into this plate.
Alternator "front support" bolts thru the stock bracket into the head.
Turned a stepped standoff spacer for the stock LQ4 idler pulley.
Thread Starter
Joined: May 2007
Posts: 1,806
Likes: 46
From: Vancouver BC, Canada
Idler bolts thru the front plate, has a spacer between the two plates, and threads into the rear plate.


Had to make a tiny notch to get alternator to clear the valve cover.


Made a small-diameter pulley to lower the belt to clear the intake tube/throttle body. Has two stacked high-rpm bearings in it.


Not the final belt wrap path but did it like this so I could hang that steel rod in it to tension it... everything fits & lines up like a glove!

Had to make a tiny notch to get alternator to clear the valve cover.
Made a small-diameter pulley to lower the belt to clear the intake tube/throttle body. Has two stacked high-rpm bearings in it.
Not the final belt wrap path but did it like this so I could hang that steel rod in it to tension it... everything fits & lines up like a glove!
LS1 Tech Stories
The Best V8 Stories One Small Block at Time

Gas Monkey Built a 6-Wheel Ferrari Testarossa With a Corvette LT4 Engine
Verdad Gallardo
7 Most Reliable High-Performance Engines GM Has Ever Built
Verdad Gallardo
Amazing '71 Camaro Restomod Is Modern Muscle Car Under the Skin
Verdad Gallardo
6 Common C5 Corvette Failures and What's Involved In Repairing Them
Pouria Savadkouei
Retro Modern Bandit Pontiac Trans AM Comes With Burt Reynolds' Autograph
Verdad Gallardo
Top 10 Greatest Cadillac V Series Performance Models Ever, Ranked
Pouria Savadkouei
Top 10 Most Powerful Chevy Trucks Ever Made!

Hennessey's New Supercharged Silverado ZR2 Has 700 HP
Verdad Gallardo
Coachbuilt N2A Anteros Is an LS2-Powered C6 Corvette In Italian Clothes
Verdad Gallardo Thread Starter
Joined: May 2007
Posts: 1,806
Likes: 46
From: Vancouver BC, Canada
Christmas in July! HOPING this is the last big batch of parts I need to get before it's on the road. Whoever said that these swaps will nickel-and-dime you to death is a lying *******... more like 20'd and 50'd to death haha.


FAR too many hours into this, doesn't look like all that much hah... need about 6" more of weld then they're off to the ceramic coater, will get more argon tomorrow morn. Going to be a big weekend... holy crap.

FAR too many hours into this, doesn't look like all that much hah... need about 6" more of weld then they're off to the ceramic coater, will get more argon tomorrow morn. Going to be a big weekend... holy crap.
Thread Starter
Joined: May 2007
Posts: 1,806
Likes: 46
From: Vancouver BC, Canada
Screws will be plenty, remember the idler pulley bolt goes thru both plates, and it is a 10.9 grade 10mm GM bolt, so that's the main point for shear. All the eight other 6mm bolts are just for making sure the two plates don't rotate against each other. I stood on the alternator pulley and as far as I could tell there wasn't any flex.. it's tough, I'm not worried about it.


Nice work, although since I see the latest batch is the turbo piping, I'd say theres another batch or two of "oh crap, I shouldn't have needed these" parts/supplies (there always is).

Joined: Mar 2010
Posts: 436
Likes: 41
From: Vancouver area, West coast Canada

Thread Starter
Joined: May 2007
Posts: 1,806
Likes: 46
From: Vancouver BC, Canada
Great work once again! Bracket looks awesome! I like how you made do with what you had at your disposal. I am in the same boat and try to use up all resources available at that time. You can always go back and "redo or do differently" things at any given time. I am with you on the nickels and dimes! **** I just dropped over $600 on something I already had but wasnt done correctly.
Thread Starter
Joined: May 2007
Posts: 1,806
Likes: 46
From: Vancouver BC, Canada
Finished up the O2 bungs on the hotside piping and dropped that all off to be ceramic coated ($$$!!!), should hopefully get it back by Friday and re-assembly on the engine this weekend
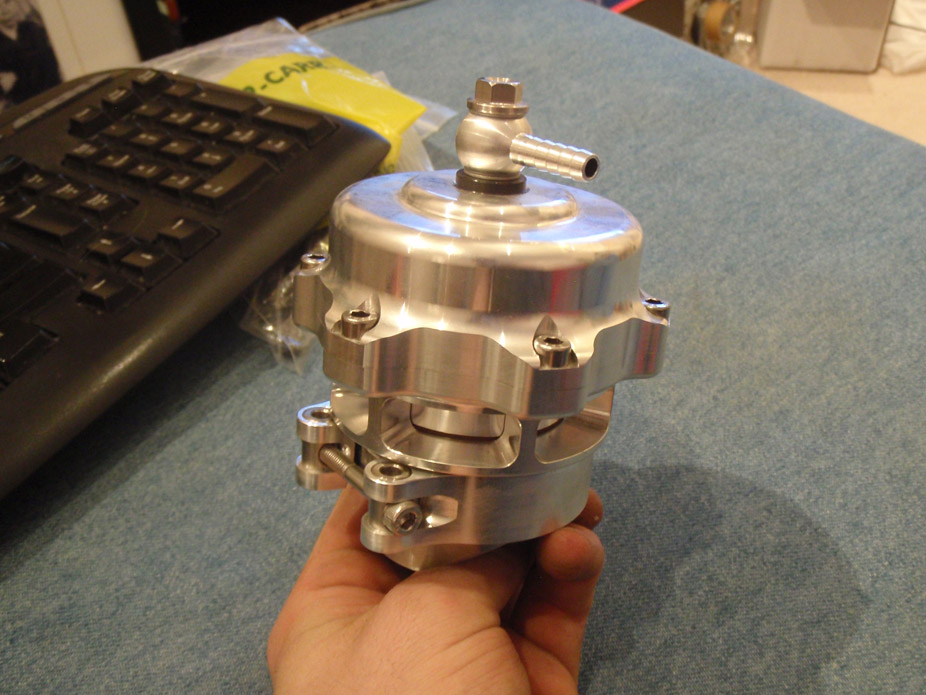
Have a handful of things that I'm juggling at once but things are starting to really come together, and so I'll just update with this little guy I made:


Have a handful of things that I'm juggling at once but things are starting to really come together, and so I'll just update with this little guy I made:
Thread Starter
Joined: May 2007
Posts: 1,806
Likes: 46
From: Vancouver BC, Canada
I'm generally not a sucker for blingy/chromey/shiny things but this badboy looks f&#^$*% badass...
And somehow the stock LQ4 belt fits my custom accessory drive perfectly, even puts the idler in between the two "good tension zone" lines.

Should have a big update tomorrow, can't wait.
And somehow the stock LQ4 belt fits my custom accessory drive perfectly, even puts the idler in between the two "good tension zone" lines.
Should have a big update tomorrow, can't wait.
I am with ya on the the badass part. I guess working with metal everyday I have come to appreciate a well machined piece. Whenever I am at Bass Pro Shops I have to go look at the deep sea reels. They usually have one on display thats is one sweet piece of aluminum. FEAD you did looks great! Thats cool you got the factory belt to fit. Keep up the good work!