
LQ4 into a 3rd Gen/1972 Nova
 04-29-2014, 04:05 PM
#1441

Oh cool, good to know. I'm thinking I'll weld on aluminum u-bends to keep it legit looking as opposed to a slash miter/weld pie-cut setup.. I think that looks kindof hokey.. like imports with the pie-cut & welded Ti intake tubes.. just looks lacking in attention to detail. I've yet to try and source aluminum bends locally tho.. The S10 rad just barely fit between the framerail horns, so this new rad has some side-to-side float in the subframe, also the core is similar in height but the Griffin has the side tanks flush with the top/bottom of the core, so that gains a bit of extra wiggle room too.
And "shouldn't".. what the hell kind of talk is that? Don't be ridiculous.
I have an automatic Craigslist search results prompter for "turbo".. and I'm constantly checking LS1tech For Sale. Particularly for a part that comes in a 76/75 kind of size. I'm serious, you sell to me when you upgrade...
And "shouldn't".. what the hell kind of talk is that? Don't be ridiculous.
I have an automatic Craigslist search results prompter for "turbo".. and I'm constantly checking LS1tech For Sale. Particularly for a part that comes in a 76/75 kind of size. I'm serious, you sell to me when you upgrade...
 04-29-2014, 04:11 PM
#1442

Oh cool, good to know. I'm thinking I'll weld on aluminum u-bends to keep it legit looking as opposed to a slash miter/weld pie-cut setup.. I think that looks kindof hokey.. like imports with the pie-cut & welded Ti intake tubes.. just looks lacking in attention to detail. I've yet to try and source aluminum bends locally tho.. The S10 rad just barely fit between the framerail horns, so this new rad has some side-to-side float in the subframe, also the core is similar in height but the Griffin has the side tanks flush with the top/bottom of the core, so that gains a bit of extra wiggle room too.
And "shouldn't".. what the hell kind of talk is that? Don't be ridiculous
And "shouldn't".. what the hell kind of talk is that? Don't be ridiculous
Cut off the appropriate piece and melted it on.
I say "shouldnt" because I need to max out the PTE 76 before I upgrade...strange sickness this turbo **** is...no cure either


 04-30-2014, 11:17 AM
#1447
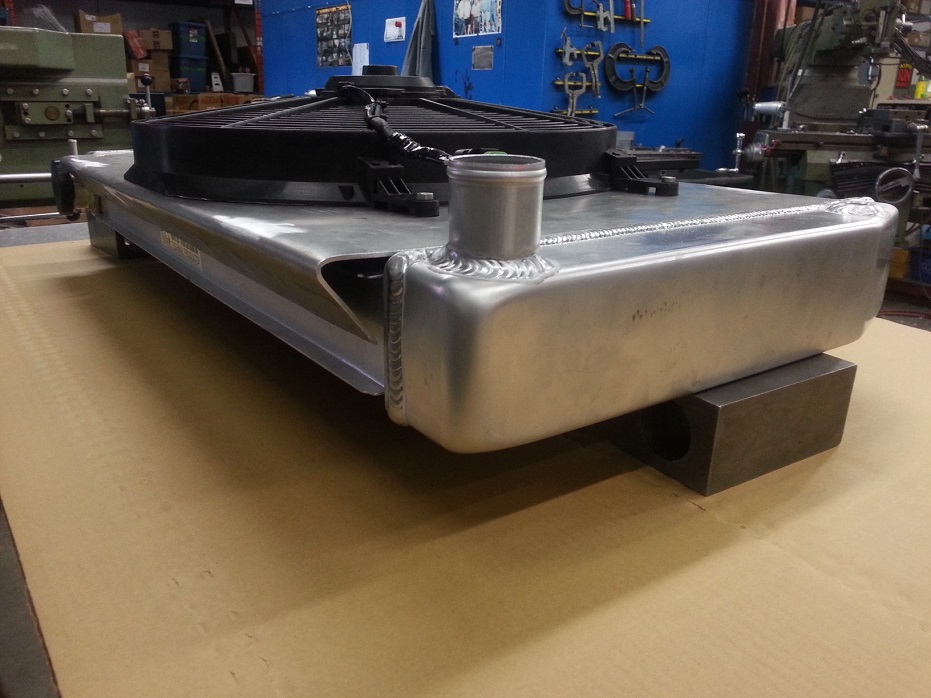
The Griffin part # 1-25271-XS.. the XS denotes a straight lower right inlet tube (perpendicular to radiator), 1-25271-X is for an "angled" lower inlet port.. but for all the googling I did, I couldn't find a pic of the angled inlet to find how angled it is, only found pics of the straight one, so I got the straight one.
04-30-2014, 01:35 PM
#1448
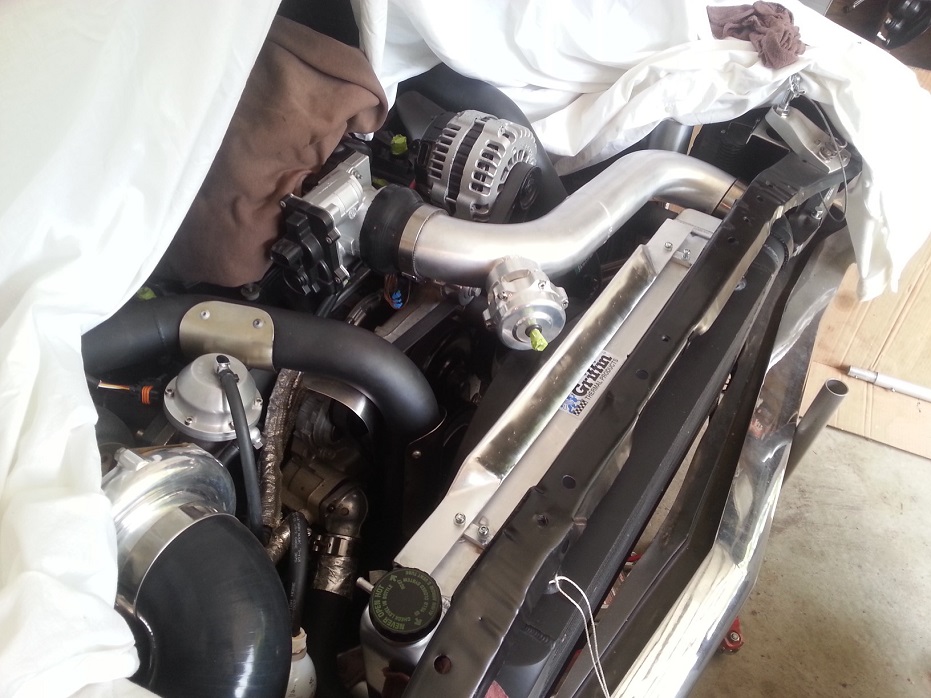
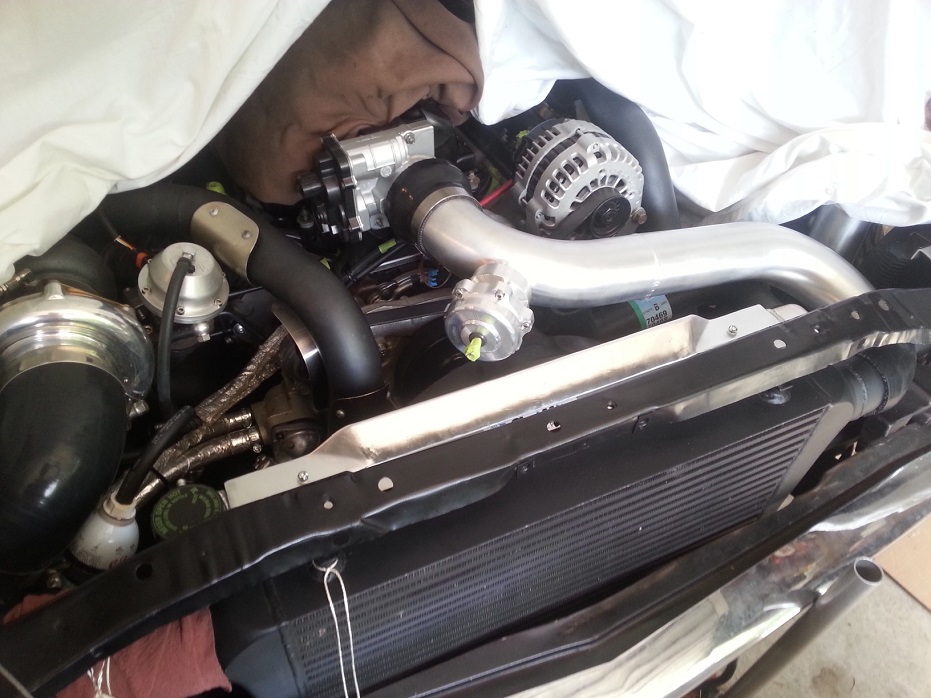
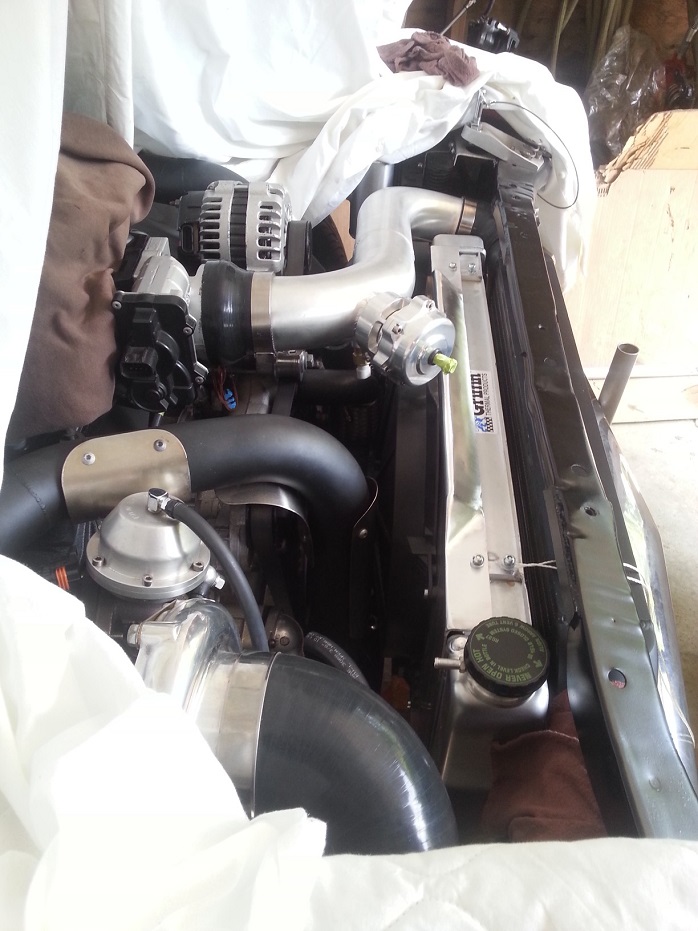
They make a direct fit radiator for our Novas, but if you're considering one I would call and ask about other options. Griffin tech support is pretty good. It would be nice to have an F-body style outlet which is offset from the top (like Joe's S10 radiator) so you can run intake tubing over that direction if need be. On mine I am running the intake toward the passenger side because of the location of the Nova radiator outlet. It looks more cluttered than I would like.
04-30-2014, 02:46 PM
#1449
I was originally hoping to do inlet/outlet both on the passenger side, because the LS3/L92 waterpump I'm using has the top pump inlet so close to the pulley it wouldn't matter much whether the upper rad hose bends left or right, but the 4" 90* turbo intake tube ixnayed that, as it's quite close to the passenger side tank of the rad.
04-30-2014, 05:30 PM
#1450
I wouldn't get too hung up on radiator core thickness... heat rejection goes down considerably in the back end of that core as the air is considerably hotter. I'd rather have a long and thin one than a short and thick one.
I'm surprised that you didn't try to fit the biggest radiator you could between the frame rails, Joe. Oh wait, I forgot - you're not out here in the desert...
I'm surprised that you didn't try to fit the biggest radiator you could between the frame rails, Joe. Oh wait, I forgot - you're not out here in the desert...
05-01-2014, 12:14 AM
#1451
Got the old radiator shroud bent up and re-purposed to fit on the new rad. Still have to weld close-out plates for the exposed upper corners of the shroud, and figure out where the new radiator-coresupport brackets will be before I weld tabs onto the radiator to mount the shroud to.
In other news, this is ridiculous cool...
In other news, this is ridiculous cool...
 05-01-2014, 01:57 PM
#1454
05-04-2014, 12:23 AM
#1455
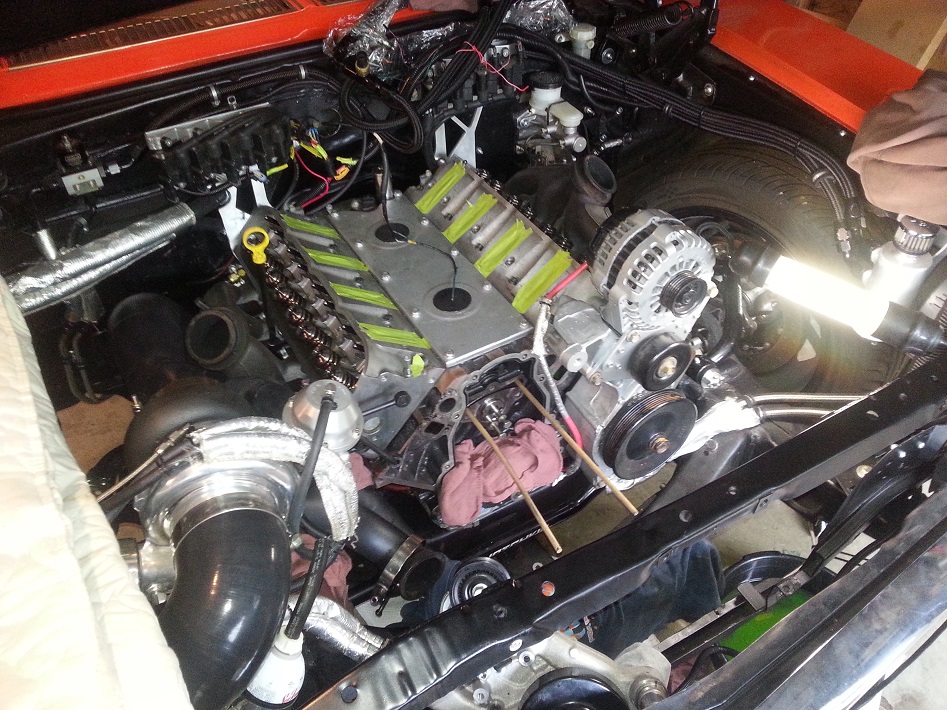
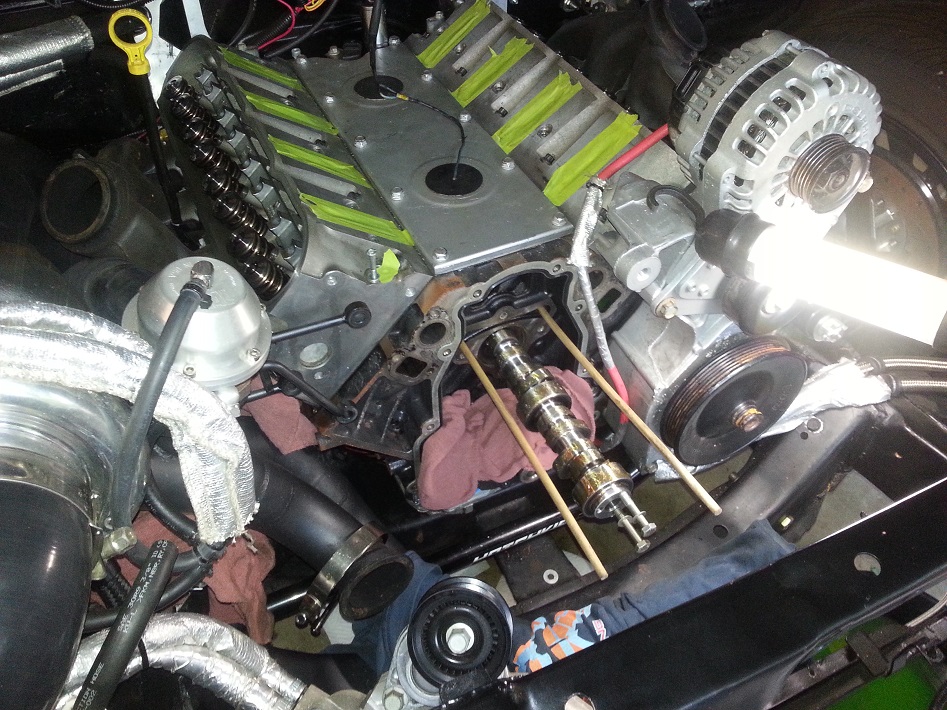
Prettymuch all the crap had to come off for this cam swap, oh well, it'll be worth it.
Just about to pull out old cam..
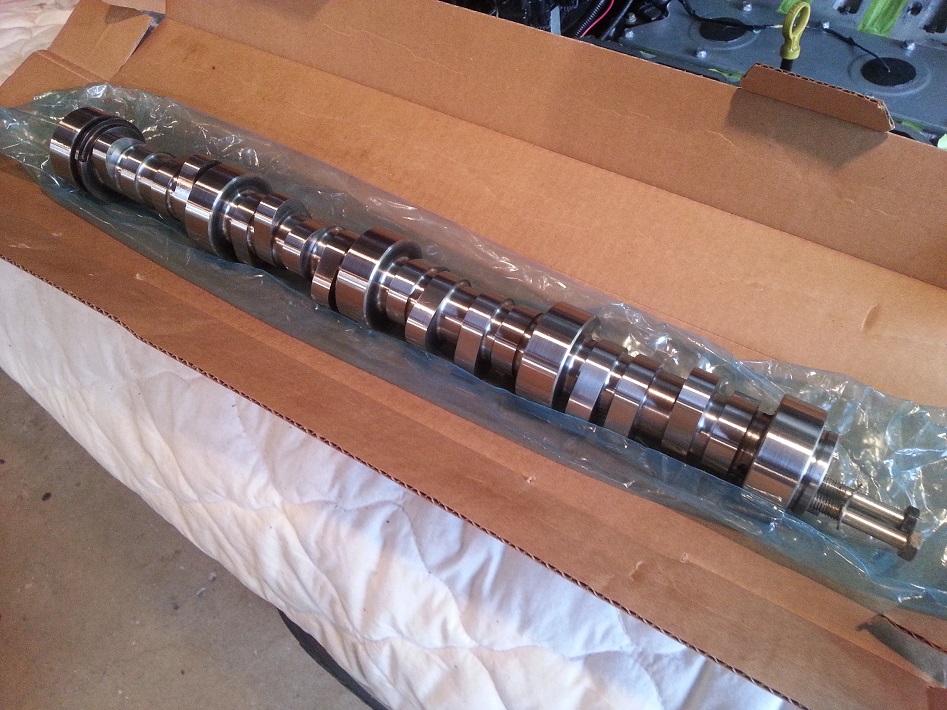
Beautiful little piece of turned automotive jewelry. It's going to make such glorious sounds..
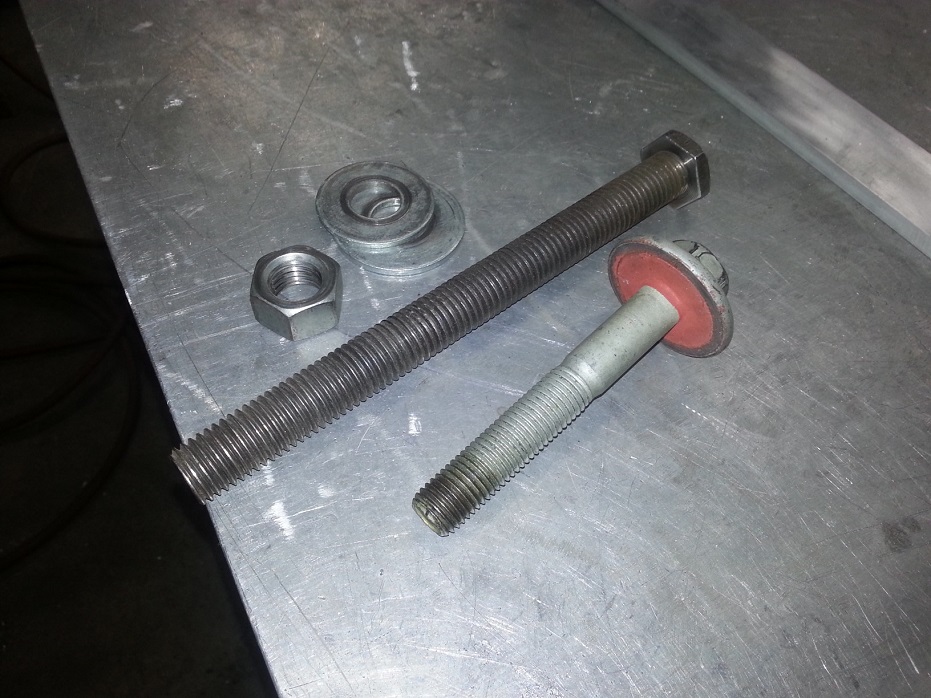
New cam all lubed up and going in. I got as far as cam gear cover loosely tightened on, but the new ATI damper has less of an initial counterbore step on the hub ID, as well as a claimed tighter pressfit, so I couldn't get it to initially slide on enough for the stock GM crank bolt to engage the crank threads. Going to cut the stock bolt and weld on some 3/4" rod to turn it into an installer stud, then a new bolt for final torque. Even though this northern wintery land of Canadia is all metric and stuff, I haven't the faintest idea where to look for 16mm threaded rod, so I'll just modify what I have to work.
Just about to pull out old cam..
Beautiful little piece of turned automotive jewelry. It's going to make such glorious sounds..
New cam all lubed up and going in. I got as far as cam gear cover loosely tightened on, but the new ATI damper has less of an initial counterbore step on the hub ID, as well as a claimed tighter pressfit, so I couldn't get it to initially slide on enough for the stock GM crank bolt to engage the crank threads. Going to cut the stock bolt and weld on some 3/4" rod to turn it into an installer stud, then a new bolt for final torque. Even though this northern wintery land of Canadia is all metric and stuff, I haven't the faintest idea where to look for 16mm threaded rod, so I'll just modify what I have to work.
05-05-2014, 12:13 AM
#1456
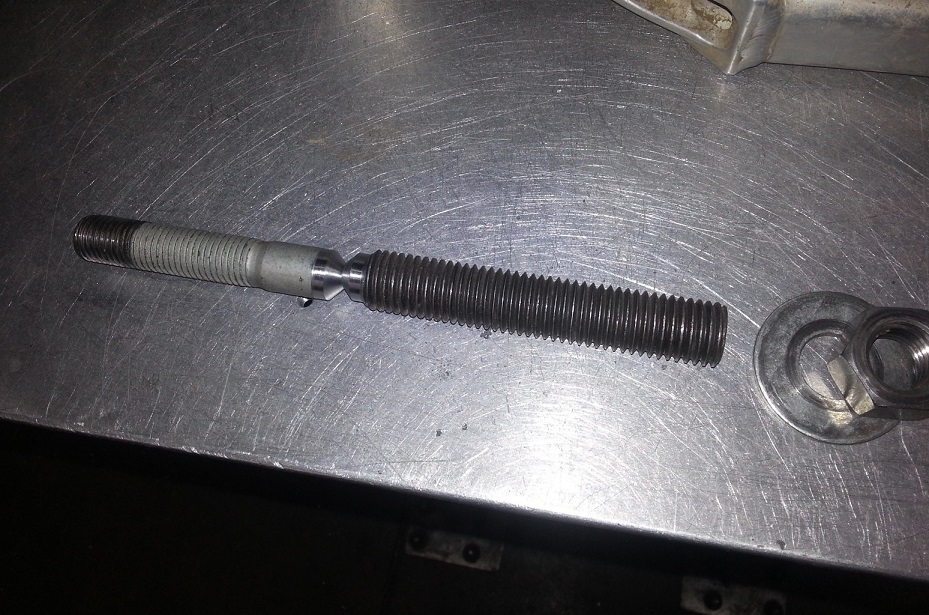
Made the ATI damper installation tool made, just welded on some standard 3/4" threaded rod.. I think I used half a filler rod just for this one weld, haha. Now I just have to go to the friggin stealership to get a new crank bolt.

Also made a bit more progress on mounting this behemoth of an ECU. When I stalled out on the installation of the ATI damper I mocked up the ECU in its final tucked position under the dash. It's so heavy it's hard to take a pic just holding it there, but if these tack-welded brackets transferred over ok from my cardboard templates, then this should be final-welded and ECU bolted into the car this week.
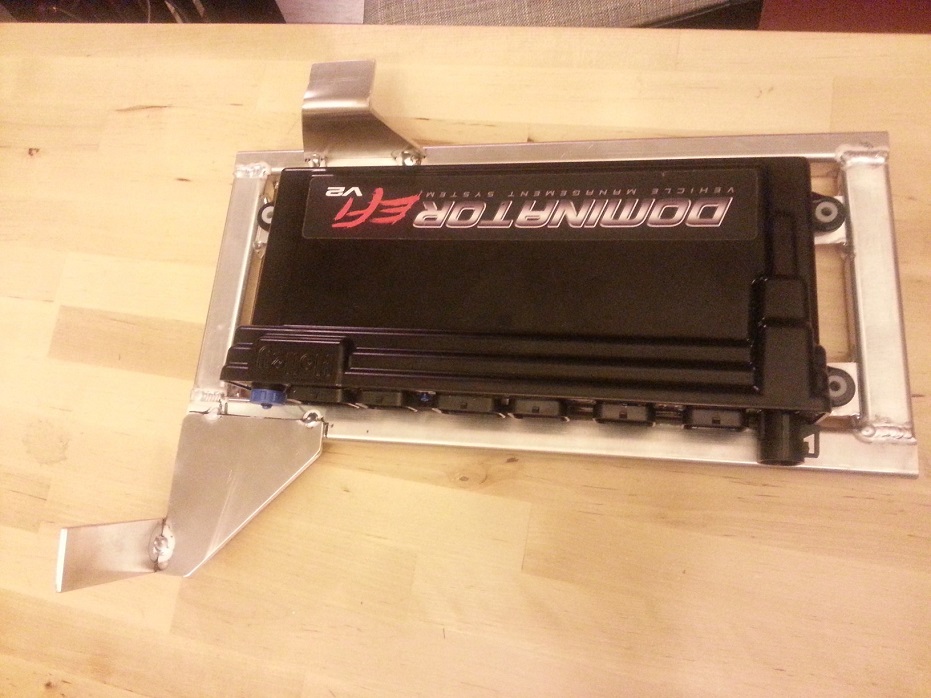
Also made a bit more progress on mounting this behemoth of an ECU. When I stalled out on the installation of the ATI damper I mocked up the ECU in its final tucked position under the dash. It's so heavy it's hard to take a pic just holding it there, but if these tack-welded brackets transferred over ok from my cardboard templates, then this should be final-welded and ECU bolted into the car this week.
06-01-2014, 11:02 PM
#1457
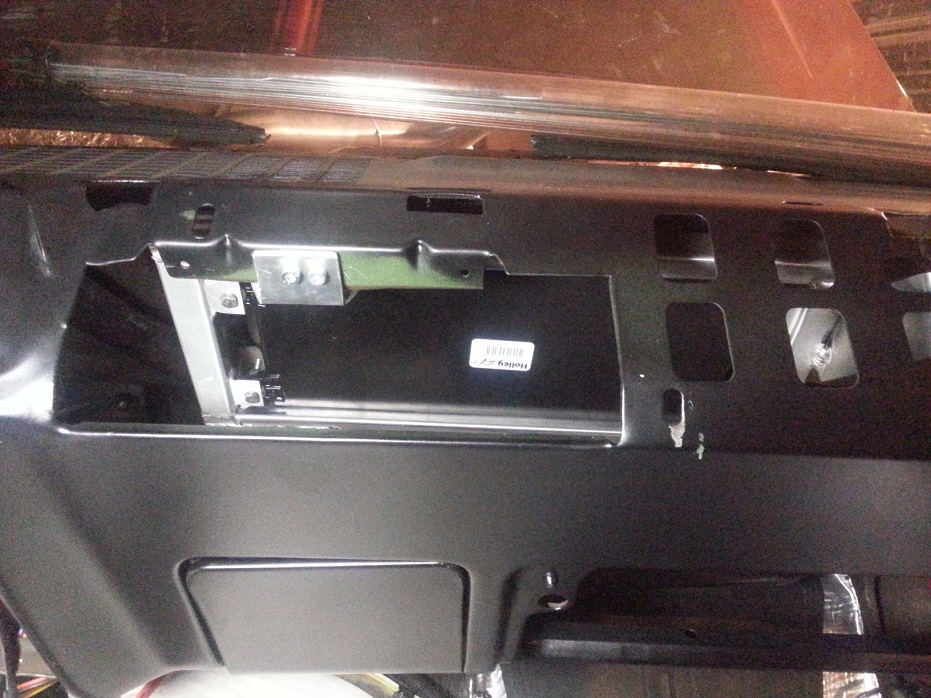
Added a 3rd brace point (to the sheetmetal hidden underneath the dash pad) for the ECU and got it mounted.. it's in a similar location as old GM one, but more accessible (shifted more to passenger side) and there is still room to fab/install a glovebox.. at a later date.


06-01-2014, 11:15 PM
#1458
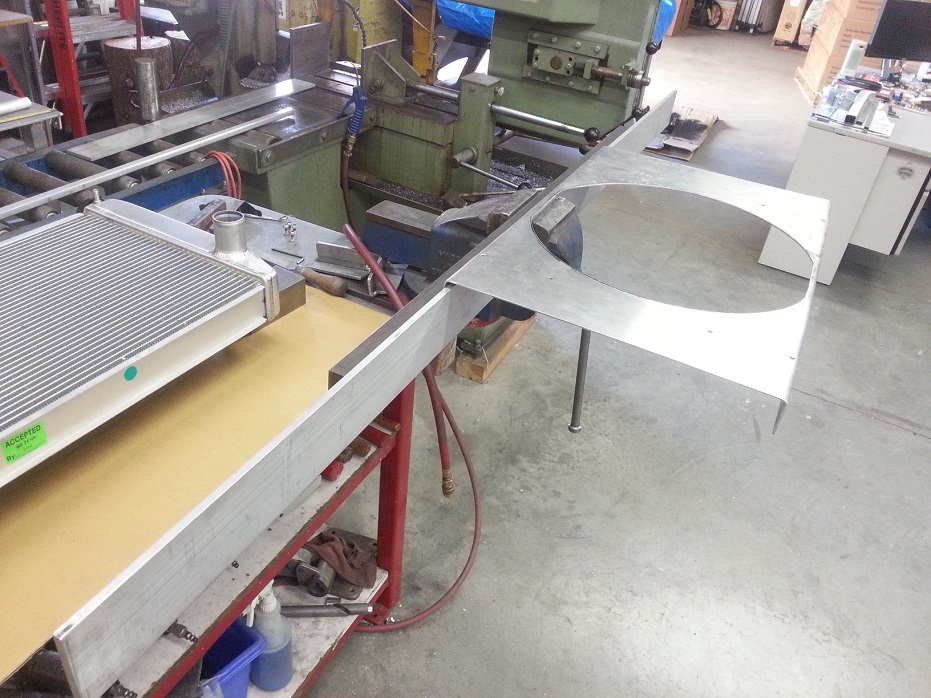
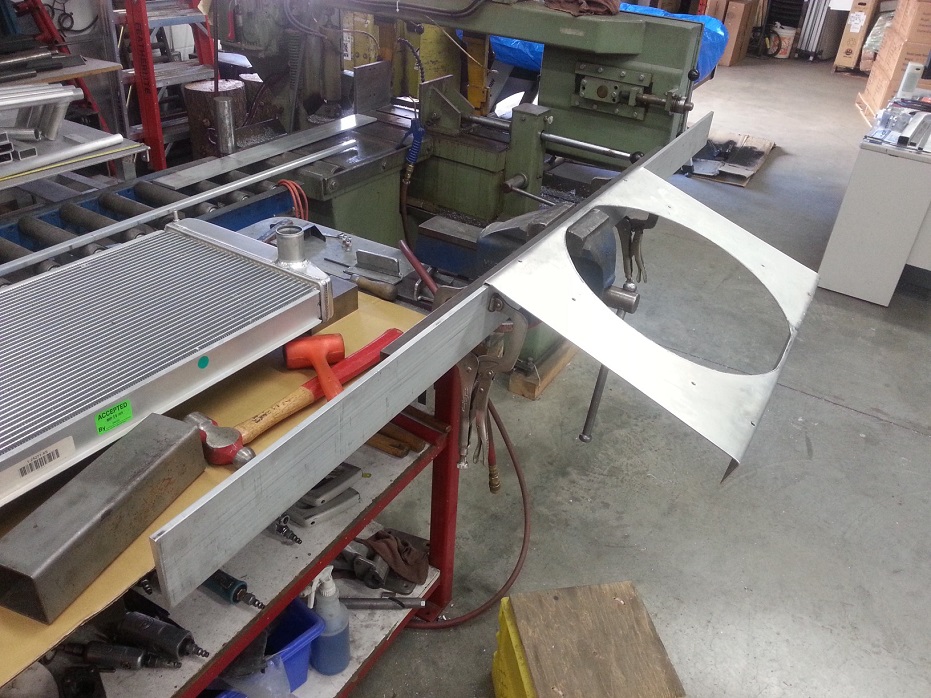
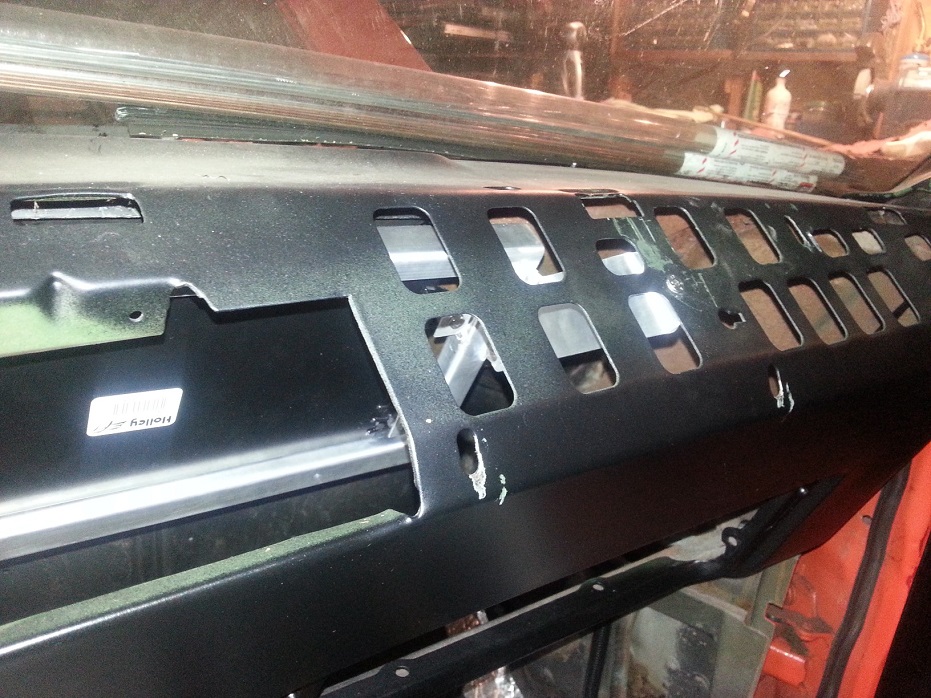
Finished modifications to the old fan shroud, including a clean-up air powered Scotchbrite belting..
These next pics show the 3D contouring of the top corners, partially to look neat kindof like a molded plastic shroud, but mainly to turn the downward-angled top bend into a flat surface I could use to mount the shroud to the rad..


I cut/tapped/welded 4 strips of 3/8" aluminum to the top and bottom channels on the rad, so that the rear 4 sets of threaded holes mount the shroud, and the front set are what the frameside brackets secure to..
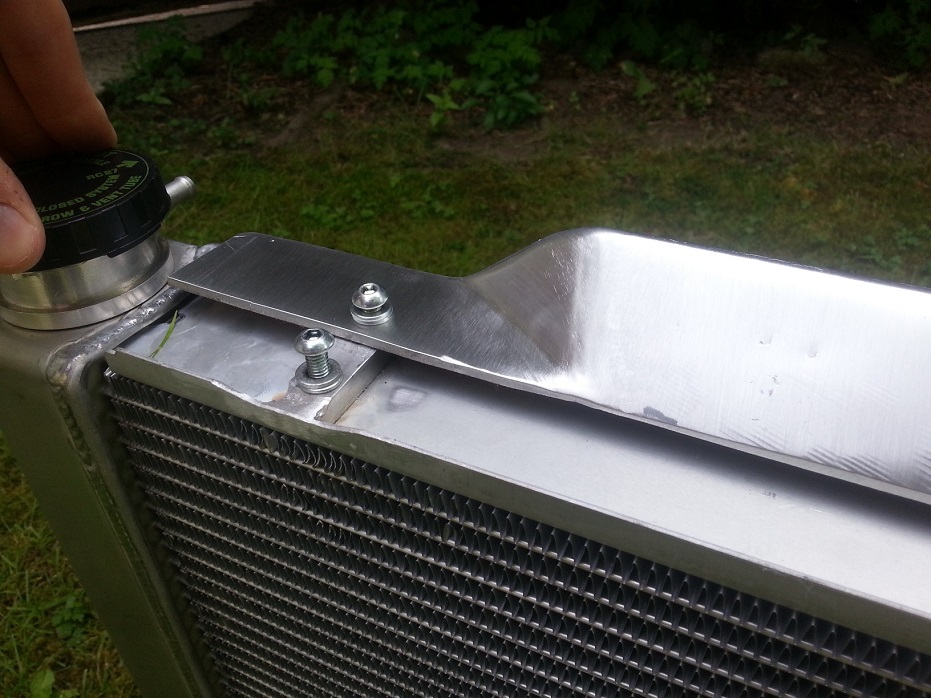
Cutting off the old rad brackets, grinding, sanding, and welding new brackets on. I HATE having to do this dirty metal work on the car, much prefer creating a mess in the shop on a bench. So I tried to make it as sanitary as possible. Kindof looks like a patient having heart surgery, haha..

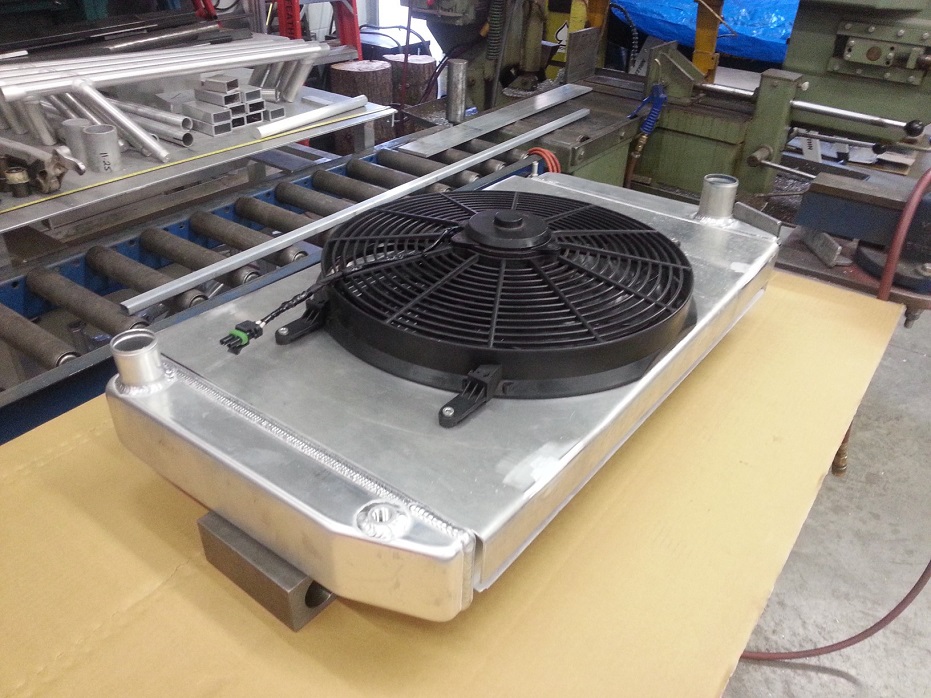
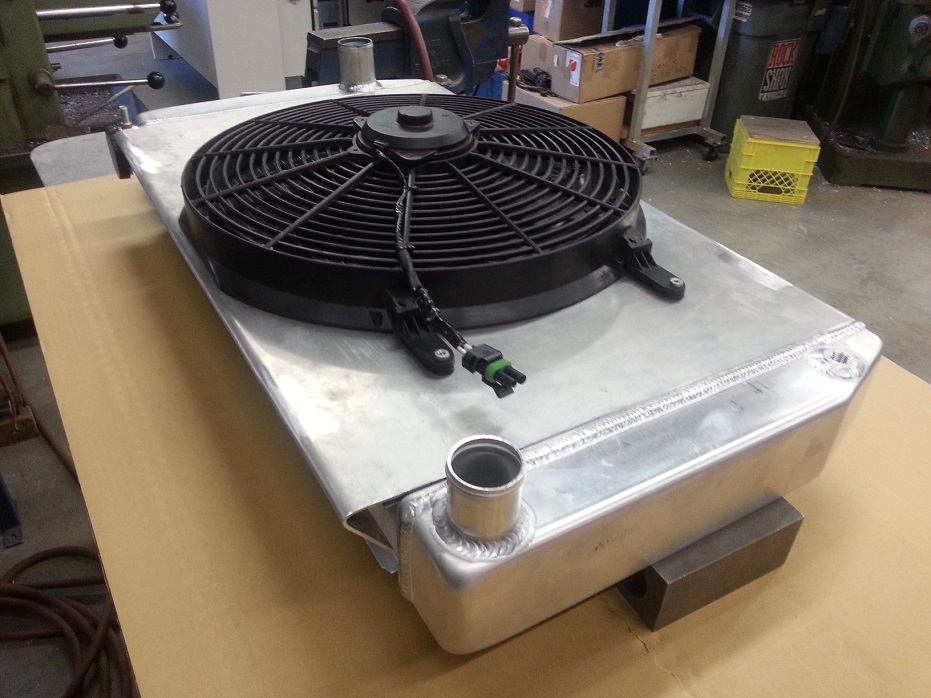
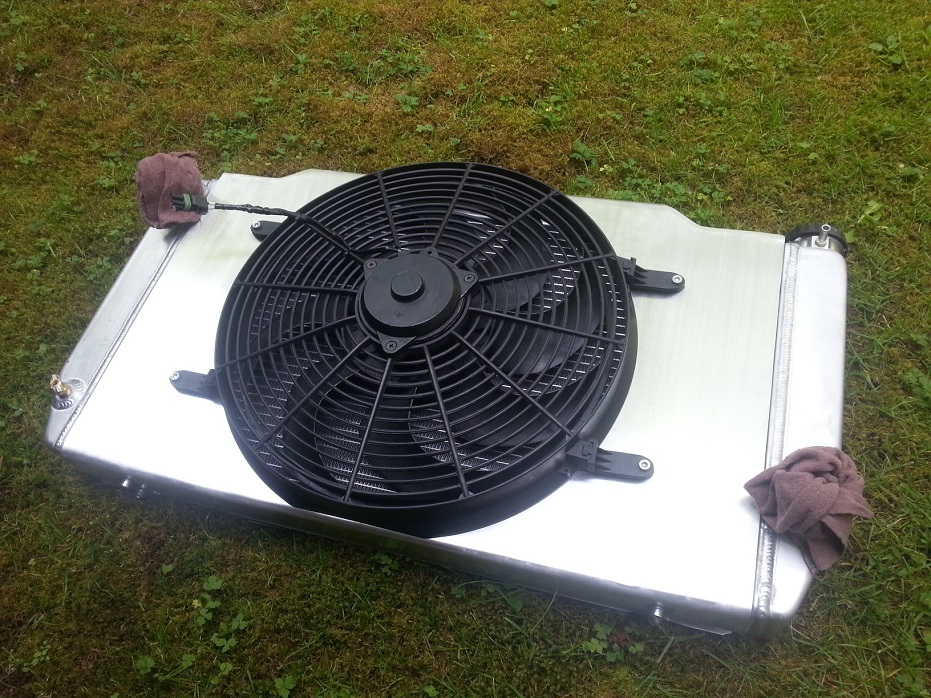
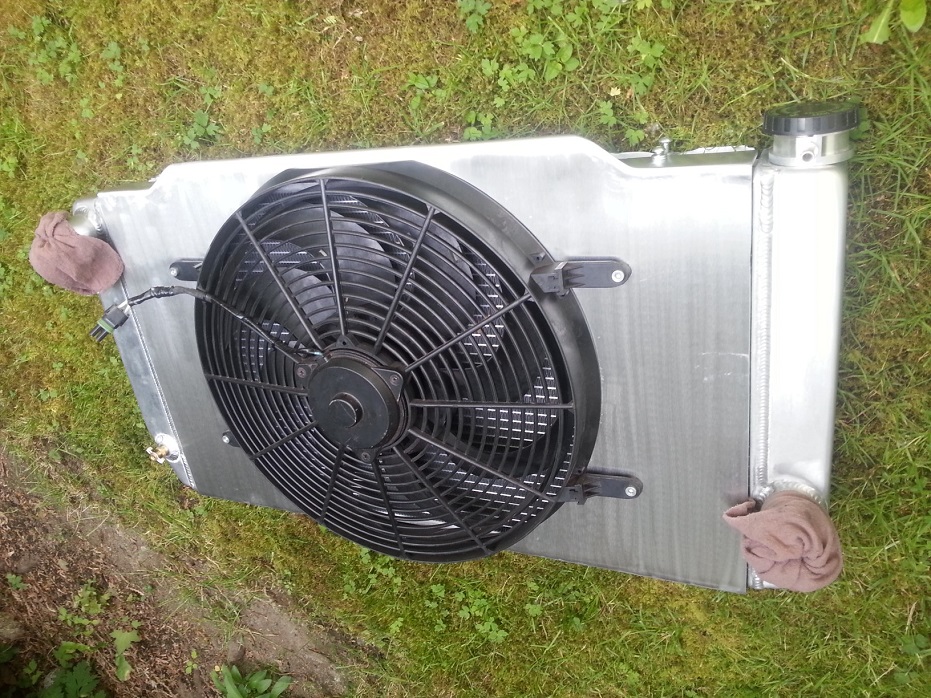
Rad being mocked up. After these pics I welded in bolt-on strips to the rad support, but I still need to make some aluminum L-brackets to connect the rad and the rad support.
I really hate how short-nosed the Nova is. I thought the old rad/fan setup was tight to the hotside pipes, but shoe-horning this new setup definitely needed some bending & black magic.

These next pics show the 3D contouring of the top corners, partially to look neat kindof like a molded plastic shroud, but mainly to turn the downward-angled top bend into a flat surface I could use to mount the shroud to the rad..
I cut/tapped/welded 4 strips of 3/8" aluminum to the top and bottom channels on the rad, so that the rear 4 sets of threaded holes mount the shroud, and the front set are what the frameside brackets secure to..
Cutting off the old rad brackets, grinding, sanding, and welding new brackets on. I HATE having to do this dirty metal work on the car, much prefer creating a mess in the shop on a bench. So I tried to make it as sanitary as possible. Kindof looks like a patient having heart surgery, haha..
Rad being mocked up. After these pics I welded in bolt-on strips to the rad support, but I still need to make some aluminum L-brackets to connect the rad and the rad support.
I really hate how short-nosed the Nova is. I thought the old rad/fan setup was tight to the hotside pipes, but shoe-horning this new setup definitely needed some bending & black magic.
06-01-2014, 11:34 PM
#1459
This rad hose info might not be applicable to many of you, since I made a connecting tee for my upper hose to tee in the vent line, and that allowed me to only have to worry about each 90* end section individually, and I could fab the tee however I needed, but I'll still throw this up here with part numbers.
The LS waterpump upper outlet is somewhere in the neighborhood of 1.25-1.375" OD I think, but my new Griffin rad needed a 1.5" upper hose and whatever size I had wouldn't stretch, so here's what I found.
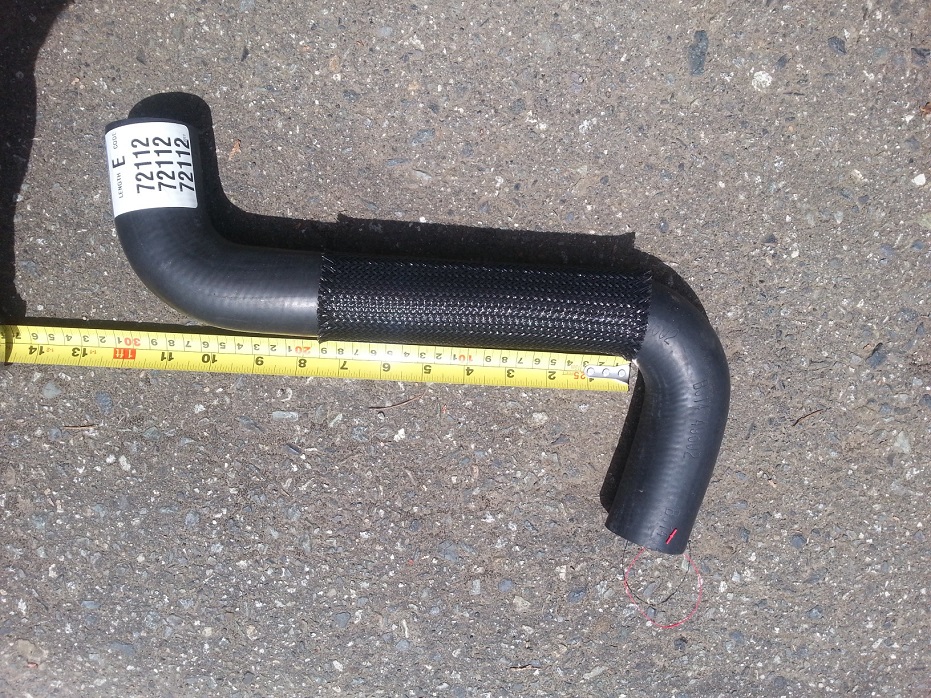
This is a neat s-bend, both ends are 1.5" ID, one end is just under 90* natural bend, the other end is just over 90* natural bend. Dayco part number 72112..
I also picked up this hose, which is the one I ended up using. The two bends are in different planes, but both ends are 1.5" ID, and the nice thing is both ends have different radii of bends. I ended up using the right end with a gentler bend for nice flow, and because I could afford the space, but in a super-tight engine swap case, the left side with the super tight bend might be the ticket. Dayco part number 70469..

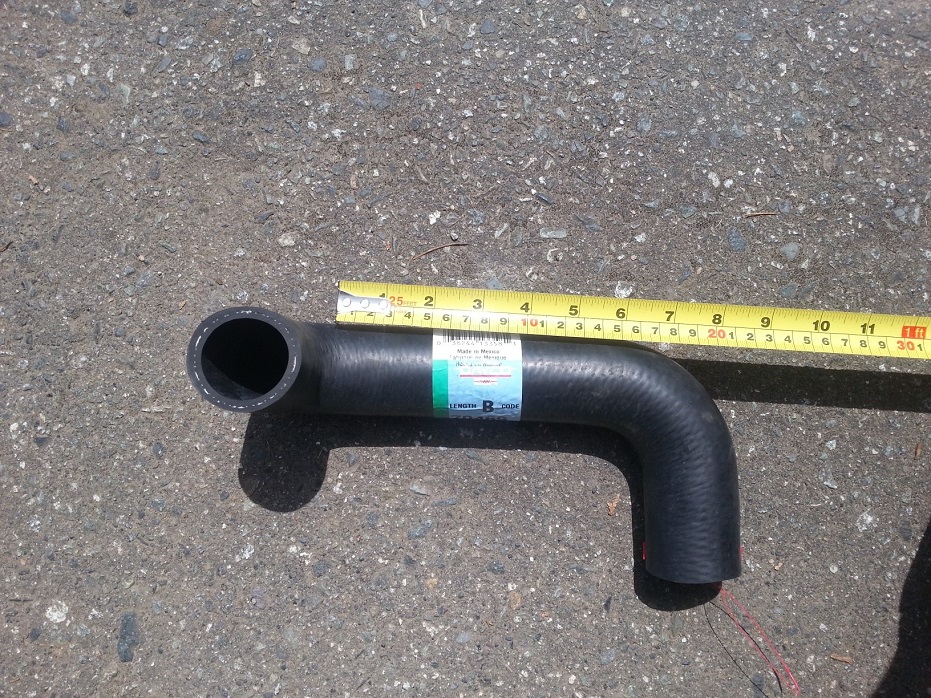
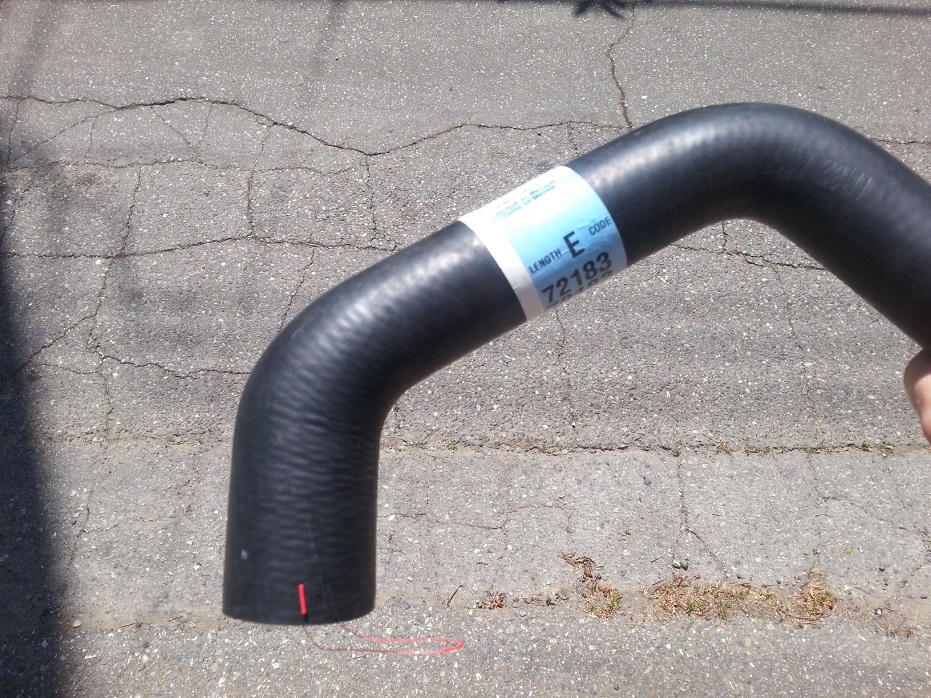
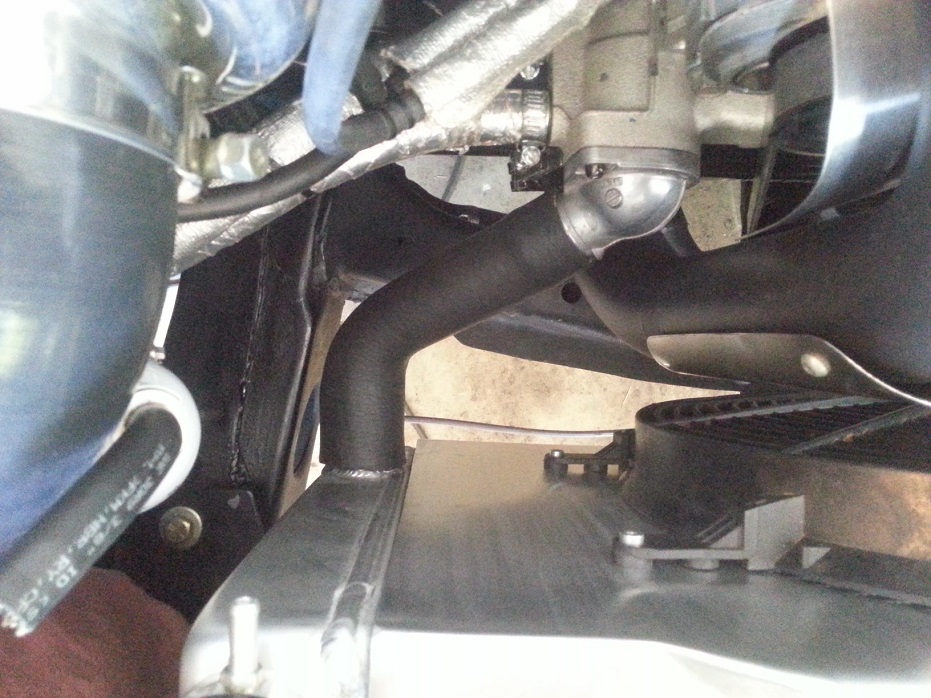
This lower rad hose is the money-maker easy button one that could probably help a lot of people, or at least short-nosed Nova people with a Griffin or other rad that has a larger-than-stock outlet diameter. Stock LS waterpump lower inlet is 1.5" OD I believe, and my Griffin has a 1.75" lower outlet. This hose was prettymuch a perfect fit. Dayco part number 72183..
Old 1.5"-1.5" hose vs new 1.75"-1.5" hose..

Ohh yeeaa..
The LS waterpump upper outlet is somewhere in the neighborhood of 1.25-1.375" OD I think, but my new Griffin rad needed a 1.5" upper hose and whatever size I had wouldn't stretch, so here's what I found.
This is a neat s-bend, both ends are 1.5" ID, one end is just under 90* natural bend, the other end is just over 90* natural bend. Dayco part number 72112..
I also picked up this hose, which is the one I ended up using. The two bends are in different planes, but both ends are 1.5" ID, and the nice thing is both ends have different radii of bends. I ended up using the right end with a gentler bend for nice flow, and because I could afford the space, but in a super-tight engine swap case, the left side with the super tight bend might be the ticket. Dayco part number 70469..
This lower rad hose is the money-maker easy button one that could probably help a lot of people, or at least short-nosed Nova people with a Griffin or other rad that has a larger-than-stock outlet diameter. Stock LS waterpump lower inlet is 1.5" OD I believe, and my Griffin has a 1.75" lower outlet. This hose was prettymuch a perfect fit. Dayco part number 72183..
Old 1.5"-1.5" hose vs new 1.75"-1.5" hose..
Ohh yeeaa..