

25.3 Outlaw Drag Radial Camaro Build
 08-13-2013, 09:18 PM
#581
Launching!
Thread Starter
Reason I'm not 100% on the rear is the wheels dictated how the rear ended up. We had a 12" set and 14" set that were made to 10" and 12 1/4 to take the width out of the back and keep the front of the wheel where we wanted it. This will keep the outside the same and just loose width from the inner side of tire. We made sure that a 275, 315 & slick could all fit if we wanted it to. Just trying to be universal.
Thanks I hope this helps.
 08-14-2013, 12:42 AM
#582

I was not trying to make it like you bagging on me but more or less stating that the parts were never just sent or un-paid for. I wish that was the case but it sure is not. I knew the car was going to take time to build to I never thought it was going to take this long. It is a mix of 10 things that is taking this but in the end it will be done 99% and the reason I say 99% is nothing is ever finished. I changed a few things through the build and or added stuff to it. Lead time in getting things also played a role but in the end DMC and both are just busy. I told Dennis from DMC work on it when he gets time and in the end that may not have been the best way to go about it. He has been thrashing to have it done in the time frame I need it now.
I planed on getting the car done this past winter but my job kept from even thinking about it. In return since I was not pushing it didn't get really worked on. I was not until the last 3 months that I have had a chance to even think about it. I was going to get it last week but they feel a little behind on it and I opted to wait the next few weeks so it will be painted and hopefully track tested when I get it back. I still plan on trying to have it done for October and able to race so we will see how it goes. I hope to post a bunch of stuff ASAP I'm just waiting on some odd and ends to be done then it would be great to show everybody where it is at as of this day. I'm just missing a bunch of pictures between the time line that has been posted so I don't want to post them up. Thanks
I planed on getting the car done this past winter but my job kept from even thinking about it. In return since I was not pushing it didn't get really worked on. I was not until the last 3 months that I have had a chance to even think about it. I was going to get it last week but they feel a little behind on it and I opted to wait the next few weeks so it will be painted and hopefully track tested when I get it back. I still plan on trying to have it done for October and able to race so we will see how it goes. I hope to post a bunch of stuff ASAP I'm just waiting on some odd and ends to be done then it would be great to show everybody where it is at as of this day. I'm just missing a bunch of pictures between the time line that has been posted so I don't want to post them up. Thanks
08-14-2013, 07:18 AM
#583
Launching!
Thread Starter
It depends on how you look at it. You loose power and you loose weight so the power loss now numbers change. At this point we are not far off where we were going by power to weight numbers. It will take about 8-10 HP more to be a number #1 bike and that is what we are shooting for. It has only been the last few races that we have ran respectable to the field et's. We have only worked on the tune up and that has made the best result. We took the same bikes and engines that we qualified 15-16 worked on the tune up and 8-10...
Just like anything it takes time to find what they like and we have started to turn that corner now. HP wouldn't have helped us before we started to find what they wanted to be tuned on. We are not to far off now and just have to keep after it. Finding HP is a full time job so it keeps everyone on their toes here at the shop. Hopefully Indy goes better since we have this month off. We will see.
Just like anything it takes time to find what they like and we have started to turn that corner now. HP wouldn't have helped us before we started to find what they wanted to be tuned on. We are not to far off now and just have to keep after it. Finding HP is a full time job so it keeps everyone on their toes here at the shop. Hopefully Indy goes better since we have this month off. We will see.
08-20-2013, 09:39 PM
#584
On The Tree

Join Date: Feb 2006
Location: Oaktown, CA
Posts: 115
Likes: 0
Received 0 Likes
on
0 Posts


 09-04-2013, 10:06 PM
#589
Launching!
Thread Starter
Progress has been getting done but I have not posted much since I was not getting the pictures of it. I would rather have the progress over the pictures but I still want to keep this thread filled with updates as often as I can but without pictures I feel it is useless.
The great news is I finally got a ton of pictures today from the work that has been done over the last few months to the car. I don't have time to post them all but I will get some up today. It really is not far off. The last thing that I know of that needs to be done is the paint work and get it together and dyno it. Only time will tell if it will make the race. Hopefully with all the time that was put into getting it to the point the reassemble should be rather direct and straightforward with no surprises. But we all know how that goes so I will not say it until I know I have it in my hands and it is done. I guess it is complete when it is complete.
Anyway last I showed pictures of the charge pipes being done inside but didn't have any front shots of the firewall area inside the car or engine compartment. Here is a few that shows what was done.
Here is the starting point on the engine or maybe I should say ending point. I'm working my way backwards on this part.

As we move inside the car

Here is what it looks like all connected together inside the car


Also getting all the brake stuff done while under the dash area

Next was to get the dash plate done and istalled

Also mounted all the electronic boxes under the dash. We are using the Speedwire System to help keep it clean and know where everything goes. We also mounted the BigStuff ECU and all the MSD Power Grid boxes under here. It will be nice to keep the floor area clean.


Final fitting and trimming of the dash to make sure it clears all the tubes and electronic parts installed under it


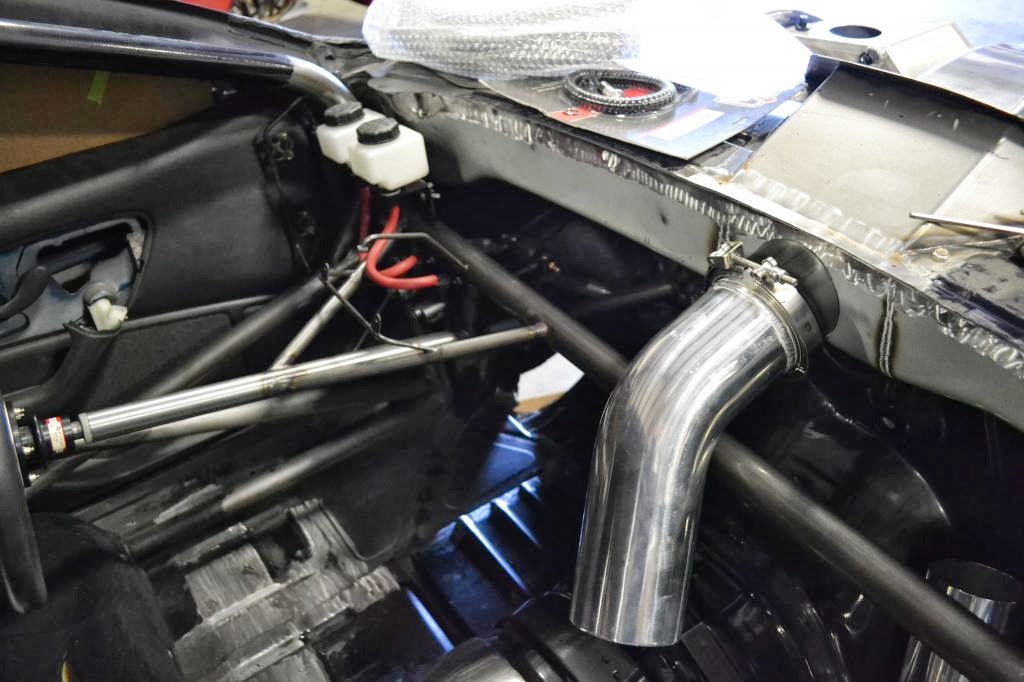
Moving outside to under the hood and here is how it looks coming out from the firewall to over the shock tower


Here is where it all starts. I have the Exile 106mm on it now for the fitment to start since it is legal for the NMCA stuff and then it will be easy to swap out at anytime with a 88mm or whatever size ends up on it depending on class rules that I race it in. We also went with the large Procharger BOV. They work great and are proven.


Well thanks for looking and I will get all the exhaust stuff up and some other things in the next few days. I have it so it is just a matter of finding time. Thanks EK
The great news is I finally got a ton of pictures today from the work that has been done over the last few months to the car. I don't have time to post them all but I will get some up today. It really is not far off. The last thing that I know of that needs to be done is the paint work and get it together and dyno it. Only time will tell if it will make the race. Hopefully with all the time that was put into getting it to the point the reassemble should be rather direct and straightforward with no surprises. But we all know how that goes so I will not say it until I know I have it in my hands and it is done. I guess it is complete when it is complete.
Anyway last I showed pictures of the charge pipes being done inside but didn't have any front shots of the firewall area inside the car or engine compartment. Here is a few that shows what was done.
Here is the starting point on the engine or maybe I should say ending point. I'm working my way backwards on this part.
As we move inside the car
Here is what it looks like all connected together inside the car
Also getting all the brake stuff done while under the dash area
Next was to get the dash plate done and istalled
Also mounted all the electronic boxes under the dash. We are using the Speedwire System to help keep it clean and know where everything goes. We also mounted the BigStuff ECU and all the MSD Power Grid boxes under here. It will be nice to keep the floor area clean.
Final fitting and trimming of the dash to make sure it clears all the tubes and electronic parts installed under it
Moving outside to under the hood and here is how it looks coming out from the firewall to over the shock tower
Here is where it all starts. I have the Exile 106mm on it now for the fitment to start since it is legal for the NMCA stuff and then it will be easy to swap out at anytime with a 88mm or whatever size ends up on it depending on class rules that I race it in. We also went with the large Procharger BOV. They work great and are proven.
Well thanks for looking and I will get all the exhaust stuff up and some other things in the next few days. I have it so it is just a matter of finding time. Thanks EK
09-04-2013, 10:38 PM
#591
I would say that they are doing a top notch job and it is well worth wait. This thing is awesome! You are going to feel like you are in your recliner driving this compared to your PSM. I really like the twin down pipes and the fitment of the cold side under the dash. 3 championships with 2 back to back, I would say you have earned this ride. Good luck, hope to see you at the nmca finals at Indy!
 09-09-2013, 08:20 PM
#593
Launching!
Thread Starter
As promised here are some more photos of past progress. I last posted some pictures of the cold charge side of the turbo system and now I will post the hot side.
We chose aluminum to keep weight down. With all the tube that is being used stainless would have added up quite fast and that is the last thing we wanted. I said in some posts back about how I couldn't stand the way some of the bull horns look on cars and how most cars have the exhaust exit right out in front of the front tire and hanging in the breeze but I couldn't deal with that. Dennis said he thinks that he can come up with something that should make it much nicer and cleaner but yet still work. So I said go for it and he ended up frenching them into the fire wall so it would clear the front tire and hide as much as the pipe as he could. I think he did a great job and think that they turned out great. Here is the process.
From the homemade Y out of the Turbo the exhaust pipes start

The start of the passenger side of the car

Behind the spindle

Into the turn

Now out with the tips

Full view
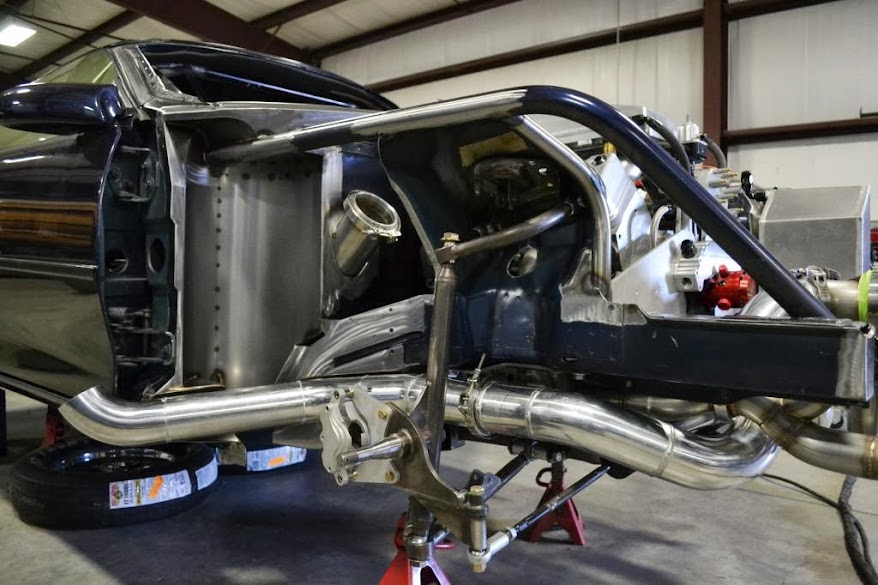
Mounted up with the tabs and welded

Now onto the drivers side and fast forwarded through the whole process and we have a completed exhaust


And when you take a step back and look at this here is what you see


As you can see this is a perfect example why things take a lot longer then expected. This was not a just make some tailpipes and mount them. The amount of metal work that went into just doing this was crazy but it is clean as can be. It is stuff like this that I feel helps set it apart from the others. The guys at DMC are craftsmen and enjoy doing the stuff that makes it mean that much more to them. Once again thanks for looking and hopefully I can post a few more soon.
We chose aluminum to keep weight down. With all the tube that is being used stainless would have added up quite fast and that is the last thing we wanted. I said in some posts back about how I couldn't stand the way some of the bull horns look on cars and how most cars have the exhaust exit right out in front of the front tire and hanging in the breeze but I couldn't deal with that. Dennis said he thinks that he can come up with something that should make it much nicer and cleaner but yet still work. So I said go for it and he ended up frenching them into the fire wall so it would clear the front tire and hide as much as the pipe as he could. I think he did a great job and think that they turned out great. Here is the process.
From the homemade Y out of the Turbo the exhaust pipes start
The start of the passenger side of the car
Behind the spindle
Into the turn
Now out with the tips
Full view
Mounted up with the tabs and welded
Now onto the drivers side and fast forwarded through the whole process and we have a completed exhaust
And when you take a step back and look at this here is what you see
As you can see this is a perfect example why things take a lot longer then expected. This was not a just make some tailpipes and mount them. The amount of metal work that went into just doing this was crazy but it is clean as can be. It is stuff like this that I feel helps set it apart from the others. The guys at DMC are craftsmen and enjoy doing the stuff that makes it mean that much more to them. Once again thanks for looking and hopefully I can post a few more soon.
 12-11-2013, 09:31 PM
#598
Launching!
Thread Starter
Well since I have been really slow on posting updates now would be a great time for one. The posting has been slow for a few reasons. Between the last few NHRA races Holidays and my trip over to the Middle East my time has been really limited. Also I have been needing to upload a bunch of pictures DMC had taken over the last few months. Now that my NHRA race season has ended and my travel has slowed down I hopefully will have some personal time from now until late Jan. During that time I plan on getting my car 100% completed.
As you will be able to see from the updates we are not really that far off and if all goes well I should have the thing sitting in my garage in the next few weeks. Well here is what I have for tonight.When I made the last posts DMC had just finished the inside of the car & completed the engine bay area along with the exhaust system. The final thing needing to be done was the front clip and that will be this update.
We wanted to make the front clip removable making it way easier to work on. I will have the option of pulling the whole clip or just the hood when done. This will make it nice at the track or having to do anything in a hurry that you will have the option. First step was to make the front loop. Dennis made it so the loop will hold the turbo and a few other items on it with ease.


Next step was to make a bracket to hold the front clip onto the loop.

One of the things Dennis & the DMC crew pride themselves on is quality work and craftsmanship. I feel this next picture shows just that. Nothing looks better then a nice weld.

After the brackets were on next was to start on what you would call the tree setup that holds the front end on. This is when you really have to get a little creative.

Time to slide the nose on and start adding bars


An inside shot showing how the tree will mount to the nose. All the steel plates will end up getting fiberglass on them holding the part onto the structure making a tight bond

When it was all said and done they ended up with something like this that will hold the nose on to the car

Now the front fenders followed. A little trimming was needed but was kind of straight forward

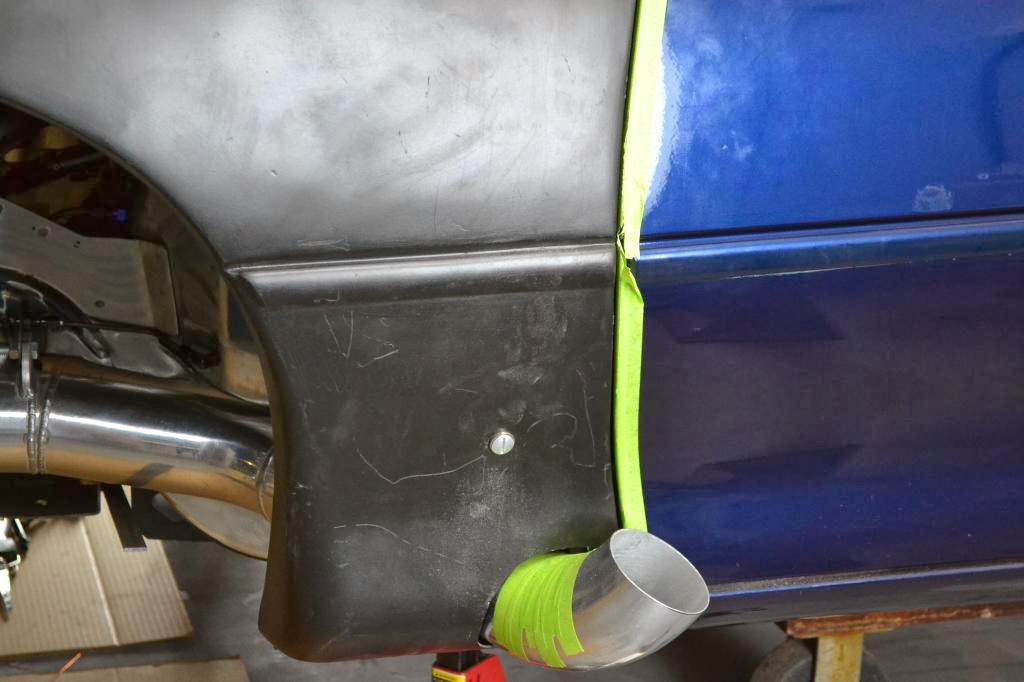
The exhaust getting cut into the firewall allowed for it to be laid back and tucked in quite nice. The pipe will not hang out no where near as far as it would have if we just ran the pipe out the side
The mounts inside holding the rear of the fenders to the main body. They are crafted to be lightweight but yet very strong and sterdy


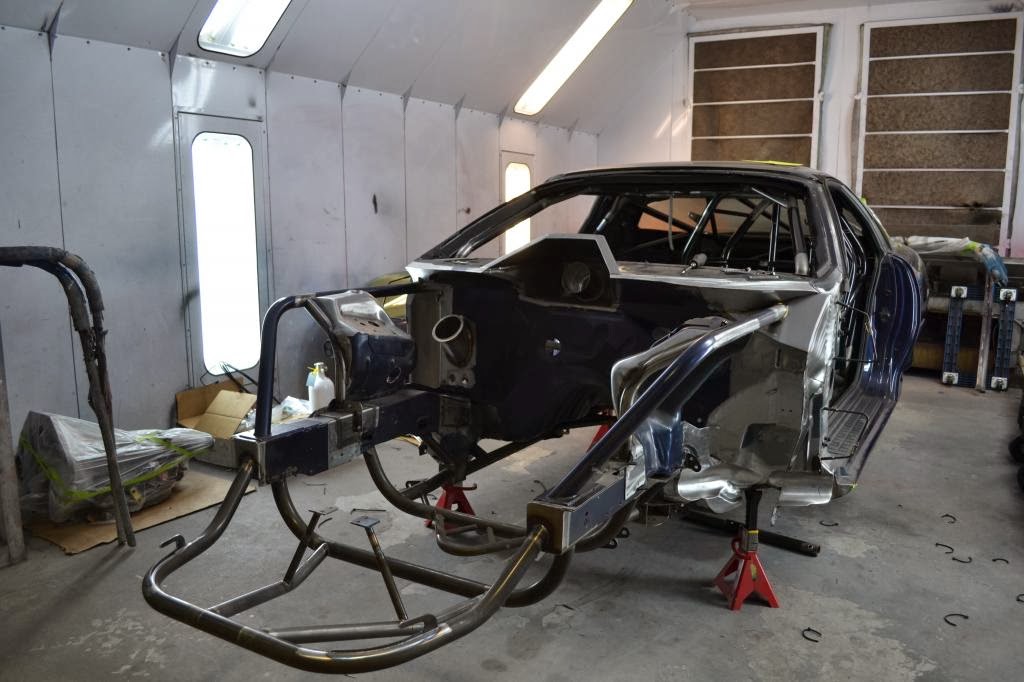
When you step back it should start looking like a car


Then hopefully the hood lines all up and you get this.


Just wait until you see this thing on the ground looking low and mean

Well since all this stuff happen in the paint booth at DMC Racing why not take it all apart and get it ready to put some color on it
They have a pile of parts that need to head out to powdercoated


A few inside shots

Thats right!! DMC didn't take the easy way out and put all new sheet metal in for the floor they used the stock stuff

Thanks for taking the time to look. With PRI this weekend in Indy I will not have a whole lot of time to post anything more but hopefully next week I can get some pictures with color on the main body posted you will start to see a car getting close to completed. EK
As you will be able to see from the updates we are not really that far off and if all goes well I should have the thing sitting in my garage in the next few weeks. Well here is what I have for tonight.When I made the last posts DMC had just finished the inside of the car & completed the engine bay area along with the exhaust system. The final thing needing to be done was the front clip and that will be this update.
We wanted to make the front clip removable making it way easier to work on. I will have the option of pulling the whole clip or just the hood when done. This will make it nice at the track or having to do anything in a hurry that you will have the option. First step was to make the front loop. Dennis made it so the loop will hold the turbo and a few other items on it with ease.
Next step was to make a bracket to hold the front clip onto the loop.
One of the things Dennis & the DMC crew pride themselves on is quality work and craftsmanship. I feel this next picture shows just that. Nothing looks better then a nice weld.
After the brackets were on next was to start on what you would call the tree setup that holds the front end on. This is when you really have to get a little creative.
Time to slide the nose on and start adding bars
An inside shot showing how the tree will mount to the nose. All the steel plates will end up getting fiberglass on them holding the part onto the structure making a tight bond
When it was all said and done they ended up with something like this that will hold the nose on to the car
Now the front fenders followed. A little trimming was needed but was kind of straight forward
The exhaust getting cut into the firewall allowed for it to be laid back and tucked in quite nice. The pipe will not hang out no where near as far as it would have if we just ran the pipe out the side
The mounts inside holding the rear of the fenders to the main body. They are crafted to be lightweight but yet very strong and sterdy
When you step back it should start looking like a car
Then hopefully the hood lines all up and you get this.
Just wait until you see this thing on the ground looking low and mean
Well since all this stuff happen in the paint booth at DMC Racing why not take it all apart and get it ready to put some color on it
They have a pile of parts that need to head out to powdercoated
A few inside shots
Thats right!! DMC didn't take the easy way out and put all new sheet metal in for the floor they used the stock stuff
Thanks for taking the time to look. With PRI this weekend in Indy I will not have a whole lot of time to post anything more but hopefully next week I can get some pictures with color on the main body posted you will start to see a car getting close to completed. EK
12-12-2013, 12:51 AM
#600
12 Second Club
iTrader: (2)
Join Date: Jan 2011
Location: Old Bridge, NJ/Corpus Christi, TX
Posts: 1,215
Likes: 0
Received 1 Like
on
1 Post
Damn Eddie that's insane. Love seeing you get into a 4th gen. Any plans on bringing it back home to Old Bridge to race at all? We'd love to see ya back in the lanes at Etown. I see your dad and brother there all the time during the summer. Lol