







The Turbo Ta Build Thread

On The Tree
Joined: Jan 2011
Posts: 176
Likes: 0
From: Indiana

This is a very good build thread, I hope you get it done quick... The snow is melting and I can hear the 1320 whispering our names!!!! Good luck with the remainder of the build..
Do you ever go to US 41 (No Limit Dragway)
Do you ever go to US 41 (No Limit Dragway)

9 Second Club


Joined: Oct 2006
Posts: 1,194
Likes: 247
From: IL

Thank you guy for the kinds words, and for following along! I relly means a lot to both of us.
Sean
Work looks good guys
If you haven't already, silicone some foam under the hood to set it on the roof. Also put some alone the back to its on the glass, might have to cut it to a angle. Mine shaped itself along the wiper cowl, and I put some double thick spots after it got worn to how it wanted. That helps keep it from rubbing. And sealing it up from wind, will have it do less buffering at speeds.
And I noticed when I trimmed up the wheel well plastics to 3/4, and removed the plastics under the nose. The hood got more movements on the hwy.
If you haven't already, silicone some foam under the hood to set it on the roof. Also put some alone the back to its on the glass, might have to cut it to a angle. Mine shaped itself along the wiper cowl, and I put some double thick spots after it got worn to how it wanted. That helps keep it from rubbing. And sealing it up from wind, will have it do less buffering at speeds.
And I noticed when I trimmed up the wheel well plastics to 3/4, and removed the plastics under the nose. The hood got more movements on the hwy.
Thanks everyone for the comments. This build will probably never be done. Myself, and sean will always keep our self busy with projects, or redoing/changing stuff as we have time. When sean gets a car, we will start all over with it
I forsee no problem staying busy the next two winters on this car, probably more
Thanks, Chris
I forsee no problem staying busy the next two winters on this car, probably more
Thanks, Chris
http://www.racecraft.com/PDF%20/1998...stallation.pdf
LS1 Tech Stories
The Best V8 Stories One Small Block at Time

Gas Monkey Built a 6-Wheel Ferrari Testarossa With a Corvette LT4 Engine
Verdad Gallardo
7 Most Reliable High-Performance Engines GM Has Ever Built
Verdad Gallardo
Amazing '71 Camaro Restomod Is Modern Muscle Car Under the Skin
Verdad Gallardo
6 Common C5 Corvette Failures and What's Involved In Repairing Them
Pouria Savadkouei
Retro Modern Bandit Pontiac Trans AM Comes With Burt Reynolds' Autograph
Verdad Gallardo
Top 10 Greatest Cadillac V Series Performance Models Ever, Ranked
Pouria Savadkouei
Top 10 Most Powerful Chevy Trucks Ever Made!

Hennessey's New Supercharged Silverado ZR2 Has 700 HP
Verdad Gallardo
Coachbuilt N2A Anteros Is an LS2-Powered C6 Corvette In Italian Clothes
Verdad Gallardo 9 Second Club
Joined: Oct 2006
Posts: 1,194
Likes: 247
From: IL
Yeah, we heard that the rails were the same. We also heard that they weren't. We (mostly me) thought that the dzus fasteners were going to be much more difficult to install than they really are. So we went with the pins. If they dont work out, we can do fiberglass work and change to the dzus fasteners.
Thanks! I am sure we can work something out. We should be at some RSD's this year if you make it out to those.
Sean
Thanks! I am sure we can work something out. We should be at some RSD's this year if you make it out to those.
Sean
Aren't the RaceCraft dzus rails the same for both the Camaro and the T/A?
http://www.racecraft.com/PDF%20/1998...stallation.pdf
http://www.racecraft.com/PDF%20/1998...stallation.pdf
On aerocatch's site they have all kinds of cars with the entire hood held on with 4 hood pins. I have no idea how much air gets under the hood of those cars though, but i also have the password jdm rings underneath, so i have a pretty good amount of fiberglass surface area covered with these 4 hood pins.
2 people at vfn saw some pictures, and they seem to think it should be just fine, but as sean said, if we have problems we will add something, and make it work like we always do
The hood is very solid with just the 4 pins, so we shall see how it goes.
Thanks everyone!
Chris
9 Second Club
Joined: Oct 2006
Posts: 1,194
Likes: 247
From: IL
Another weekend has come and gone, and while we did get a good amount of work done, we did not get it started. Thats partly because some needed parts wont be here till this week, but mostly because we decided not to work on it Friday. Saturday morning (any it was actually morning) we went in the garage and got to work. Chris started right away on tackling the wiring for the battery relocation. Since he was working on that, and I knew that the battery tie down that came with the box did not fit our battery, I started working on a new tie down. I started making it out of some aluminum, but that failed because it was too thin and just flexed. So I whipped one up out of some molly round bar and angle iron.
Here is what I came up with

My welding is getting a little better

And here it is in place with most of Chris's wiring. He still needs to run main wire from the alternator to the battery.


Here is a quick shot showing the difference between quality wire (stinger on the right), and cheap ****. Both of these are 4gauge.

After that, the new valley cover plate showed up! This was the replacement piece we got from AEI Inc. after they found the root cause of the problem (I believe a program error). This one looked beautiful (just like the last one) and fit like a glove! I didn't really get any pics of the plate for some reason, but you can see it well enough in the next few.
Here is the Kurt Urban Performance water vapor block mounted to the plate. This was just a quick bracket the Chris whipped up out of some aluminum angle.

And on the motor, ready for the intake manifold. You can also see the valve covers all powder coated and installed.
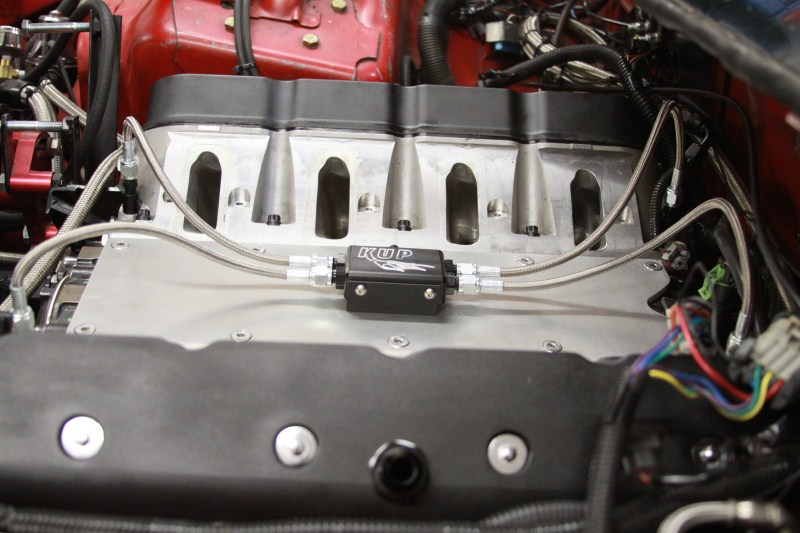
Speaking of the intake, here are some pics of it before being installed. Here is the FAST intake gaskets installed ready to go.

Here you can see the bracket for the fuel rails that the machinist at work whipped up out of some aluminum.

And here is a plug he made up. This intake has a hole and a bracket for MAP sensor which we aren't using. So instead of threading and tapping the hole, I had the machinist whip up a plug. The allen on the right hand side holds the plug itself that has a very slight press to seal it. Then the screw on the left is what holds it in to the factory bracket hole. This way it plugs the hole, but doesn't modify the intake if Chris ever decides to sell it.

Here are some shots of it all on the car!


Here is a quick pic of the upper inter cooler pipe. Obviously its not 100%, we are waiting on the 3"-3.5" adapter to come in this week so that it fits the silicone transition to the throttle body. That should all be wrapped up next weekend for sure.

The eagle eye among you will notice that the alternator, AND the alternator bracket are missing. We have a little surprise in store for that That is why the wiring is not complete yet either. Thats all for this week, thanks for following along!
Sean
Here is what I came up with
My welding is getting a little better
And here it is in place with most of Chris's wiring. He still needs to run main wire from the alternator to the battery.
Here is a quick shot showing the difference between quality wire (stinger on the right), and cheap ****. Both of these are 4gauge.
After that, the new valley cover plate showed up! This was the replacement piece we got from AEI Inc. after they found the root cause of the problem (I believe a program error). This one looked beautiful (just like the last one) and fit like a glove! I didn't really get any pics of the plate for some reason, but you can see it well enough in the next few.
Here is the Kurt Urban Performance water vapor block mounted to the plate. This was just a quick bracket the Chris whipped up out of some aluminum angle.
And on the motor, ready for the intake manifold. You can also see the valve covers all powder coated and installed.
Speaking of the intake, here are some pics of it before being installed. Here is the FAST intake gaskets installed ready to go.
Here you can see the bracket for the fuel rails that the machinist at work whipped up out of some aluminum.
And here is a plug he made up. This intake has a hole and a bracket for MAP sensor which we aren't using. So instead of threading and tapping the hole, I had the machinist whip up a plug. The allen on the right hand side holds the plug itself that has a very slight press to seal it. Then the screw on the left is what holds it in to the factory bracket hole. This way it plugs the hole, but doesn't modify the intake if Chris ever decides to sell it.
Here are some shots of it all on the car!
Here is a quick pic of the upper inter cooler pipe. Obviously its not 100%, we are waiting on the 3"-3.5" adapter to come in this week so that it fits the silicone transition to the throttle body. That should all be wrapped up next weekend for sure.
The eagle eye among you will notice that the alternator, AND the alternator bracket are missing. We have a little surprise in store for that
That is why the wiring is not complete yet either. Thats all for this week, thanks for following along!Sean


yeah same one that Tatershack used a few years back.
https://ls1tech.com/forums/12423552-post47.html
it works good from the pictures he has posted.
https://ls1tech.com/forums/12423552-post47.html
it works good from the pictures he has posted.
9 Second Club
Joined: Oct 2006
Posts: 1,194
Likes: 247
From: IL
IT'S ALIVE!!!
But that is getting a little ahead of ourselves. It was a LONG weekend, and we got a lot done for sure. Friday night we dove right in, and I started on finishing the upper inter cooler pipe since the material came in. Nothing really too exciting, we had to go from 3" to 3.5" because apparently nobody makes a 4.5" to 3" silicone coupler. Anyway we took the easy way out and Chris picked up a 3-3.5 transition and some 3.5" pipe. I think you can figure out what happened from there
Here is the finished product before paint. I didn't bother cleaning up the welds because I know I am changing it all again after this season.


While I was doing that Chris was busy helping his girlfriend Rachel pull off the back bumper so she could finish the CETA mod she started a couple weeks back. Here is the bumper pulled off, masked and prepped for primer.

Once that was done Rachel sprayed the primer, and we called it a night.
Saturday morning, Chris was busy helping his dad change the belt on his car. After he was finished with that he jumped on making a mount for the fuel pressure regulator. Some may remember that we had a fuelab FPR that we never even used really. We had to change to a Forge Performance unit before hitting the dyno last year since we needed a boost referenced unit. Well we never had time to make a new mount for it so it was temped in, that is until now!
Here is Chris doing... something with the mount I am sure

And here it is all wrapped up.

I got busy on the coil pack mounts first thing in the morning. After looking around for some good spots, we decided to mount them up on the shock towers. This gives us quick and easy access to them if we need to do any trouble shooting, or change one out. Also we didn't have to worry about getting new plug wires, or modifying the wiring. I didn't get any pics of them, but you can see them some others. We need to clean up the wiring to the coils still to make it look nicer.
After that I got crackin on getting the turbo installed. This is no easy task to do by yourself, but I got it done, and without dropping it! Rachel got busy finishing up the back bumper.
Here it is with the final coat of paint on it before she pulled off the masking

and here it is all unmasked and ready to go back on

and just a quick one of it back on the car. Once its on the ground next weekend we can move it forward to get some better shots of it.

Once that was all done Chris got to work on mounting the vacuum manifold, and running all new lines.
Here is the manifold installed. It is fed by a 3/8" line from the back of the intake which is the line on the right

And here it is with all of the new lines installed. We did everything in 1/4" silicone line to make it easier.

While he was working on that, I was busy installing the inter cooler pipes, and wrapping up small things under the car like the shifter cable. Rachel was busy running some new wires for the alternator, and shut off. Then it was a matter of going through everything on the car and making sure it was all tight. We tried to start the car late Saturday night, but the battery was dead, and so was the jumper pack. So we had to wait until the next morning for this...
http://www.youtube.com/watch?v=fACxsRpEjbw
And some pics.


So now that its running we need to finish up the alternator and the associated wiring, the fuel pumps, and some other odds and ends. Then we have to clean up the engine bay, and change over to a 99 up ECU for better tune-ability. Thats right, now that its running we are changing the computer and a lot of the wiring, so that means we will have a second first start of the year As always, thanks for following along!
Sean
But that is getting a little ahead of ourselves. It was a LONG weekend, and we got a lot done for sure. Friday night we dove right in, and I started on finishing the upper inter cooler pipe since the material came in. Nothing really too exciting, we had to go from 3" to 3.5" because apparently nobody makes a 4.5" to 3" silicone coupler. Anyway we took the easy way out and Chris picked up a 3-3.5 transition and some 3.5" pipe. I think you can figure out what happened from there
Here is the finished product before paint. I didn't bother cleaning up the welds because I know I am changing it all again after this season.
While I was doing that Chris was busy helping his girlfriend Rachel pull off the back bumper so she could finish the CETA mod she started a couple weeks back. Here is the bumper pulled off, masked and prepped for primer.
Once that was done Rachel sprayed the primer, and we called it a night.
Saturday morning, Chris was busy helping his dad change the belt on his car. After he was finished with that he jumped on making a mount for the fuel pressure regulator. Some may remember that we had a fuelab FPR that we never even used really. We had to change to a Forge Performance unit before hitting the dyno last year since we needed a boost referenced unit. Well we never had time to make a new mount for it so it was temped in, that is until now!
Here is Chris doing... something with the mount I am sure
And here it is all wrapped up.
I got busy on the coil pack mounts first thing in the morning. After looking around for some good spots, we decided to mount them up on the shock towers. This gives us quick and easy access to them if we need to do any trouble shooting, or change one out. Also we didn't have to worry about getting new plug wires, or modifying the wiring. I didn't get any pics of them, but you can see them some others. We need to clean up the wiring to the coils still to make it look nicer.
After that I got crackin on getting the turbo installed. This is no easy task to do by yourself, but I got it done, and without dropping it! Rachel got busy finishing up the back bumper.
Here it is with the final coat of paint on it before she pulled off the masking
and here it is all unmasked and ready to go back on
and just a quick one of it back on the car. Once its on the ground next weekend we can move it forward to get some better shots of it.
Once that was all done Chris got to work on mounting the vacuum manifold, and running all new lines.
Here is the manifold installed. It is fed by a 3/8" line from the back of the intake which is the line on the right
And here it is with all of the new lines installed. We did everything in 1/4" silicone line to make it easier.
While he was working on that, I was busy installing the inter cooler pipes, and wrapping up small things under the car like the shifter cable. Rachel was busy running some new wires for the alternator, and shut off. Then it was a matter of going through everything on the car and making sure it was all tight. We tried to start the car late Saturday night, but the battery was dead, and so was the jumper pack. So we had to wait until the next morning for this...
http://www.youtube.com/watch?v=fACxsRpEjbw
And some pics.
So now that its running we need to finish up the alternator and the associated wiring, the fuel pumps, and some other odds and ends. Then we have to clean up the engine bay, and change over to a 99 up ECU for better tune-ability. Thats right, now that its running we are changing the computer and a lot of the wiring, so that means we will have a second first start of the year
As always, thanks for following along!Sean


