When you click on links to various merchants on this site and make a purchase, this can result in this site earning a commission. Affiliate programs and affiliations include, but are not limited to, the eBay Partner Network.
I've thrown away my interior harness and while my car is at TRZ Motorsports getting a moly cage (couple bars short of a 25.2) I decided to order a complete kit from Bob at Spaghetti Menders to power what I need. My question is does anyone have pics of moving the PCM harness inside the car? I thought of cutting a hole by the passenger side head and simply shooting inside that way. Bob has provided me with relays to power my coils, injectors, 02's, and computer in the under dash relay center. I thought for the sake of making things easier to move the computer inside since the harness won't need to go across the front of the car to the old factory relay center. I've used the search and didn't see any brackets to hold the PCM in place and the stock one I have is kind of old. Any help would be appreciated!
put a notch in the HAVAC block off panel, So you hav the 1 or 2 holes right on the inside edge. You dont have to drill another hole, and its easier to get the PCM red/blue ends thu
put a notch in the HAVAC block off panel, So you hav the 1 or 2 holes right on the inside edge. You dont have to drill another hole, and its easier to get the PCM red/blue ends thu
That sounds like a good idea and thanks for the advice. Once I get the relay blocks mounted to the roll bar I should be able to get an idea of how it is all going to look. Right now with everything out of the car and not knowing the length of any wires I'm sort of left wondering how it's all going to look.
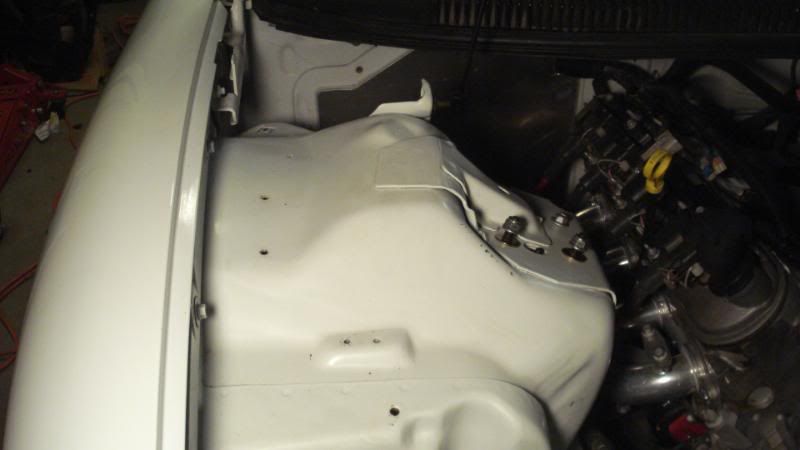
Punch out the divet behind the intake where the hvac bolt used to be and mount the pcm on the underside of the inner cowl then u can just pull out the radio bezel and get to your pcm connectors super easy plus u wont have wires ruinnin over the outside of the firewall itll be nicely hidden
put a notch in the HAVAC block off panel, So you hav the 1 or 2 holes right on the inside edge. You dont have to drill another hole, and its easier to get the PCM red/blue ends thu
X2
This is how mine is. Easy to do, and makes for a super clean install, that's easy to pull back apart if needed.
Only problem with doing it any other place is:
A) you have a huge hole, big enough to fit the PCM connectors thru
B) you have to de-pin the harness any time you've gotta pull it through the firewall.
Half way through the HVAC panel is the best of both worlds. And only your "wire mod" connectors (c100?) have to be extended. I actually re routed my "wire mod" wires to the drivers side, as back behind the dash, so the only wires running along the core support are for the head/turn/park lights.
Thanks for the advice everyone! Does anyone have pictures of the notch in the HVAC plate? My wiremod wires will be inside the car also because my relay center will now be inside as far as PCM power and ignition goes.
This was done a couple years ago...since then I have torn the motor out and did t picsa better job. No recent pics yet
To those of you who are interested in relocating your PCM. I took myair conditioning out, I believe this is the only way to complete this project. I also had the dash apart, but you can do it with the dash still installed. Materials that are needed, are a delete panel, something to cut it with (Dremel) 22 strands of 3 feet of 20 gauge wire, one 3 foot 10 gauge wire. A soldering gun, solder, Heat shrink, wirecutters, and strippers (for the wires, not for entertainment) a drill oryou could use the dremel to cut a hole in the fender, some type of silicone to seal the panel. And your choice of beverage.[B]First thing is to disconnect the battery! Then you can take out the PCM.[B]
Once the AC is out, you then have to take your delete panel, eitherbought or made, and cut two holes in it for the wires to go through. The ones leading from the Starter, which are wrapped in heat tape, and the main wires running behind the engine block. Now I never did the wire mod, so my holes are a little different, more on that later.
Once you have the delete panel, start cutting where you want the wiresto go. I cut mine at the top right (looking from the front bumper.) and at the very bottom. I then placed the PCM and the wires that usually run over the fender,inside the glove compartment. I just disconnected them from the connecters....it was the easiest.
The only wires that need to be lengthened are these 23 wires. Most are 20 gauge, some are 22 and there is one 10 Gauge. I made them all 20 to make it easier. I picked some red 20 gauge wire, up at the local parts store, it is 100feet.
Then measured 3 feet and cut 22 strands. After that I cut the connecters one at a time, making sure I labeled each one.
After cutting all the connecters and having them labeled I soldered the new wire to the old wire.
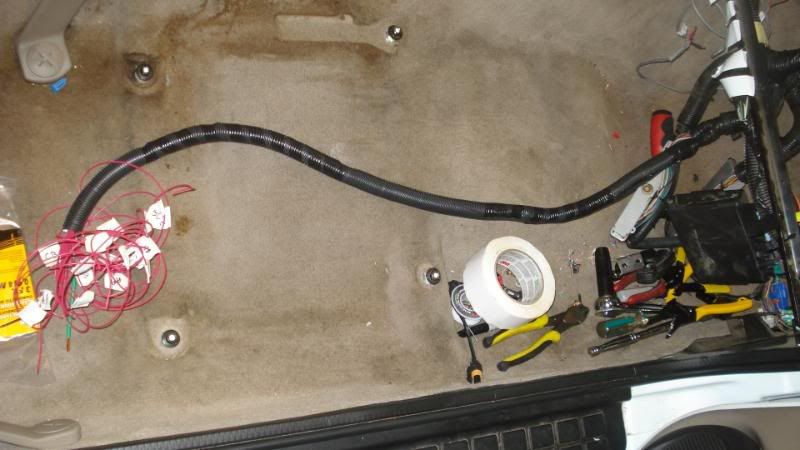
I labeled each of the lengthened wires to correspond. After the wires where labeled I wrapped them up in electric tape, and placed them in a wire loom.
I then drilled a hole in the passenger fender. I had to take off the splash guard. Once the hole was drilled, I ran the wire through the hole and soldered the ends to the connecter ends, making sure all the labels were the same.
Once done with that I connected the connecters and put the splash guardback in. Looks just like the wire mod, but I did not cut a whole in the fender to the engine compartment, instead it was to cabin area. I would assume you could just run the wires through the grommet in the fire wall to the hole in the engine compartment if you have already done the wire mod. I put in the delete panel, plugged back in the PCM and then connected the battery back up. Start her up, make sure nothing is running crazy,and then sit back and enjoy the lust and envy from those that see your car for now on.
Last edited by GhostofKrypton; Aug 30, 2011 at 10:01 PM.
I moved my PCM inside as well since I was rewiring the whole car. I ended up using a deutsch connector in the AC delete panel and then mounted the PCM on standoffs
I moved my PCM inside as well since I was rewiring the whole car. I ended up using a deutsch connector in the AC delete panel and then mounted the PCM on standoffs
I know I revived an old thread but I'm sure A lot of people would like to know what connector you used and how you did it as well as what the blue and red **** looking things are on the plate. I am looking to do this myself and think a connector would look better then hacking a 60 dollar plate apart to slide the hardness through. So if anyone could shed light on this im sure A lot of people would be happy.
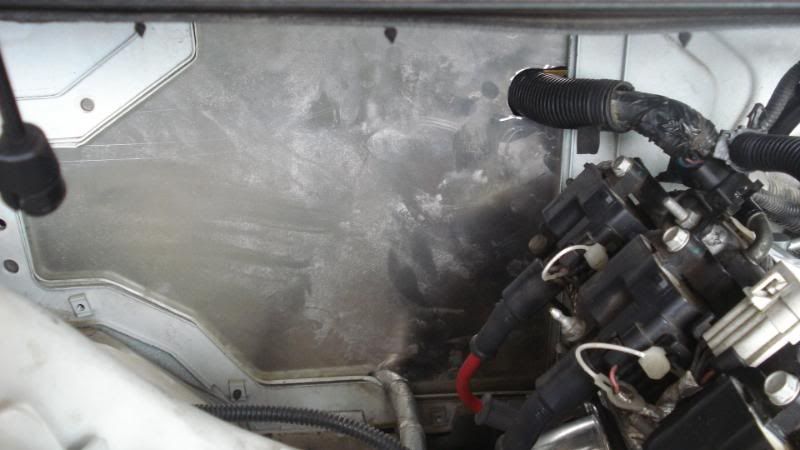
The blue connector is a nitrous bulkhead, the red connector is a power bulkhead. Look at the 3rd pic you quoted and you can see them. I made my own panel out of old road sign and just cut a small enough grove for the harness to go through. I screwed my panel on from the engine side.
The blue connector is a nitrous bulkhead, the red connector is a power bulkhead. Look at the 3rd pic you quoted and you can see them. I made my own panel out of old road sign and just cut a small enough grove for the harness to go through. I screwed my panel on from the engine side.
so is that from a square road sign lol. And what is the power bulk head for? And do you have the small hole at the bottom as well for the starter and trans wires?
thanks for the link I try searching and i must be dumb because i can never find anything lol.
I try to link stuff bc the next guy searching may find this thread again and will find my link again so it keeps people getting the right info they need.
Hard to tell what he used the power bulkhead for but most likely the battery was relocated to the back and he's powering at least the nitrous noids and a stand alone fuel system off it. I do have a cut out on the bottom of my ac block off plate for the starter wire loom along with the 4 connectors usually on top of the passenger inner fender. Pretty sure it may have been a octagonal sign.
6 Common C5 Corvette Failures and What's Involved In Repairing Them
Slideshow: From wobbling harmonic balancers to failed EBCMs, these are the issues that define long-term C5 ownership and what repairs typically involve.
Retro Modern Bandit Pontiac Trans AM Comes With Burt Reynolds' Autograph
Slideshow: A modern Camaro transformed into a retro icon, this limited-run "Bandit" build blends nostalgia with brute force in a way few revivals manage.
Top 10 Greatest Cadillac V Series Performance Models Ever, Ranked
Slideshow: Cadillac didn't just crash the high-performance luxury vehicle party, it showed up loud, supercharged, and occasionally a little unhinged...
Coachbuilt N2A Anteros Is an LS2-Powered C6 Corvette In Italian Clothes
Slideshow: A one-off sports car that looks like a vintage Italian exotic-but hides a C6 Corvette underneath-just sold for the price of a new mid-engine Corvette.