

MWC Chromoly Fbody Cage....underway!!

Thread Starter
TECH Fanatic
Joined: Mar 2011
Posts: 1,916
Likes: 8
From: Statesville, NC
I got all the interior out off my twin turbo ta and starting on my cage I received from mwc. It's a 10pt chromoly. Just starting a picture thread on it for reference info for others and I'm sure I will have questions myself along the way.
First question I have. I know nhra rules say tig entire cage. That's no problem. But where the bars touch the floor plates, can that be mig? If it's something that is in question I'll just tig. Not like I know any chassis inspectors.
I'll post a bunch of progress pictures tomorrow when I get to a computer.


I tig'd all of mine, even the floor plates. Pretty shitty, but it looks great. IIRC I found out that you can mig the floor plates. I know alot of people also tack the bars into place with a mig.


Thread Starter
TECH Fanatic
Joined: Mar 2011
Posts: 1,916
Likes: 8
From: Statesville, NC
Well I tacked bars so they will stay in place. I tacked them in easy accessible places so I can cut the tacks off and tig later.
Thread Starter
TECH Fanatic
Joined: Mar 2011
Posts: 1,916
Likes: 8
From: Statesville, NC
The bars were suppose to go to the speaker holes or that's how I ordered it. But im not hard to get along with so I just said screw it and used the original style bars they sent lol. Still looks fine.
Trending Topics

The rear bars placed where you have them is by far the best. Going through the speaker hole places the tube over the inner wheel well where there is very little strength(or safety).
The floor plates are fine to be MIG welded, chromoly tubes are supposed to be TIG welded at any point.
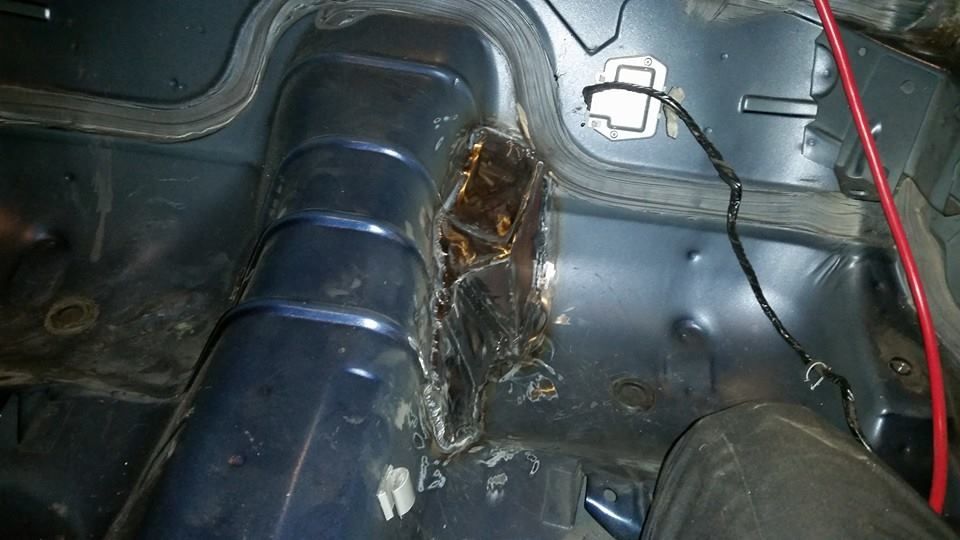
Whats up with that big gaping hole in the tunnel over the torque arm?
The floor plates are fine to be MIG welded, chromoly tubes are supposed to be TIG welded at any point.
Whats up with that big gaping hole in the tunnel over the torque arm?
Thread Starter
TECH Fanatic
Joined: Mar 2011
Posts: 1,916
Likes: 8
From: Statesville, NC
The rear bars placed where you have them is by far the best. Going through the speaker hole places the tube over the inner wheel well where there is very little strength(or safety).
The floor plates are fine to be MIG welded, chromoly tubes are supposed to be TIG welded at any point.
Whats up with that big gaping hole in the tunnel over the torque arm?
The floor plates are fine to be MIG welded, chromoly tubes are supposed to be TIG welded at any point.
Whats up with that big gaping hole in the tunnel over the torque arm?
Thread Starter
TECH Fanatic
Joined: Mar 2011
Posts: 1,916
Likes: 8
From: Statesville, NC
Got the gaping hole closed up and boxed in so the torque arm can still move up in there. Just pieced it since its gonna be under the carpet. Painted black after this also.


Thread Starter
TECH Fanatic
Joined: Mar 2011
Posts: 1,916
Likes: 8
From: Statesville, NC
The bar on the driver side im having trouble getting just right. ssvert99, do I need to cut the dash support a little for the bar clearance? Or should it go in front of it fine and im just not holding my mouth right lol?
The driver side a-pillar bar is sunk into the bulkhead approximately 1/2 the diameter of the tube. Just use a body saw or cut-off wheel to clearance it as needed. This is required as the body is not the same on both sides.
Thread Starter
TECH Fanatic
Joined: Mar 2011
Posts: 1,916
Likes: 8
From: Statesville, NC
Thanks man. I already hammered it a little but realized it probably needed to be cut.


I will be installing a cage this winter and have been seriously considering this exact cage. A local buddy of mine installed the same cage and the only thing I don't like are the way those front bars come down off the hoop and don't run even along the windshield pillar. I love everything else about this kit.
Looking really good!
Looking really good!