LSX alternator relocation kit


 07-01-2011, 02:37 PM
#128
TECH Enthusiast

[QUOTE=nahasapeemapetalon;15083677]Got the (i think first bracket made)!
My mid 90's suburban alternator wasnt doing the job, voltage was always really low and my belt alignment wasnt very great.
I got a 145A truck alternator and used this Modular Turbo bracket. I have nasty nate fuel rails and just had to replace the passenger front rail fuel fitting with an NPT 90 to hose end fitting.
The bracket was well put together, seems really sturdy. Nice adjustable tensioner. No more belt squeal. So far so good.
I probably didnt need to modify the alternator back plastic cover but chose to for possible belt tightening.
14.0Volts FTW!! Nice work guys, thanks for the quick ship!

First thought was a gas leak at the 90 and spark from alt.
My mid 90's suburban alternator wasnt doing the job, voltage was always really low and my belt alignment wasnt very great.
I got a 145A truck alternator and used this Modular Turbo bracket. I have nasty nate fuel rails and just had to replace the passenger front rail fuel fitting with an NPT 90 to hose end fitting.
The bracket was well put together, seems really sturdy. Nice adjustable tensioner. No more belt squeal. So far so good.
I probably didnt need to modify the alternator back plastic cover but chose to for possible belt tightening.
14.0Volts FTW!! Nice work guys, thanks for the quick ship!
First thought was a gas leak at the 90 and spark from alt.
 07-01-2011, 09:10 PM
#130

He got the very first one.
I had just enough material in the shop to make 2 kits, he got the first one
and the other left right behind it.
It takes a few days to get the materials in the shop and a few days to get them made
powder coated and shipped.
5 kits got shipped USPS Thursday.
You may get yours tomorrow.
I have enough material in the shop now to make over 50 kits
 07-05-2011, 01:20 PM
#136
Got my bracket installed. Here's a quick write up for install (though it's pretty self explanatory).
Tools needed:
Adjustable crescent wrench
Socket wrench with 9/16", 5/8", and 17mm (or 11/16") sockets
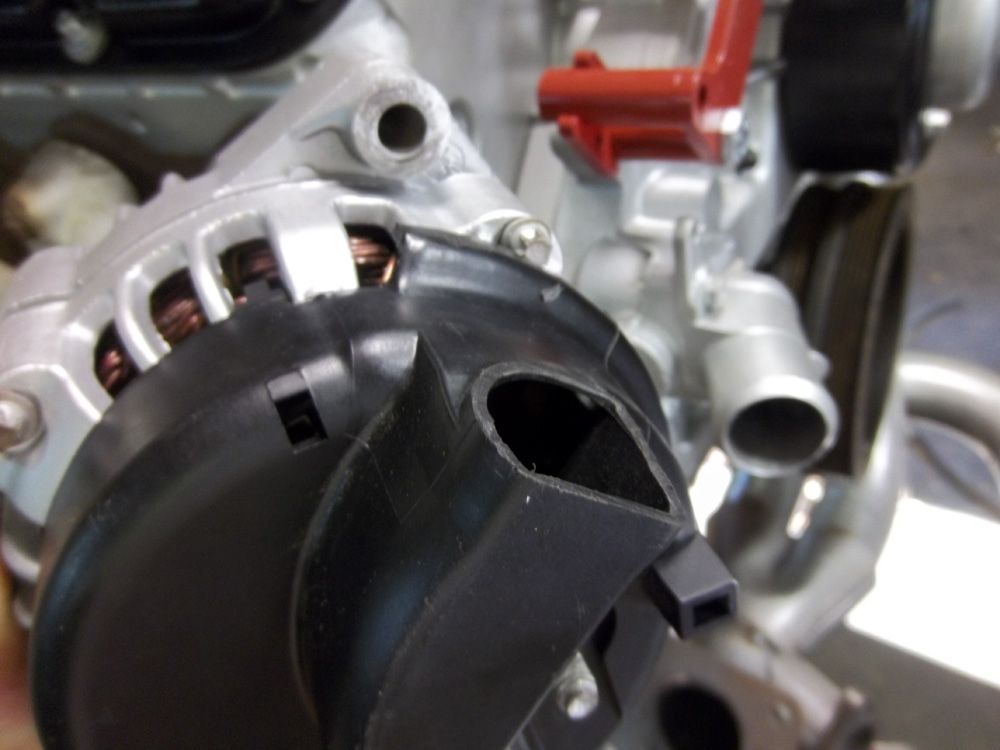
1) Cut the plastic "vent" off the back of the LS1 alternator. I made quick work of it with a Dremel and cutoff wheel.

2) Remove the factory tensioner using a 5/8" socket wrench.
3) Use the two shortest bolts (17mm) to affix the smaller bracket to the passenger side head.

4) Use the two fully-threaded bolts (17mm) to affix the larger bracket to the water pump housing.

5) Place the "ear" on the alternator into the open area on the top right side of the alternator bracket, and slide the 5" long bolt (17mm) through the opening and hand tighten. If you fully tighten it now, it'll make it harder to set the tension on the belt later.
6) Take the two remaining 3.25" bolts and insert one through the hole on the alternator, then the other through the hole on the alternator bracket.
7) Place the adjustable tensioner rod on the back of the 3.25" bolts and secure it using the 9/16" nuts. You may have to adjust the length of the tensioner rod to get it to fit.


8) Route the belt as shown below. I had to remove my oil filler cap and fully lower the alternator using the tensioner rod in order to slip the belt over the crank.

9) Lengthen the tensioner rod (9/16") to set the proper belt tension.
10) Once your tension is properly set, perform a final tightening on the top right bracket bolt (17mm") that runs through the ear on the alternator.


I haven't pulled the alternator wire out of the engine harness yet, so maybe Rob or Chris can chime in with more specific directions on that portion.
The bracket is very nice, install was straight forward, and setting the tension was easy. Nice work!
Tools needed:
Adjustable crescent wrench
Socket wrench with 9/16", 5/8", and 17mm (or 11/16") sockets
1) Cut the plastic "vent" off the back of the LS1 alternator. I made quick work of it with a Dremel and cutoff wheel.
2) Remove the factory tensioner using a 5/8" socket wrench.
3) Use the two shortest bolts (17mm) to affix the smaller bracket to the passenger side head.
4) Use the two fully-threaded bolts (17mm) to affix the larger bracket to the water pump housing.
5) Place the "ear" on the alternator into the open area on the top right side of the alternator bracket, and slide the 5" long bolt (17mm) through the opening and hand tighten. If you fully tighten it now, it'll make it harder to set the tension on the belt later.
6) Take the two remaining 3.25" bolts and insert one through the hole on the alternator, then the other through the hole on the alternator bracket.
7) Place the adjustable tensioner rod on the back of the 3.25" bolts and secure it using the 9/16" nuts. You may have to adjust the length of the tensioner rod to get it to fit.
8) Route the belt as shown below. I had to remove my oil filler cap and fully lower the alternator using the tensioner rod in order to slip the belt over the crank.
9) Lengthen the tensioner rod (9/16") to set the proper belt tension.
10) Once your tension is properly set, perform a final tightening on the top right bracket bolt (17mm") that runs through the ear on the alternator.
I haven't pulled the alternator wire out of the engine harness yet, so maybe Rob or Chris can chime in with more specific directions on that portion.
The bracket is very nice, install was straight forward, and setting the tension was easy. Nice work!
Last edited by evo462; 07-05-2011 at 01:26 PM.
07-05-2011, 04:30 PM
#137
Be careful with that belt tensioner, you can easily over tighten the belt.
You will be able to put plenty of tenstion on the belt with out needing a 9/16 wrench.
Let me give everyone that has had there harmonic balancer off there motor a heads up.
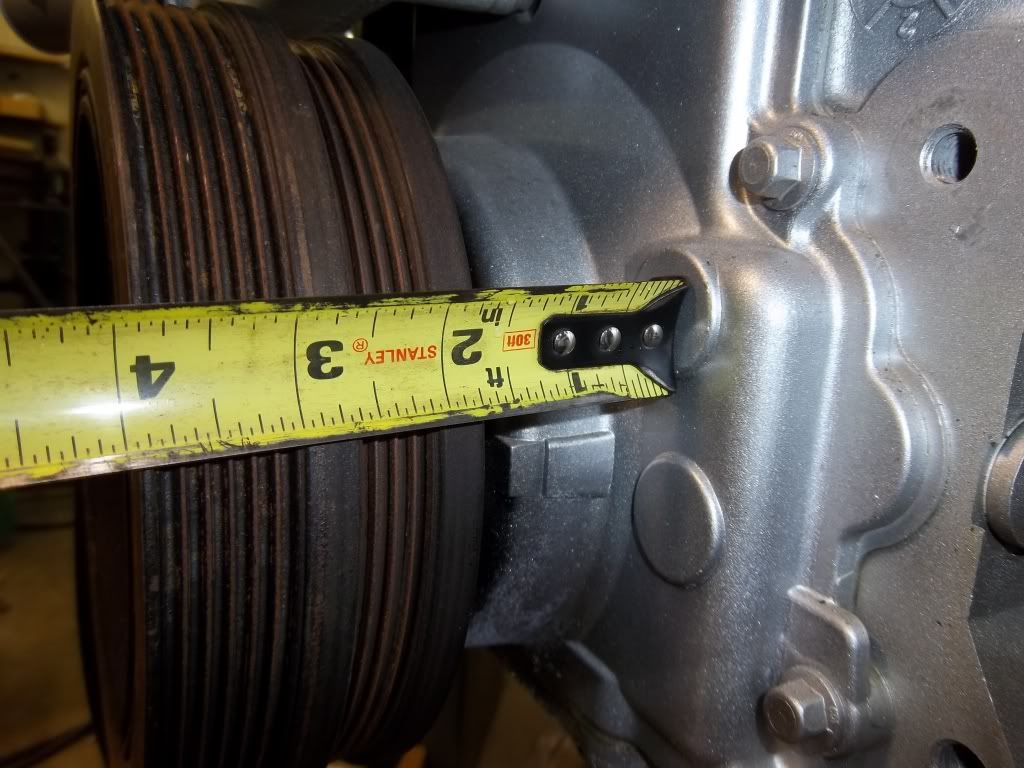
It should a little more than 3-7/8" and less that 3-15/16. I put a set of calipers on it
and got 3.925. 3-7/8= 3.875 and 3-15/16= 3.9375.
I know these things can be hell to get seated all the way, this should help.
You will be able to put plenty of tenstion on the belt with out needing a 9/16 wrench.
Let me give everyone that has had there harmonic balancer off there motor a heads up.
It should a little more than 3-7/8" and less that 3-15/16. I put a set of calipers on it
and got 3.925. 3-7/8= 3.875 and 3-15/16= 3.9375.
I know these things can be hell to get seated all the way, this should help.
Last edited by Chris@CBR; 07-05-2011 at 04:57 PM.