
My build - Lots of pics


 07-28-2010, 05:24 PM
#246
https://ls1tech.com/forums/forced-in...icle-here.html
Sean
08-01-2010, 02:13 PM
#247
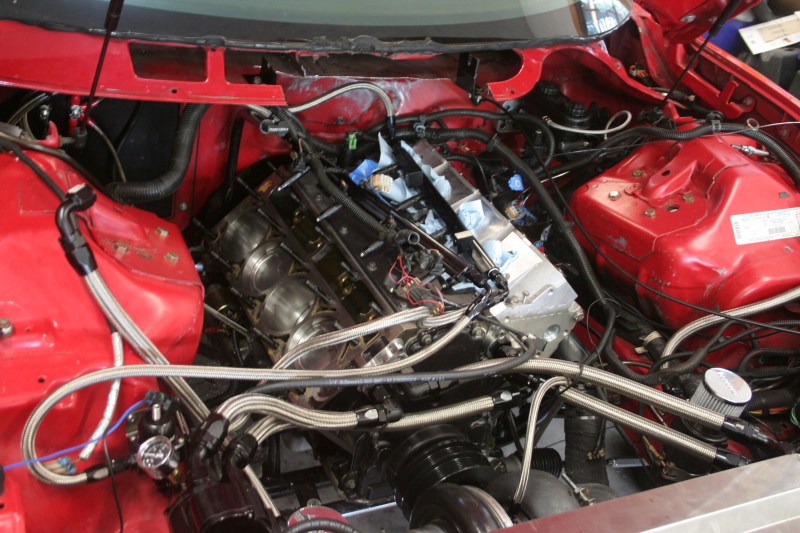
What a crazy weekend! The plan for this weekend was to clean up the wiring, make some coil mounts, and just start wrapping up the loose ends. Well sometimes things don't go as planned. This is basically what it looked like under the hood Friday when we showed up

And this is what it looked like Friday night
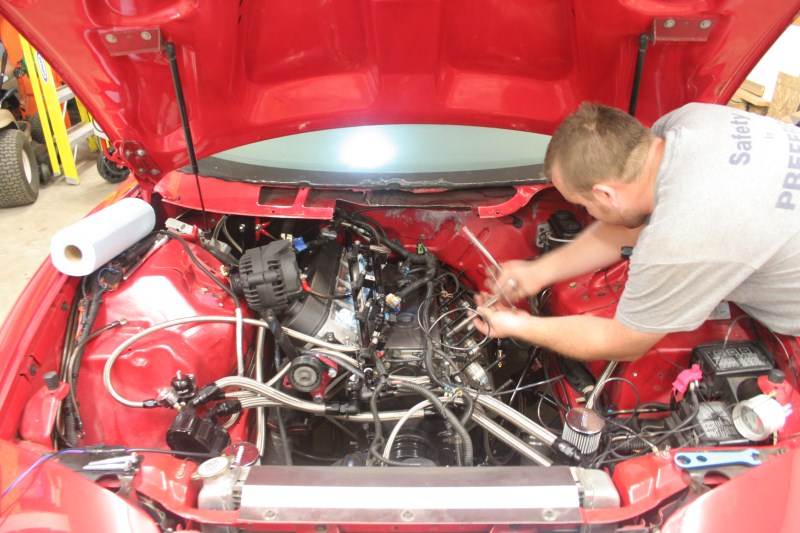
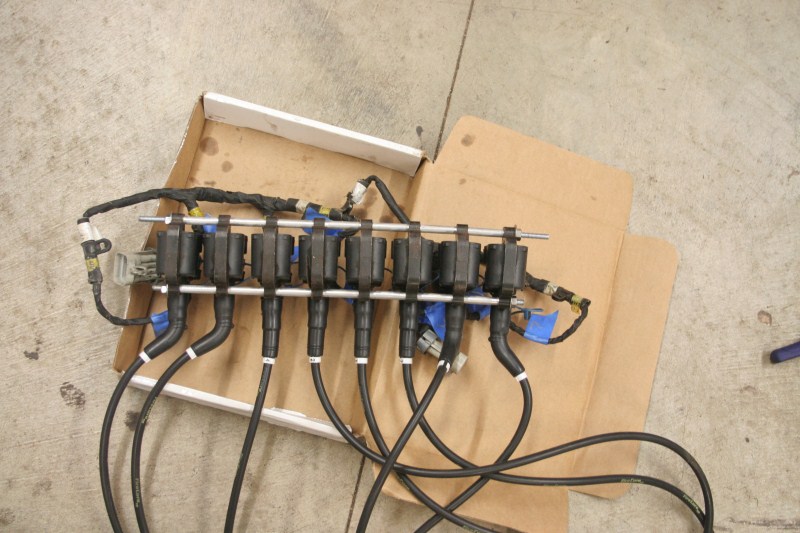
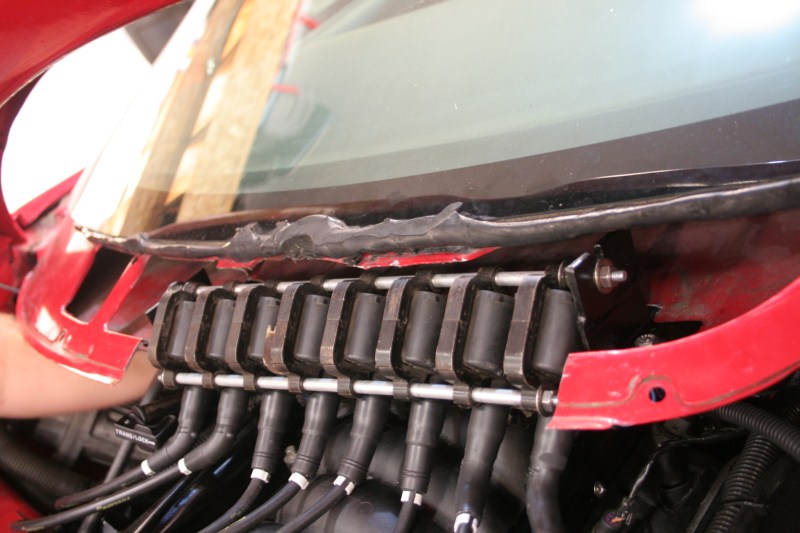
Let me explain how we got to this point real quick. During the week Chris was working on the idle and heard a noise which he thought was a coil rubbing. So Friday, since we had gotten the new plug wires, we made up the coil mounts. The mount is simple, just some 1/4-20 rod with 5/16 aluminum tubing as spacers. The over hang of the top rod sits in some cradles that I whipped up real quick so that the whole assembly is easy to install/remove. That little part came in quite handy more times than we would have like this weekend. Here is the coils mounted to the rods. I did not get a picture of the cradles, but you will be able to see them installed later.
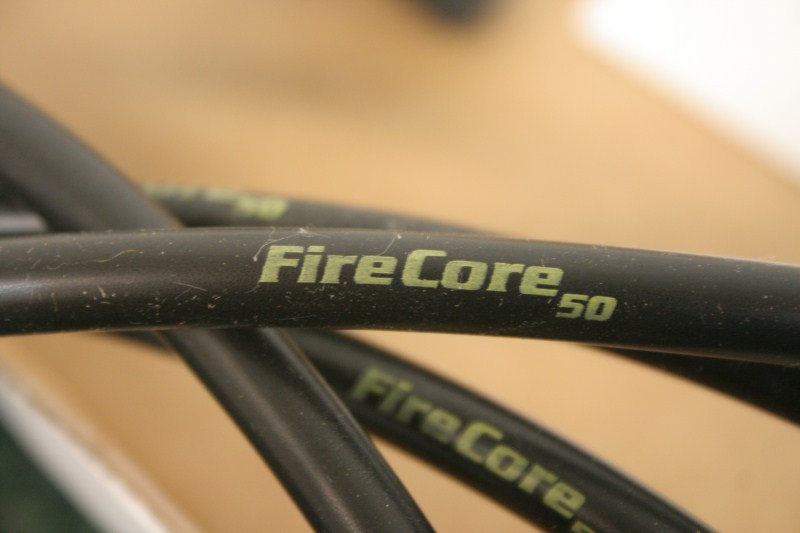
BTW, we are using Fire Core 50 wires that were custom made for us by www.customwiresets.com They have been great to deal with, and are highly recommended.
So once we had the coil mount made, we installed them with the new wires and started it up. I heard the noise that Chris was referring to almost immediately. It was not a noise I was happy to hear, a squeak which means that something isn't getting oil. I was hoping it was simple, so we pulled off the valve cover on the driver side and saw some metal flakes by the front most rocker. We then pulled the rockers, and the push rods and cleaned then throughly thinking that oil just wasn't making it up the push rod. Put it all back together and started it up, same noise! So then we knew the head had to come off. Chris suddenly found some energy and was able to get the head off Friday night. Got everything cleaned up, and put the lifters in some oil to soak over night. We did find one piece of metal down by the rear lifters which may have been some of the problem.
Saturday morning Chris get the head back on, and everything re-assembled. While he was working on that I was doing smaller things like running the line for the radiator overflow to the back of the car, extending the upper inter cooler pipe, and final installing the lower inter cooler pipe. So we get it all back together, fire it up.... SAME NOISE but now on the other side. This time we both traded off taking everything apart and pulling the head. We also checked everything out on the driver side to make sure it was doing OK. We got the passenger side head pulled and all of the parts cleaned and soaking early in the afternoon.
In this picture you can see the cradles for the coil packs in the cowl notch.
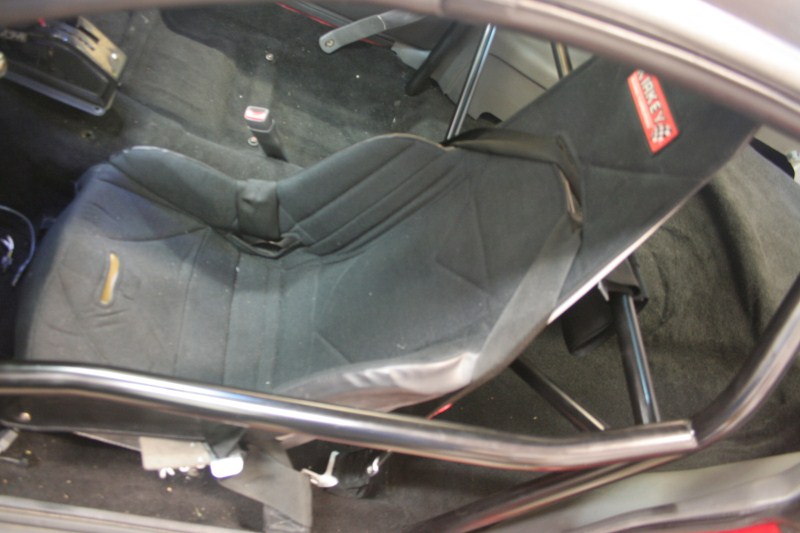
We took a break while the parts were soaking and tried to make sure we didn't miss anything else before we put it all together. There were a couple of things we checked, but they were all OK, so we put it all back together. While Chris was working on finishing everything up, I was able to get the seat bolted in, and most of the harness installed (I need some parts to install the crotch strap).
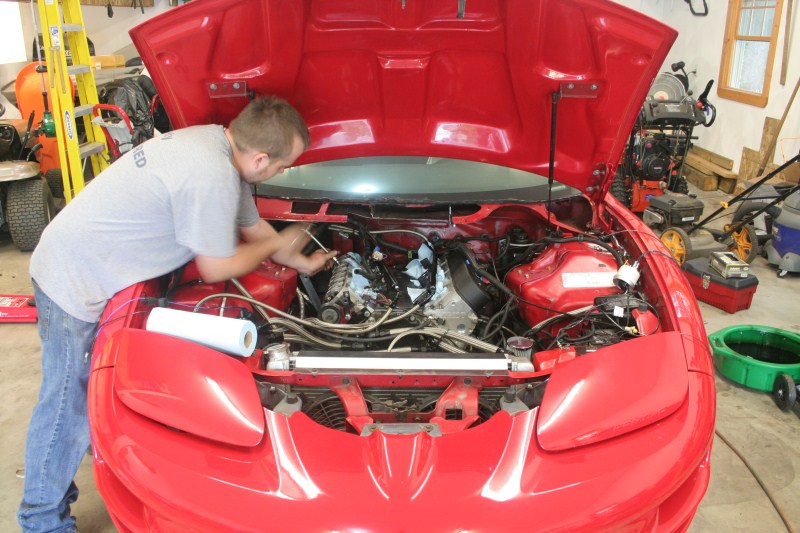
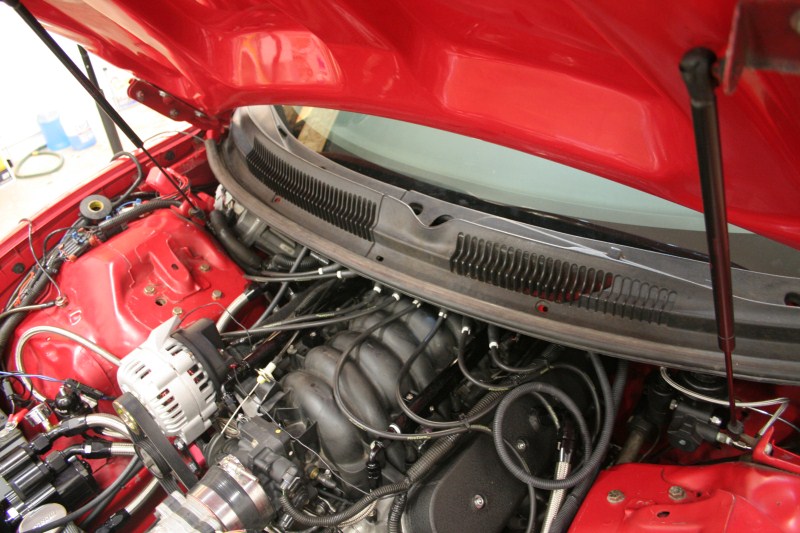
This time we got it all back together, started it up, and it was perfect!!! Car sounded great, and was holding an idle at about 800 RPM just fine. We ran it for about 5 min and let it get to full operating temperature. It was a lot of work, but we are more confident about how the valve train is installed, and we caught something that could have been a huge issue, that piece of metal down by the lifter. Here is a quick shot of how it looked when when we were done for the weekend.
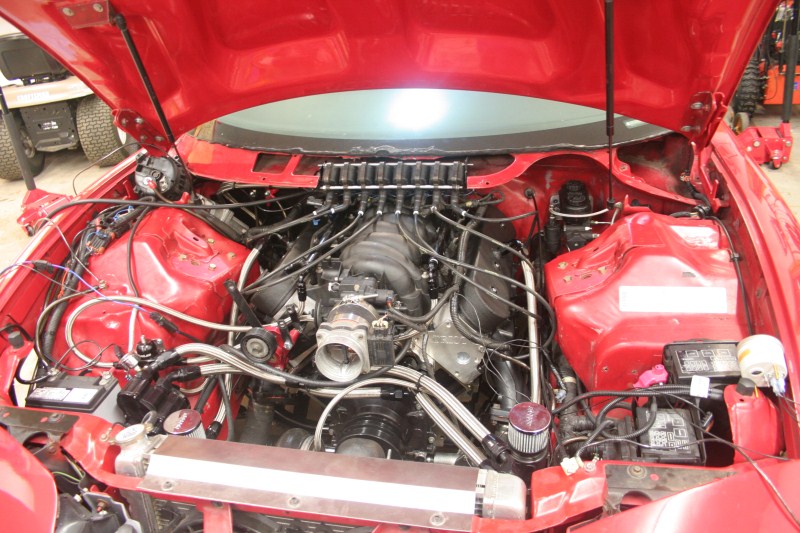
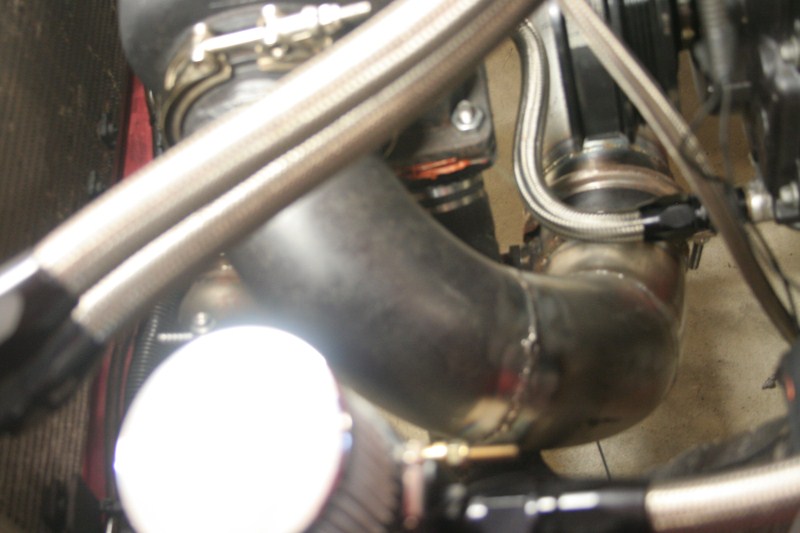
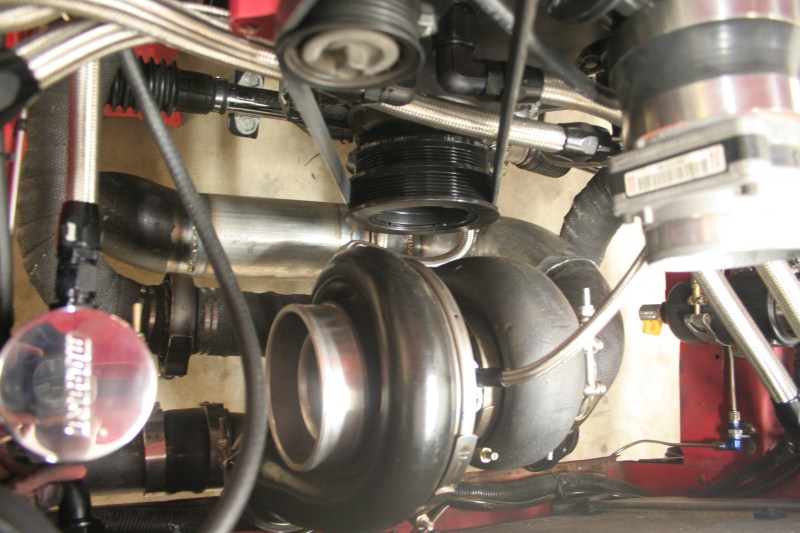
We were able to do a few other things this weekend as well. Chris cleaned up the engine harness by removing unneeded connectors, re wrapping parts and so on. Cleaned up the grounds on the main harness as well. We also discovered that the alternator is no good, which is why its juts laying there in the last pic, a new one is on order. We temporarily hooked up the oil pressure gage (seen on the right side) to make sure we had good oil pressure, which we do (around 40 at idle). You will also notice that the MAF is still there in the last pic, even though I extended the upper inter cooler pipe (not installed), that is because we are having a hard time getting it to idle on a speed density tune up. Chris is already working on getting the speed density tune up good to go, so that we can finally get rid of that ugly *** MAF.
Well thats all for this weekend, thanks again for looking!
Sean
And this is what it looked like Friday night
Let me explain how we got to this point real quick. During the week Chris was working on the idle and heard a noise which he thought was a coil rubbing. So Friday, since we had gotten the new plug wires, we made up the coil mounts. The mount is simple, just some 1/4-20 rod with 5/16 aluminum tubing as spacers. The over hang of the top rod sits in some cradles that I whipped up real quick so that the whole assembly is easy to install/remove. That little part came in quite handy more times than we would have like this weekend. Here is the coils mounted to the rods. I did not get a picture of the cradles, but you will be able to see them installed later.
BTW, we are using Fire Core 50 wires that were custom made for us by www.customwiresets.com They have been great to deal with, and are highly recommended.
So once we had the coil mount made, we installed them with the new wires and started it up. I heard the noise that Chris was referring to almost immediately. It was not a noise I was happy to hear, a squeak which means that something isn't getting oil. I was hoping it was simple, so we pulled off the valve cover on the driver side and saw some metal flakes by the front most rocker. We then pulled the rockers, and the push rods and cleaned then throughly thinking that oil just wasn't making it up the push rod. Put it all back together and started it up, same noise! So then we knew the head had to come off. Chris suddenly found some energy and was able to get the head off Friday night. Got everything cleaned up, and put the lifters in some oil to soak over night. We did find one piece of metal down by the rear lifters which may have been some of the problem.
Saturday morning Chris get the head back on, and everything re-assembled. While he was working on that I was doing smaller things like running the line for the radiator overflow to the back of the car, extending the upper inter cooler pipe, and final installing the lower inter cooler pipe. So we get it all back together, fire it up.... SAME NOISE but now on the other side. This time we both traded off taking everything apart and pulling the head. We also checked everything out on the driver side to make sure it was doing OK. We got the passenger side head pulled and all of the parts cleaned and soaking early in the afternoon.
In this picture you can see the cradles for the coil packs in the cowl notch.
We took a break while the parts were soaking and tried to make sure we didn't miss anything else before we put it all together. There were a couple of things we checked, but they were all OK, so we put it all back together. While Chris was working on finishing everything up, I was able to get the seat bolted in, and most of the harness installed (I need some parts to install the crotch strap).
This time we got it all back together, started it up, and it was perfect!!! Car sounded great, and was holding an idle at about 800 RPM just fine. We ran it for about 5 min and let it get to full operating temperature. It was a lot of work, but we are more confident about how the valve train is installed, and we caught something that could have been a huge issue, that piece of metal down by the lifter. Here is a quick shot of how it looked when when we were done for the weekend.
We were able to do a few other things this weekend as well. Chris cleaned up the engine harness by removing unneeded connectors, re wrapping parts and so on. Cleaned up the grounds on the main harness as well. We also discovered that the alternator is no good, which is why its juts laying there in the last pic, a new one is on order. We temporarily hooked up the oil pressure gage (seen on the right side) to make sure we had good oil pressure, which we do (around 40 at idle). You will also notice that the MAF is still there in the last pic, even though I extended the upper inter cooler pipe (not installed), that is because we are having a hard time getting it to idle on a speed density tune up. Chris is already working on getting the speed density tune up good to go, so that we can finally get rid of that ugly *** MAF.
Well thats all for this weekend, thanks again for looking!
Sean
08-01-2010, 05:50 PM
#249
It was a squeak, like metal on metal. It wasn't real loud (hard to hear much over the car) but it was changing with RPM. It was somewhat hard to locate because it you can hear it on both sides, but it was louder on the driver side for sure. Then when it was the passenger side turn, it almost sounded like the driver side, but it was much louder on the passenger side of the car. We didn't want to take both heads off at the same time, because it would be a lot more work, so we decided to pull the passenger side, fix it, and see if there was any noise on the driver side. Lucky for us that fixed it, and there was no more noise!
Sean
Sean
08-01-2010, 08:25 PM
#251
 08-05-2010, 11:51 AM
#254
Registered User

Join Date: Jul 2010
Posts: 18
Likes: 0
Received 0 Likes
on
0 Posts
im on several websites and just got on this one because im doing research on what all i need to turbo my ss, and i want to see all the possible issues everyone runs into so i know how to fix them. I must say this is by far the best build thread i have ever seen. I have built 600 hp hondas, mustangs and other junk and i have seen several build threads. this agian is a well put together car and thread.
Its crazy how once you mod the car and make power and the more you get into it the crazier the build gets...
nice job. keep up the good work.
Its crazy how once you mod the car and make power and the more you get into it the crazier the build gets...
nice job. keep up the good work.
08-05-2010, 08:49 PM
#255
im on several websites and just got on this one because im doing research on what all i need to turbo my ss, and i want to see all the possible issues everyone runs into so i know how to fix them. I must say this is by far the best build thread i have ever seen. I have built 600 hp hondas, mustangs and other junk and i have seen several build threads. this agian is a well put together car and thread.
Its crazy how once you mod the car and make power and the more you get into it the crazier the build gets...
nice job. keep up the good work.
Its crazy how once you mod the car and make power and the more you get into it the crazier the build gets...
nice job. keep up the good work.
Believe it or not, we have been following along a path we laid out before any work started. There have been very few deviations from the plan which helps to save money and heartache.
Again I am glad you enjoy it, we will keep it up!

Thanks,
Sean
08-08-2010, 02:23 PM
#256
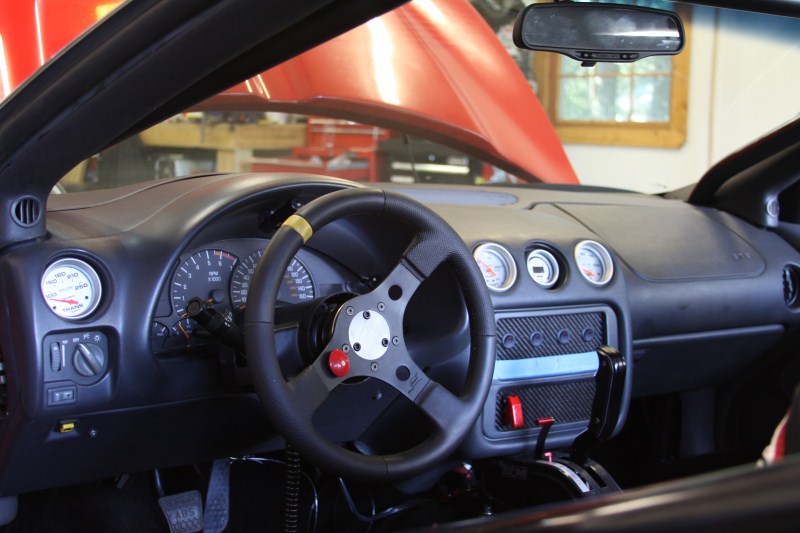
Well boys and girls we are getting close to being all wrapped up! This weekend we just tied up loose ends, finished mounting things, and so on. Nothing all that interesting , so Ill just move on to the pictures.
Here is another shot of the coil pack mount that we made last week. Since we didn't have to tear the motor down again we finally mounted it up!
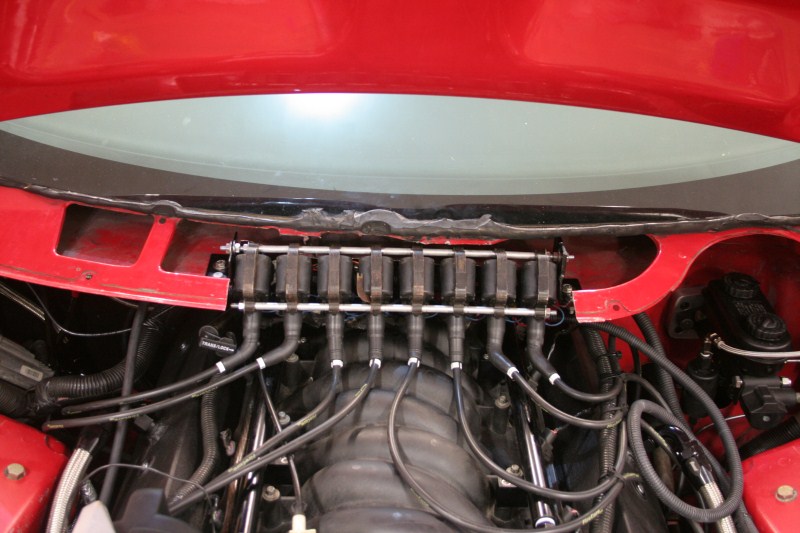
We actually made the hole in the cowl so that we could install the motor, but it was exactly the size needed for the coils! Here is a quick shot of the mount on the car side.
And with the plastic back on
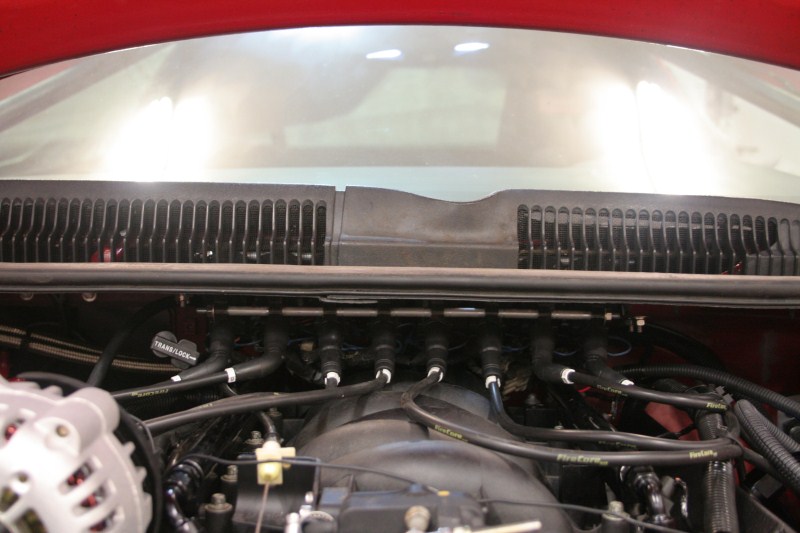
I have to say that it worked out perfect!
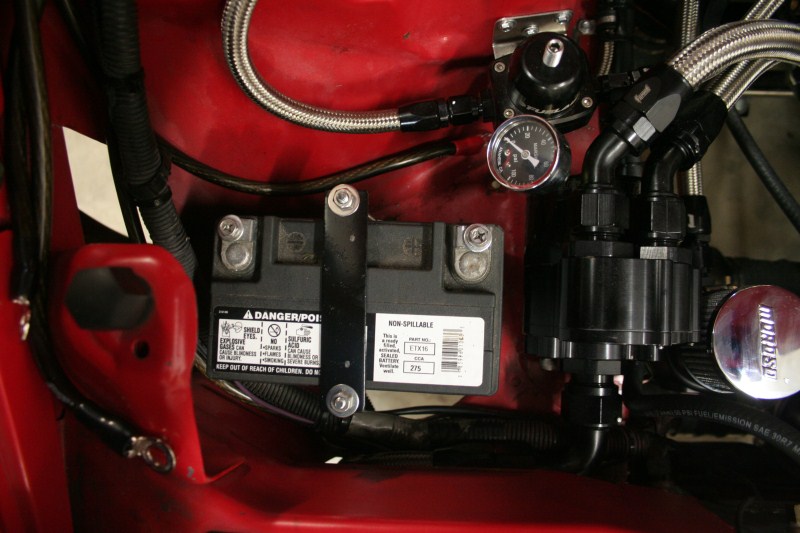
Next up was finishing the battery mount/tie down. This was just a simple set up, as we plan on moving the battery to the back of the car soonish. The bottom of the tray is some 1-1/2" aluminum angle that I notched and bent into a box. Then its just two pieces of flat stock with some 1/4-20 threaded rod to hold the battery down.
The last thing that that we needed to fab was an "exhaust". This was something that gave us problems last time the car was out. Before we basically had a down pipe which was a very shortened 4" 90 right off of the turbo with a v-band at the end. Right at the edge of the down pipe, about 1/4" from the v-band was our wide band O2, which was fine when the rest of the exhaust was on. Problem was that we had to go under the factory K-member since we had the turbo facing the way we did. Well despite my best effort it was just way to low and we ended up not using it ever. So then the O2 was at the very end of the "exhaust" and did not read very well because one side was more or less open to outside air. So since the turbo is still facing the same way, we still had the same problem, we also didn't have much 4" stuff to work with. The best solution we came up with was to bend the exhaust around to face the passenger side. Now that we had a plan I started cutting and welding, and here is the end result.
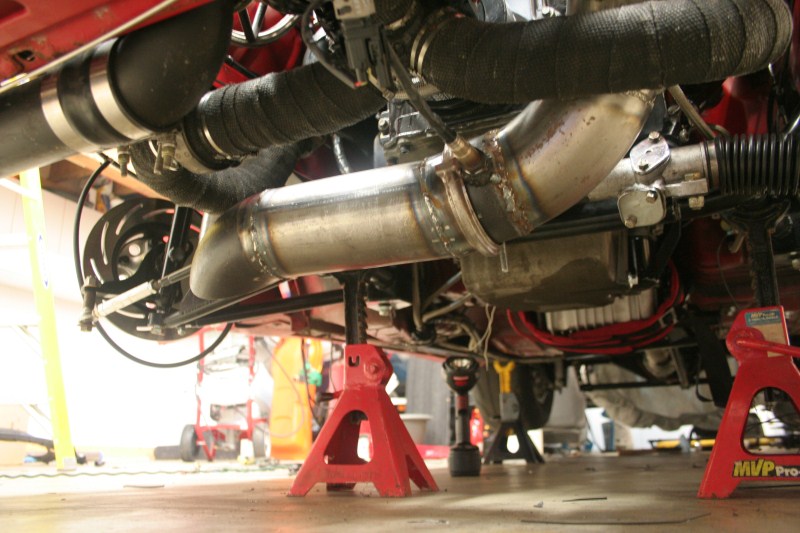
Its not the prettiest thing out there, but it does the job. We still need to paint it with some high temp paint, and then wrap it to hide the ugly. While I was doing that stuff Chris was laboring away on all of the wiring inside the car. He was bent up like a pretzel cutting out un needed wiring, soldering in new stuff and making it all look nice. I would say the hardest stuff is now finished as far as the wiring goes, but there is still more to be done. Once its all done, Ill get some pictures but wiring in process is nothing to look at.
As I said we are getting very close to being done. There is a few small things that need to be finalized, but 99% of the work is done. Then its just a matter of getting an alignment, checking everything over, tuning, and making passes! I probably wont update the thread until the car is finished and on the dyno, or the track. Hopefully that should only be a couple of weeks away, but we will see.
As always, Thanks for looking!
Sean
Here is another shot of the coil pack mount that we made last week. Since we didn't have to tear the motor down again we finally mounted it up!
We actually made the hole in the cowl so that we could install the motor, but it was exactly the size needed for the coils! Here is a quick shot of the mount on the car side.
And with the plastic back on
I have to say that it worked out perfect!
Next up was finishing the battery mount/tie down. This was just a simple set up, as we plan on moving the battery to the back of the car soonish. The bottom of the tray is some 1-1/2" aluminum angle that I notched and bent into a box. Then its just two pieces of flat stock with some 1/4-20 threaded rod to hold the battery down.
The last thing that that we needed to fab was an "exhaust". This was something that gave us problems last time the car was out. Before we basically had a down pipe which was a very shortened 4" 90 right off of the turbo with a v-band at the end. Right at the edge of the down pipe, about 1/4" from the v-band was our wide band O2, which was fine when the rest of the exhaust was on. Problem was that we had to go under the factory K-member since we had the turbo facing the way we did. Well despite my best effort it was just way to low and we ended up not using it ever. So then the O2 was at the very end of the "exhaust" and did not read very well because one side was more or less open to outside air. So since the turbo is still facing the same way, we still had the same problem, we also didn't have much 4" stuff to work with. The best solution we came up with was to bend the exhaust around to face the passenger side. Now that we had a plan I started cutting and welding, and here is the end result.
Its not the prettiest thing out there, but it does the job. We still need to paint it with some high temp paint, and then wrap it to hide the ugly
. While I was doing that stuff Chris was laboring away on all of the wiring inside the car. He was bent up like a pretzel cutting out un needed wiring, soldering in new stuff and making it all look nice. I would say the hardest stuff is now finished as far as the wiring goes, but there is still more to be done. Once its all done, Ill get some pictures but wiring in process is nothing to look at.As I said we are getting very close to being done. There is a few small things that need to be finalized, but 99% of the work is done. Then its just a matter of getting an alignment, checking everything over, tuning, and making passes! I probably wont update the thread until the car is finished and on the dyno, or the track. Hopefully that should only be a couple of weeks away, but we will see.
As always, Thanks for looking!
Sean
 09-12-2010, 11:21 PM
#258
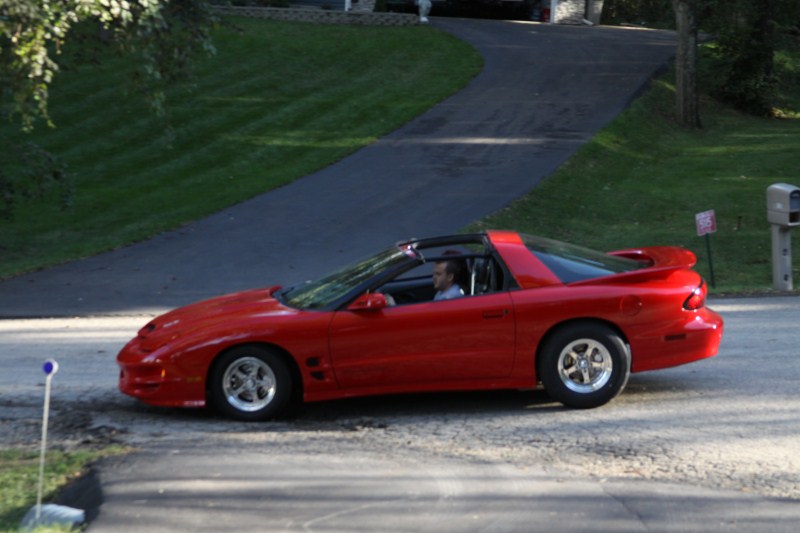
First time it moved under its own power.
http://www.youtube.com/watch?v=AqQLAEJBOp8
Need to get an alignment and tune it. Might have a dyno video up in the next couple of weeks.
http://www.youtube.com/watch?v=AqQLAEJBOp8
Need to get an alignment and tune it. Might have a dyno video up in the next couple of weeks.