1dirtyZ V3.2 build (F2 procharger , 427, etc. )
 11-14-2010, 08:28 AM
#241

Those are a big part of your problem. The single adjustable shocks are allowing the front end to quickly rise, but they also allow the front end to quickly drop, which unloads the weight transfer. If you upgraded to QA1 double adjustable shocks, you can adjust how slow you want the front end to settle, which will dramatically quicken your 60ft times. Bob
__________________
ATI ProCharger and Moser Sales 260 672-2076
PM's disabled, please e-mail me
E-mail: brutespeed@gmail.comob@brutespeed.com
https://brutespeed.com/ Link to website

ATI ProCharger and Moser Sales 260 672-2076
PM's disabled, please e-mail me
E-mail: brutespeed@gmail.comob@brutespeed.com
https://brutespeed.com/ Link to website
 11-14-2010, 04:15 PM
#242
8 Second Club
Thread Starter
iTrader: (1)
Join Date: Nov 2001
Location: the not so stock tribe
Posts: 3,697
Likes: 0
Received 0 Likes
on
0 Posts

i agree with you bob, but the strange thing is that it used to cut low 1.3 60' times before 
either way , i took a closer look today and it seems that i had my pinion angle way off,,, it almost looks like it was pointing upwards! i'll be taking a closer look tommorow .
either way , i took a closer look today and it seems that i had my pinion angle way off,,, it almost looks like it was pointing upwards! i'll be taking a closer look tommorow .
 11-15-2010, 04:01 AM
#243
8 Second Club
Thread Starter
iTrader: (1)
Join Date: Nov 2001
Location: the not so stock tribe
Posts: 3,697
Likes: 0
Received 0 Likes
on
0 Posts
Here are some pics i got off another fourm (thanks again shaker  :
:


you can see how the car twists to one side , even though it has a beefy antiroll bar, i'll have to look into that too
:you can see how the car twists to one side , even though it has a beefy antiroll bar, i'll have to look into that too
11-15-2010, 06:22 AM
#244
I'd swap out those front shocks while you are at it, a double adjustable shock will make the car more consistent and should make the car 60 ft even better.
You may have to adjust the pre-load on your anti roll bar, but I'd get the pinion angle dialed in first and see how the car reacts to it. Bob
__________________
ATI ProCharger and Moser Sales 260 672-2076
PM's disabled, please e-mail me
E-mail: brutespeed@gmail.comob@brutespeed.com
https://brutespeed.com/ Link to website
ATI ProCharger and Moser Sales 260 672-2076
PM's disabled, please e-mail me
E-mail: brutespeed@gmail.comob@brutespeed.com
https://brutespeed.com/ Link to website
11-27-2010, 04:59 PM
#245
8 Second Club
Thread Starter
iTrader: (1)
Join Date: Nov 2001
Location: the not so stock tribe
Posts: 3,697
Likes: 0
Received 0 Likes
on
0 Posts
uggggh, totally forgot about the season opener race in qatar this weekend
sure its only an 1/8 mile track but i really can use the track time to dial in the car .
so in my infinate wisdom i decided to remove the whole rear end and torque arm off the car in anticipation for some goodies , so now i have to put those back on , as well as the transbrake solinoid and blower and blower drive. then i have to scale and adjust the swaybar and pinion angle . i also have to fab up some sort of panel under the engine to act like a containment system to prevent oil leaking on the track in case of a "catastrophic engine failure" , and if i have time fix the 2 step switch
forgot to mention that i had to take all the stuff infront of the engine off ( blower , drive, balancer and waterpump) so i can get to and replace the front main seal wich decided to leak .
i wonder what it would do launching off the trans brake at 4k rpm
sure its only an 1/8 mile track but i really can use the track time to dial in the car .
so in my infinate wisdom i decided to remove the whole rear end and torque arm off the car in anticipation for some goodies
, so now i have to put those back on , as well as the transbrake solinoid and blower and blower drive. then i have to scale and adjust the swaybar and pinion angle . i also have to fab up some sort of panel under the engine to act like a containment system to prevent oil leaking on the track in case of a "catastrophic engine failure" , and if i have time fix the 2 step switch forgot to mention that i had to take all the stuff infront of the engine off ( blower , drive, balancer and waterpump) so i can get to and replace the front main seal wich decided to leak .
i wonder what it would do launching off the trans brake at 4k rpm
Last edited by 1dirtyZ; 11-27-2010 at 05:14 PM.
12-05-2010, 01:07 AM
#246
8 Second Club
Thread Starter
iTrader: (1)
Join Date: Nov 2001
Location: the not so stock tribe
Posts: 3,697
Likes: 0
Received 0 Likes
on
0 Posts
time for a quick update ,
didn't make it to the first round in qatar last week , but i think i'm ready for the second round this weekend ( thursday and friday ) . they have their races on a pretty tight schedule ; they have a race every weekend for three weekends then they pause for a weekend and contiue with one more race the weekend after xmas . then the venue changes to the Abudabi track at Yas marina where they will have the same deal where they race every weekend for four weeks !
any how , on to the pics
so i did get the rear end back in as well as the blower drive, blower, and transbrake . and i finally wired the VSS (speed sensor ) so i can log it
also managed to set pinion angle (wich was set at +1 for some reason ! )and adjusted the sway bar .
another thing i had to do was get the engine tray fabbed up and mounted , and here is how it came out :
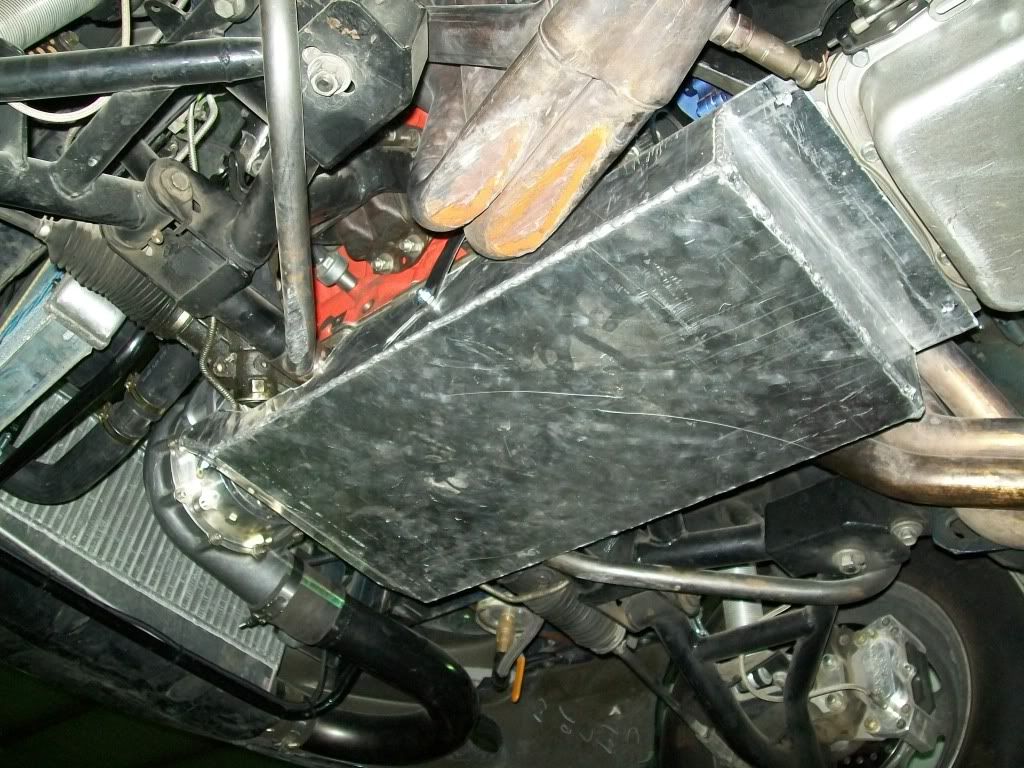
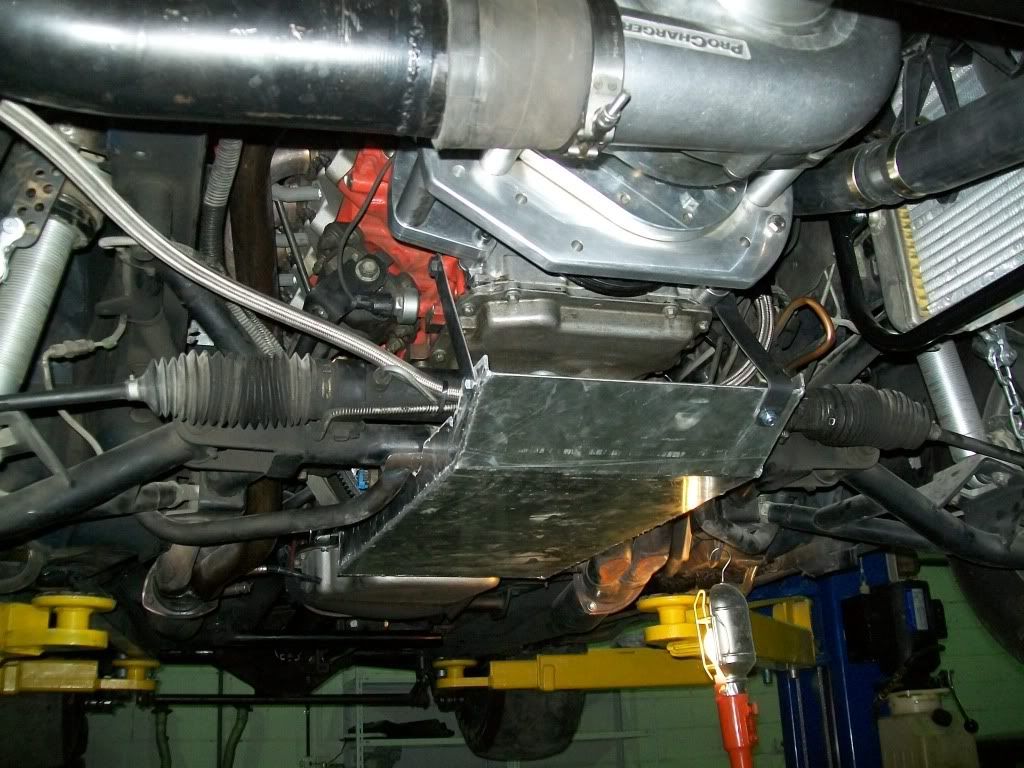
it tucks in nicely and sits higher than the headers , so it shouldn't scrape that bad
and since i'm uploading and posting pics , here is the 8.6 from the last race in bahrain :
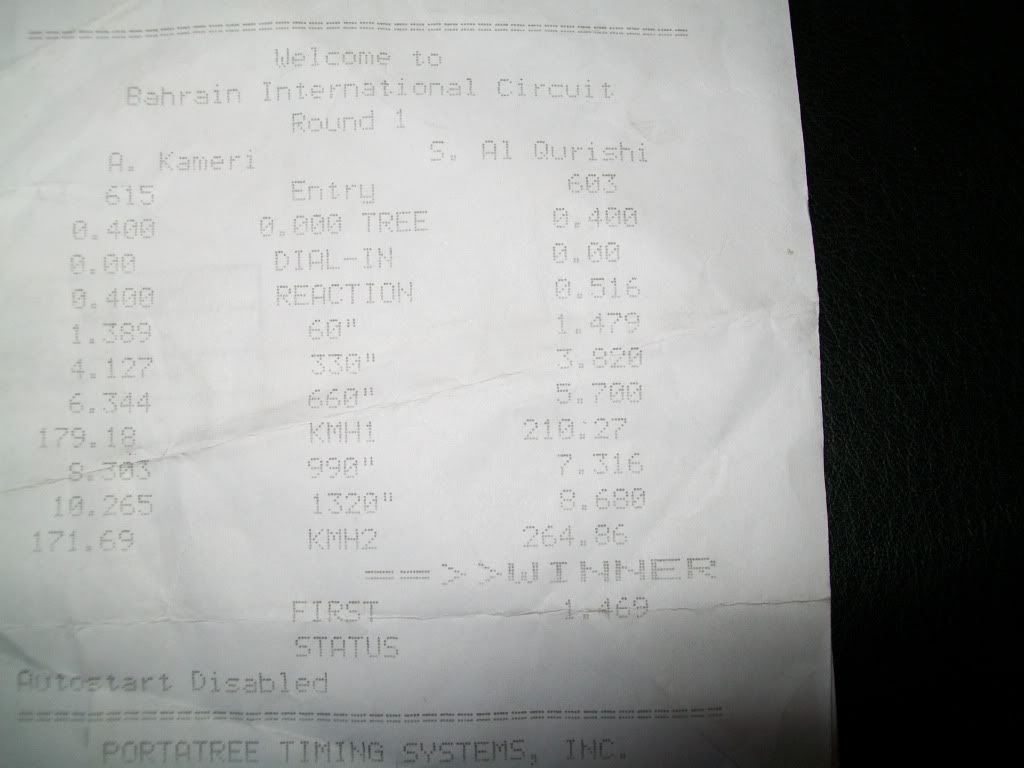
the speed is in KPH which comes out to 164.04 MPH
this is with spinnig all through 1st
didn't make it to the first round in qatar last week , but i think i'm ready for the second round this weekend ( thursday and friday ) . they have their races on a pretty tight schedule ; they have a race every weekend for three weekends then they pause for a weekend and contiue with one more race the weekend after xmas . then the venue changes to the Abudabi track at Yas marina where they will have the same deal where they race every weekend for four weeks !
any how , on to the pics
so i did get the rear end back in as well as the blower drive, blower, and transbrake . and i finally wired the VSS (speed sensor ) so i can log it
also managed to set pinion angle (wich was set at +1 for some reason ! )and adjusted the sway bar .
another thing i had to do was get the engine tray fabbed up and mounted , and here is how it came out :
it tucks in nicely and sits higher than the headers , so it shouldn't scrape that bad
and since i'm uploading and posting pics , here is the 8.6 from the last race in bahrain :
the speed is in KPH which comes out to 164.04 MPH
this is with spinnig all through 1st
 12-05-2010, 10:46 AM
#249
8 Second Club
Thread Starter
iTrader: (1)
Join Date: Nov 2001
Location: the not so stock tribe
Posts: 3,697
Likes: 0
Received 0 Likes
on
0 Posts
loool oso , i still sneak in " its stock with a few boltons " every now and then in conversations just to see the looks on peoples faces
12-20-2010, 02:43 AM
#251
8 Second Club
Thread Starter
iTrader: (1)
Join Date: Nov 2001
Location: the not so stock tribe
Posts: 3,697
Likes: 0
Received 0 Likes
on
0 Posts
time for an update :
went to Qatar for the second round , trying out the transbrake and the 2 step as well as working on the suspension . i also hooked up the VSS sensor so i can log speed
did a few test and tune runs before qualifying and in the first one launching off the footbrake the car got a 1.38 60' (not really pushing it ) which is good because that meant the traction issue i got was solved .
the next runs ( including the qualifying runs got progressively worse , i didn't know it at the time , but the plug wires i had ( 4 year old MSD) were shot , it got so bad that the car would not stall high enough to engage the 5000rpm 2step and would just bog as soon as the brake was released and the car would not pull properly ( almost felt like it had a missfire)
anyhow , after i came back i decided to take a look at it and two of the wires simply came off without any effort at all, which means i was racing on 6 cylinders and would explain the overly rich readings i was getting .
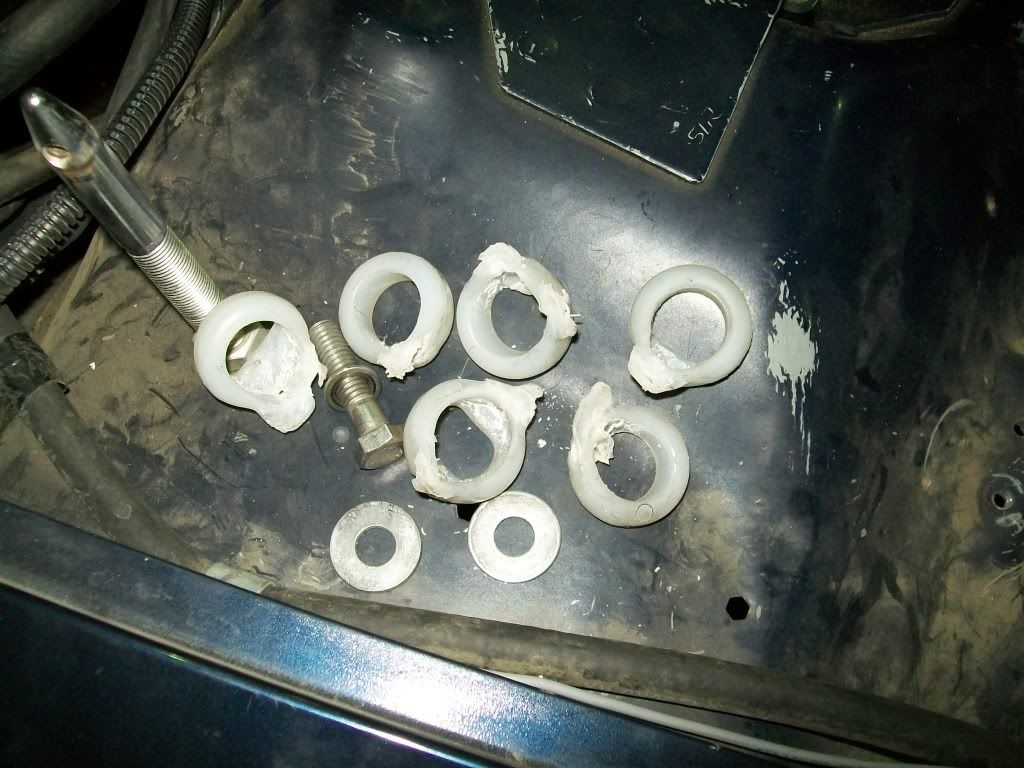
on a positive note , the geardrive was working great ! i maxed out the 3bar sensor i had pushing 30 psi, but the missfires took their toll on the bushings :
also started to work on the tubelar front end to hold the face and headlight covers on, it will be a one peice design. some pics of the progress i made :
still need some trimming and a few tabs welded on to hold everything in place.
then its off to the powder coaters to have it and some other peices done.
also got the AFCO shocks in today , i ordered a set of fronts and rears as well as adjustable spring perches for the rears. and will dig in to those pretty soon .
also got some remote water pump fittings coming in soon , i already have the remote pump (had it for over a year and a half) and was thinking of installing it to clean up the front of the engine some more.
the pump will mount right next to the radiator and will have two lines connecting it to the block . i'll snap some pics as soon as i get the stuff in .
i've also been toying around with the idea of a belt driven fuel pump , its dependable , greater capacity for feul delivery, and lighter ( i loose the 16V if i go belt driven). i'm still in the "thinking about it " phase.
so next on the to do list is :
- finish front end brace
- install shocks and springs
- new gear drive bushings
- remote water pump and weld mount
- figure out how to get an alternator on there ( so i can run a smaller battery in the rear )
went to Qatar for the second round , trying out the transbrake and the 2 step as well as working on the suspension . i also hooked up the VSS sensor so i can log speed
did a few test and tune runs before qualifying and in the first one launching off the footbrake the car got a 1.38 60' (not really pushing it ) which is good because that meant the traction issue i got was solved .
the next runs ( including the qualifying runs got progressively worse , i didn't know it at the time , but the plug wires i had ( 4 year old MSD) were shot , it got so bad that the car would not stall high enough to engage the 5000rpm 2step and would just bog as soon as the brake was released and the car would not pull properly ( almost felt like it had a missfire)
anyhow , after i came back i decided to take a look at it and two of the wires simply came off without any effort at all, which means i was racing on 6 cylinders
and would explain the overly rich readings i was getting .on a positive note , the geardrive was working great ! i maxed out the 3bar sensor i had pushing 30 psi, but the missfires took their toll on the bushings :
also started to work on the tubelar front end to hold the face and headlight covers on, it will be a one peice design. some pics of the progress i made :
still need some trimming and a few tabs welded on to hold everything in place.
then its off to the powder coaters to have it and some other peices done.
also got the AFCO shocks in today , i ordered a set of fronts and rears as well as adjustable spring perches for the rears. and will dig in to those pretty soon .
also got some remote water pump fittings coming in soon , i already have the remote pump (had it for over a year and a half) and was thinking of installing it to clean up the front of the engine some more.
the pump will mount right next to the radiator and will have two lines connecting it to the block . i'll snap some pics as soon as i get the stuff in .
i've also been toying around with the idea of a belt driven fuel pump , its dependable , greater capacity for feul delivery, and lighter ( i loose the 16V if i go belt driven). i'm still in the "thinking about it " phase.
so next on the to do list is :
- finish front end brace
- install shocks and springs
- new gear drive bushings
- remote water pump and weld mount
- figure out how to get an alternator on there ( so i can run a smaller battery in the rear )
12-22-2010, 04:10 AM
#255
You're going to be bored once you get your car to where there is nothing to do to it... lol
That sand has to play havoc with the piston rings! Bob
That sand has to play havoc with the piston rings! Bob
__________________
ATI ProCharger and Moser Sales 260 672-2076
PM's disabled, please e-mail me
E-mail: brutespeed@gmail.comob@brutespeed.com
https://brutespeed.com/ Link to website
ATI ProCharger and Moser Sales 260 672-2076
PM's disabled, please e-mail me
E-mail: brutespeed@gmail.comob@brutespeed.com
https://brutespeed.com/ Link to website
12-22-2010, 06:11 AM
#256
8 Second Club
Thread Starter
iTrader: (1)
Join Date: Nov 2001
Location: the not so stock tribe
Posts: 3,697
Likes: 0
Received 0 Likes
on
0 Posts
loool, the sandstorms and/or shifting sands usually get us on the way to or back from a race . and i run a filter on the blower when i tow the car so no fear for contaminating anything inside the engine
now if you are referring to the stehyness coating on the outside of the car then that is just from sitting in the garage for months .
now if you are referring to the stehyness coating on the outside of the car
then that is just from sitting in the garage for months .
12-27-2010, 01:16 AM
#257
8 Second Club
Thread Starter
iTrader: (1)
Join Date: Nov 2001
Location: the not so stock tribe
Posts: 3,697
Likes: 0
Received 0 Likes
on
0 Posts
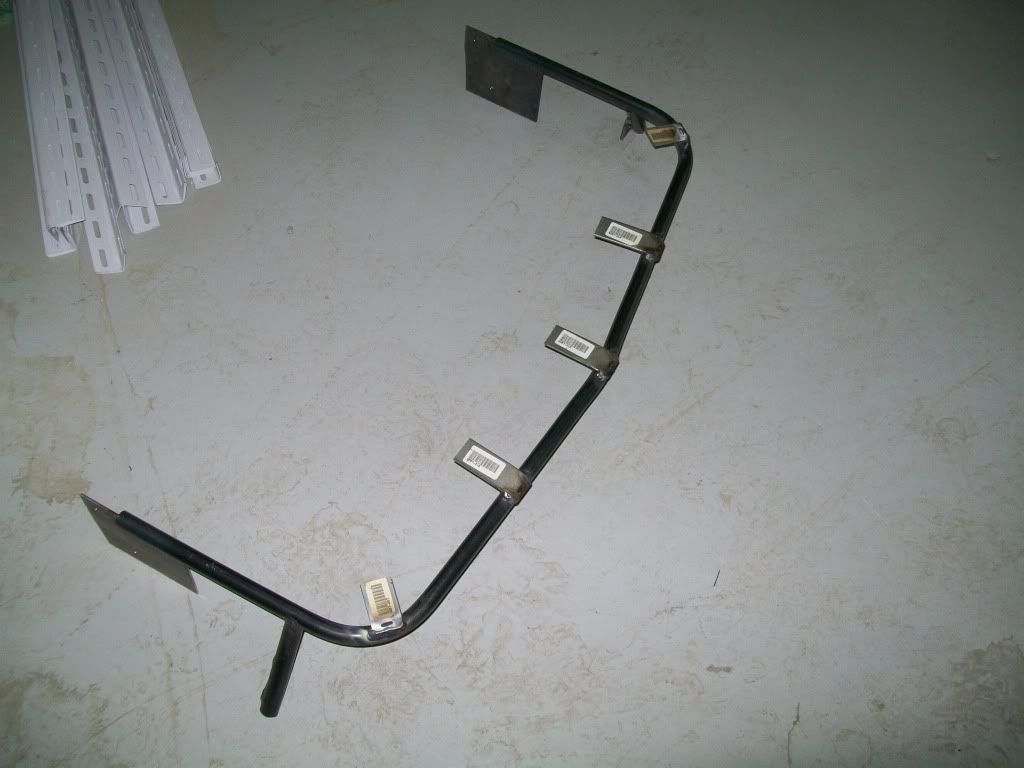
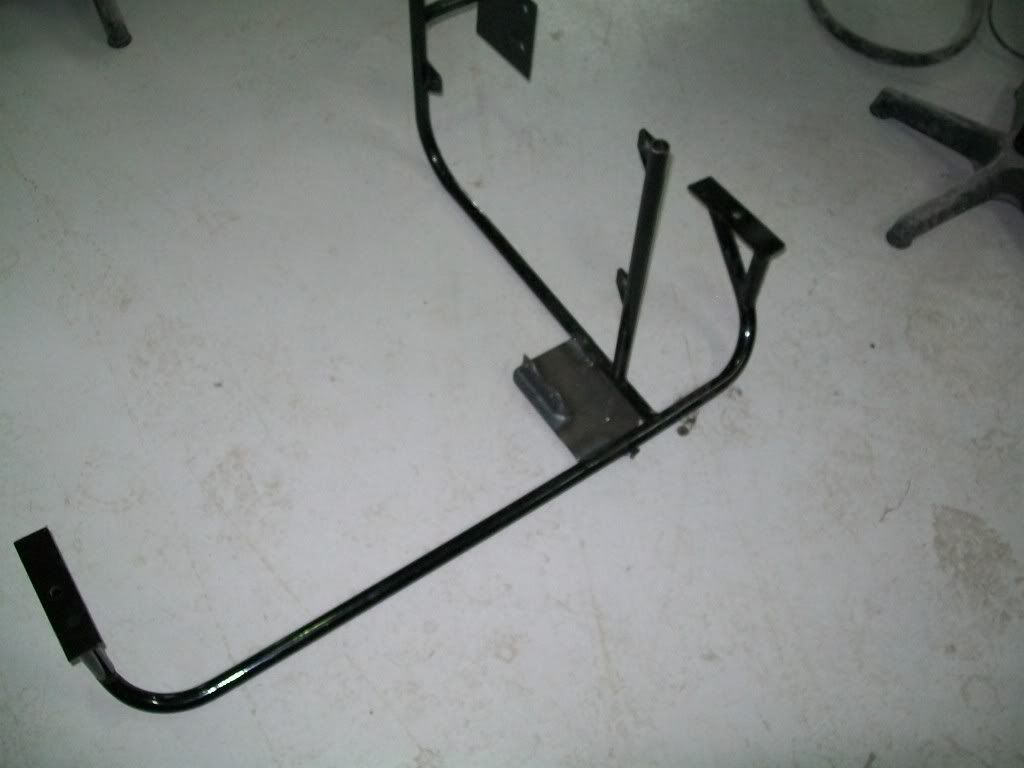
Got more stuff done :
i'm almost done with the face brace
just need to drill a few more holes in the tabs and have it powdercoated
and i just got the new geardrive bushings from the supercharger store, these are the new improved ones ( black) and should hold up to the abuse. a lspped them on and installed the blower/geardrive assembly.
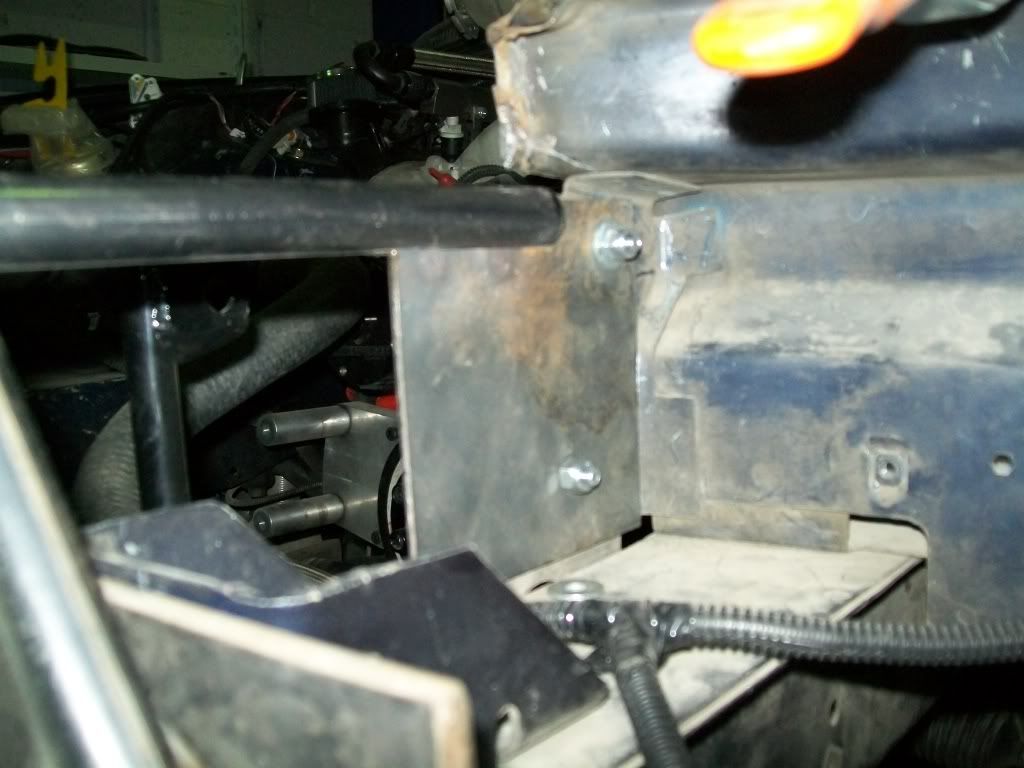
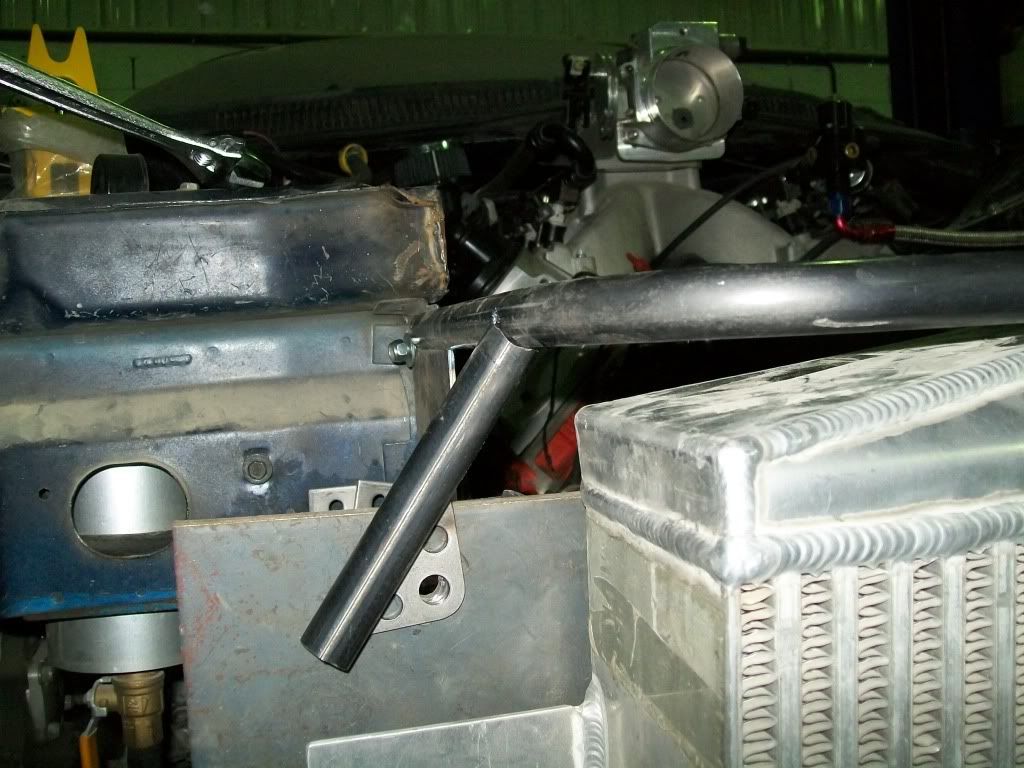
also started working on the remote water pump , i decided to go that route to free some space for the alternator as well as better looks
the water pump will be placed just next to the radiator outlet and connected via a 3 inch hose like so :
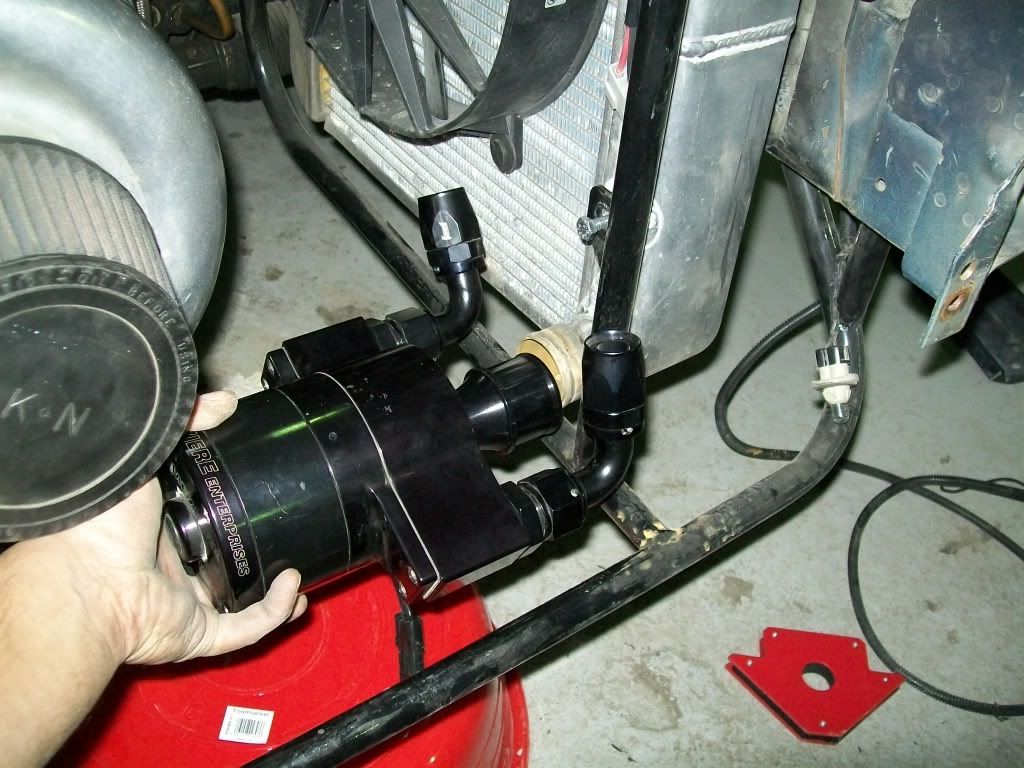
to do so i had to weld a pad for the pump to sit on , so out came the tig welder and :
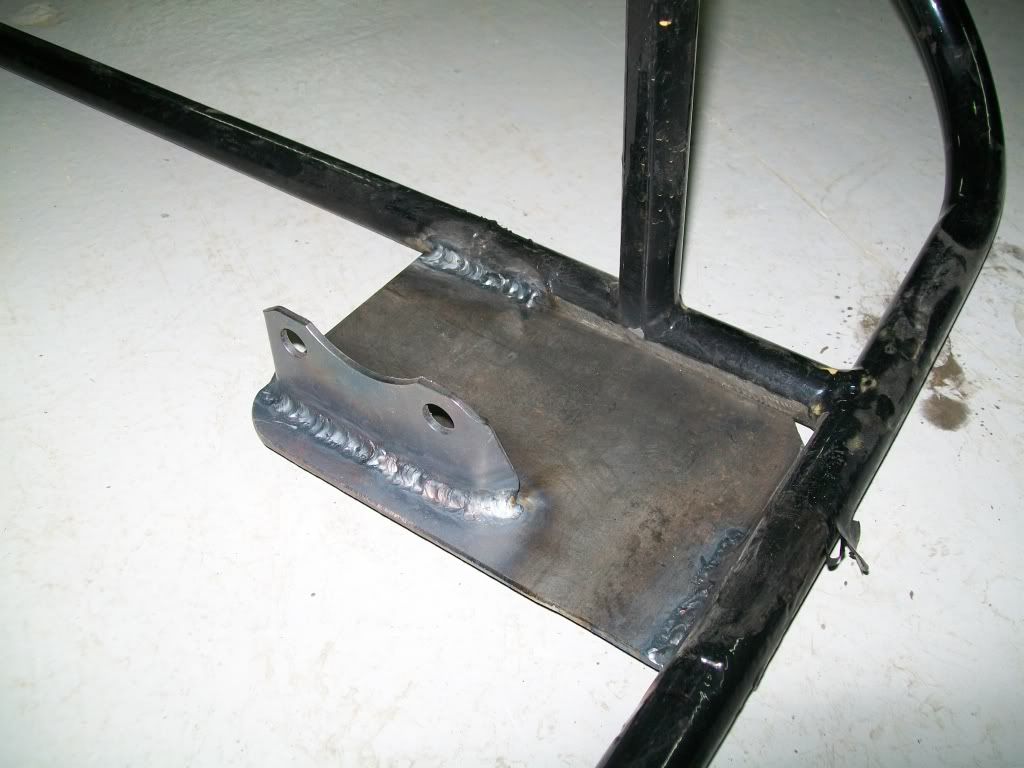
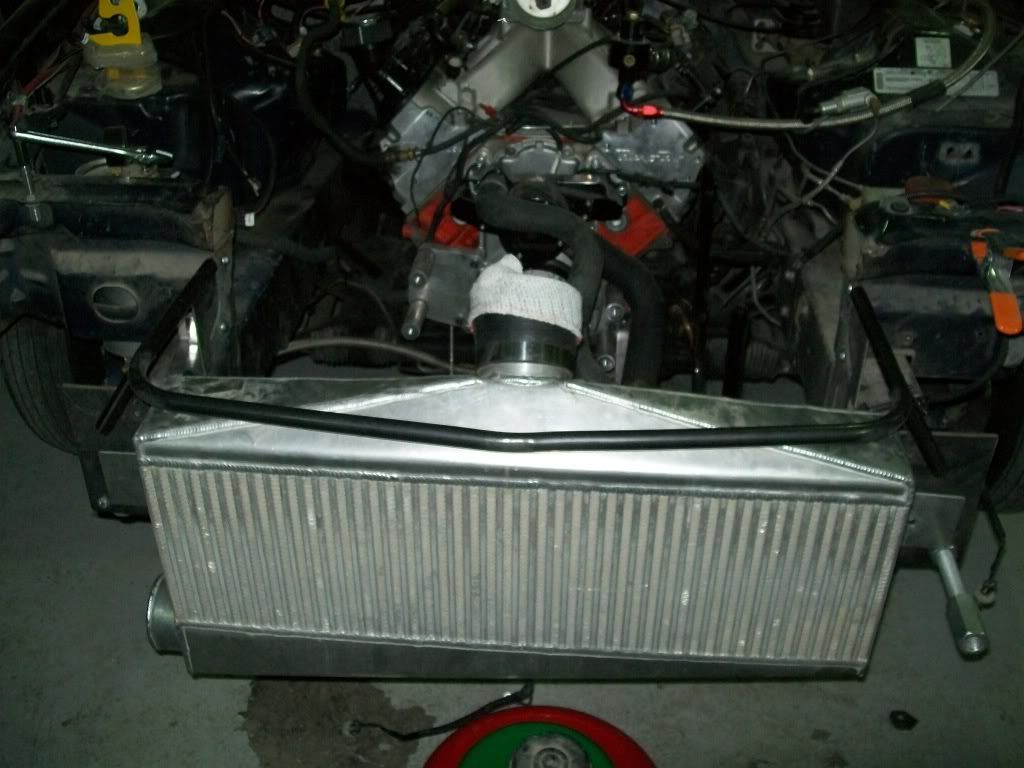
and here is how the block adapters look like with -12 hose ends sticking out of them:
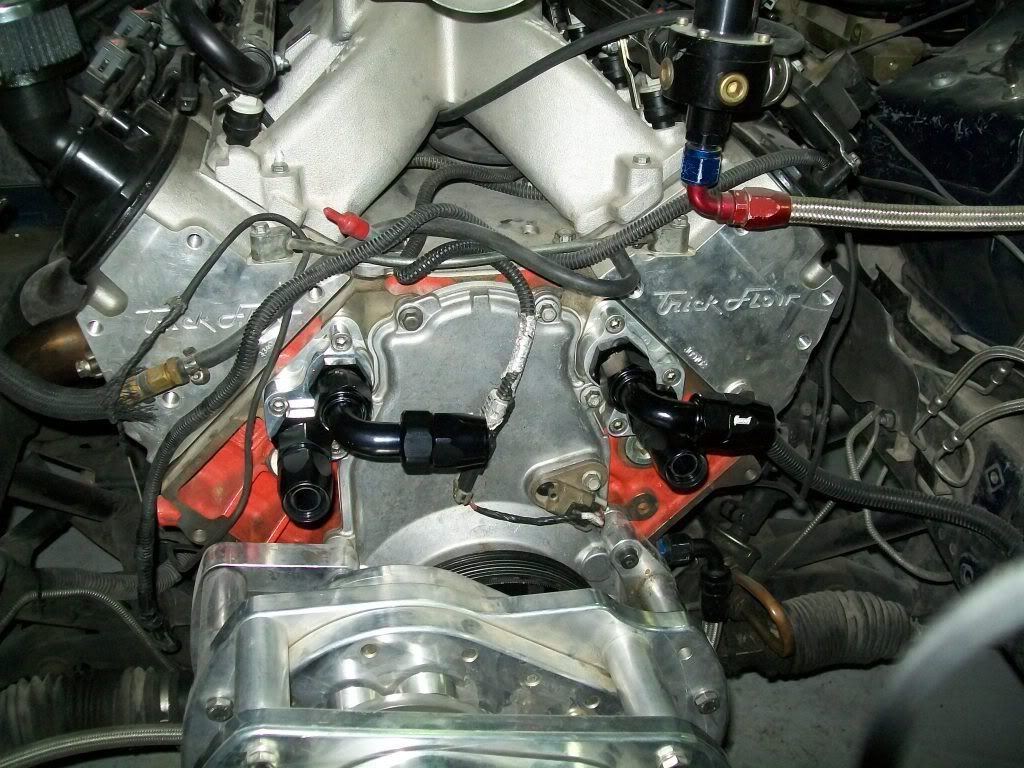
all i have to do now is make the -12 hoses and send the brace off to be powdercoated .
i also got a nice xmas gift for myself
a set of front and rear AFCO double adjustable coilovers and adjustable spring perch :
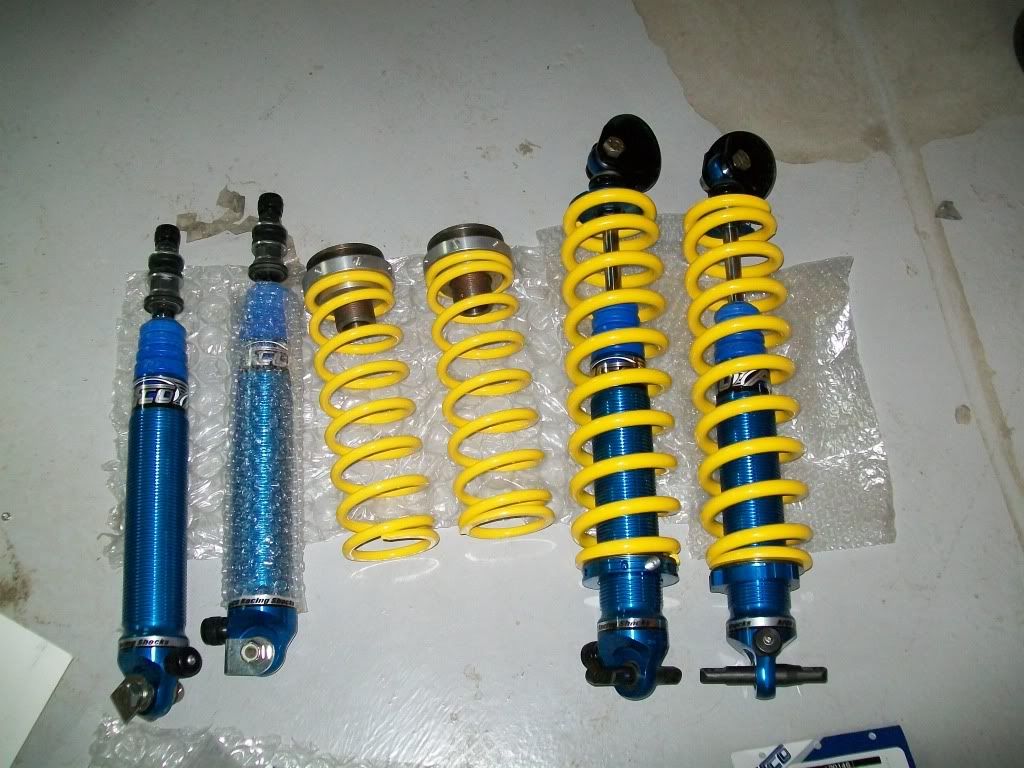
those will go on next
i'm almost done with the face brace
just need to drill a few more holes in the tabs and have it powdercoated
and i just got the new geardrive bushings from the supercharger store, these are the new improved ones ( black) and should hold up to the abuse. a lspped them on and installed the blower/geardrive assembly.
also started working on the remote water pump , i decided to go that route to free some space for the alternator as well as better looks
the water pump will be placed just next to the radiator outlet and connected via a 3 inch hose like so :
to do so i had to weld a pad for the pump to sit on , so out came the tig welder and :
and here is how the block adapters look like with -12 hose ends sticking out of them:
all i have to do now is make the -12 hoses and send the brace off to be powdercoated .
i also got a nice xmas gift for myself
a set of front and rear AFCO double adjustable coilovers and adjustable spring perch :
those will go on next