
Adjusting the stock tachometer
 03-15-2009, 10:35 AM
#1
If you are like many 4th generation F Body owners you may have a tachometer that is not accurate, typically reading about 200 rpms too high. Of course you could add an aftermarket tach but I figure if there is one already in the instrument cluster it may as well be accurate if possible. Here is how to adjust it.
Tools needed:
Slotted screwdriver
7mm socket driver or ratchet with extension
Scanner capable of showing actual RPM from the PCM
For a scanner I used a Scangauge II, this is a code reader/trip computer/gauge pod that connects to the OBDII port on basically any '96 and up vehicle. But anything that can connect to the vehicle computer and show the actual RPM will work fine.
The first step to accessing the gauge cluster is to remove the trim bezel. These instructions are for a Firebird, a Camaro should be similar. Before attempting to remove it there is a small plastic cover on the left hand side of the steering column, in front of the headlight/cruise control lever, that must be removed. To remove it just pry it off gently with a screwdriver towards the front of the vehicle.
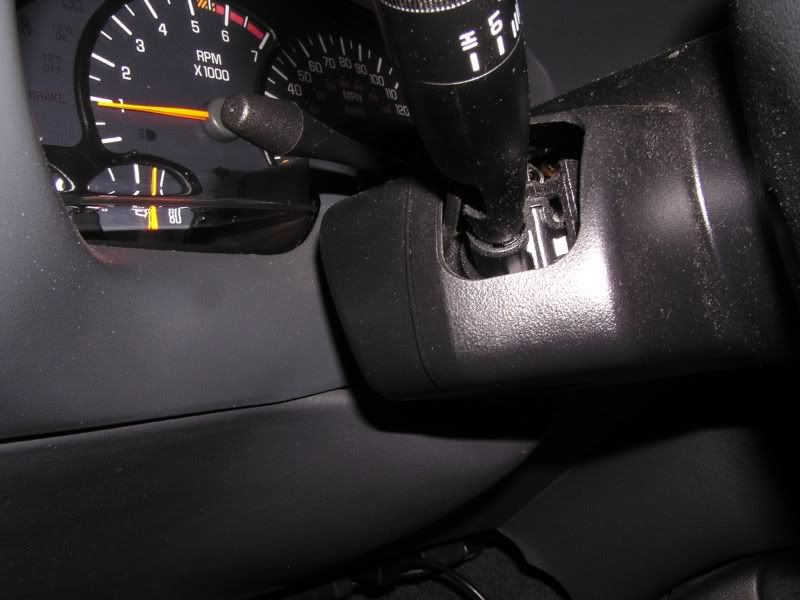
The trim bezel is held in with push in fasteners. To remove it you simply pry it out. I did not use the screwdriver for this because I did not want to risk damaging it or the dash. I found I was able to remove it by gently prying it out by hand a little at a time, working my way around the unit. When removing the trim bezel it helps to have the steering column tilted all the way down.
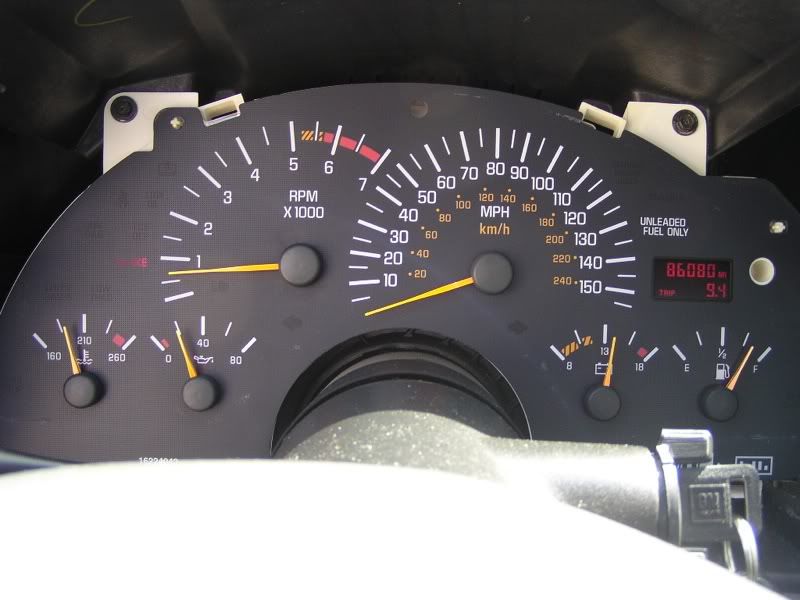
The next step is to remove the window covering the instrument cluster. Start by removing the four screws that hold the instrument cluster in place using the 7mm nut driver. There are four screws, two on top which you can see in the picture, and two below which are somewhat hidden.
Note: It will not be neccesary to remove the entire instrument cluster from the vehicle.
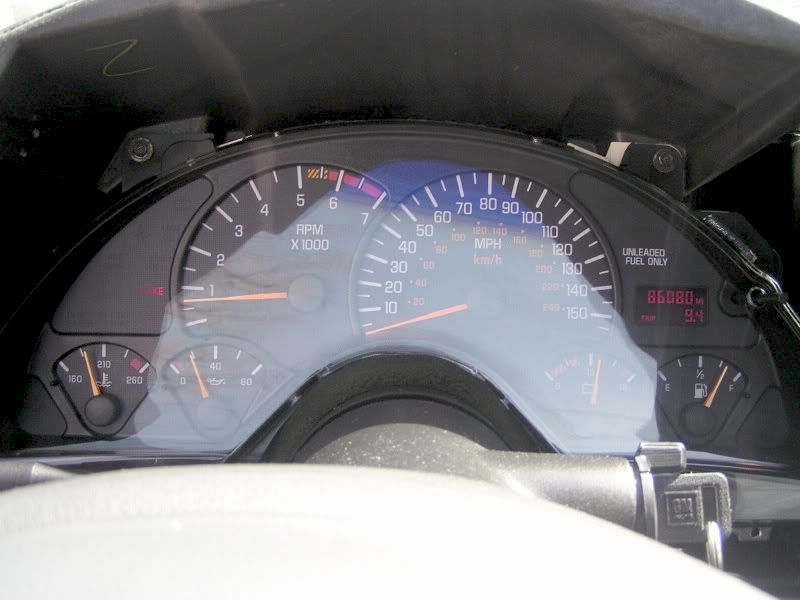
Now that the screws are out, the next step is to release the two tabs at the top of the window using the slotted screwdriver. The tabs are right next to the holes for the screws. In this photo you can see the screw is still there, but that is only because these photos were taken out of sequence, the screw should be out.
After you have released these two tabs, gently rock the window towards you from the top. There are tabs on the bottom of the window as well, but if you tilt the window towards you from the top these tabs will release without needing to use the screwdriver. One other thing to be aware of is that the piece of foam between the window and the steering column may be stuck, if it is, work it loose gently so as not to damage it. Now you should be looking at the instrument cluster.
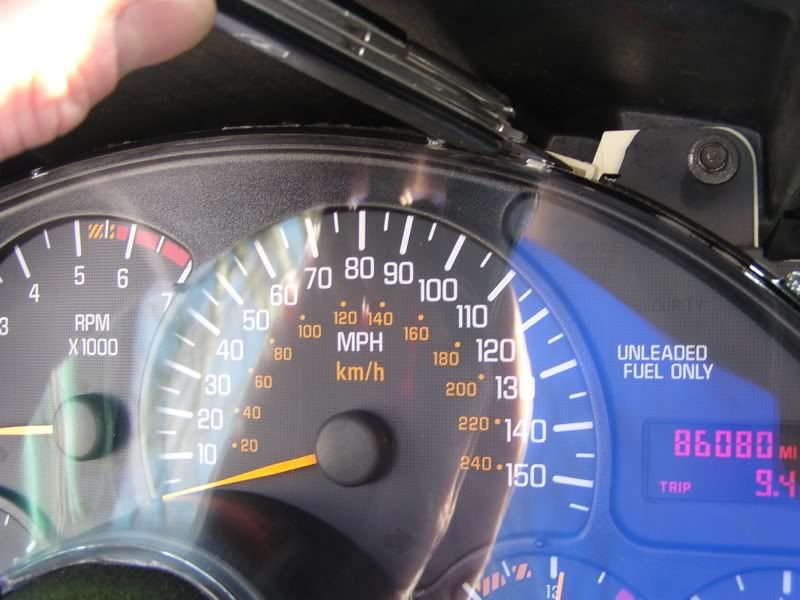
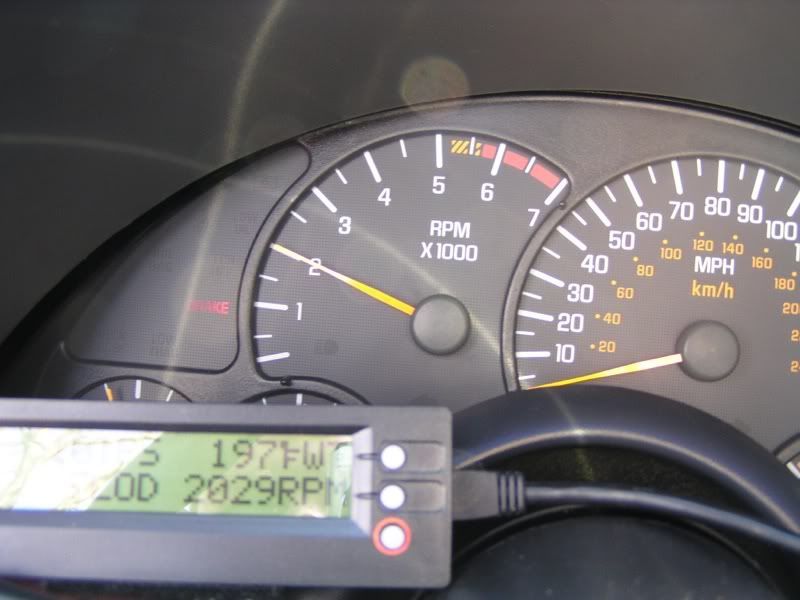
The next step is to remove the needle from the tachometer. The needle simply pushes onto a small metal shaft. To remove it, first try pulling it off with your fingertips. If that does not work, insert the blade of the screwdriver underneath the base of the needle and gently pry it loose, taking care not to scratch the face of the gauge cluster. It is important to take your time and use care, because the shaft on which the tach needle sits is very small.
Once you have the needle off, start the car, connect your scanner, and set it to display engine RPM. It may make the next step easier to let the car warm up first. What you want to do is open the throttle until the RPMs are at a speed which matches a mark on the gauge face. Without a load on the engine it can be difficult to obtain a precise RPM, so try a few different spots. For example, if you can't get the engine to stay right at 1000 RPM, try 1500 or 2000. Once you have the engine stable at a fixed RPM, gently slide the needle back onto it's shaft, aliging it with the RPM you have the engine running at. This can be tricky, as the shaft will move around as you are trying to get the needle back on. Once you have the needle lined up and showing the correct RPM, push it on as far as it will go, without using too much force. The idea is to get the needle on tight so it will not move and become innaccurate again. Once the needle is back on, try bringing engine speed to different levels to verify that the tach is now accurate.
Now you can put everything back together by following the steps used to dissasemble everything in reverse. The most important things to remember with this project are to be gentle and take your time to avoid damaging anything in the process.
Any questions or comments feel free to post up.
Tools needed:
Slotted screwdriver
7mm socket driver or ratchet with extension
Scanner capable of showing actual RPM from the PCM
For a scanner I used a Scangauge II, this is a code reader/trip computer/gauge pod that connects to the OBDII port on basically any '96 and up vehicle. But anything that can connect to the vehicle computer and show the actual RPM will work fine.
The first step to accessing the gauge cluster is to remove the trim bezel. These instructions are for a Firebird, a Camaro should be similar. Before attempting to remove it there is a small plastic cover on the left hand side of the steering column, in front of the headlight/cruise control lever, that must be removed. To remove it just pry it off gently with a screwdriver towards the front of the vehicle.
The trim bezel is held in with push in fasteners. To remove it you simply pry it out. I did not use the screwdriver for this because I did not want to risk damaging it or the dash. I found I was able to remove it by gently prying it out by hand a little at a time, working my way around the unit. When removing the trim bezel it helps to have the steering column tilted all the way down.
The next step is to remove the window covering the instrument cluster. Start by removing the four screws that hold the instrument cluster in place using the 7mm nut driver. There are four screws, two on top which you can see in the picture, and two below which are somewhat hidden.
Note: It will not be neccesary to remove the entire instrument cluster from the vehicle.
Now that the screws are out, the next step is to release the two tabs at the top of the window using the slotted screwdriver. The tabs are right next to the holes for the screws. In this photo you can see the screw is still there, but that is only because these photos were taken out of sequence, the screw should be out.
After you have released these two tabs, gently rock the window towards you from the top. There are tabs on the bottom of the window as well, but if you tilt the window towards you from the top these tabs will release without needing to use the screwdriver. One other thing to be aware of is that the piece of foam between the window and the steering column may be stuck, if it is, work it loose gently so as not to damage it. Now you should be looking at the instrument cluster.
The next step is to remove the needle from the tachometer. The needle simply pushes onto a small metal shaft. To remove it, first try pulling it off with your fingertips. If that does not work, insert the blade of the screwdriver underneath the base of the needle and gently pry it loose, taking care not to scratch the face of the gauge cluster. It is important to take your time and use care, because the shaft on which the tach needle sits is very small.
Once you have the needle off, start the car, connect your scanner, and set it to display engine RPM. It may make the next step easier to let the car warm up first. What you want to do is open the throttle until the RPMs are at a speed which matches a mark on the gauge face. Without a load on the engine it can be difficult to obtain a precise RPM, so try a few different spots. For example, if you can't get the engine to stay right at 1000 RPM, try 1500 or 2000. Once you have the engine stable at a fixed RPM, gently slide the needle back onto it's shaft, aliging it with the RPM you have the engine running at. This can be tricky, as the shaft will move around as you are trying to get the needle back on. Once you have the needle lined up and showing the correct RPM, push it on as far as it will go, without using too much force. The idea is to get the needle on tight so it will not move and become innaccurate again. Once the needle is back on, try bringing engine speed to different levels to verify that the tach is now accurate.
Now you can put everything back together by following the steps used to dissasemble everything in reverse. The most important things to remember with this project are to be gentle and take your time to avoid damaging anything in the process.
Any questions or comments feel free to post up.
 03-15-2009, 12:24 PM
#3
TECH Fanatic
iTrader: (45)
Join Date: Sep 2006
Location: Clarksville, TN
Posts: 1,122
Likes: 0
Received 0 Likes
on
0 Posts

Nice write-up, thanks for putting this together! I do second the slow reaction thing though because my engine will hit the rev limiter before the tach gets within 200-300 rpm of the limiter but the tach seems to be accurate at more constant speeds.
03-23-2009, 03:29 PM
#6
TECH Regular
iTrader: (4)
Join Date: Oct 2006
Location: The Plywood State
Posts: 492
Likes: 0
Received 0 Likes
on
0 Posts
This is a great writeup! This is applicable for ALL gauges on the cluster. I used an OBDII scanner from Advanced Auto Parts. Be sure not to push the needles in too far, otherwise they will not move fluidly. Don't press them ALL the way down.
03-23-2009, 05:23 PM
#7
TECH Addict
iTrader: (1)
Join Date: May 2007
Location: NY
Posts: 2,516
Likes: 0
Received 0 Likes
on
0 Posts
While this may be a nice mod if you damage the needle or mounting stud you're screwed. I wouldn't even mess with it. If you're that concerned about it being 200rpms off just know that in your head and if it says 2500 rpms just know it's really 2700 rpms or whatever.
Trending Topics
03-26-2009, 01:10 AM
#10
TECH Regular

i got my cluster out now to install led's and overlay. my question is i removed the lens and the mph needle moved around so i couldnt get the lens back on. i moved the needle up so i can get the lens back on now its staying around 80-90mph. is this going to be a problem when i reinstall the cluster.. i didnt take the needles off just moved them.
03-26-2009, 10:35 AM
#11
Staging Lane
iTrader: (4)
Join Date: Feb 2007
Location: Nova Scotia, Canada
Posts: 88
Likes: 0
Received 0 Likes
on
0 Posts
I had the same problem with the speedometer needle dropping down. I just took a bent piece of wire and routed it between the steering column and the cluster (where the foam is) to keep the needle up in place. I did this with the car running so all the other needles would stay up out of the way too.
03-26-2009, 02:46 PM
#12
I had the same problem with the speedometer needle dropping down. I just took a bent piece of wire and routed it between the steering column and the cluster (where the foam is) to keep the needle up in place. I did this with the car running so all the other needles would stay up out of the way too.
03-26-2009, 06:42 PM
#14
TECH Regular
right now my cluster is on a flat surface and the mph is at 90mph. so if i were to reinstall the cluster, should all the needles go to where there suppose to be. being that i did move the location of the mph?
03-26-2009, 07:24 PM
#15
The cluster is 100% electronic, so it'll just do what it does when you re-install it.
If you removed the needle from the cluster, you'll have to re-calibrate it.
03-26-2009, 07:27 PM
#16
TECH Regular
As long as you didn't remove the needle from the cluster itself, you should be fine. If you just finger-f***** the needle (like you would setting a clock), then you should be fine.
The cluster is 100% electronic, so it'll just do what it does when you re-install it.
If you removed the needle from the cluster, you'll have to re-calibrate it.
The cluster is 100% electronic, so it'll just do what it does when you re-install it.
If you removed the needle from the cluster, you'll have to re-calibrate it.
03-26-2009, 08:24 PM
#17
Once you have the plastic shield back on, just turn the cluster upside down and then rotate it so the needles all fall back to the left (this will re-engage the speedometer - then re-install.
03-26-2009, 08:36 PM
#18
TECH Regular
If you install the custer with the needle at 90 mph, you will have a problem. The innerds will roll off of the electromagnet.
Once you have the plastic shield back on, just turn the cluster upside down and then rotate it so the needles all fall back to the left (this will re-engage the speedometer - then re-install.
Once you have the plastic shield back on, just turn the cluster upside down and then rotate it so the needles all fall back to the left (this will re-engage the speedometer - then re-install.
it only goes down to 80mph and stops.no matter which way i turn/rotate. then goes right back to 90mph. should i just move the needle back to 0mph?
03-27-2009, 12:20 PM
#19
If the furthest back you can move the needle back to the left is 80 mph, then the needle is probably installed at the wrong position.