


 Apr 25, 2016, 07:02 PM
Last edit by: IB Advertising
See related guides and technical advice from our community experts:
Browse all: Chevrolet Camaro or Pontiac Firebird Exterior Guides
- Chevrolet Camaro 2010-Present: How to Replace Your Power Window Actuator
Step by step instructions for do-it-yourself repairs.
Browse all: Chevrolet Camaro or Pontiac Firebird Exterior Guides

How to replace your power window motor...
Thread Starter
10 Second Club
iTrader: (16)
Joined: Jan 2006
Posts: 1,013
Likes: 1
From: Wichita Falls, TX
We all know how long our power windows like to last. If you own an F-body, and havn't changed one yet, you will. It's just a matter of time. So here is how you do it. It would be easy if GM used screws instead of rivits to hold them on...and then didn't hide the rivits that hold them on. So here it is. Here is what you have to do, and where you have to drill.
1) First, remove the door panel.
-There are 5 phillips head screws, all of which are right around the door handle.
-The door panel should pop out around the egdes from here. It might take a little finess to get it off and around the handle that is connected to the door.
2) Next, there will probably be a piece of plastic tarred onto the inside of the door. You shouldn't have to take it all off...the tar will be messy. You can probably just cut out what you need to get to the power window motor.
3) Now you have to drill 3 holes through the fiberglass door, to get to the 3 rivits holding the power window motor on. Here is a pic of where you have to drill.
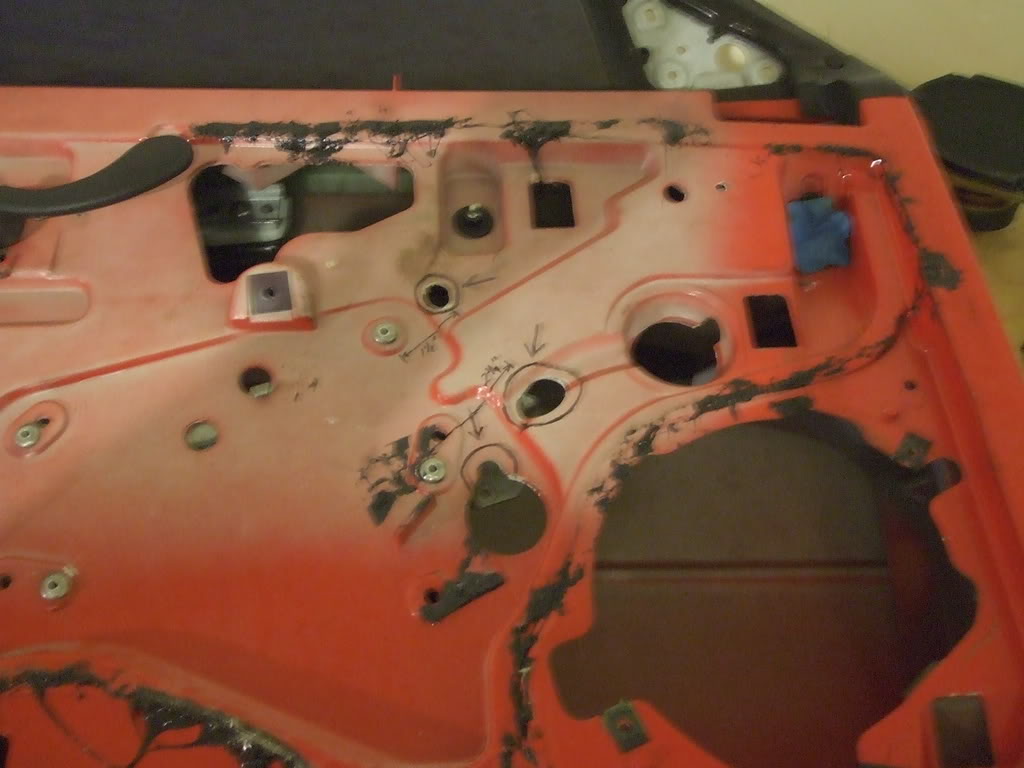
-The 3 circled holes are where you need to drill. You can use the larger rivits as a reference. Here is a closer pic.
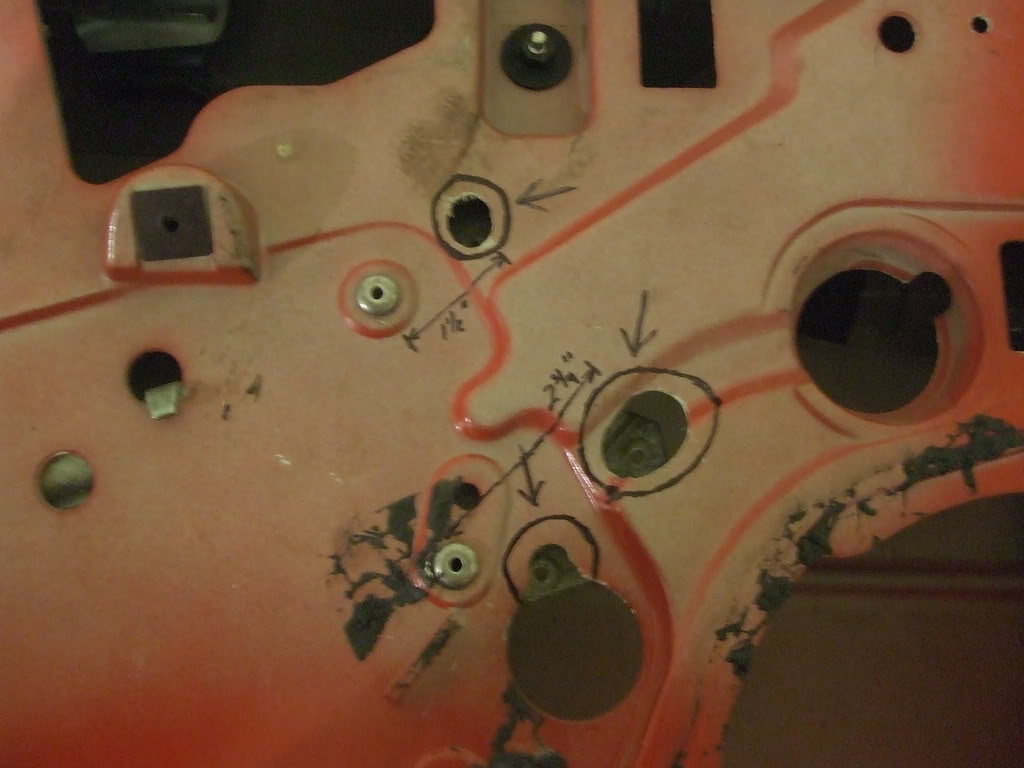
-The bottom hole you need to drill is actually attached to a hole that is already there.
-The second hole you need to drill is about 2 3/4 inches up and over from the rivit next to the first hole you drilled. That is from the center of the rivit, to the center of the hole.
-The third hole you need to drill is about 1 1/2 inches up and over from the rivit above the first rivit you used for a reference. Again, thats from the center of the rivit, to the center of the hole.
-Its really not that complicated if you use the provided pictures as references.
4) Now you can see the 3 small rivits holding the power window motor in place. Drill them out. Once they are out, the motor pops right out. Just don't forget to pull off the wire harness attached to the top, forward part of the motor.
5) The new motor. Most new motors come with small screws and nuts, which is what GM should have used in the first place. Put the new motor in, attach the wire harness, and put the door back together.
- There you go. New window motor. Enjoy it...until the other side goes on you. Then you get to do this all over again. Hope this helps.
Maybe this should be a sticky with how often we have to change our window motors. If its not written up somewhere already.
1) First, remove the door panel.
-There are 5 phillips head screws, all of which are right around the door handle.
-The door panel should pop out around the egdes from here. It might take a little finess to get it off and around the handle that is connected to the door.
2) Next, there will probably be a piece of plastic tarred onto the inside of the door. You shouldn't have to take it all off...the tar will be messy. You can probably just cut out what you need to get to the power window motor.
3) Now you have to drill 3 holes through the fiberglass door, to get to the 3 rivits holding the power window motor on. Here is a pic of where you have to drill.
-The 3 circled holes are where you need to drill. You can use the larger rivits as a reference. Here is a closer pic.
-The bottom hole you need to drill is actually attached to a hole that is already there.
-The second hole you need to drill is about 2 3/4 inches up and over from the rivit next to the first hole you drilled. That is from the center of the rivit, to the center of the hole.
-The third hole you need to drill is about 1 1/2 inches up and over from the rivit above the first rivit you used for a reference. Again, thats from the center of the rivit, to the center of the hole.
-Its really not that complicated if you use the provided pictures as references.
4) Now you can see the 3 small rivits holding the power window motor in place. Drill them out. Once they are out, the motor pops right out. Just don't forget to pull off the wire harness attached to the top, forward part of the motor.
5) The new motor. Most new motors come with small screws and nuts, which is what GM should have used in the first place. Put the new motor in, attach the wire harness, and put the door back together.
- There you go. New window motor. Enjoy it...until the other side goes on you. Then you get to do this all over again. Hope this helps.
Maybe this should be a sticky with how often we have to change our window motors. If its not written up somewhere already.
Copy & Paste Moderator


Joined: Apr 2002
Posts: 9,764
Likes: 208
From: Eastern MA
Thanks for the write-up.
There is already a sticky:
https://ls1tech.com/forums/showpost....1&postcount=18
Its in the "Frequently Asked Questions" sticky in the "Stereo & Electronics" section.
I sent Richiec77 a PM about adding this to that sticky.
Originally Posted by 02SS:ZEUS
Maybe this should be a sticky with how often we have to change our window motors. If its not written up somewhere already.
https://ls1tech.com/forums/showpost....1&postcount=18
Its in the "Frequently Asked Questions" sticky in the "Stereo & Electronics" section.
I sent Richiec77 a PM about adding this to that sticky.
This is a great addition to
http://shbox.com/page/windowmotor.html
because it allows a much better view of where to drill the holes for the rivets. The pictures in the link above are way too close. I was able to do it but it was a bit of guessing still.
I get to enjoy doing the passenger side soon. Driver's side is running strong now but passenger is getting slower by the day.
there's already a post up here https://ls1tech.com/forums/wiring-stereo-electronics/303776-frequently-asked-questions.html but I think more people would see it in this section! Not to mention these are easy to follow steps!
Copy & Paste Moderator
Joined: Apr 2002
Posts: 9,764
Likes: 208
From: Eastern MA
Originally Posted by camaroguy26
there's already a post up here https://ls1tech.com/forums/showthread.php?t=303776 but I think more people would see it in this section! Not to mention these are easy to follow steps!
.
.
.
BTW, I have not heard back from Richiec77 yet.
Trending Topics
LS1 Tech Stories
The Best V8 Stories One Small Block at Time

Topdon ONE vs. Artidiag 800 BT2: Which is the Diagnostic Tablet For You?
Pouria Savadkouei
Gas Monkey Built a 6-Wheel Ferrari Testarossa With a Corvette LT4 Engine
Verdad Gallardo
7 Most Reliable High-Performance Engines GM Has Ever Built
Verdad Gallardo
Amazing '71 Camaro Restomod Is Modern Muscle Car Under the Skin
Verdad Gallardo
6 Common C5 Corvette Failures and What's Involved In Repairing Them
Pouria Savadkouei
Retro Modern Bandit Pontiac Trans AM Comes With Burt Reynolds' Autograph
Verdad Gallardo
Top 10 Greatest Cadillac V Series Performance Models Ever, Ranked
Pouria Savadkouei
Top 10 Most Powerful Chevy Trucks Ever Made!

Hennessey's New Supercharged Silverado ZR2 Has 700 HP
Verdad GallardoThis is a great addition to
http://shbox.com/page/windowmotor.html
because it allows a much better view of where to drill the holes for the rivets. The pictures in the link above are way too close. I was able to do it but it was a bit of guessing still.
I get to enjoy doing the passenger side soon. Driver's side is running strong now but passenger is getting slower by the day.
TECH Fanatic
Joined: Jun 2006
Posts: 1,285
Likes: 1
From: Elgin, Il
Yes it is. But thats coming from a guy who doesnt like drilling the fiberglass out of my "alreadyweakfromthefactory" door. I do them in less than an hour minus removing the door panel. 1 10mm bolt, 3 10mm nuts, 2 13mm nuts and 4 large rivets. Versus drilling into the door and risking that finger-lovin whoop *** spring coming loose. Then either way your pulling out the regulator...
~The Troll~
~The Troll~


Staging Lane
Joined: Dec 2009
Posts: 95
Likes: 0
From: MD
Oh thats just bloody great. I drilled all the rivets out, including the large ones. Window came down, and I now have a scratched tint, not to mention that its going to take a lot of time and willpower to replace the window motor now. The arm has a tension spring(feels like it) and has to be pulled up and held in place, while trying to position the motor behind it, and also insert the screws to hold the stupid motor.
Too bad I didnt care to look up the instructions before starting the job. DO NOT drill out the large rivets that hold the arm, or you'll be sorry. I don't know what idiot designed these cars.
Too bad I didnt care to look up the instructions before starting the job. DO NOT drill out the large rivets that hold the arm, or you'll be sorry. I don't know what idiot designed these cars.


Joined: Nov 2001
Posts: 34,651
Likes: 2,577
From: Schiller Park, ILL Member: #317
Personally I'm not worried about drilling a few small access holes into an area that nobody will ever see and that cannot rust. I can't see how these holes would cause any significant weakening of the door structure as they are so small and in a central area. Anyway, mine had these access holes for years and the door never fell apart. I would do it this way again on future cars without a second thought.

I agree, easy fix hardest part is trying to get pannel back in.

Registered User
Joined: Jul 2016
Posts: 1
Likes: 0
So recently someone backed in to my driver side door. I found one same color which was not easy that will fit on my car but it is a Manuel window door mine is Power I need to know the steps to switch over and make it power as well any informtion would be be grateful thanks in advance.