

Finally pulling the trigger on parts!
 10-21-2013, 09:20 PM
#641

I don't think they will. That's why I wanted to take off the damn stem, just so I could test fit. I think they would be very close to touching. And I think I'd want the other valve clear anyway, just because the amount of shavings it produces would be horrifying.
And thanks, Noah. I started the thread with the intent of buying the parts, why I bought them, how they all get installed, and at the end, the payoff. I hope to lay down a good time.
And thanks, Noah. I started the thread with the intent of buying the parts, why I bought them, how they all get installed, and at the end, the payoff. I hope to lay down a good time.

 10-31-2013, 01:13 AM
#642
So, I've been busy with work and haven't messed with the car. The engine has been out in my garage with the oil drained. But I haven't had it covered. Mainly cuz it's still coated in oil internally. Is that a problem? I know a lot of times they tell you to cover and engine when you aren't working on it, but that's usually a fresh engine without any oil in it and iron blocks that can rust.
But I plan to actually flycut sometime Friday or Saturday and then I can actually button it up with the heads and wait on the pushrods.
Also, I've got the itch to buy some new wheels and have them ready for once I get the thing tuned.
Billet Specialties Street Lites 17x9.5 w/7" BS and 17x11 w/7.75" BS
-or-
Weld RT-S 17x9.5 w/6.8" or 7.3" BS (leaning to a more flush look with the 6.8") and 17x11 w/7.8" BS
I'm thinking Weld wheels as they look better and are lighter and stronger. And really don't cost a whole lot more.
Thoughts?
10-31-2013, 01:38 AM
#643
So, I've been busy with work and haven't messed with the car. The engine has been out in my garage with the oil drained. But I haven't had it covered. Mainly cuz it's still coated in oil internally. Is that a problem? I know a lot of times they tell you to cover and engine when you aren't working on it, but that's usually a fresh engine without any oil in it and iron blocks that can rust.
But I plan to actually flycut sometime Friday or Saturday and then I can actually button it up with the heads and wait on the pushrods.
Also, I've got the itch to buy some new wheels and have them ready for once I get the thing tuned.
Billet Specialties Street Lites 17x9.5 w/7" BS and 17x11 w/7.75" BS
-or-
Weld RT-S 17x9.5 w/6.8" or 7.3" BS (leaning to a more flush look with the 6.8") and 17x11 w/7.8" BS
I'm thinking Weld wheels as they look better and are lighter and stronger. And really don't cost a whole lot more.
Thoughts?
But I plan to actually flycut sometime Friday or Saturday and then I can actually button it up with the heads and wait on the pushrods.
Also, I've got the itch to buy some new wheels and have them ready for once I get the thing tuned.
Billet Specialties Street Lites 17x9.5 w/7" BS and 17x11 w/7.75" BS
-or-
Weld RT-S 17x9.5 w/6.8" or 7.3" BS (leaning to a more flush look with the 6.8") and 17x11 w/7.8" BS
I'm thinking Weld wheels as they look better and are lighter and stronger. And really don't cost a whole lot more.
Thoughts?
Some garages would contaminate an open engine, I know mine would..
10-31-2013, 02:45 AM
#644
It just has the car in it, the engine, tools, and the old parts over in the corner.
I wouldn't conduct surgery in it.
I do plan to spray everything down with compressed air and to apply fresh oil before I re-assemble. I just went and looked at it. It doesn't have any dust or dirt clinging to the oiled surfaces.
I wouldn't conduct surgery in it.
I do plan to spray everything down with compressed air and to apply fresh oil before I re-assemble. I just went and looked at it. It doesn't have any dust or dirt clinging to the oiled surfaces.
10-31-2013, 02:58 AM
#646
Yeah. I don't have much of that. Regular dust won't destroy bearings, unless it's grit and crude. Then it can ruin lifters and such. But just like fine dust, I don't see that doing anything. And I'd notice that clinging to the oil. And it's not happening.
10-31-2013, 08:56 AM
#647
I sprayed my engine down with WD-40 then wrapped it in a plastic engine bag. Been like that for months now(soon will be sent to machine shop then Ill assemble the shortblock) but I check on it every once in awhile to check for any kind of dirt build up and whatnot..its always fine.
Oh and I vote Weld RT-S!!
Oh and I vote Weld RT-S!!
10-31-2013, 06:44 PM
#653
TECH Fanatic
as long as you're not measuring bearing clearances, a little dust won't hurt anything. just keep the surfaces oiled and everything will be OK.
If its out of the car for more than a month or so, I'd recommend wrapping it in a garbage bag. The 3mil "contractor clean up" bags from Home Depot are the perfect size.
If its out of the car for more than a month or so, I'd recommend wrapping it in a garbage bag. The 3mil "contractor clean up" bags from Home Depot are the perfect size.
10-31-2013, 08:35 PM
#654
as long as you're not measuring bearing clearances, a little dust won't hurt anything. just keep the surfaces oiled and everything will be OK.
If its out of the car for more than a month or so, I'd recommend wrapping it in a garbage bag. The 3mil "contractor clean up" bags from Home Depot are the perfect size.
If its out of the car for more than a month or so, I'd recommend wrapping it in a garbage bag. The 3mil "contractor clean up" bags from Home Depot are the perfect size.
11-02-2013, 12:26 PM
#655
I might have the motor together by Sunday night. I'll post pics of the progress then.
Btw, I went ahead and ordered some Billet Specialties Street Lite wheels... I'll post pics of those once I get them in. They are supposed to ship Nov 16, so I'm going to hopefully have the car back together by then so I can roll out with the wheels on it for the dyno tune.
Btw, I went ahead and ordered some Billet Specialties Street Lite wheels... I'll post pics of those once I get them in. They are supposed to ship Nov 16, so I'm going to hopefully have the car back together by then so I can roll out with the wheels on it for the dyno tune.
11-06-2013, 12:15 AM
#657
Alright, so here is a long post about what I've done here lately.
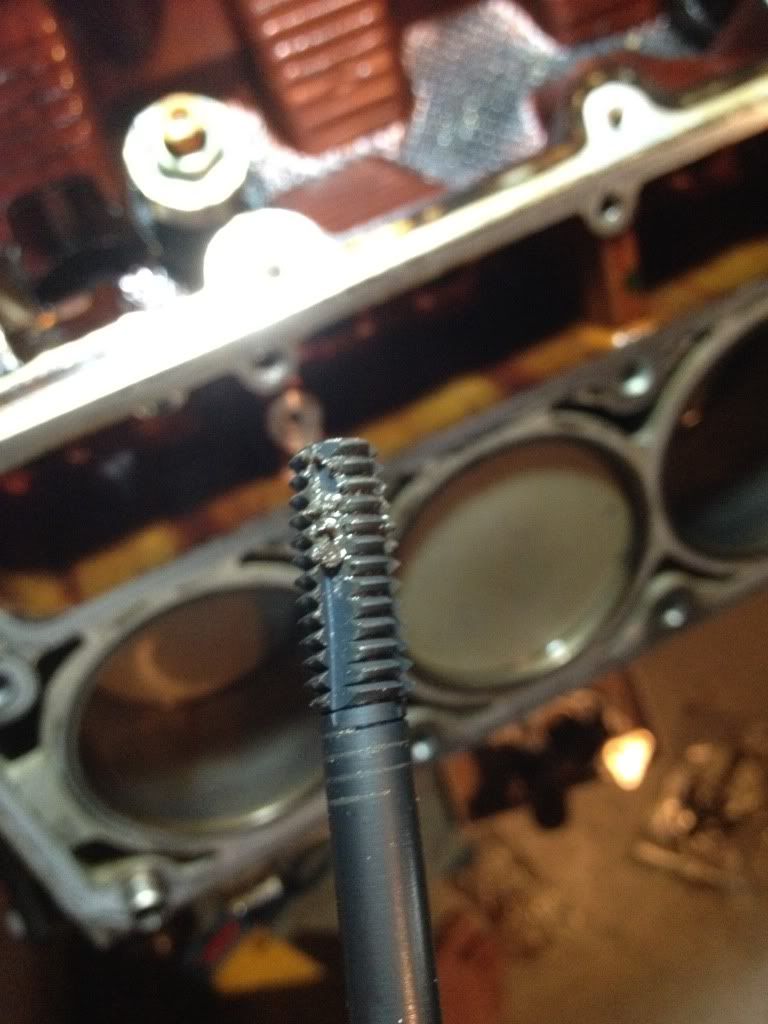
I cleaned up the threads with the ARP M11 thread cleaner tool. Excellent tool. Notice the grime in the bolt holes:
I figured I'd work more on the deck surface after I flycut the pistons. But I picked up a plastic, nomarring scraper, and it seems to work pretty okay. It doesn't damage the surface, which is a major plus.
Now, let me say that flycutting pistons is not really that bad. It just takes time and patience. The issue I had is that is it very hard to get absolutely repeatable results. Especially when you use a stock GM casting head, which has some variation in it anyway.
The first four cuts I made, all were in the .080" depth neighborhood, which is what I wanted. But I need a more reliable way to accurately measure depth other than feeler gauges, so I will probably pick up a depth mic to see what the cuts actually are. I say that because while they were all in the .080" neighborhood, the width of the cuts varied by almost 1/8" of an inch, meaning some went a little deeper to make a wider cut. I used a stack of feeler gauges to set depth. And that seemed to produce some variation as well since I was placing the lock collar on top of that stack and then resting the feelers on top of the guides. Any variation there would produce anomalies in the cuts as well.
I found TDC on Piston 1 (and 6) using my degree wheel and dial indicator and rotated over 90 degrees each time I made a cut, since I knew I'd be at TDC at 5 and 8, and so forth.
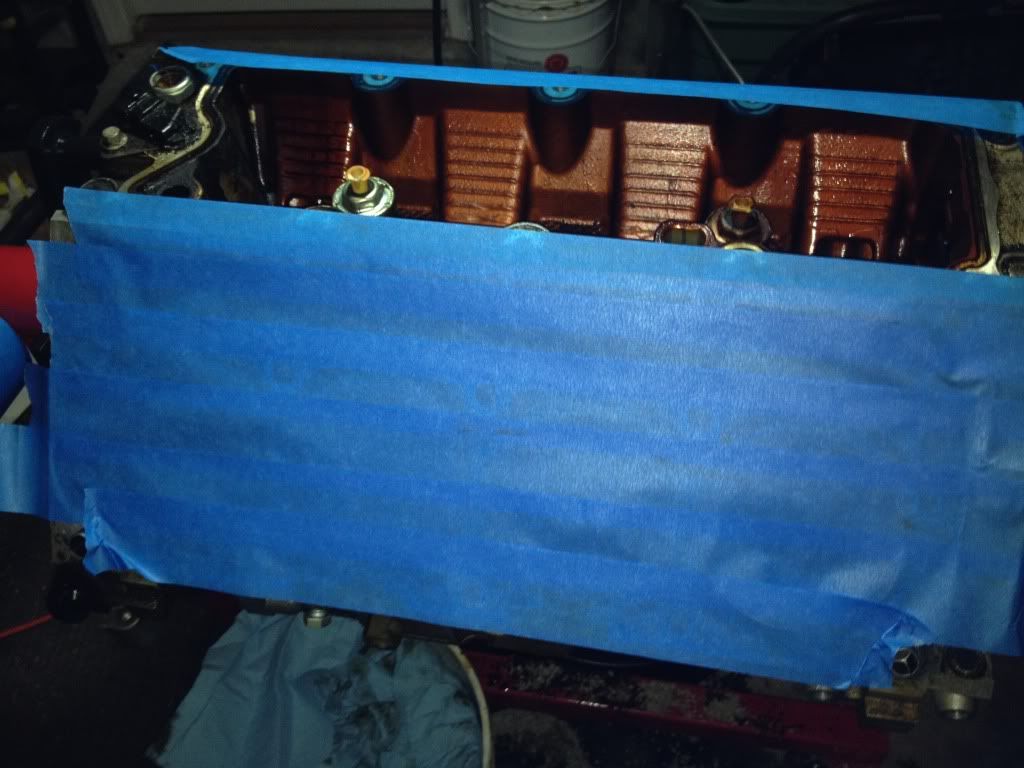
Here is the deck covered in Painters tape (since it's pretty thin and generally resistant to liquids). I actually reinstalled the valley cover after I taped off everything, because I didn't want any flakes getting in through there.
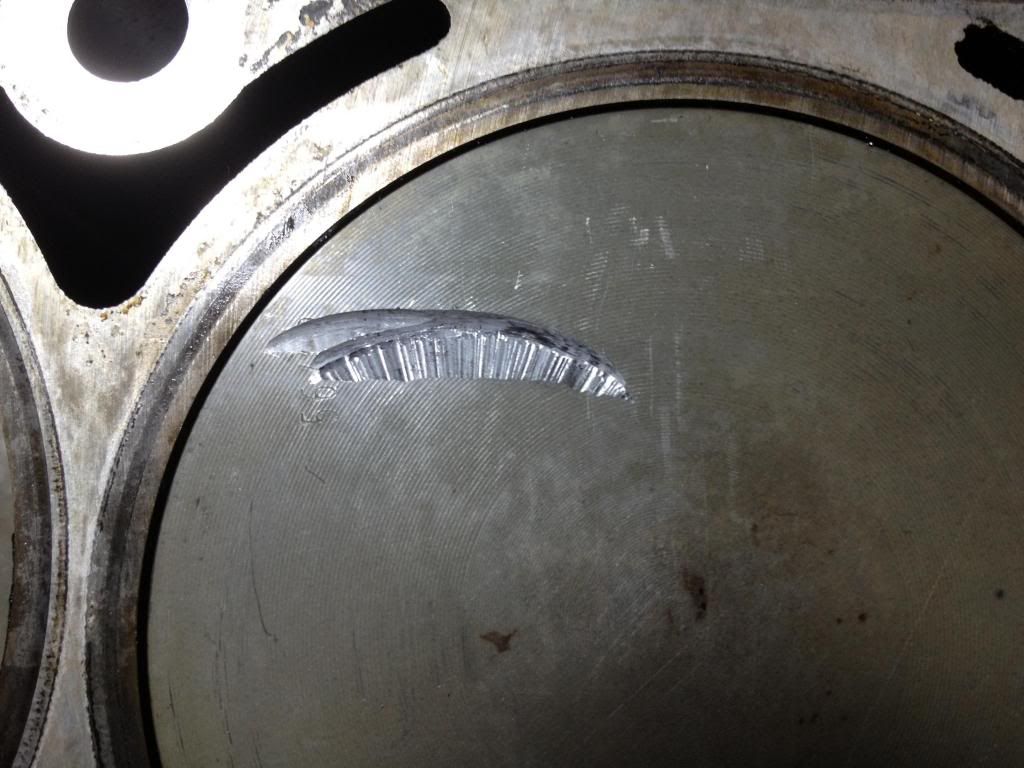
Next, I made a cut (and here's what's cool about putting the head on a flat, parallel to the ground deck): I was able to use the dowels to center the heads and didn't have to bolt them down. So the driver's side went very quickly. Notice the amount of shavings (which I vacuumed off). Also, take note of the way the cut was made. It creates a banded cut where it's not smooth. This will important later when I came across some issues.
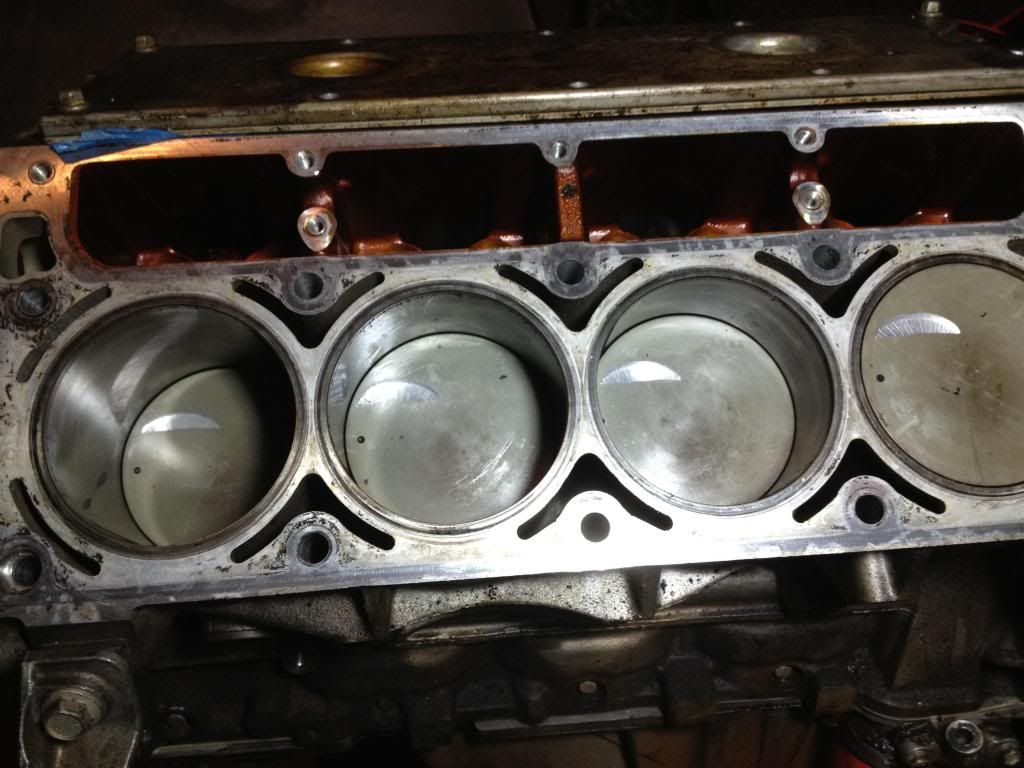
And here are the cylinders on the drivers side all cut. The variation is about 1/8" of an inch in the width of cuts. As long as they mic out with proper minimal depth, I'll probably just leave them. The difference in compression won't be much. Probably the variation difference in deck height piston to piston.
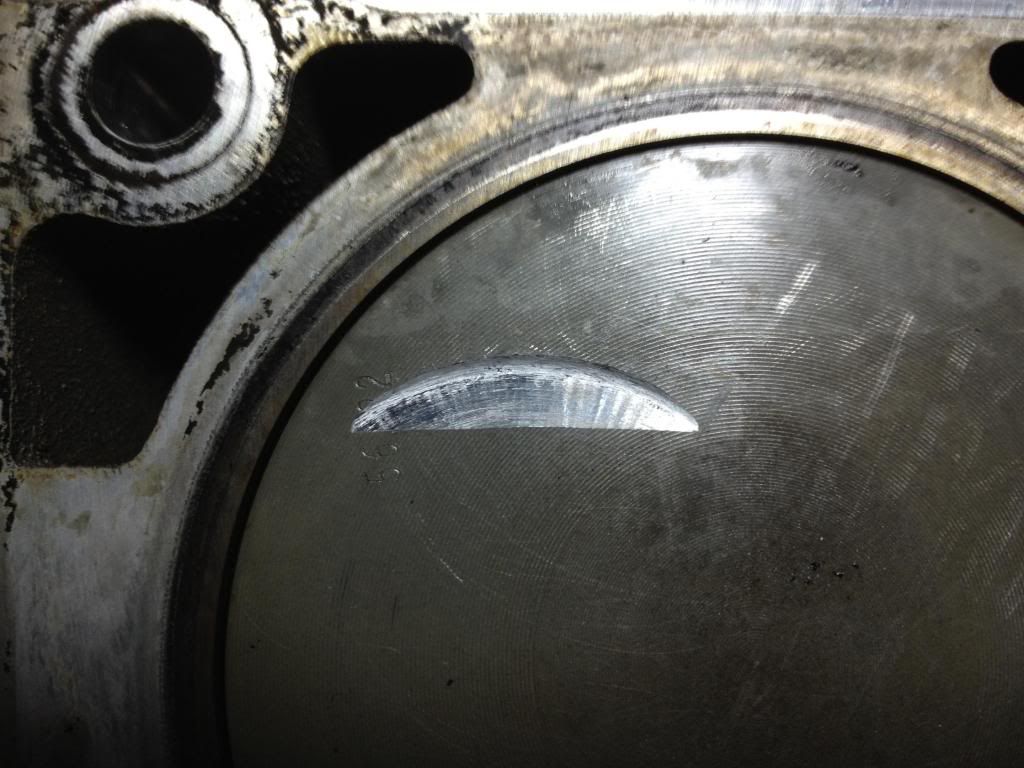
Now, here is the issue. I took a break, came back later and did the passenger side. I still kept rotating 90 degrees for TDC, but the damn dowels holding the heads came off the block on the driver's side on the last cut and became stuck in the head I was using. Instead of trying to disassemble my other stock head, I just pulled the dowel pins out of the block on the passenger side and took extra care to center the heads (and I might be off there a bit - I guess I'll find out when I put the TEA heads on to check for radial interference).
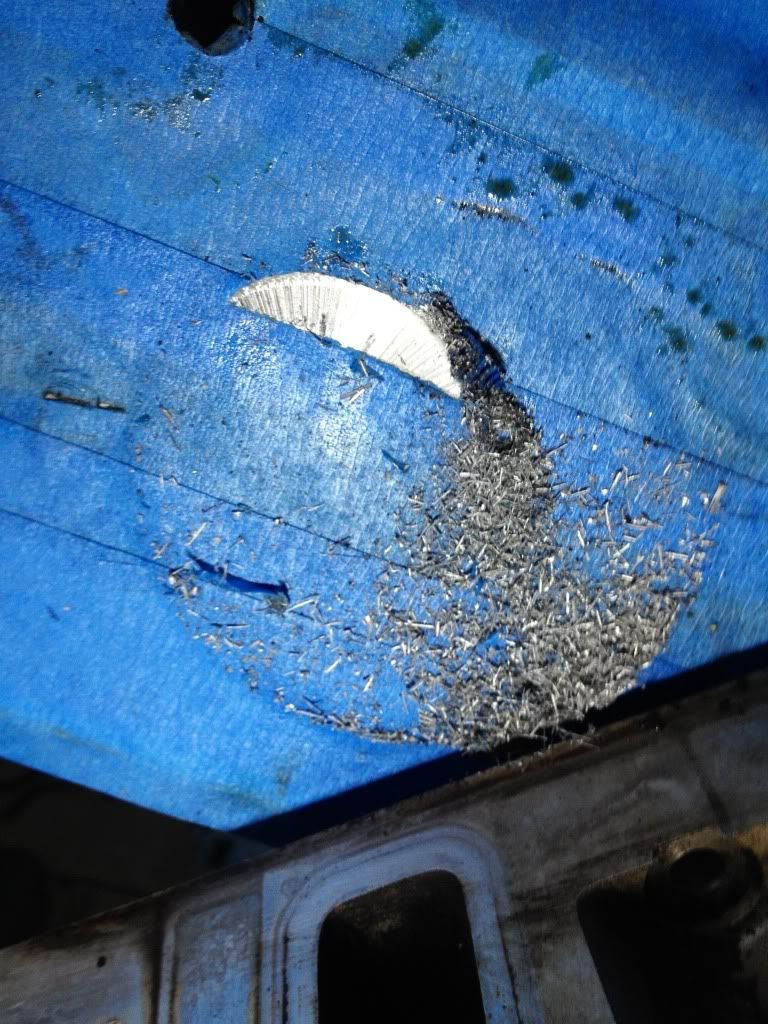
But, the major issue is I didn't sufficiently bolt them down. My brashness of not bolting down the drivers side (because they seemed to "fit" and didn't move) wasn't to be repeated on the passenger's side. Lesson learned. ALWAYS BOLT THEM DOWN. Otherwise, you get this:
Now, that's not too bad. It didn't run off to the cylinder liner and if anything, it gives me a little more radius. The problem is, when it slipped, it did something to my drill and/or the chuck, and my drill started to slip. Which is a major problem. Now, while the next cut was proper depth and actually was about the same size as the 4 done on the driver's side, the last two on the passenger's side were not good cuts. They were very smooth and they refused to go deep enough, even when I set the lock collar the same way. The drill kept spinning on the cutter's driveshaft.
I ended up with this:
Much narrower cuts and only about ~.060" deep. I'm going to clean the bit very well and see if I can't figure out what happened. It seems like it lost it's sharpness and/or the drill spinning is not putting enough torque on the cutter. Either way, I have at least two, and possibly a third with that slip cut that may need to be recut (if I can). Sigh
I plan to measure the exhaust before cutting.
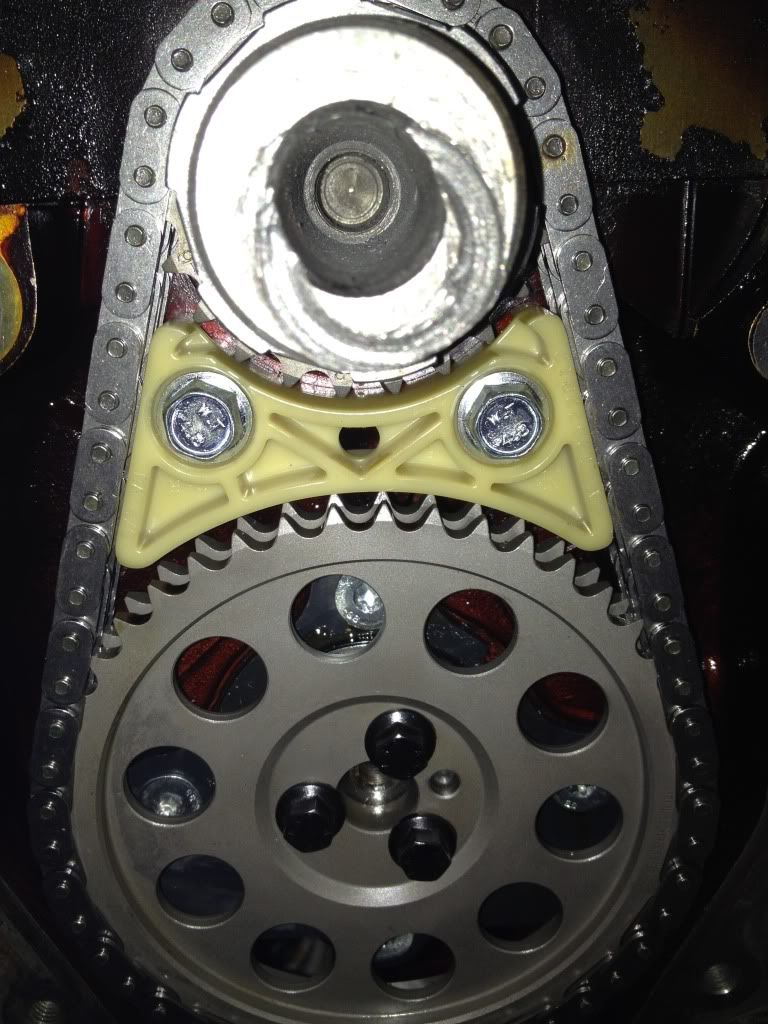
Also, I went ahead and installed the oil pump and oil pan, along with the LS6 timing chain damper (from Katech).
First the timing chain damper. I saw GM said torque the bolt to 18ft-lbs. So I took the supplied bolts and torqued the first one to 18. It snapped. It SNAPPED OFF IN THE BLOCK. So, after fighting with that for about 2 hours, I got it out. I went to Home Depot and got some zinc plated Grade 4.8 (the ones that snapped at 18ft-lbs were 8.8 - but it's not holding anything other than a polymer, so I wanted some that would fit perfectly and that's what Home Depot had). I also got some that were 5mm shorter in case it bottomed out. I also ran my ARP thread chaser through it to clean out the gunk of the dead bolt. Behold, the result (torqued to hand tight and half a turn).
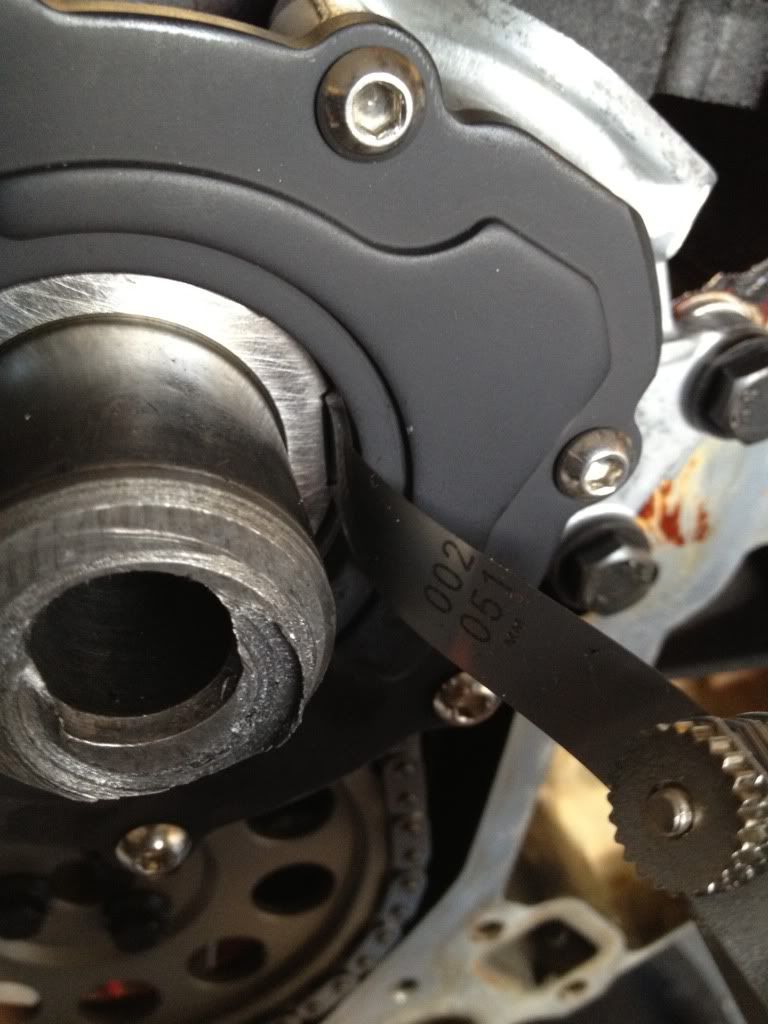
Next, I installed the oil pump and put copper spray on the spacers for the double roller. I centered it using .002" feeler gauges on both sides:
Next, I installed the oil pickup tube. Which didn't want to fit being spaced out 3mm. I tried to get it on the stud, but it slipped out of the oil pump and sort of pinched the o-ring and rubbing off some of the outside color. I inspected it and it was fine except for the cosmetic damage. I then worked on bending the pickup tube support bracket into place. Presto, perfect. I torqued the bolt to around 10-ft/lbs since I don't have a torque wrench that reads 106in/lbs (which is ~8.8ft/lbs).
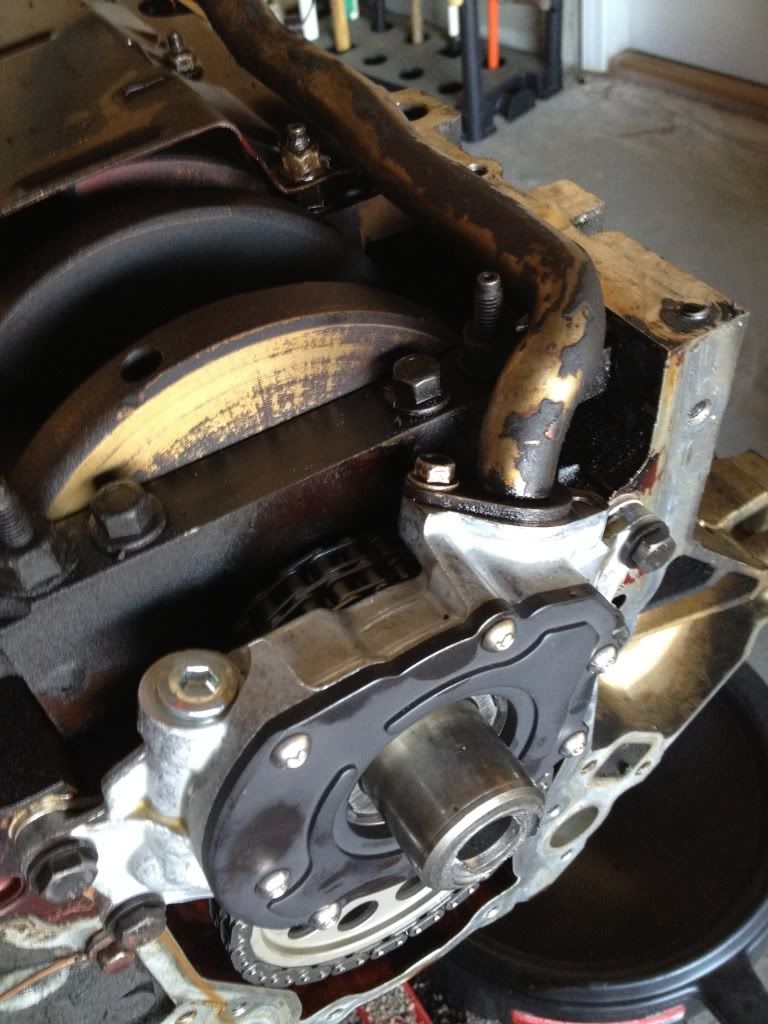
Next, I installed the new oil pan gasket, put some Black RTV on the corners of the rear cover, and squared it to the bell-housing flange using a straight edge. I then torqued down the sequence starting at the inner bolt on each side and worked my way out alternating, hitting 18-ft/lbs on all but the bolt behind the oil filter. I hit it at 16-ft/lbs because it is prone to cracking.
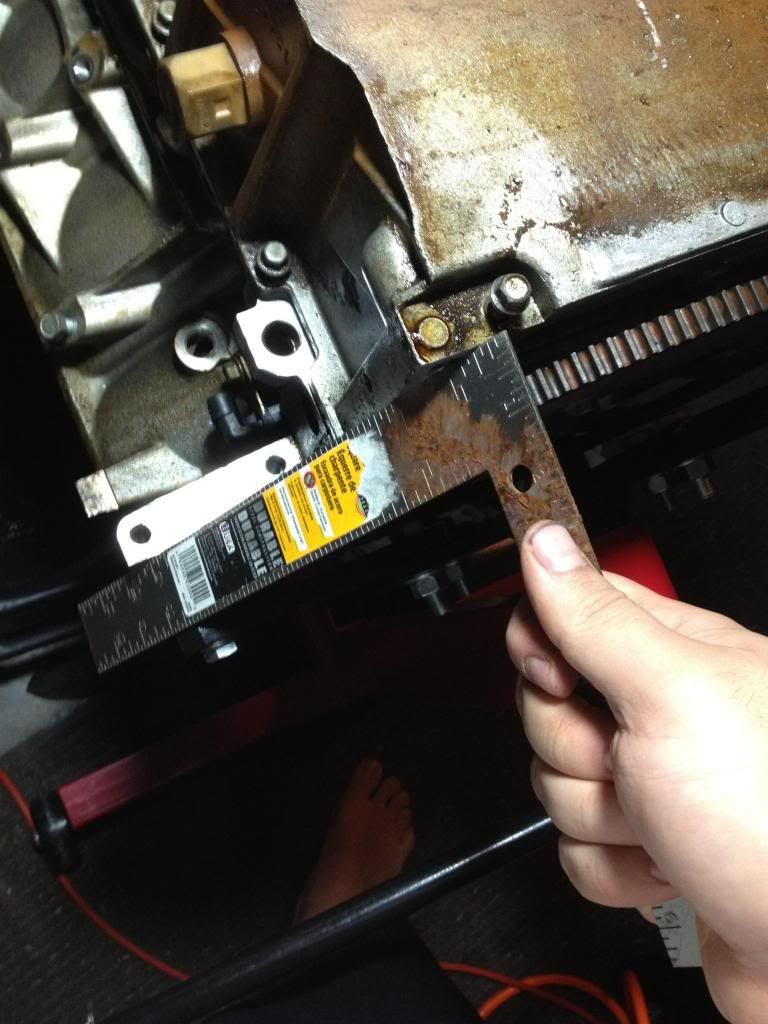
I'll try to get my piston cutter issue resolved, measure the exhaust valve to see if it needs a cut, and then install the front cover (which will need some clearancing, I'm sure). And then, I'll be ready to install the rockers and TEA heads and measure for the pushrods on all 16 valves for the Johnson Short-Travel lifters.
I cleaned up the threads with the ARP M11 thread cleaner tool. Excellent tool. Notice the grime in the bolt holes:
I figured I'd work more on the deck surface after I flycut the pistons. But I picked up a plastic, nomarring scraper, and it seems to work pretty okay. It doesn't damage the surface, which is a major plus.
Now, let me say that flycutting pistons is not really that bad. It just takes time and patience. The issue I had is that is it very hard to get absolutely repeatable results. Especially when you use a stock GM casting head, which has some variation in it anyway.
The first four cuts I made, all were in the .080" depth neighborhood, which is what I wanted. But I need a more reliable way to accurately measure depth other than feeler gauges, so I will probably pick up a depth mic to see what the cuts actually are. I say that because while they were all in the .080" neighborhood, the width of the cuts varied by almost 1/8" of an inch, meaning some went a little deeper to make a wider cut. I used a stack of feeler gauges to set depth. And that seemed to produce some variation as well since I was placing the lock collar on top of that stack and then resting the feelers on top of the guides. Any variation there would produce anomalies in the cuts as well.
I found TDC on Piston 1 (and 6) using my degree wheel and dial indicator and rotated over 90 degrees each time I made a cut, since I knew I'd be at TDC at 5 and 8, and so forth.
Here is the deck covered in Painters tape (since it's pretty thin and generally resistant to liquids). I actually reinstalled the valley cover after I taped off everything, because I didn't want any flakes getting in through there.
Next, I made a cut (and here's what's cool about putting the head on a flat, parallel to the ground deck): I was able to use the dowels to center the heads and didn't have to bolt them down. So the driver's side went very quickly. Notice the amount of shavings (which I vacuumed off). Also, take note of the way the cut was made. It creates a banded cut where it's not smooth. This will important later when I came across some issues.
And here are the cylinders on the drivers side all cut. The variation is about 1/8" of an inch in the width of cuts. As long as they mic out with proper minimal depth, I'll probably just leave them. The difference in compression won't be much. Probably the variation difference in deck height piston to piston.
Now, here is the issue. I took a break, came back later and did the passenger side. I still kept rotating 90 degrees for TDC, but the damn dowels holding the heads came off the block on the driver's side on the last cut and became stuck in the head I was using. Instead of trying to disassemble my other stock head, I just pulled the dowel pins out of the block on the passenger side and took extra care to center the heads (and I might be off there a bit - I guess I'll find out when I put the TEA heads on to check for radial interference).
But, the major issue is I didn't sufficiently bolt them down. My brashness of not bolting down the drivers side (because they seemed to "fit" and didn't move) wasn't to be repeated on the passenger's side. Lesson learned. ALWAYS BOLT THEM DOWN. Otherwise, you get this:
Now, that's not too bad. It didn't run off to the cylinder liner and if anything, it gives me a little more radius. The problem is, when it slipped, it did something to my drill and/or the chuck, and my drill started to slip. Which is a major problem. Now, while the next cut was proper depth and actually was about the same size as the 4 done on the driver's side, the last two on the passenger's side were not good cuts. They were very smooth and they refused to go deep enough, even when I set the lock collar the same way. The drill kept spinning on the cutter's driveshaft.
I ended up with this:
Much narrower cuts and only about ~.060" deep. I'm going to clean the bit very well and see if I can't figure out what happened. It seems like it lost it's sharpness and/or the drill spinning is not putting enough torque on the cutter. Either way, I have at least two, and possibly a third with that slip cut that may need to be recut (if I can). Sigh
I plan to measure the exhaust before cutting.
Also, I went ahead and installed the oil pump and oil pan, along with the LS6 timing chain damper (from Katech).
First the timing chain damper. I saw GM said torque the bolt to 18ft-lbs. So I took the supplied bolts and torqued the first one to 18. It snapped. It SNAPPED OFF IN THE BLOCK. So, after fighting with that for about 2 hours, I got it out. I went to Home Depot and got some zinc plated Grade 4.8 (the ones that snapped at 18ft-lbs were 8.8 - but it's not holding anything other than a polymer, so I wanted some that would fit perfectly and that's what Home Depot had). I also got some that were 5mm shorter in case it bottomed out. I also ran my ARP thread chaser through it to clean out the gunk of the dead bolt. Behold, the result (torqued to hand tight and half a turn).
Next, I installed the oil pump and put copper spray on the spacers for the double roller. I centered it using .002" feeler gauges on both sides:
Next, I installed the oil pickup tube. Which didn't want to fit being spaced out 3mm. I tried to get it on the stud, but it slipped out of the oil pump and sort of pinched the o-ring and rubbing off some of the outside color. I inspected it and it was fine except for the cosmetic damage. I then worked on bending the pickup tube support bracket into place. Presto, perfect. I torqued the bolt to around 10-ft/lbs since I don't have a torque wrench that reads 106in/lbs (which is ~8.8ft/lbs).
Next, I installed the new oil pan gasket, put some Black RTV on the corners of the rear cover, and squared it to the bell-housing flange using a straight edge. I then torqued down the sequence starting at the inner bolt on each side and worked my way out alternating, hitting 18-ft/lbs on all but the bolt behind the oil filter. I hit it at 16-ft/lbs because it is prone to cracking.
I'll try to get my piston cutter issue resolved, measure the exhaust valve to see if it needs a cut, and then install the front cover (which will need some clearancing, I'm sure). And then, I'll be ready to install the rockers and TEA heads and measure for the pushrods on all 16 valves for the Johnson Short-Travel lifters.
11-06-2013, 01:29 AM
#658
Nice work, I can't believe the damper bolt broke off at 18lbs?
Is that a m8 or m10 bolt?
Either way it should of held
Those piston cuts look good, even that one that slipped will work if you deburr it a little..
They get covered anyway so function over form..
So your planning on possibly running different length PR's on the whole motor??
Is that a m8 or m10 bolt?
Either way it should of held
Those piston cuts look good, even that one that slipped will work if you deburr it a little..
They get covered anyway so function over form..
So your planning on possibly running different length PR's on the whole motor??
11-06-2013, 01:47 AM
#659
Yeah. If I have to on the pushrods. Giant pain in the ***. I'm hopeful it's the same all the way around. I won't know til I measure.
I got them from Mamo and he said to measure all to be safe, since the preload window is so narrow. Only .052" of total travel. So, you can't miss by .025" and expect them to work.
It was an M8 bolt. I think it was heated or something. My torque wrench won't allow me to torque past the value. As soon as it clicked on 18, it just spun. I was like wtf!!! And that was all she wrote.
And the cuts that are deep enough are fine. The two that aren't look like they are marred with discoloration. So something weird is happening. Maybe if I hit it fresh I'll figure it out. Btw, I used WD-40 to lubricate all the cuts...
The one where I slipped, should be fine as well. I'll mic it to make sure the depth is right and then put the TEA heads on and clay the radius. I plan to hit all the cuts with sandpaper to smooth them out.