When you click on links to various merchants on this site and make a purchase, this can result in this site earning a commission. Affiliate programs and affiliations include, but are not limited to, the eBay Partner Network.
picked up a set of 241's locally for 100 bucks... figured id give it a shot and do some hand porting and if worse comes to worse and I did a **** job, i'll have um cnc ported, or make a table out of them if the damage is irreversible
so did some reading about the basics for ls1 head porting...
what I have learned:
1. dont touch the short turn radii
2. blend the bowl
3. grind down the swirl ramp
4. grind down the rocker bolt base
5. grind the valve guide boss
6. dont cut down the coolant hump in the exhaust port
7. leave intake ports rough cut, but polish exhaust ports
8. basically copy the port jobs done by the professional heads because I am an amateur
before you gasp at the ugliness, let me forewarn you:
-this is the very first rough cut, I can cut more if you guys out there think I should, or I can begin sanding and smoothing
-I am waiting on a few new, different shaped tungsten bits so I can finish cutting down the swirl ramps
-also waiting on a replacement piece for my rotary tool so i can get back into the meat of the intake port and grind out the rest of the rocker bolt hole
-the sharpie lines i made on the intake ports are just references for straightness, NOT the width that I am going to cut the runners out to
questions I have that I could not find on my own:
-is it worth it to mess with the combustion chamber and try and polish it out; what type of gains are seen by a well-polished combustion chamber?
--take into consideration: I have a stupidly large cam, and don't want to have to cut a bunch off the deck when I have them planed, and don't want to lose a lot of compression in the chamber....
-should I change the height or diameter of the intake port runners? or just cut out the walls enough to get rid of the casting marks, and polish um up real nice? I keep reading that I don't want to enlarge the runners in order to keep port velocity high
i plan to drop them off to get flow tested in order to get the ports more uniform before installing them.
any suggestions? tips and tricks from any pro's out there?
In my non professional opinion everything looks good for a rough cut, although port work is notoriously difficult to accurately access via photos. I left my swirl ramps in, although most professional porters do remove them. It's my inderstanding that most benefits are in the bowl to valve seat area. Although I'm not really sure if that's truth or not. Concrete data is mostly guarded by those in the Industry. Good luck with your heads.
In my non professional opinion everything looks good for a rough cut, although port work is notoriously difficult to accurately access via photos. I left my swirl ramps in, although most professional porters do remove them. It's my inderstanding that most benefits are in the bowl to valve seat area. Although I'm not really sure if that's truth or not. Concrete data is mostly guarded by those in the Industry. Good luck with your heads.
It's pretty much unanimously agreed upon that the seat and the immediate areas below and above the seat are where you find most of your gains. It's where the port is most restricted in these heads, generally speaking. David Vizard among others has written about this in his books for years.
Having a good "performance" valve job done and then opening the venturi diameter to no more than ~91% of the valve diameter is a safe bet. Depending on the angles of the valvejob, you might end up with a step around the valve job on the chamber side, which would also be beneficial to blend in.
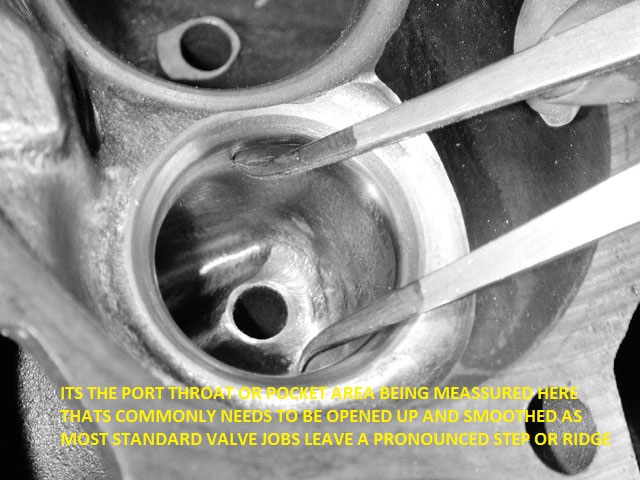
Even though it isn't an LS head, you can still see the where the throat is located, which is the area being measured in this photo.
Nice visual. On my heads, I found it interesting how it seemed the seats weren't perfectly "centered", leaving the step that you mentioned. Is that just a factory tolerance exposure?
Nice visual. On my heads, I found it interesting how it seemed the seats weren't perfectly "centered", leaving the step that you mentioned. Is that just a factory tolerance exposure?
Yeah, I think that's probably part of the reason. It's also a perfectly round hole that transitions into a more square shaped port, so I think that will cause some bumps and ledges that need to be blended in as well.
He says he's gonna have em flowed to make sure he gets them all pretty even before install.
How are ported 241's compared to 243's??
241 heads can be hand ported can get flow # of 270s. Intake and 210 cfm on exhaust. So the results fall somewhere between a good cnc program and stock 243 flow numbers
new assortment of chinese tungsten carbide bits came in. gotta say.... as much as i dont like to admit it... chinese crap isnt necessarily total crap anymore. got an assortment of tungsten carbide bits for the dremel for 11 dollars on amazon and its chewin through these aluminum heads like butter and they're definitely keeping their edges!
glad to see im on the correct route though. I widened the girth of the throat/pocket area, to blend the bowl, and tried to keep as much of the same shape as what I see in pictures of professionally hand and cnc ported heads, and I think I may have hit that 90% or so almost perfectly, on accident. I just opened them up right up close to the lip of the valves, as you hopefully should be able to see in the pictures...
also, does anyone have any guidance on exhaust port sizing? I blended the bowl, trimmed the valve guide boss, removed some material from the side walls and opened up the header side to match my header diameter, while keeping the D shape to keep the air in the same shape. Also refrained from removing much floor material, only enough to smooth it out, in hopes to keep the bend and persuade higher velocity towards the ceiling of the port.
question of the day: does polishing the combustion chamber make any crazy difference? i'm not sure, even after taking on this much of a project, if i want to mess with the combustion chamber... i dont have much piston to valve clearance to begin with, and after i mill the head, I think the bump in compression may be better than the extra time it would take to fix the probable change in combustion chamber size i'll get after grinding and polishing
question of the day: does polishing the combustion chamber make any crazy difference? i'm not sure, even after taking on this much of a project, if i want to mess with the combustion chamber... i dont have much piston to valve clearance to begin with, and after i mill the head, I think the bump in compression may be better than the extra time it would take to fix the probable change in combustion chamber size i'll get after grinding and polishing
Polish and softening will lower the cr slightly but the benefits out weight any losses.
Most shops doing a Performance valve job will cut the seat where it blends into the throat for you. Polishing the combustion chamber helps prevent detonation.
For reference I also did some minor clean up to some 241s and flowed them as well
My exhausts were similar to yours. Sides and roof on exit, triangulated the guide boss and cartridge roll blended the bowls and picked up a solid 20CFM with the GM valve job. 200 cfm @.600" and 220 w/ pipe
On the intake side I cut the rocker bolt boss out, left it carbide rough, then cartridge roll blended the bowls leaving the swirl ramp in place AND untouched
Those picked up roughly 14 cfm from 232-ish (A.I. website) to 246.5 cfm
All with the crappy GM valve job which had 16,000 miles on it
I was happy as my total time investment was under five hours. Basically nothing when talking about DIY home porting. I recall spending three or four times that amount on some old *** GEN I 882 castings and still struggling to make a measly 400 horsepower from a 10:1 406" engine. LOL
The stock valve job isn't just terrible. I have had heads flowed at different stages of porting just to see what works and what don't. I have seen just blending the factory intake seat pick up 15 .
Nice visual. On my heads, I found it interesting how it seemed the seats weren't perfectly "centered", leaving the step that you mentioned. Is that just a factory tolerance exposure?
I have not seen any perfectly centered seats in factory casting. Especially sand cast heads . Example 799 has quite a bit of shift compared to 243s
Veerry interesting. Thanks for the reply's yall, some good info.
I got some more fine grinding and shaping down. Gonna start some light sanding tomorrow, drop um off at the shop to get flow checked so i can make any adjustments before probably having them flow checked again, adjustments, flow check, polish, over and over, etc. Gonna cap my spending at 300. So far, im in 140-150 bucks or so here
Some more pics:
Gas Monkey Built a 6-Wheel Ferrari Testarossa With a Corvette LT4 Engine
Slideshow: The controversial Ferrari F6 swaps its original flat-12 for a Corvette Z06-derived LT4 V8 and sends power to four rear wheels through a custom-built drivetrain.
7 Most Reliable High-Performance Engines GM Has Ever Built
Slideshow:These GM engines didn't just make huge power, they survived abuse, boost, track days, and six-digit mileage with a reputation for refusing to quit.
6 Common C5 Corvette Failures and What's Involved In Repairing Them
Slideshow: From wobbling harmonic balancers to failed EBCMs, these are the issues that define long-term C5 ownership and what repairs typically involve.
Retro Modern Bandit Pontiac Trans AM Comes With Burt Reynolds' Autograph
Slideshow: A modern Camaro transformed into a retro icon, this limited-run "Bandit" build blends nostalgia with brute force in a way few revivals manage.
Top 10 Greatest Cadillac V Series Performance Models Ever, Ranked
Slideshow: Cadillac didn't just crash the high-performance luxury vehicle party, it showed up loud, supercharged, and occasionally a little unhinged...