


M6 Swap Complete Writeup
Thread Starter
TECH Veteran
iTrader: (14)
Joined: Mar 2009
Posts: 4,444
Likes: 9
From: Pompano Beach FL
I see questions like this all the time on here and to the best of my knowledge there isn't one thread that completely outlines it all in one post so here it goes.
]I did the m6 swap on my auto car and most of pics did get deleted but I figured I'd try to do a comprehensive writeup and use pica from other sources, if anyone doesnt want their pics up just send me a pm....also for some reason the pics are only showing up when logged in so login to view or maybe a mod can help.
Parts list....
Fbody/GTO T56 (gto t56 will need fbody shifter lever, shifter, and ls2 starter)
T56 crossmember
T56/T5 torque arm mount
T56/T5 manual pedals
T56 center console.
Clutch M/C with reservoir
Slave
Clutch assembly
Flywheel and clutch bolts
Lower rubber floor boot for 6 speed
I like to get the interior done first. So go into the car and unbolt the console. There are 2 10mm bolts under the armrest and 2 more in the very front of the console closest to the pedals. There are also 2 small 7mm screws that hold in the top shifter plate. Remove the small u-clip on the back of the shifter **** and pull it off.

You will now be looking at the auto shifter assembly... Unbolt the 10mm bolts that hold it in, unplug the small electrical harness on the side and disregard for now. The large pulg near the shifter will be used so dont destroy that. Next unhook the shifter cable and push it through the grommet underneathe the car. you will now be looking at this...
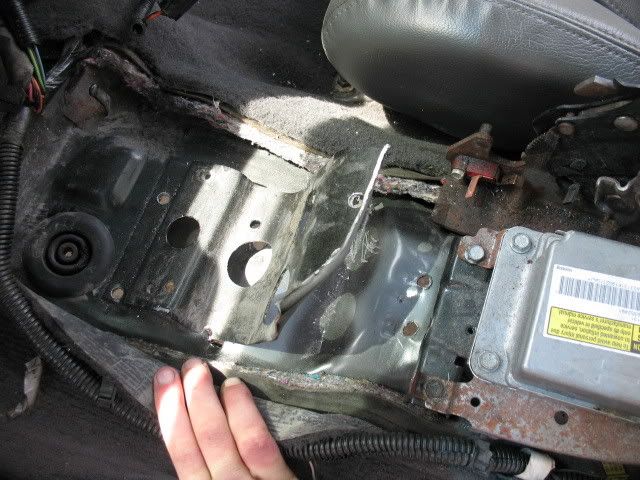
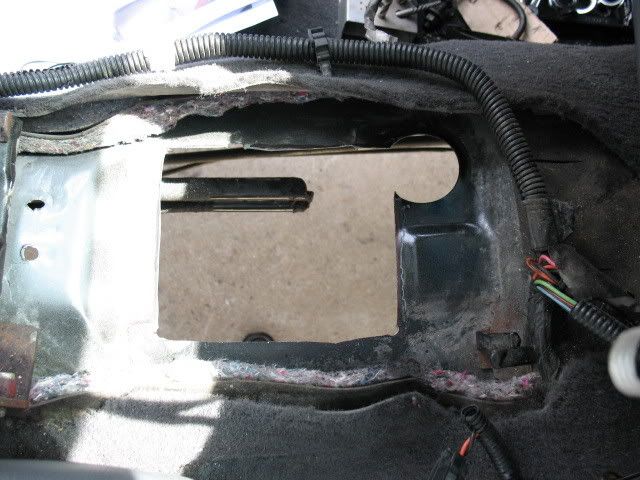
As you can see there are 6 rivet holes you will need to drill out and you will need to cut the autobrace from the back console brace as shown in the pic. Once this is all done you are now ready to cut the hole for the shifter. There are honestly no measurements for this I just did it by eye and the pics and just had to trim a little bit when I got the tranny in.
Once this is done you are now ready top swap the pedals and drill the hole for the M/C. First thing is to take off all the plastic covers on the pedals they are just held on with some small clips and screws. Once these are off you can now loosen the pedals, first unplug the brake and cruise switches and unscrew them out of their sockets. Next remove the 6 (i think) 13mm bolts on the pedals and rotate them in a counter clockwise motion over the steering column to remove, there is no easy way to do this it just takes finese lol. Install the new manual pedals in reverse order and reinstall the switches and bolts. you will now notice you have a perfect template for the mc hole....
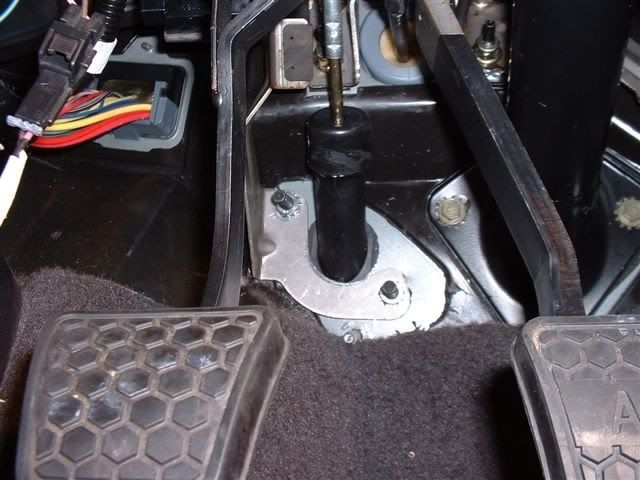
The center of the hole should be drilled 4 1/4" from the steering shaft and the top of the hole should be level with the top steering bolt. The hole saw needed here is 1 3/4. Of you notice here in the pic there is a stud that was used to hold the shift lock cable in the auto. it is fine with the stock master but if you choose to use a Tick m/c it needs to be removed. The m6 cars have a small plate tack welded the the firewall here where the mc goes for added support. MAKE SURE TO ADD A PLATE. If you just mount the mc to the a4 firewall it will flex and may cause issues bleeding and eventually crack the firewall. I simply made a brace plate out of 1/8" alum. next bolt up the m/c and reservoir of your choice.
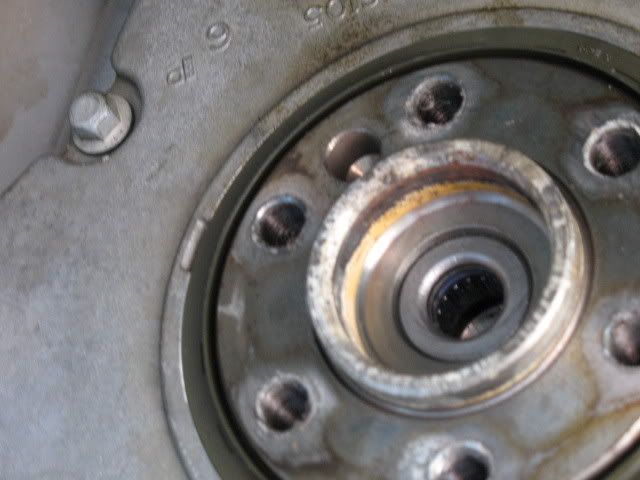
Ok, no beer breaks yet. Jack up the car as humanly possible and crawl underneath. Make sure the batt is disconnected and remove the starter. Now by turning the crankshaft find the 3 torque converter bolts on the flywheel and remove them. You are now ready to begin removing the 4l60e. Remove the bolts holding in the torque arm mount and driveshaft and transmission crossmember. With a jack supporting the transmission lower it so you can see the belhousing bolts and wire harness. Unplug the big wiring harness VSS and o2 connectors and set aside. Now get about 3ft of extensions and from behind the tranny remove the top bellhousing bolts working your way towards the bottom.
Once you're done here have a buddy hold the jack under the oil pan and both of you wiggle the tranny free with some effort it should come off. New move the flexplate bolts with an impact. YOU ARE NOW DONE DISASSEMBLING CRAP lol.
Get your new clutch assembly and pilot bearing... Tap it in with a socket or install tool and install the clutch and flywheel using the correct bolts. Next bolt the t56 bellhousing in place using the old bolts.
install your NEW GM style slave onto the transmission and move it under the car. Now the t56 frankly sucks to lift because its not flat so however you want to get it up there go ahead lol once its bolted to the bellhousing proceed to the next step.
Now that the tranny is bolted to the engine install the trans crossmember and reuse your auto trans mount. Also reinstall the torque arm using the new t56 mount. Bolt back up the driveshaft, exhaustand connect the master line to the slave routed out of the way of the exhaust. Now its time to get back into the car to finish things up.
Now that your back inside its time to do some wiring. Take the large plug that went into the auto shifter and cut the head completely off. Now the way to wire it is like this....This is not mine lol my connections were all heat shrunk and crimped lol. Before i continue I highly recommend going on ebay and ordering the pigtails connectors for the t56 reverse lights, and reverse lockout to make this all easier.
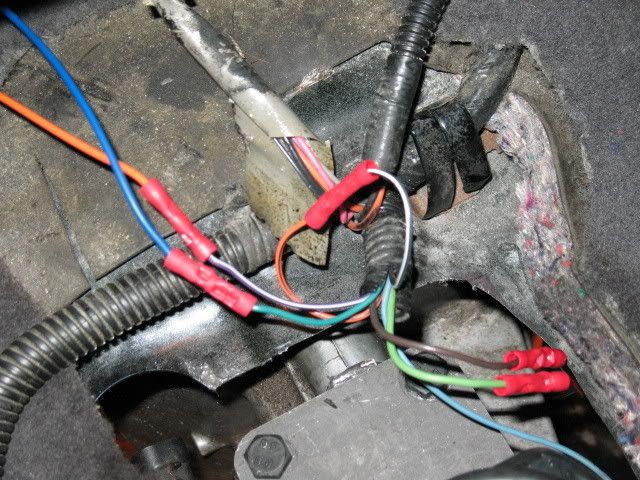
Connect the orange and black wires together to make the hatch release function. The green and brown wires go underneath the car to the reverse light socket on the t56 the polarity here does not matter. Next look at the green and purple wires these go to the switch on the clutch pedal to allow the car to start they are polarity sensitive so if you do not have the color coded harness on the pedal and have to make your own just try it both ways to see what works. Now your vss harness under the car may reach the t56 sensor but if no just extend it about 8-10" to reach i had to do this with mine. The hardest bit of wiring here is this and its not even that bad lol.
The reverse lockout solenoid allows you to enter reverse when the car is going below 3mph. Without it you will have to muscle and over power the solenoid to get into reverse. The way the pcm does this is by sending a constant 12v signal to the solenoid located on the shifter base and then momentarily grounds the solenoid when speed is <3 mph we need to replicate this to make it function correctly.
NOTE:wire color on pcm is for 99-02 cars only 98 is different.
Go under the car and find the auto harness plug now located the tan wire in the plug and cut it thjis is the TCC lockup wire which wont be used with the manual. Run a wire from the ground side of the reverse lockout solenoid to this wire. Now go up to the pcm and go to the red connector. Now remove the tan wire that is in pin 42 of the red connector and move it over to pin 44 which controls the reverse lockout feature. I'm not going into detail on how to repin things but youtube shows you how and the job should take only 10 mins... Now find a keyed 12v to supply the reverse lockout with power I simply tapped into the accessory charger on the lower console. Also if you want cruise control to work on 99-02 models then you will need to do this. Get you clutch pedal position switch and you will see 4 wires on it you will need to run a wire from the PCM to the switch it is pin 32 gray on the blue connector and will attach to the gray wire on the switch. I simply used the purple tcc lockup wire from the brake pedal since it won't be used then simply repinned it in the PCM. The black wire on the switch ground to the body of the car and then the other pin and brown wires get wired in series with the brake pedal cruise switch.
ON 98 CARS REVERSE LOCKOUT:
It will be very similar look at pin 42 on the red connector of your pcm this will be where you will need to connect the ground from the reverse lockout solenoid. Now the tcc control wire like above will be found in the blue connector on 98 cars on pin 32 you will find the same tan wire with a black tracer as above swap this into the pin 42 in the red connector. or you can also just run you're own new wire from the pcm to the trans. for the 12v source just follow above
WIRING IS DONE. Tape and ziptie all the other wires out of the way.
Install the shifter of your choice along with the rubber lower shift boot with self tapping screws and then reassemble the console just as you pulled it apart but with the new m6 shift plate and leather top boot. Next bleed the clutch and re assemble your interior panels and go drive your new m6 converted car! You will need the tune flashed to an m6 one to make the reverse lockout work as well as turnoff a bunch of ses lights and asr light if you have TCS.
]I did the m6 swap on my auto car and most of pics did get deleted but I figured I'd try to do a comprehensive writeup and use pica from other sources, if anyone doesnt want their pics up just send me a pm....also for some reason the pics are only showing up when logged in so login to view or maybe a mod can help.
Parts list....
Fbody/GTO T56 (gto t56 will need fbody shifter lever, shifter, and ls2 starter)
T56 crossmember
T56/T5 torque arm mount
T56/T5 manual pedals
T56 center console.
Clutch M/C with reservoir
Slave
Clutch assembly
Flywheel and clutch bolts
Lower rubber floor boot for 6 speed
I like to get the interior done first. So go into the car and unbolt the console. There are 2 10mm bolts under the armrest and 2 more in the very front of the console closest to the pedals. There are also 2 small 7mm screws that hold in the top shifter plate. Remove the small u-clip on the back of the shifter **** and pull it off.
You will now be looking at the auto shifter assembly... Unbolt the 10mm bolts that hold it in, unplug the small electrical harness on the side and disregard for now. The large pulg near the shifter will be used so dont destroy that. Next unhook the shifter cable and push it through the grommet underneathe the car. you will now be looking at this...
As you can see there are 6 rivet holes you will need to drill out and you will need to cut the autobrace from the back console brace as shown in the pic. Once this is all done you are now ready to cut the hole for the shifter. There are honestly no measurements for this I just did it by eye and the pics and just had to trim a little bit when I got the tranny in.
Once this is done you are now ready top swap the pedals and drill the hole for the M/C. First thing is to take off all the plastic covers on the pedals they are just held on with some small clips and screws. Once these are off you can now loosen the pedals, first unplug the brake and cruise switches and unscrew them out of their sockets. Next remove the 6 (i think) 13mm bolts on the pedals and rotate them in a counter clockwise motion over the steering column to remove, there is no easy way to do this it just takes finese lol. Install the new manual pedals in reverse order and reinstall the switches and bolts. you will now notice you have a perfect template for the mc hole....
The center of the hole should be drilled 4 1/4" from the steering shaft and the top of the hole should be level with the top steering bolt. The hole saw needed here is 1 3/4. Of you notice here in the pic there is a stud that was used to hold the shift lock cable in the auto. it is fine with the stock master but if you choose to use a Tick m/c it needs to be removed. The m6 cars have a small plate tack welded the the firewall here where the mc goes for added support. MAKE SURE TO ADD A PLATE. If you just mount the mc to the a4 firewall it will flex and may cause issues bleeding and eventually crack the firewall. I simply made a brace plate out of 1/8" alum. next bolt up the m/c and reservoir of your choice.
Ok, no beer breaks yet. Jack up the car as humanly possible and crawl underneath. Make sure the batt is disconnected and remove the starter. Now by turning the crankshaft find the 3 torque converter bolts on the flywheel and remove them. You are now ready to begin removing the 4l60e. Remove the bolts holding in the torque arm mount and driveshaft and transmission crossmember. With a jack supporting the transmission lower it so you can see the belhousing bolts and wire harness. Unplug the big wiring harness VSS and o2 connectors and set aside. Now get about 3ft of extensions and from behind the tranny remove the top bellhousing bolts working your way towards the bottom.
Once you're done here have a buddy hold the jack under the oil pan and both of you wiggle the tranny free with some effort it should come off. New move the flexplate bolts with an impact. YOU ARE NOW DONE DISASSEMBLING CRAP lol.
Get your new clutch assembly and pilot bearing... Tap it in with a socket or install tool and install the clutch and flywheel using the correct bolts. Next bolt the t56 bellhousing in place using the old bolts.
install your NEW GM style slave onto the transmission and move it under the car. Now the t56 frankly sucks to lift because its not flat so however you want to get it up there go ahead lol once its bolted to the bellhousing proceed to the next step.
Now that the tranny is bolted to the engine install the trans crossmember and reuse your auto trans mount. Also reinstall the torque arm using the new t56 mount. Bolt back up the driveshaft, exhaustand connect the master line to the slave routed out of the way of the exhaust. Now its time to get back into the car to finish things up.
Now that your back inside its time to do some wiring. Take the large plug that went into the auto shifter and cut the head completely off. Now the way to wire it is like this....This is not mine lol my connections were all heat shrunk and crimped lol. Before i continue I highly recommend going on ebay and ordering the pigtails connectors for the t56 reverse lights, and reverse lockout to make this all easier.
Connect the orange and black wires together to make the hatch release function. The green and brown wires go underneath the car to the reverse light socket on the t56 the polarity here does not matter. Next look at the green and purple wires these go to the switch on the clutch pedal to allow the car to start they are polarity sensitive so if you do not have the color coded harness on the pedal and have to make your own just try it both ways to see what works. Now your vss harness under the car may reach the t56 sensor but if no just extend it about 8-10" to reach i had to do this with mine. The hardest bit of wiring here is this and its not even that bad lol.
The reverse lockout solenoid allows you to enter reverse when the car is going below 3mph. Without it you will have to muscle and over power the solenoid to get into reverse. The way the pcm does this is by sending a constant 12v signal to the solenoid located on the shifter base and then momentarily grounds the solenoid when speed is <3 mph we need to replicate this to make it function correctly.
NOTE:wire color on pcm is for 99-02 cars only 98 is different.
Go under the car and find the auto harness plug now located the tan wire in the plug and cut it thjis is the TCC lockup wire which wont be used with the manual. Run a wire from the ground side of the reverse lockout solenoid to this wire. Now go up to the pcm and go to the red connector. Now remove the tan wire that is in pin 42 of the red connector and move it over to pin 44 which controls the reverse lockout feature. I'm not going into detail on how to repin things but youtube shows you how and the job should take only 10 mins... Now find a keyed 12v to supply the reverse lockout with power I simply tapped into the accessory charger on the lower console. Also if you want cruise control to work on 99-02 models then you will need to do this. Get you clutch pedal position switch and you will see 4 wires on it you will need to run a wire from the PCM to the switch it is pin 32 gray on the blue connector and will attach to the gray wire on the switch. I simply used the purple tcc lockup wire from the brake pedal since it won't be used then simply repinned it in the PCM. The black wire on the switch ground to the body of the car and then the other pin and brown wires get wired in series with the brake pedal cruise switch.
ON 98 CARS REVERSE LOCKOUT:
It will be very similar look at pin 42 on the red connector of your pcm this will be where you will need to connect the ground from the reverse lockout solenoid. Now the tcc control wire like above will be found in the blue connector on 98 cars on pin 32 you will find the same tan wire with a black tracer as above swap this into the pin 42 in the red connector. or you can also just run you're own new wire from the pcm to the trans. for the 12v source just follow above
WIRING IS DONE. Tape and ziptie all the other wires out of the way.
Install the shifter of your choice along with the rubber lower shift boot with self tapping screws and then reassemble the console just as you pulled it apart but with the new m6 shift plate and leather top boot. Next bleed the clutch and re assemble your interior panels and go drive your new m6 converted car! You will need the tune flashed to an m6 one to make the reverse lockout work as well as turnoff a bunch of ses lights and asr light if you have TCS.
Last edited by redbird555; May 9, 2013 at 02:10 PM.
Thread Starter
TECH Veteran
iTrader: (14)
Joined: Mar 2009
Posts: 4,444
Likes: 9
From: Pompano Beach FL
thanks guys. the swap really wasnt that bad I DID NOT have a lift. this was all done on jack stands in my garage I started on a friday afternoon and drove the car wed while working 8 hour days mon-tues so its not too hard just pay attention to the details to make sure its done right
Trending Topics
There are measurements for cutting the shifter hole.. 7.25 inches long, 6.5 inches wide. From the back of the engine block (measured from the top of the crank), the hole starts approximately 25 inches from it.
Read more: http://www.gmhightechperformance.com...p/viewall.html
More..
http://www.google.com/url?sa=t&rct=j...41934586,d.b2U
Read more: http://www.gmhightechperformance.com...p/viewall.html
More..
http://www.google.com/url?sa=t&rct=j...41934586,d.b2U
LS1 Tech Stories
The Best V8 Stories One Small Block at Time

Topdon ONE vs. Artidiag 800 BT2: Which is the Diagnostic Tablet For You?
Pouria Savadkouei
Gas Monkey Built a 6-Wheel Ferrari Testarossa With a Corvette LT4 Engine
Verdad Gallardo
7 Most Reliable High-Performance Engines GM Has Ever Built
Verdad Gallardo
Amazing '71 Camaro Restomod Is Modern Muscle Car Under the Skin
Verdad Gallardo
6 Common C5 Corvette Failures and What's Involved In Repairing Them
Pouria Savadkouei
Retro Modern Bandit Pontiac Trans AM Comes With Burt Reynolds' Autograph
Verdad Gallardo
Top 10 Greatest Cadillac V Series Performance Models Ever, Ranked
Pouria Savadkouei
Top 10 Most Powerful Chevy Trucks Ever Made!

Hennessey's New Supercharged Silverado ZR2 Has 700 HP
Verdad Gallardo Don't wire the hatch release like that. Doing it like that will allow the hatch to open while the car is moving. Instead, splice the orange/black wire into the e-brake handle wire. This makes it so the hatch can only open when the e-brake is engaged. The black wire can be tucked out of sight, it's just a ground.
Thread Starter
TECH Veteran
iTrader: (14)
Joined: Mar 2009
Posts: 4,444
Likes: 9
From: Pompano Beach FL
I've been getting a lot of questions regarding how to make cruise control function on 99-up cars with an m6 tune and the 4 wire clutch position switch so heres how I did it and it works like factory..... I really wish the mods would make this a sticky since its really the only complete writeup but anyway.
If you look at the gm 4 wire clutch pedal switch you will see the following.
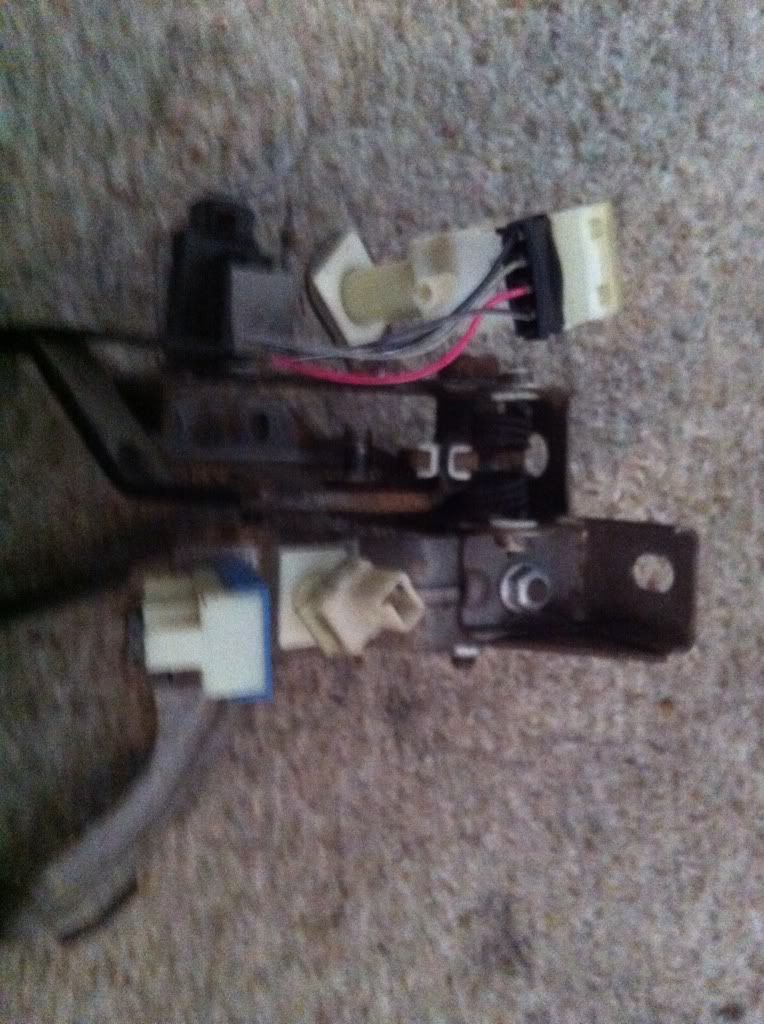
Now turn your attention to the pink and brown wires first. These will get wired in series with the same colored wires coming off the brake pedal. Meaning the pink on the clutch will go with the black on the brake and vice versa, all feeding into the plug that goes into the body harness. This now ensures that when either the brake or clutch goes in the cruise will shut off....Now onto the other wires the black is just a ground so ground it on the body wherever you wish, now for the gray wire.
On 99-up cars the pcm looks for this wire signal when the car is running without it the pcm will not allow cruise to function which is why many people have issues. If you look over to the brake pedal switch you will see a purple wire. This wire used to be the torque converter lockup cutoff for when you pushed in the brake.
If you go to the pcm you will notice that in pin 33 of the blue connector you will see the same purple wire. Now look one pin over at 32, this is where the pcm looks for the clutch signal on the m6 tune so simply repin the wire one spot over to 32.
Once this is done go back in the car and cut the wire from the brake and extend it over to the clutch gray wire.... Once this is done you will have cruise control functioning just like a factory m6 car.
FOR 98 CARS ONLY
The cruise control on a 98 should work without any modification. It doesnt use the pcm to control cruise on the clutch. If you look at your pedal setup you should see the cruise controla and brake switch mounted on your brake pedal. From it you will see a small harness with a pink and brown wire in it. Over you your clutch pedal you will either have or need to get a 93-98 cruise switch that has the same 2 wire plug simply wire these in series like in my thread and your cruise should work.
For reverse lockout again just follow my thread but with a couple alterations. You will still need a constant 12v key on source so find that. Then go to pin 33 on the blue pcm connector which should be a brown wire and switch it with pin 42 in the red connector. Once this isdone go underneath to the auto harness and find the same brown wire, cut it and wire it into the other side of the reverse lockout.... You could in theory also use the old 1-2 shift solenoid wire in the red connector pin 35 which is light green and put it in the red 42pin if it makes the wiring easier seeing as it will be in the same "bank" of wires rather than switching one from the blue to the red.
If you look at the gm 4 wire clutch pedal switch you will see the following.
Now turn your attention to the pink and brown wires first. These will get wired in series with the same colored wires coming off the brake pedal. Meaning the pink on the clutch will go with the black on the brake and vice versa, all feeding into the plug that goes into the body harness. This now ensures that when either the brake or clutch goes in the cruise will shut off....Now onto the other wires the black is just a ground so ground it on the body wherever you wish, now for the gray wire.
On 99-up cars the pcm looks for this wire signal when the car is running without it the pcm will not allow cruise to function which is why many people have issues. If you look over to the brake pedal switch you will see a purple wire. This wire used to be the torque converter lockup cutoff for when you pushed in the brake.
If you go to the pcm you will notice that in pin 33 of the blue connector you will see the same purple wire. Now look one pin over at 32, this is where the pcm looks for the clutch signal on the m6 tune so simply repin the wire one spot over to 32.
Once this is done go back in the car and cut the wire from the brake and extend it over to the clutch gray wire.... Once this is done you will have cruise control functioning just like a factory m6 car.
FOR 98 CARS ONLY
The cruise control on a 98 should work without any modification. It doesnt use the pcm to control cruise on the clutch. If you look at your pedal setup you should see the cruise controla and brake switch mounted on your brake pedal. From it you will see a small harness with a pink and brown wire in it. Over you your clutch pedal you will either have or need to get a 93-98 cruise switch that has the same 2 wire plug simply wire these in series like in my thread and your cruise should work.
For reverse lockout again just follow my thread but with a couple alterations. You will still need a constant 12v key on source so find that. Then go to pin 33 on the blue pcm connector which should be a brown wire and switch it with pin 42 in the red connector. Once this isdone go underneath to the auto harness and find the same brown wire, cut it and wire it into the other side of the reverse lockout.... You could in theory also use the old 1-2 shift solenoid wire in the red connector pin 35 which is light green and put it in the red 42pin if it makes the wiring easier seeing as it will be in the same "bank" of wires rather than switching one from the blue to the red.
Last edited by redbird555; May 9, 2013 at 07:16 AM.
Thread Starter
TECH Veteran
iTrader: (14)
Joined: Mar 2009
Posts: 4,444
Likes: 9
From: Pompano Beach FL
Yes you will need an m6 segment swap to make it all work. If you just had a tune a tuner should do it for practically nothing since it just involves a little laptop time
Great thread, bump for finally getting the answer on reverse lock out and if it was needed or not. Now I'm just waiting for one more pigtail to complete wiring.
I've got cruise control wired up in series, and I'm going to wire up the lockout using the 1-2 Shift Solenoid (Pin 35) and move it to Pin 42. That route seems more straight forward being that they are on the same connector.
Hopefully I'll have her running again next weekend!
Hopefully I'll have her running again next weekend!