


Painting for dummies need help

Thread Starter
10 Second Club

Joined: Jan 2010
Posts: 2,317
Likes: 20
From: Hurley, VA
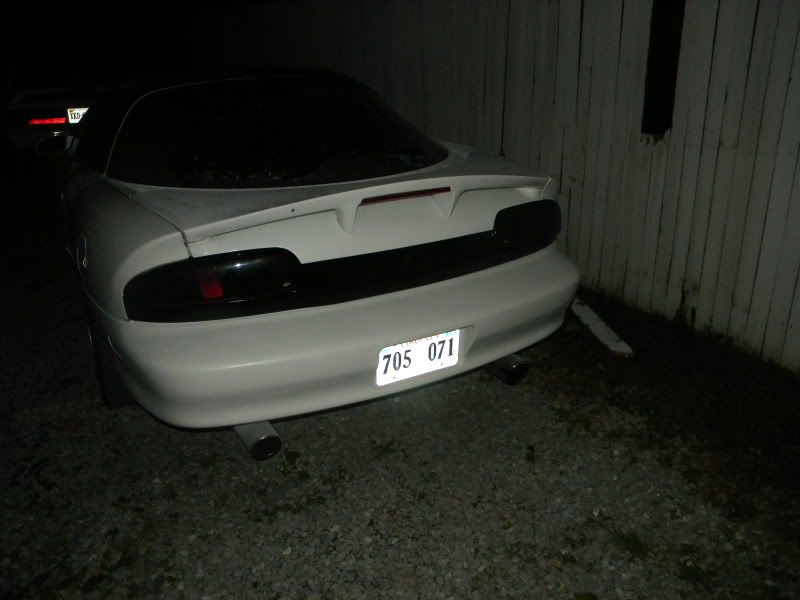
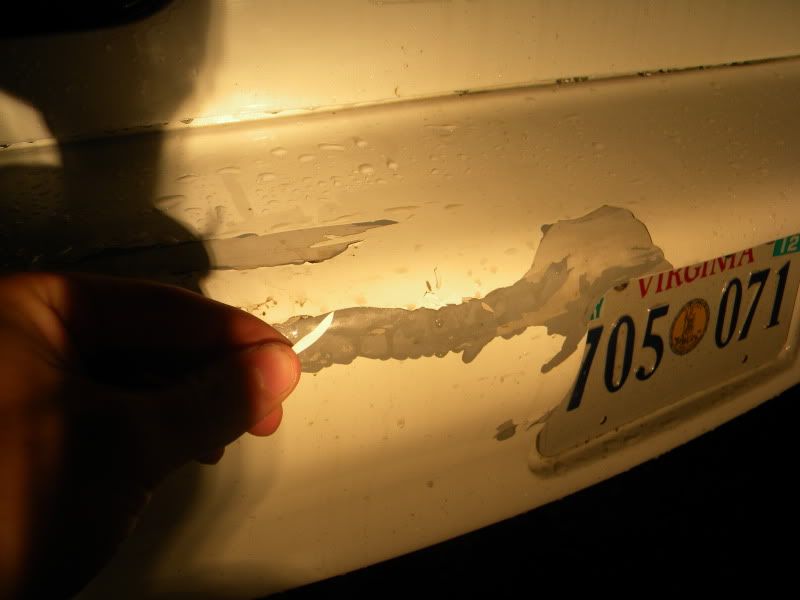
My car was tapped in the back before I bought the car, the hole car needs painted but this is the only major problem. So I wanted to try to paint it myself. I did the ceta mod by instructions found on here. So in a nutshell could someone give me a run down of what I'd need to do to fix this. The main question is what grits of sand paper do i need to start and progress to. Where would the paint code be? you can see in the pic the paint is just flaking off. Thanks
strip the whole bumper,start with 80 on a DA,then go back over with 180 DA, then prime 2-4 coats(flexable primer)sand with 320 to knock the top off,then 500 wet till its nice n smooth.then paint.your paint code is on a sticker on your door at the bottom of the sticker there is either/or a U or WA followed by a number if yours is white it could be 8624
800 grit then paint.. make sure you use a block or a sanding sponge, do not use your fingers.. also, try sanding with a warm soapy solution from a 5 gal bucket and rinsing final with garden hose... wipe off with mineral spirits and then tack cloth... pay attention to the colors around the edges, there should be a light gray for the material the bumper is made of, then a sealer which should be a dark gray then your primer and color.. both could be white ish but will most likely be gray.. stick with the same primer/basecoat colors, that will give you the best chance of matching everything else.. if you put white paint over a black primer, it will come out dull white/almost gray.. i can post some pics tomorrow of what i am talking about.. i did the same thing on my red WS6..
Thread Starter
10 Second Club
Joined: Jan 2010
Posts: 2,317
Likes: 20
From: Hurley, VA
I took an electric sander with 80 grit all over it. Then 220 because i didn't have any 180 on the electric sander. Primered it. then I took a 320 sanding sponge to it followed by some 400 grit and then some 1000. from 320 up was all wet with a block. Then whipped it all off and sprayed it. I still haven't cleared coated it yet. You can tell i had not the slightest idea what i was doing it has small lines in places but you have to get right up on it to tell. It turned out alot better than i thought it would. I'll take some more pics of up close and post in the morning I"m at work now. And by lines i guess its like high spots where it wasn't sanded as much in places as others. Thanks
I took an electric sander with 80 grit all over it. Then 220 because i didn't have any 180 on the electric sander. Primered it. then I took a 320 sanding sponge to it followed by some 400 grit and then some 1000. from 320 up was all wet with a block. Then whipped it all off and sprayed it. I still haven't cleared coated it yet. You can tell i had not the slightest idea what i was doing it has small lines in places but you have to get right up on it to tell. It turned out alot better than i thought it would. I'll take some more pics of up close and post in the morning I"m at work now. And by lines i guess its like high spots where it wasn't sanded as much in places as others. Thanks
Trending Topics
Thread Starter
10 Second Club
Joined: Jan 2010
Posts: 2,317
Likes: 20
From: Hurley, VA
I'm more than satisfied with it. It turned out alot better than I thought it was going to. The only real thing about it is that it isn't as shiny as the other paint but I haven't cleared it yet. If the cleare didn't help anything I'm more than happy with it. I just wanted the big busted spots gone. I appreciate the help. I"ll post pics in the morning.
LS1 Tech Stories
The Best V8 Stories One Small Block at Time

Topdon ONE vs. Artidiag 800 BT2: Which is the Diagnostic Tablet For You?
Pouria Savadkouei
Gas Monkey Built a 6-Wheel Ferrari Testarossa With a Corvette LT4 Engine
Verdad Gallardo
7 Most Reliable High-Performance Engines GM Has Ever Built
Verdad Gallardo
Amazing '71 Camaro Restomod Is Modern Muscle Car Under the Skin
Verdad Gallardo
6 Common C5 Corvette Failures and What's Involved In Repairing Them
Pouria Savadkouei
Retro Modern Bandit Pontiac Trans AM Comes With Burt Reynolds' Autograph
Verdad Gallardo
Top 10 Greatest Cadillac V Series Performance Models Ever, Ranked
Pouria Savadkouei
Top 10 Most Powerful Chevy Trucks Ever Made!

Hennessey's New Supercharged Silverado ZR2 Has 700 HP
Verdad Gallardo hell yeah,make sure you have good light when you clear it,white is HARD to see when clearing. 2-3 coats is all youll need.never hurts to try something you havent done n learn something.