





Custom Hood Mods

Thread Starter
Joined: Sep 2004
Posts: 6,814
Likes: 3
From: Hou. TX.

Originally Posted by JasonWW
About the license plate, I've got some Constable friends and they said it was fine. I haven't had any warnings or anything either. Still, I went 3 years with no front plate at all with no trouble, so your mileage my vary.
BTW, I'm trying to rig up some kind of light to make the plates glow at night. I have an LED flashlight that makes it glow real nice if the light bounces off of it at a 180* angle. Or else I may try and paint over the white areas with a clear UV paint and then attach a black light over head.
Oh yea, I did modify it a little since that picture was taken. On a few driveways it would scrape and you could hear the metal, so I decided to trim 3/8" off the entire bottom to keep it from scraping and then put a 1/4 notch where the plate goes to raise it a little highier. Now the scoop does not scrape and when it does the metal plate does not contact the ground, only the plastic.
BTW, I'm trying to rig up some kind of light to make the plates glow at night. I have an LED flashlight that makes it glow real nice if the light bounces off of it at a 180* angle. Or else I may try and paint over the white areas with a clear UV paint and then attach a black light over head.
Oh yea, I did modify it a little since that picture was taken. On a few driveways it would scrape and you could hear the metal, so I decided to trim 3/8" off the entire bottom to keep it from scraping and then put a 1/4 notch where the plate goes to raise it a little highier. Now the scoop does not scrape and when it does the metal plate does not contact the ground, only the plastic.
Thread Starter
Joined: Sep 2004
Posts: 6,814
Likes: 3
From: Hou. TX.
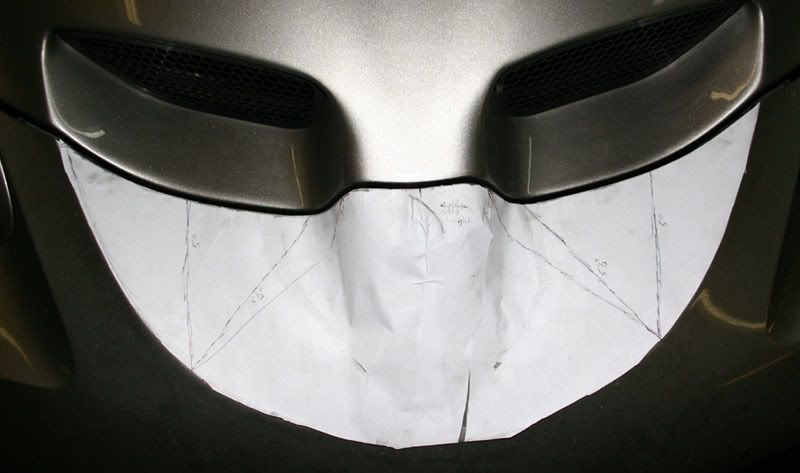
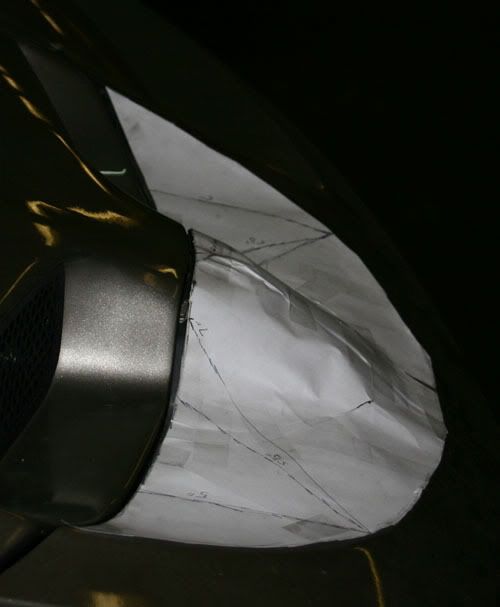
I also FINALLY got my hands on a firehawk to make a template from. Just cut up some paper and taped it together to get the shape and then an hour later, viola! It was a lot of work making it with too many little details so I won't bore you with that. If you need to cut a bumper cover, I'll just mail you my template. Save you a lot of work.
I also picked up a damaged front bumper cover for 25 bucks at the local salvage yard to practice cutting on. I should be able to slap the template on, mark the cut lines and then slice that bad boy up.
Once that's done I'll fit the hood and figure out how far to extend the front to match up. I think I'll actually extend it too far and then just carefully cut the hood to fit the bumper cover, just in case.
Does anyone know how to remove paint from a fiberglass hood without damaging the gel coat and without sanding all day long? I think it would be wise to remove the white in front and on top as my car is black and I imagine every little rock chip would show up as a white spec.
I also picked up a damaged front bumper cover for 25 bucks at the local salvage yard to practice cutting on. I should be able to slap the template on, mark the cut lines and then slice that bad boy up.
Once that's done I'll fit the hood and figure out how far to extend the front to match up. I think I'll actually extend it too far and then just carefully cut the hood to fit the bumper cover, just in case.
Does anyone know how to remove paint from a fiberglass hood without damaging the gel coat and without sanding all day long? I think it would be wise to remove the white in front and on top as my car is black and I imagine every little rock chip would show up as a white spec.
Last edited by JasonWW; Oct 28, 2006 at 03:03 PM.
Thread Starter
Joined: Sep 2004
Posts: 6,814
Likes: 3
From: Hou. TX.
Another note.
For those wnating to cut the front bumper cover to fit a Firehawk hood you are better off just using the hood as a template as it will be more accurate that the one I have made.
Attach the hood and line it up then let it lay on the stock bumper cover like in the picture. Then draw a line and trim it conservatively. Cut a little and close the hood to check, then cut a little more until it is just right.
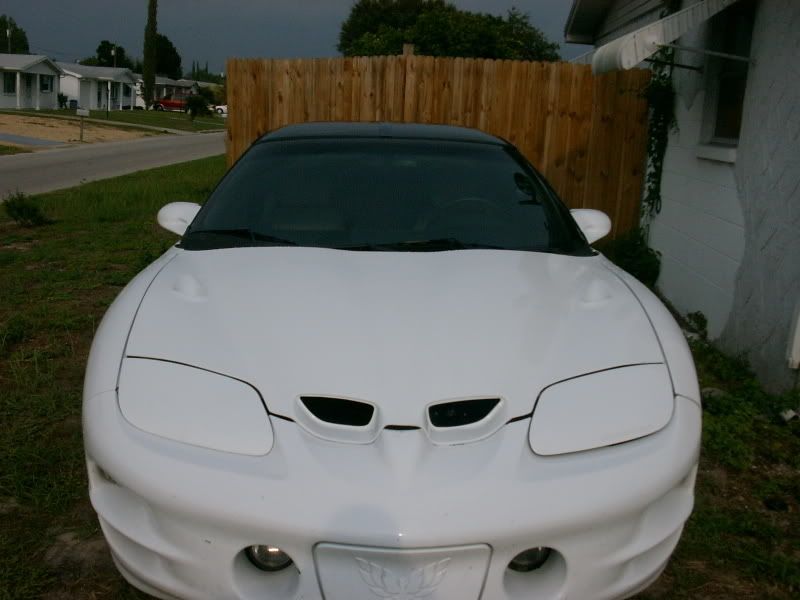
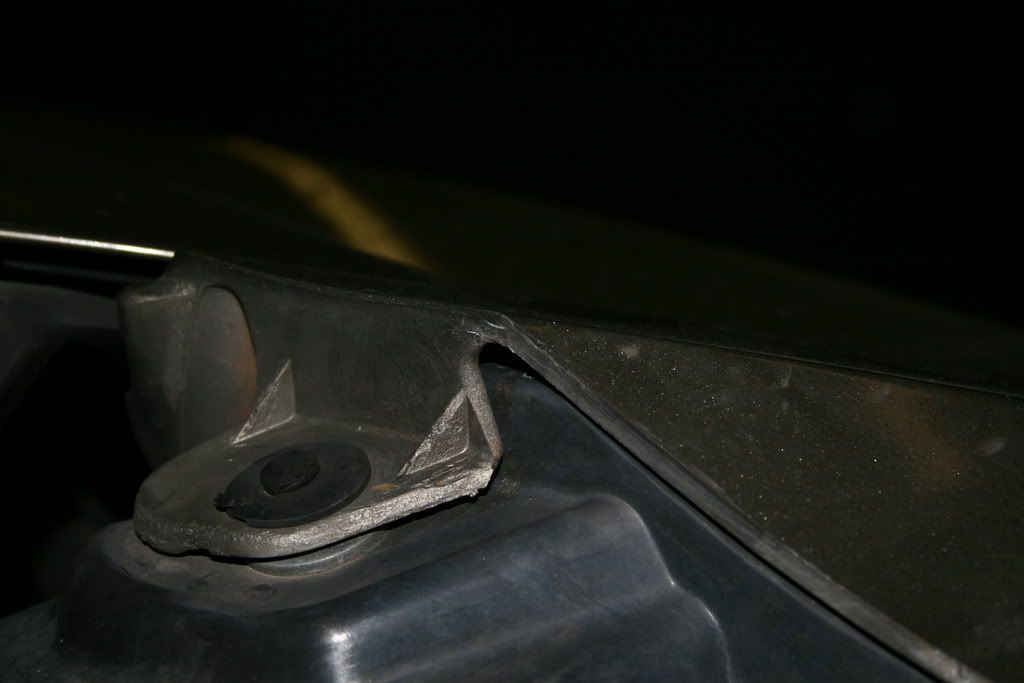
Make sure your hood is lined up properly at the rear and sides. I also noticed that the Firehawk used shims on the 2 outer mounting tabs around the nose. The center tab did not have a shim. My regular TA also did not have the shims. So keep in mind you may need to shim the cover. The attached pic is of the shim.
For those wnating to cut the front bumper cover to fit a Firehawk hood you are better off just using the hood as a template as it will be more accurate that the one I have made.
Attach the hood and line it up then let it lay on the stock bumper cover like in the picture. Then draw a line and trim it conservatively. Cut a little and close the hood to check, then cut a little more until it is just right.
Make sure your hood is lined up properly at the rear and sides. I also noticed that the Firehawk used shims on the 2 outer mounting tabs around the nose. The center tab did not have a shim. My regular TA also did not have the shims. So keep in mind you may need to shim the cover. The attached pic is of the shim.
Thread Starter
Joined: Sep 2004
Posts: 6,814
Likes: 3
From: Hou. TX.
I tried a few different techniques to cut the polyurethane bumper.
Do you have a dremel or a clone tool? I'd get one as they are handy for all kinds of things. Make sure you get a variable speed unit.
It seems the thin cutting discs work well.

The thicker cutting discs are good also, but generate more heat.
Heat is going to be a big deal as well as dust. Cut a little and let it cool off so you don't burn the paint. Or wipe the cut area with a damp rag to remove the dust and cool it.
The small, metal toothed cutter #199 does a good job as well, but also generates a lot of heat.

http://www.dremel.com/en-us/attachme...=66237&I=66279
I would mark the cut line very conservatively so you don't take too much off. Then tape some cardboard over the good side to protect the paint from accidental slips with the cutting tool. The edge of the cuts can be finished with a razorblade. The razorblade works well cutting slivers, but not big chunks.
Don't cut any behind the new Firehawk emblem. It seems like you need to trim there when the hood is about an 1/2 inch up, but once the hood is all the way down that gap opens up. Just cut the two flaps on either side first so you can get the hood all the way down, then fine tune the gap size.
PS, I've also decided to go with a straight black paint job. Nothing real fancy. I'll add vinyl blackbird strips later on if I want to.
Do you have a dremel or a clone tool? I'd get one as they are handy for all kinds of things. Make sure you get a variable speed unit.
It seems the thin cutting discs work well.
The thicker cutting discs are good also, but generate more heat.
Heat is going to be a big deal as well as dust. Cut a little and let it cool off so you don't burn the paint. Or wipe the cut area with a damp rag to remove the dust and cool it.
The small, metal toothed cutter #199 does a good job as well, but also generates a lot of heat.
http://www.dremel.com/en-us/attachme...=66237&I=66279
I would mark the cut line very conservatively so you don't take too much off. Then tape some cardboard over the good side to protect the paint from accidental slips with the cutting tool. The edge of the cuts can be finished with a razorblade. The razorblade works well cutting slivers, but not big chunks.
Don't cut any behind the new Firehawk emblem. It seems like you need to trim there when the hood is about an 1/2 inch up, but once the hood is all the way down that gap opens up. Just cut the two flaps on either side first so you can get the hood all the way down, then fine tune the gap size.
PS, I've also decided to go with a straight black paint job. Nothing real fancy. I'll add vinyl blackbird strips later on if I want to.
LS1 Tech Stories
The Best V8 Stories One Small Block at Time

Gas Monkey Built a 6-Wheel Ferrari Testarossa With a Corvette LT4 Engine
Verdad Gallardo
7 Most Reliable High-Performance Engines GM Has Ever Built
Verdad Gallardo
Amazing '71 Camaro Restomod Is Modern Muscle Car Under the Skin
Verdad Gallardo
6 Common C5 Corvette Failures and What's Involved In Repairing Them
Pouria Savadkouei
Retro Modern Bandit Pontiac Trans AM Comes With Burt Reynolds' Autograph
Verdad Gallardo
Top 10 Greatest Cadillac V Series Performance Models Ever, Ranked
Pouria Savadkouei
Top 10 Most Powerful Chevy Trucks Ever Made!

Hennessey's New Supercharged Silverado ZR2 Has 700 HP
Verdad Gallardo
Coachbuilt N2A Anteros Is an LS2-Powered C6 Corvette In Italian Clothes
Verdad Gallardo Thread Starter
Joined: Sep 2004
Posts: 6,814
Likes: 3
From: Hou. TX.
Originally Posted by JasonWW
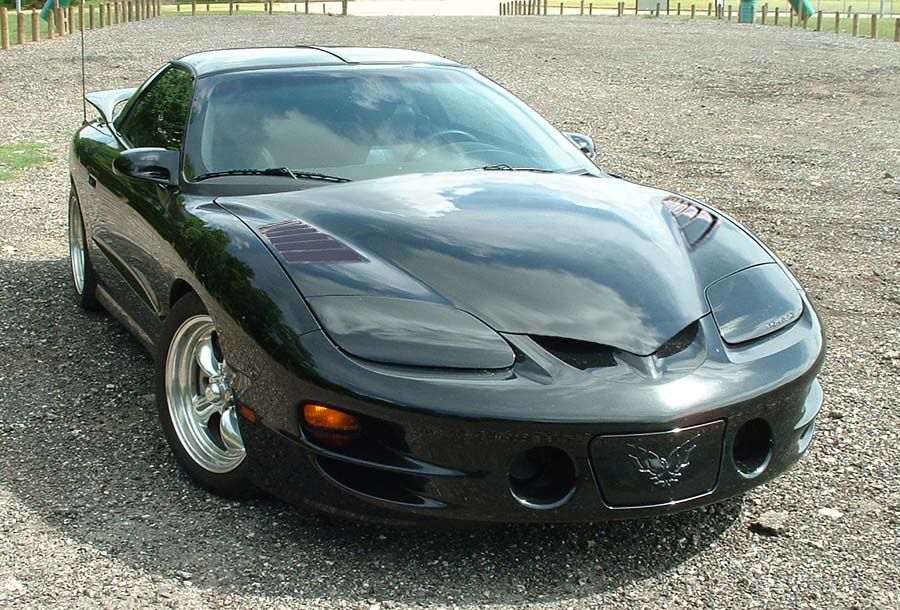
I still want to do something with the center of the hood plus I want a unique air intake system. So I could kill 2 birds with one stone (actually more) by making a airbox on top of the intake manifold and have a polished aluminum tube do a 180* from the throttle body straight up and over itself and go into the airbox. The airbox could hold a filter and get it's air from the cowl area. It would also cover the plain black intake and fuel rails and I can relocate the coil packs in there as well as the MAF. This would leave the valve covers exposed so they can be polished or painted. It should be a very clean look. Then I can make a hood bulge to get clearance for the tubing and airbox.
I need to do a mockup in Photoshop, but I think it would look good. Here is a similar hood scoop. The front pointy part (like a dagger) would be for the tubing clearance and it goes with the pointy hood. Then it will get wide for the airbox, but won't have the scoop in the front. It will have the back side open for air to come in, though.


I doubt I would paint it another color, but that option is open.
Last edited by JasonWW; Aug 11, 2007 at 01:40 AM.

I think that the car would look badass with filled in nose and either the corvette stinger (like posted above), or a nice cowl hood (like the vfn one, not the square one's). I've seen both on an LT1 TA and it looked pretty sweet. If nothing else, the shaker on the ''heritage firebird'' would look badass too. Good luck, and keep us updated cause it be doing a project like this soon if my lady buys a TA.
Thread Starter
Joined: Sep 2004
Posts: 6,814
Likes: 3
From: Hou. TX.
Originally Posted by Marz
The filled nose does look nice... would like to see it with a ram air hood on top

The stinger hood would look good on that car....I'm also trying to come up with a air induction box for mine..I was looking at the camaro ss airbox that sits on the intake and maybe tweekin it abit to fit up in mine.
Thread Starter
Joined: Sep 2004
Posts: 6,814
Likes: 3
From: Hou. TX.
Originally Posted by Pony_Killer
The stinger hood would look good on that car....I'm also trying to come up with a air induction box for mine..I was looking at the camaro ss airbox that sits on the intake and maybe tweekin it abit to fit up in mine.
I wouldn't mind using a scoop of some sort, but it would only look right if it were past the halfway mark of the hood. Since the MAF and TB are at the halfway point you would have to divert the air 180* and then another 180*. There is not room for a single tube.
It may be possible to have the scoop go straight into the MAF near the cowl and then split into 2 small tubes and snake around to the TB. That might look cool. Oops, forgot about a air cleaner. I just want to get rid of the stock airbox design every car has.

Originally Posted by JasonWW
The camaro doesn't use any special airbox. Do you mean the hood air intake? There are passages in the hood that split the air left and right to channel it to the front, around the air inlet, so it can enter the airbox.
Thread Starter
Joined: Sep 2004
Posts: 6,814
Likes: 3
From: Hou. TX.
Originally Posted by Phoenix 5.7
the 97 SS has an air box that sits on top of the intake manifold. look into it, probably will work on an LS1

I see it was on the 96 SS as well. Weren't the 96 and 97 SS cars made by SLP? I'm guessing this air filter setup was something they added.
I know it won't just bolt on a LS1 car due to the different TB shapes. It may be modified to fit though. I'm really going to look into this. I might be able to utilize the filter box and have a nice custom polished aluminum tube route the air back around to the front. It looks like the fuel rail, coils and power steering reservoir are going to be in the way. Either that, or it's going to be a real tight fit. It's possible that the stinger looking hood scoop may privide extra room for the tube to swing around back to the front, but I'll have to do a lot more research into it. I'm sure the MAF could be mounted in the rear to get rid of it and clean up the look. With my EGR gone there may be more room on the passenger side for the tube. Or. if I could get the MAF way in the back, I could split it into 2 smaller diameter tubes and have them snake around on both sides. That may look real cool.
Thanks for the info.
Thread Starter
Joined: Sep 2004
Posts: 6,814
Likes: 3
From: Hou. TX.
Well guys, After living with the raptor for a while, I kind of don't like it. 
I think I'm going to sell it and use a stock hood. I have a few different ideas I want to mix together.
First is I want to add the side vents from this picture.
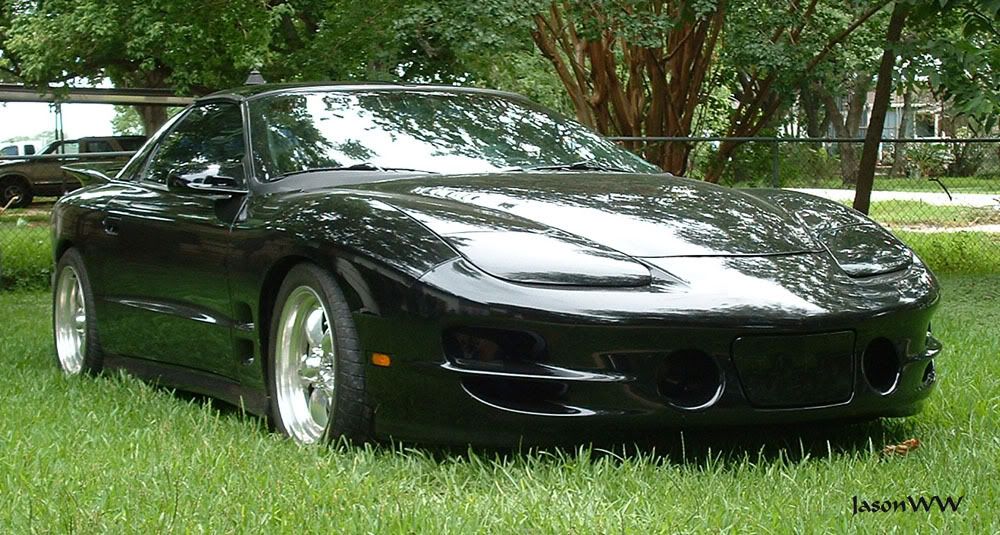
Then fill in the nose like in this pic:
And finally, swap on this custom front end design:
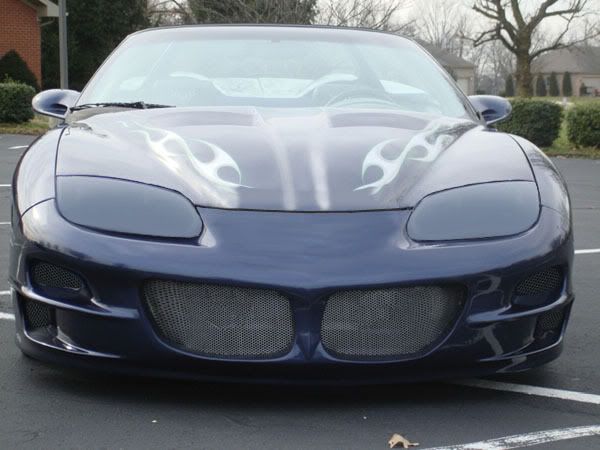
I guess I need to make a picture of all 3 mods together, but I don't have time right now.
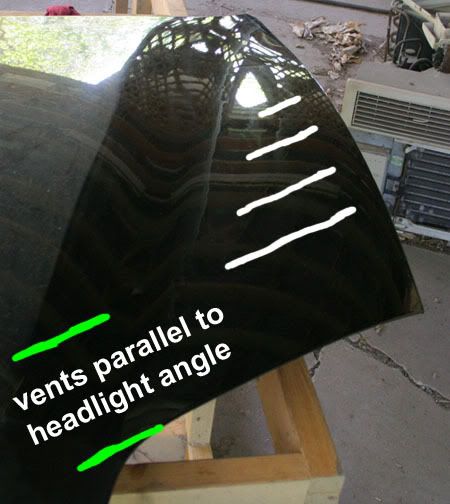
Now my first question for you guys where I should start the first and last vent. Right behind the headlight is a hood adjustor stud, so I'll have to start further up like in the picture.
I think I'm going to sell it and use a stock hood. I have a few different ideas I want to mix together.
First is I want to add the side vents from this picture.
Then fill in the nose like in this pic:
And finally, swap on this custom front end design:
I guess I need to make a picture of all 3 mods together, but I don't have time right now.
Now my first question for you guys where I should start the first and last vent. Right behind the headlight is a hood adjustor stud, so I'll have to start further up like in the picture.
Thread Starter
Joined: Sep 2004
Posts: 6,814
Likes: 3
From: Hou. TX.
I went ahead and cut off as much of the rear support metal as I could leaving room for the hinges and the strut mount.
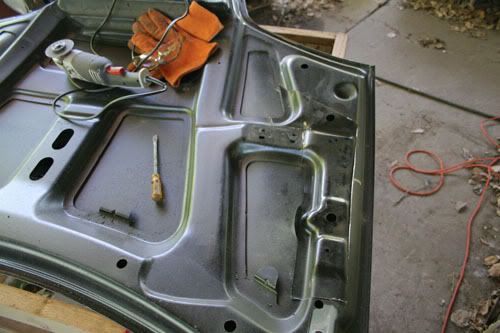
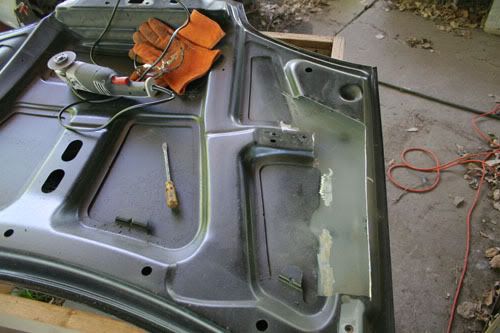
You have to be careful prying away the glue bonding the piece together. You don't want to dent the outer shell or cut through it!
You have to be careful prying away the glue bonding the piece together. You don't want to dent the outer shell or cut through it!
Thread Starter
Joined: Sep 2004
Posts: 6,814
Likes: 3
From: Hou. TX.
The white lines are the slices in the metal. I want to carefully lay a round wooden rod near the center of each one and tap the rear side down. This will create the difference in height to allow the hot air to escape. It will leave a crease on the backside of each vent. I think it would look best if I line up the creases even though it will be at an odd angle to the actual cut.
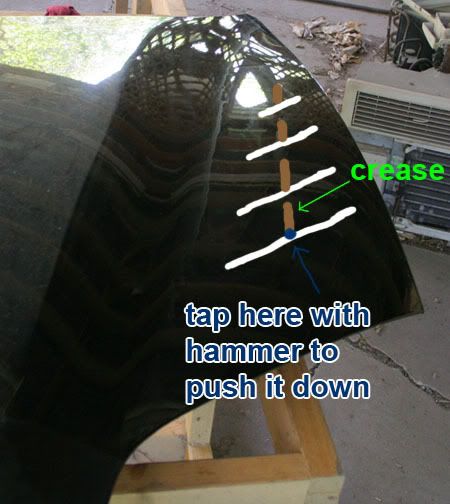
Think it will work?
I'm really not sure how far the crease will extend rearward. I want the opening big enough to let air out, but if the crease goes too far back it will reduce the number of total vents. I'd like at least 4-5 vents on each side.
Think it will work?
I'm really not sure how far the crease will extend rearward. I want the opening big enough to let air out, but if the crease goes too far back it will reduce the number of total vents. I'd like at least 4-5 vents on each side.