
Painted my Intake
 05-04-2007, 09:22 AM
#1
TECH Fanatic
Thread Starter
iTrader: (3)
Join Date: Jun 2004
Location: Dayton, OH
Posts: 1,844
Likes: 0
Received 0 Likes
on
0 Posts

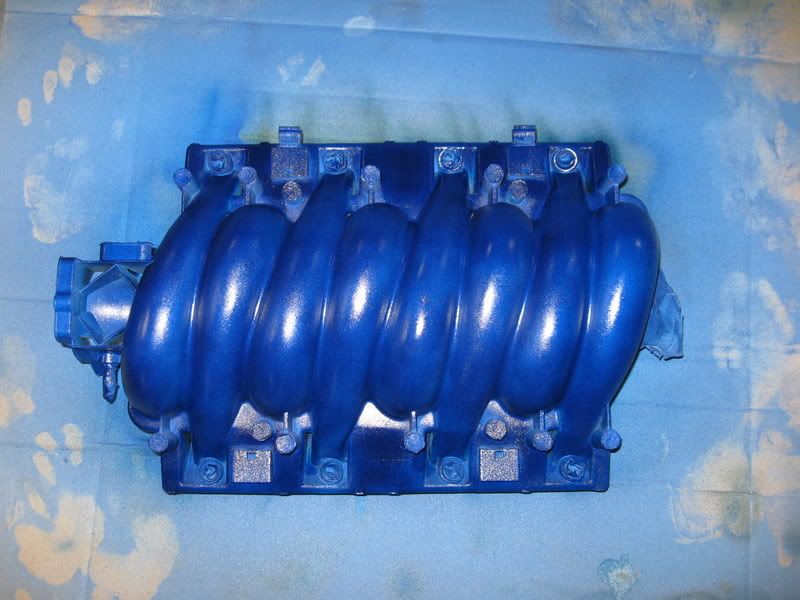
Didn't come out exactly how I wanted. Maybe if I sand the clear in a few days it will look a little better. What I learned though, is that I suck at painting and next time will let someone else do it.
 05-04-2007, 10:31 AM
#3
TECH Addict
iTrader: (17)

Join Date: Dec 2002
Location: Hanover, MD
Posts: 2,190
Likes: 0
Received 0 Likes
on
0 Posts
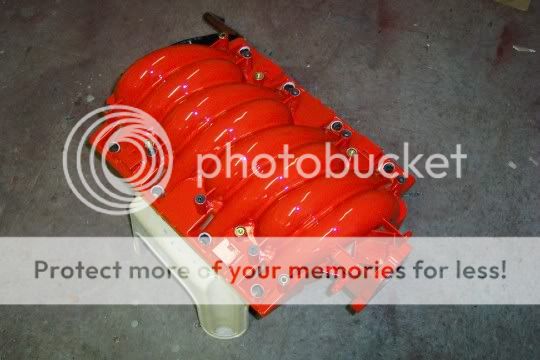
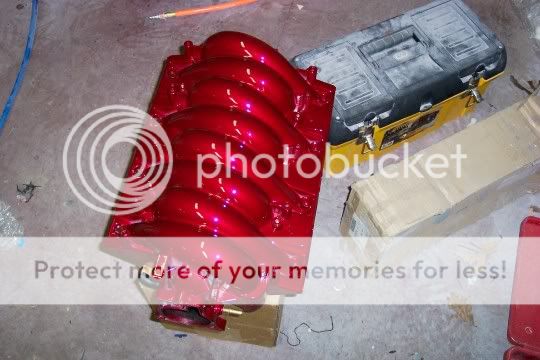
Sanding these intakes smooth is a PITA because of all the nooks and crannies. Best solution I've found is a quick sand for some mechanical adhesion, 2 coats of adhesion promoter, then a couple pretty thick coats of high build primer before laying on base. Comes out super smooth and slick:
Bryan
parbreak
Bryan
parbreak
05-04-2007, 03:57 PM
#4
Originally Posted by Louie83
Didn't come out exactly how I wanted. Maybe if I sand the clear in a few days it will look a little better. What I learned though, is that I suck at painting and next time will let someone else do it.
Edited to add the following.
I would advise following Parbreak's "how to" very closely. Some advocate lots of clear. I think that may have caused some minor problems for me. Also, do not let base and clear over-dry between coats. If for some reason you are interrupted and you cannot lay all your base and clear down at one time (allowing the curing times Parbreak recommends), scuff it with 400 grit and start over with base. My first mistake was not properly scuffing the base I let dry so I could remove a mark I made in the wet paint. The second might be applying too much clear.
Last edited by bsf; 05-04-2007 at 04:09 PM.
05-04-2007, 10:31 PM
#5
TECH Fanatic
Thread Starter
iTrader: (3)
Join Date: Jun 2004
Location: Dayton, OH
Posts: 1,844
Likes: 0
Received 0 Likes
on
0 Posts
Originally Posted by parbreak
Sanding these intakes smooth is a PITA because of all the nooks and crannies. Best solution I've found is a quick sand for some mechanical adhesion, 2 coats of adhesion promoter, then a couple pretty thick coats of high build primer before laying on base. Comes out super smooth and slick:
Bryan
parbreak
Bryan
parbreak
I sanded the absolute hell out of it. You suggested a minumum of 400 grit if using high build primer - I went to 1000. I sanded the high build primer super smooth as well.
The silver base came out pretty good I think. I just wish I could watch someone paint something plastic like this once. I'm so afraid that I'm going to spray it on too thick, so I do it light and spread it out over 6 or 7 coats instead of 3 or 4. Maybe I'm doing too much misting which is causing it to be uneven.
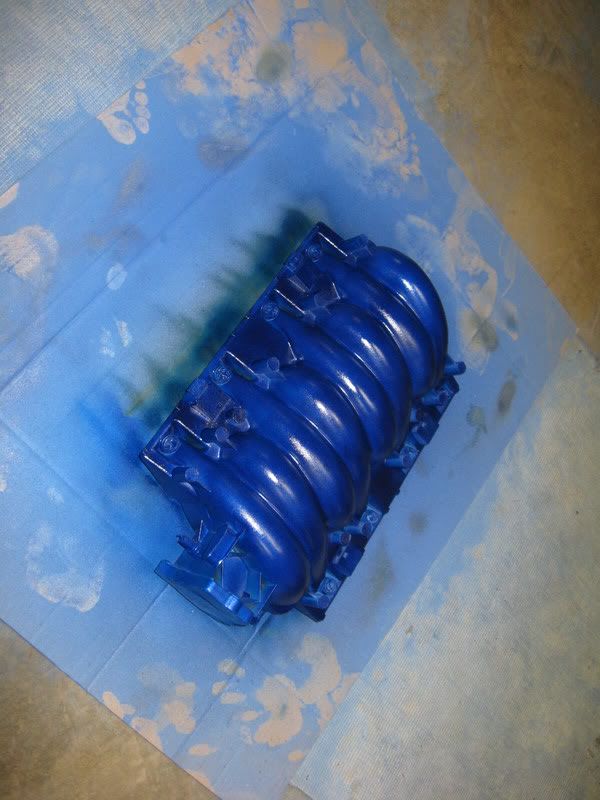
Either way, the real problems arose when I added the anodized blue over the silver. It didn't come out nearly as nice as when done on my calipers. In fact, the first time I did the blue it was so rough the top coat would crumble off if you touched it. So I waited a week, then sanded it smooth again until some silver could be seen again. This time I think I laid it on too thick
I don't know. It looks like I was drunk and half-assed it when I really spent A LOT of time on it. Depressing.
05-05-2007, 12:08 AM
#6
Originally Posted by Louie83
I followed your guide as well as the other person's guide who has pictures in his.
I sanded the absolute hell out of it. You suggested a minumum of 400 grit if using high build primer - I went to 1000. I sanded the high build primer super smooth as well.
The silver base came out pretty good I think. I just wish I could watch someone paint something plastic like this once. I'm so afraid that I'm going to spray it on too thick, so I do it light and spread it out over 6 or 7 coats instead of 3 or 4. Maybe I'm doing too much misting which is causing it to be uneven.
Either way, the real problems arose when I added the anodized blue over the silver. It didn't come out nearly as nice as when done on my calipers. In fact, the first time I did the blue it was so rough the top coat would crumble off if you touched it. So I waited a week, then sanded it smooth again until some silver could be seen again. This time I think I laid it on too thick
I don't know. It looks like I was drunk and half-assed it when I really spent A LOT of time on it. Depressing.
That is something weird with the anodized blue though. Was it the same type of paint you used as the silver base?


Trending Topics
05-05-2007, 09:50 AM
#8
TECH Fanatic
Thread Starter
iTrader: (3)
Join Date: Jun 2004
Location: Dayton, OH
Posts: 1,844
Likes: 0
Received 0 Likes
on
0 Posts
Originally Posted by SweeTbone
If you start over, know that you will get in done in 3 to 4 coats and spray accordingly.
That is something weird with the anodized blue though. Was it the same type of paint you used as the silver base?
That is something weird with the anodized blue though. Was it the same type of paint you used as the silver base?
And the anadodized blue is a Duplicolor Metalcast. The silver is an Acrylic Lacquer Duplicolor.
05-05-2007, 10:37 AM
#9
You can get like a paint thinner/aircraft stripper. You could also sand it all off, but that would clog things up. I would go a chemical route. It will all curd right up and be really easy to remove. As for the paint, maybe the Duplicolor Metalcast is having a problem with the plastic. I'm not too familiar with it. I assume it can be used on plastic right, if properly prepped?
 . But hey aleast you tried.
05-06-2007, 01:05 PM
. But hey aleast you tried.
05-06-2007, 01:05 PM
#11
TECH Fanatic
Thread Starter
iTrader: (3)
Join Date: Jun 2004
Location: Dayton, OH
Posts: 1,844
Likes: 0
Received 0 Likes
on
0 Posts
Originally Posted by SweeTbone
You can get like a paint thinner/aircraft stripper. You could also sand it all off, but that would clog things up. I would go a chemical route. It will all curd right up and be really easy to remove. As for the paint, maybe the Duplicolor Metalcast is having a problem with the plastic. I'm not too familiar with it. I assume it can be used on plastic right, if properly prepped?
05-06-2007, 05:08 PM
#14
The almighty Paint Fumes Director Parbreak suggested using Lacquer Thinner and wiping it off. Here is a thread with that advice.
https://ls1tech.com/forums/appearance-detailing/611622-what-use-get-paint-off-intake.html
https://ls1tech.com/forums/appearance-detailing/611622-what-use-get-paint-off-intake.html
05-06-2007, 09:30 PM
#16
Teching In

Join Date: May 2006
Location: I have a house in st.charles and in nashville il.
Posts: 25
Likes: 0
Received 0 Likes
on
0 Posts
You dont have to resand it all the way back down to black plastic. Just smooth out your paint and reprime it. Then reshoot your color and clear..
05-06-2007, 09:59 PM
#17
TECH Fanatic
Thread Starter
iTrader: (3)
Join Date: Jun 2004
Location: Dayton, OH
Posts: 1,844
Likes: 0
Received 0 Likes
on
0 Posts
Originally Posted by blackbird9984
You dont have to resand it all the way back down to black plastic. Just smooth out your paint and reprime it. Then reshoot your color and clear..
So when I use stripper/thinner, will that just take off the paint or does that take off primer as well?
05-07-2007, 04:29 PM
#18
Teching In
Join Date: May 2006
Location: I have a house in st.charles and in nashville il.
Posts: 25
Likes: 0
Received 0 Likes
on
0 Posts
Use aircraft remover.It will take off everything. Thinner will probably work alright but aircraft remover is a little easier.Its sometimes pretty messy though thats why I would just scuff it up good and reprime. Since its pretty fresh paint though it should eat it off pretty easily. If you have a high pressure washer I would spray the aircraft remover on the intake let the paint bubble up a little bit then spray off with water. Repeat as much as needed till your done. Hopefully not too much sanding.
05-09-2007, 03:35 PM
#19
On The Tree
iTrader: (-1)
Join Date: Jan 2006
Location: So.Cal/Cen.Cal
Posts: 174
Likes: 0
Received 0 Likes
on
0 Posts
How do you guys spray the intakes, with a gun sprayer or can paint?
BTW, I used that same blue paint for one of my projects, and came out alright.
http://img90.imageshack.us/my.php?i...build058xj4.jpg
http://img245.imageshack.us/my.php?...build059xb9.jpg
http://img408.imageshack.us/my.php?...build060fn0.jpg
BTW, I used that same blue paint for one of my projects, and came out alright.
http://img90.imageshack.us/my.php?i...build058xj4.jpg
http://img245.imageshack.us/my.php?...build059xb9.jpg
http://img408.imageshack.us/my.php?...build060fn0.jpg
05-11-2007, 07:45 AM
#20
TECH Apprentice
Join Date: Oct 2002
Location: Houston, Tx
Posts: 393
Likes: 0
Received 0 Likes
on
0 Posts
I would not use a chemical stripper, or thinner!!!
It could soften the plastic and ruin the intake.
Use what you already have on there as a filler.
So all you need to do is just sand it smooth with 320 or 400 then apply 2 coats of a high build primer, then sand smooth.
If you still see dimples and it is not completely smooth then re-apply more primer and then sand smooth again. The smoother the primer is the smoother the base and clear will lay down!
Try to think of primer as liquid filler!