
Firebird Headlights--ALL COMMENTS/QUESTIONS REGARDING HEADLIGHTS GO IN HERE
 04-19-2011, 08:42 PM
#1061
Once you've eliminated a mechanical problem then it's probably electrical. Check the connectors for corrosion. If look okay, use a voltmeter and check to see how much voltage is getting to the motor. Damaged or corroded connectors or wire might be dropping the voltage too low for it to operate. Or it might not be getting any voltage at all.
If lack of voltage is your problem then your going to need to trace the wires back to the "Headlight Control Module" next to the fuse boxes.
Does anyone have a a repair book showing the headlight circuit? I can't find mine at the moment.
If lack of voltage is your problem then your going to need to trace the wires back to the "Headlight Control Module" next to the fuse boxes.
Does anyone have a a repair book showing the headlight circuit? I can't find mine at the moment.

 04-23-2011, 12:27 PM
#1063
Registered User

Join Date: Nov 2010
Posts: 3
Likes: 0
Received 0 Likes
on
0 Posts
Hi guys.
Ive been having this problem for a little while now.
When i click the lights on the lamps dont always pop up. To get them to pop open i have to leave the lights on for about 3 seconds and quickly turn them off and return them to the on position to get them to pop up.
Also they always go down first shot.
This started when i did my retro fit bi-xenon projector hid setup
I'm thinking some where along the line that there not getting enough juice for the initial turn on?
Has anyone had this problem before? Any ideas?
Thanks in advance.
~tom
04-24-2011, 10:25 AM
#1065
Staging Lane
iTrader: (1)

Join Date: Apr 2011
Location: Dallas
Posts: 93
Likes: 0
Received 0 Likes
on
0 Posts

My drivers side light use to be really bipolar, both the motor and low beam would randomly decide if it wanted to work or not. After messing with the wires a bit, I haven't had problems with it in about a year now, never did actually diagnose the problem though, just assumed I had a wire shorting out somewhere.
If you have access to a voltage tester it should be easy to find out if the motor is getting enough power if any at all.
Quoted from the sticky at the top of the page: "Also the harness underneath the headlight tends to develop corrosion over time, check this if you experience a dim light (bad ground), or the headlight occasionally won't go up or down or, no power to the headlight/motor at all."
Last edited by Pete137; 04-24-2011 at 10:41 AM.
05-02-2011, 06:32 PM
#1066
Teching In

Join Date: Feb 2010
Location: westport, ma
Posts: 8
Likes: 0
Received 0 Likes
on
0 Posts
drivers side was making noise. the other day id decided not to work anymore so i bought a replacement motor. when i was taking it apart i noticed that it seemed like the linkage had over extended itself. i pushed it over and sure enough the light went up and down again, just with the noise. so i go on to replace the motor and now it dont work. plug the old one in and that one dont work either. its getting power but wont flip. (now i know the old one worked). i cleaned all the connections and still nothing. what could it be? light works just dont open and close
05-03-2011, 02:08 PM
#1068
Teching In
Join Date: Nov 2007
Location: Ossian, IN
Posts: 11
Likes: 0
Received 0 Likes
on
0 Posts
I had an electrical issue, put a battery charger on car and heard a pop and small poof of smoke come from behind glove box. anyway, I fried the headlight motors. I replaced both motors and the driver side works and the pass side does nothing. Also when I lock/unlock the car with keyfob or from inside car the driver side headlight pops up and goes back down, looks like the car winks at ya. the lights are not on but something triggers the motor. WTF. I got all the lights working again though. I have no idea what to do next any help is greatly appreciated.
05-03-2011, 06:50 PM
#1069
Teching In
Join Date: Nov 2007
Location: Ossian, IN
Posts: 11
Likes: 0
Received 0 Likes
on
0 Posts
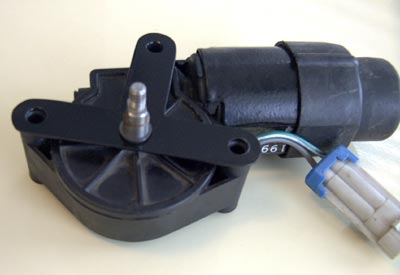
Headlight motor module: there are four prongs in the harness, are all suppose to be hot? I'm only getting power to the two center prongs. Does anyone know what each one is for?
05-03-2011, 07:08 PM
#1070
There should be a 5 wire connector and then a 4 wire connector.
I think the 5 wire side is input and the 4 wire side is output to the motors.
If you have 2 hot wires then the module only has to connect the other 2 wires to ground to make the motor turn. Then to go the other direction the module will make the 2 hot wires ground and the other 2 wires hot.
05-10-2011, 07:19 PM
#1071
Teching In

Join Date: May 2011
Posts: 6
Likes: 0
Received 0 Likes
on
0 Posts
Found a cheap fix for keeping the gear cover in place after replacing/rotating the worn gear. Last month I took the motor assembly to my local hardware store and walked around for a while and came up with this:
3/8"X3" U bolt plate (flat plate for use on a U-bolt) $1.19
3/4" square bumper (rubber feet for lamps 12pack) $2.79
I ran the u-bolt plate from the bottom bolt to the front bolt (over the top of the rotating pin) and used two bumpers, one on either side of the rotating pin, on the side of the plate facing assembly. Tightened nuts back on bolts. Presto.
No need for epoxy. No slippage. Just run a bead of rtv silicone to keep moisture out of gear housing. Cheap and easy, but most important is that it works (so far)
05-20-2011, 07:21 PM
#1072
Teching In
Join Date: Feb 2008
Location: west Texas
Posts: 16
Likes: 0
Received 0 Likes
on
0 Posts
Here's some of the HL door stuff;
Underhood fuses via dual orange wires in the harness to the control module in front of the wheelwell, then out the other side in pairs of blue or green wires
back into the harness and out the connector behind the headlight. Only 2 wires going to each motor. Looks like the controller plays games with the polarity.
 05-20-2011, 07:38 PM
#1073
Teching In
Join Date: Feb 2008
Location: west Texas
Posts: 16
Likes: 0
Received 0 Likes
on
0 Posts
Found a cheap fix for keeping the gear cover in place after replacing/rotating the worn gear. Last month I took the motor assembly to my local hardware store and walked around for a while and came up with this:
3/8"X3" U bolt plate (flat plate for use on a U-bolt) $1.19
3/4" square bumper (rubber feet for lamps 12pack) $2.79
I ran the u-bolt plate from the bottom bolt to the front bolt (over the top of the rotating pin) and used two bumpers, one on either side of the rotating pin, on the side of the plate facing assembly. Tightened nuts back on bolts. Presto.
No need for epoxy. No slippage. Just run a bead of rtv silicone to keep moisture out of gear housing. Cheap and easy, but most important is that it works (so far)
3/8"X3" U bolt plate (flat plate for use on a U-bolt) $1.19
3/4" square bumper (rubber feet for lamps 12pack) $2.79
I ran the u-bolt plate from the bottom bolt to the front bolt (over the top of the rotating pin) and used two bumpers, one on either side of the rotating pin, on the side of the plate facing assembly. Tightened nuts back on bolts. Presto.
No need for epoxy. No slippage. Just run a bead of rtv silicone to keep moisture out of gear housing. Cheap and easy, but most important is that it works (so far)
I just put a couple wide thick washers over the posts. When it's bolted back on the brace the washers hold the cover on tight.
-------------------------
This post built with 100% recycled electrons.
No electrons were harmed in the making of this post.
05-20-2011, 08:47 PM
#1074
Thanks for the schematic Overlord, that confirms what I was thinking.
Your correct about the controller swapping polarity to make the motors open and close.
The controller module also senses each motors amperage draw to determine when the headlight is fully open and fully closed. Monitoring amp draw is much cheaper during assembly than installing limit switches, but it can be temperamental and allow the motors to run for too long forcing them to self destruct.
Self destruct meaning:
stripping gears
slipping gears
cover pushing off
In my experience, repairing the motors is only a short term solution lasting from a couple days to maybe a year. It was only after replacing the motor that my problems went away for good.
05-22-2011, 11:39 PM
#1075
Launching!
iTrader: (17)
Join Date: Jan 2011
Location: New Braunfels, TX
Posts: 221
Likes: 0
Received 0 Likes
on
0 Posts
Had a question if anyone could answer,
I need know what or where to purchase the "rivet/piece" or whatever it may be that hold the headlight arm in place. Anyone know where to get that piece? or what to use as a replacement
Please chime in if you have any info, thanks
-Colin
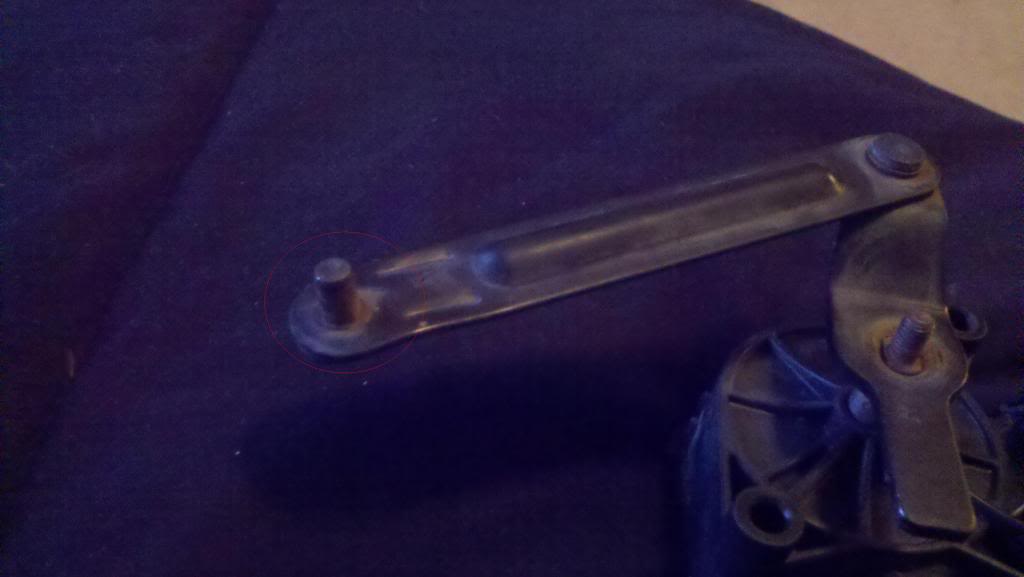
I need know what or where to purchase the "rivet/piece" or whatever it may be that hold the headlight arm in place. Anyone know where to get that piece? or what to use as a replacement
Please chime in if you have any info, thanks
-Colin
06-06-2011, 12:30 AM
#1077
so I bought a car with stripped gears, both motors.
I bought 2 used motors and 2 new gears to rebuild then swap in.
After installing the first motor with new gear, it went up when the other side went down - rotating the wrong way. It ruined my new gear by the time I could watch what was going on and try to get it working.
Plugged back my old motor and it rotated the correct way to open / close.
WTF - somehow that motor is reversed? wires/plugs all untuched.
Anyway - I flipped the gear and re installed my old motor - Wala - one side done.
So on the second motor - I just removed the bolt holding the drive lever, using the manual **** rotated the drive shaft 180 degrees and put the lever back on the shaft.
Wala - no more gear grinding - so, why open the motor and flip the gear?
just detach the drive shaft, rotate the **** onto different teeth and mount the lever back onto the shaft.
One nut, a few spins of the **** and same thing as taking out the entire motor and flipping/replacing the gear.
I'll do that 10 times before I remove another motor to change the gear.
06-06-2011, 03:17 AM
#1078
so, why open the motor and flip the gear?
just detach the drive shaft, rotate the **** onto different teeth and mount the lever back onto the shaft.
One nut, a few spins of the **** and same thing as taking out the entire motor and flipping/replacing the gear.
I'll do that 10 times before I remove another motor to change the gear.
just detach the drive shaft, rotate the **** onto different teeth and mount the lever back onto the shaft.
One nut, a few spins of the **** and same thing as taking out the entire motor and flipping/replacing the gear.
I'll do that 10 times before I remove another motor to change the gear.
Typically it will strip the plastic teeth again in short order and then you'll need to replace the gear with a metal one or else replace the whole motor.
It's common for the motors to turn different directions after they've had power removed from them. You just need to pull the fuse for one side only and then turn the headlights on. Once their both in sync, put the fuse back in. Nothing is damaged by that.
How exactly did your new gear get damaged?
Last edited by JasonWW; 06-06-2011 at 03:24 AM.
06-06-2011, 06:16 PM
#1079
That's what we tell everyone to do.
Typically it will strip the plastic teeth again in short order and then you'll need to replace the gear with a metal one or else replace the whole motor.
It's common for the motors to turn different directions after they've had power removed from them. You just need to pull the fuse for one side only and then turn the headlights on. Once their both in sync, put the fuse back in. Nothing is damaged by that.
How exactly did your new gear get damaged?
these spare motors have been around - one has that 3 point flat plate pictured above - I didn't know what it was until now! and the motor spinning in reverse has had the motor part removed before, can tell by the tabs - perhaps something was assembled wrong by them?
when the headlight door was closing/opening opposite the other side b/c of the spare motor spinning wrong direction, at one try I hear the dreaded 'grrrr' for 5 seconds after it was down. I did not open cover to see the gear, I just used my old motor with flipped gear - at that point I had enough!
just wanted to share the simple temp fix of removing the arm/rotating by hand. I had not seen it posted before. For me that may last awhile - no real daily/night driving.
oh - can you pm that sensored pic in your sig? nice!
 06-07-2011, 01:07 PM
#1080
Teching In
iTrader: (3)
Join Date: Jun 2011
Location: Massachusetts
Posts: 37
Likes: 0
Received 0 Likes
on
0 Posts
I just put a new plastic gear in my motor today. It worked great for about 5 times and then began to grind again after goinf down. Is my entire motor shot or should I buy a metal gear instead?