2001: A CoreyD TA


The following users liked this post:
ramairjohn2000 (09-24-2021)

 09-24-2021, 02:19 PM
#265
TECH Resident
Thread Starter
iTrader: (9)
Thanks for reminding me! lol Got my buddy to test fit one of my grilles on his OEM WS6 hood and the shape was pretty off for him apparently. Need to get my hands on an OEM grille so I can replicate it.
The following users liked this post:
ramairjohn2000 (09-26-2021)

The following users liked this post:
blackbyrd (10-09-2021)
10-09-2021, 10:03 PM
#267
Copy & Paste Moderator

3D Printers are awesome. I've been designing and printing stuff for my Firebird and Mustang as well. I have a smaller printer so if I need something larger or if I need ABS, I send the model to CraftCloud to print.
I see you have a Prusa pinter (I have a Monoprice Mini). What modeling software do you use? I've been using Fusion360.
I see you have a Prusa pinter (I have a Monoprice Mini). What modeling software do you use? I've been using Fusion360.
10-10-2021, 07:01 PM
#268
TECH Resident
Thread Starter
iTrader: (9)
3D Printers are awesome. I've been designing and printing stuff for my Firebird and Mustang as well. I have a smaller printer so if I need something larger or if I need ABS, I send the model to CraftCloud to print.
I see you have a Prusa pinter (I have a Monoprice Mini). What modeling software do you use? I've been using Fusion360.
I see you have a Prusa pinter (I have a Monoprice Mini). What modeling software do you use? I've been using Fusion360.
I have an Ender 3 as well, which was great to start with, but I really love my Prusa. I plan on getting an MK3S whenever my other printers can pay for it lol.
I've been using Rhino5. I'd like to do more in Fusion, I'm just comfortable in Rhino
10-11-2021, 08:37 AM
#269
Copy & Paste Moderator
Monoprice has a range of 3D printers. I have the Select Mini V3/Pro which is a smaller printer. It can't handle ABS.
It works beautiful with PLA and the few things I printed with TPU worked fine as well (I made Lego wheels in PLA and tires in TPU).
I have had mixed results with PETG. I got some prints to work and others that failed. Earlier prints with new spools seemed to mostly work fine. Later prints failed. I've used a dryer too to help since I've had the spools some months, but I do keep them in vacuum sealed bags with desiccant. Smaller details were blobbed and larger prints warped. Messing more with drying times and print settings could help with the blobs and a enclosure should help with the warping.
However, I looked up the prices of printing services and found CraftCloud's prices have been acceptable so far so it has worked out. (The shrouds I designed for my projectors were $36 delivered for the pair in black ABS). So If I need to print something that needs the heat handling of ABS (like for car parts), I'll pay CraftCloud. For the rest of the stuff, I'll stick with PLA.
So far, the best print surface I've found so far is a layer of Kapton Tape over the standard black PEI print surface. I bought a roll of the 4" wide stuff. It is expensive but stuff sticks well. If you are careful getting parts off, the layer you put on lasts for some prints. It was the only way I could get PETG to stick. However, it made everything stick better so I've stuck with it.
I've been having fun designing and printing all sorts of things.. Lightsabers, replacement clip in refrigerator, custom switch panel in car ... etc.
Last edited by VIP1; 10-11-2021 at 08:48 AM.
10-11-2021, 09:50 PM
#270
TECH Resident
Thread Starter
iTrader: (9)
I've been having some issues with PETG as well recently, when I dont reeeally slow it down, has been good other than that little quirk.
How do you like your dryer? Wanted to buy one or a dehydrator because my ASA loves to absorb the moisture here.
Anywhere I could view your prints? Would love to see them!
How do you like your dryer? Wanted to buy one or a dehydrator because my ASA loves to absorb the moisture here.
Anywhere I could view your prints? Would love to see them!
10-11-2021, 11:42 PM
#271
Copy & Paste Moderator
I bought this dryer on sale for $35 with tax:
(JAYO Dryer Box)
I had a role of PETG that was printing foamed and this stopped that. Had to sit spool in there for 2 cycles at 4-6hrs each at 2 diff rotation angles to get the filament useable again (it comes with instructions and suggestions - I was testing since heating element in the dryer is at the bottom so I rotated the filament spool between cycles). I still had the typical stringing with PETG but no more foam.
Last edited by VIP1; 10-11-2021 at 11:49 PM.
10-11-2021, 11:58 PM
#272
Copy & Paste Moderator
These threads show the custom switch panels, *****, and ash tray cover I designed and printed on my printer:
(One of my lightsabers is in there as well)
https://ls1tech.com/forums/appearanc...tch-panel.html
https://ls1tech.com/forums/appearanc...vac-*****.html
I've re-done the ***** recently since the red tint paint bubbled. I had CraftCloud print the new set in translucent ABS and I used a different red tint paint.
https://www.fadingarrow.com/images/F...%20-%20Far.jpg

https://www.fadingarrow.com/images/L...Lightsaber.jpg
The projector shrouds are in this thread:
https://ls1tech.com/forums/appearanc...rojectors.html
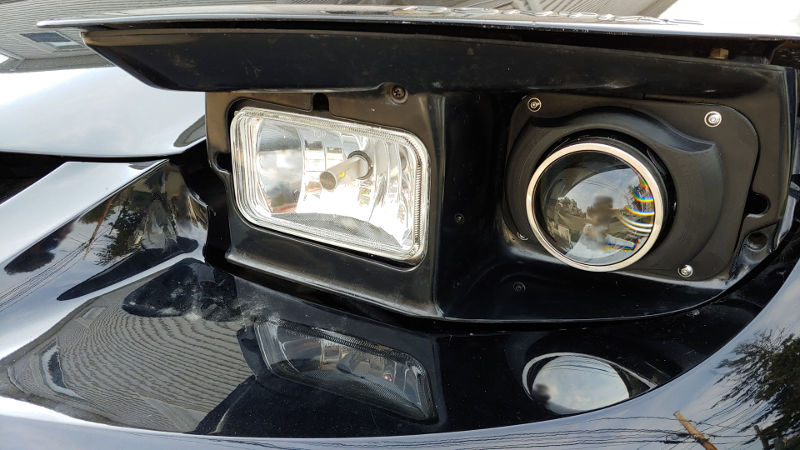
I designed them and prototyped on my printer in sections/pieces in PLA (my printer not big enough and can't do ABS), but I had CraftCloud print the final version in ABS (to handle the heat and weather, PLA not good enough to be near a headlight).
https://www.fadingarrow.com/images/F...lted_SMALL.jpg
I've also printed center caps for my Mustang (they attach in the recess of the original center caps after removing the worn out center) and an antenna cap (to cover the screw hole left when unscrewing the antenna). The center cap is a NASA logo (I also have a STS mission patch on my center console lid too).
(One of my lightsabers is in there as well)
https://ls1tech.com/forums/appearanc...tch-panel.html
https://ls1tech.com/forums/appearanc...vac-*****.html
I've re-done the ***** recently since the red tint paint bubbled. I had CraftCloud print the new set in translucent ABS and I used a different red tint paint.
https://www.fadingarrow.com/images/F...%20-%20Far.jpg
https://www.fadingarrow.com/images/L...Lightsaber.jpg
The projector shrouds are in this thread:
https://ls1tech.com/forums/appearanc...rojectors.html
I designed them and prototyped on my printer in sections/pieces in PLA (my printer not big enough and can't do ABS), but I had CraftCloud print the final version in ABS (to handle the heat and weather, PLA not good enough to be near a headlight).
https://www.fadingarrow.com/images/F...lted_SMALL.jpg
I've also printed center caps for my Mustang (they attach in the recess of the original center caps after removing the worn out center) and an antenna cap (to cover the screw hole left when unscrewing the antenna). The center cap is a NASA logo (I also have a STS mission patch on my center console lid too).
Last edited by VIP1; 10-12-2021 at 12:53 AM.
The following users liked this post:
CoreyD (10-12-2021)
10-12-2021, 02:03 PM
#273
TECH Resident
Thread Starter
iTrader: (9)
Wow that's some impressive stuff! They all look really good.
I love the projector shroud. Mine are kinda just sandwiched in there and using one of those hella plates off ebay lol. Certainly not ideal.
I love the projector shroud. Mine are kinda just sandwiched in there and using one of those hella plates off ebay lol. Certainly not ideal.
10-12-2021, 04:56 PM
#274
Copy & Paste Moderator
Thanks. 
The hella plates are fine if you are using hella 60mm projectors. The projectors I have are a bit larger.
I see you made grill plates, cup holder ring, and gauge holder. Any other car parts or other items? Has your brother noticed the ones on his Corvette yet?
The hella plates are fine if you are using hella 60mm projectors. The projectors I have are a bit larger.
I see you made grill plates, cup holder ring, and gauge holder. Any other car parts or other items? Has your brother noticed the ones on his Corvette yet?
Last edited by VIP1; 10-13-2021 at 12:57 AM.
10-12-2021, 11:15 PM
#275

These threads show the custom switch panels, *****, and ash tray cover I designed and printed on my printer:
(One of my lightsabers is in there as well)
https://ls1tech.com/forums/appearanc...tch-panel.html
https://ls1tech.com/forums/appearanc...vac-*****.html
I've re-done the ***** recently since the red tint paint bubbled. I had CraftCloud print the new set in translucent ABS and I used a different red tint paint.
https://www.fadingarrow.com/images/F...%20-%20Far.jpg
https://www.fadingarrow.com/images/L...Lightsaber.jpg
The projector shrouds are in this thread:
https://ls1tech.com/forums/appearanc...rojectors.html
I designed them and prototyped on my printer in sections/pieces in PLA (my printer not big enough and can't do ABS), but I had CraftCloud print the final version in ABS (to handle the heat and weather, PLA not good enough to be near a headlight).
https://www.fadingarrow.com/images/F...lted_SMALL.jpg
I've also printed center caps for my Mustang (they attach in the recess of the original center caps after removing the worn out center) and an antenna cap (to cover the screw hole left when unscrewing the antenna). The center cap is a NASA logo (I also have a STS mission patch on my center console lid too).
10-13-2021, 12:34 AM
#276
Copy & Paste Moderator
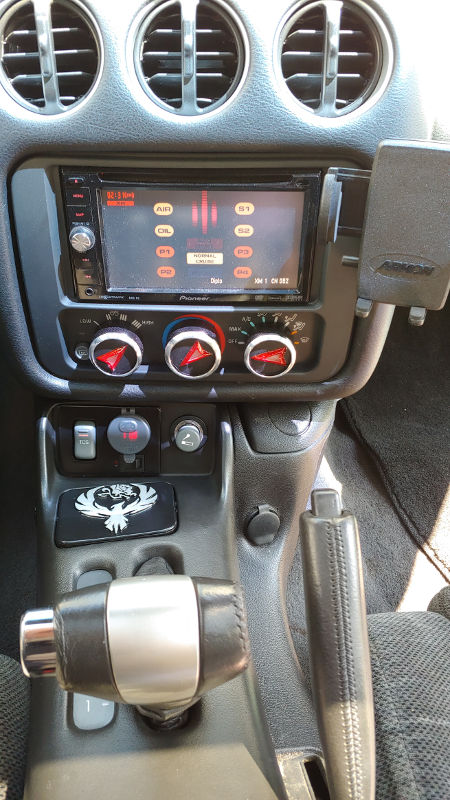
The shifter is from a Trailblazer SS. I'm not the first to install it, but it is uncommon. It secures with a set screw instead of the stock staple/clip. I don't remember specifically, but I may have had to make a minor trimming inside the shifter to sit right. I did it years ago.
EDIT 1:
I found my old post in another thread on it...
You just need to trim a tab on the inside of the **** shaft/hole. You'll see it if you flip the TB SS **** upside down and look in.
EDIT 2:
I think the leather boot that I have on there now is the one from the Trailblazer SS as well that I trimmed and secured to the console. I attached it with glue and bolted to the console. The front and rear have bolt/washer/nut through leather and console to prevent pulling off with age/use. You don't need to do that though. My first attempt with a universal boot was a non-destructive pressure fit and lasted years. I felt that I needed to do something more secure for this Trailblazer boot when the universal one was showing its age.
https://www.fadingarrow.com/ShiftBoot.htm
Here is a pic of a universal leather shift boot on the stock shifter:
(pressure fit -- instructions in link above)

https://www.fadingarrow.com/images/shiftboot.jpg
EDIT 1:
I found my old post in another thread on it...
You just need to trim a tab on the inside of the **** shaft/hole. You'll see it if you flip the TB SS **** upside down and look in.
EDIT 2:
I think the leather boot that I have on there now is the one from the Trailblazer SS as well that I trimmed and secured to the console. I attached it with glue and bolted to the console. The front and rear have bolt/washer/nut through leather and console to prevent pulling off with age/use. You don't need to do that though. My first attempt with a universal boot was a non-destructive pressure fit and lasted years. I felt that I needed to do something more secure for this Trailblazer boot when the universal one was showing its age.
https://www.fadingarrow.com/ShiftBoot.htm
Here is a pic of a universal leather shift boot on the stock shifter:
(pressure fit -- instructions in link above)
https://www.fadingarrow.com/images/shiftboot.jpg
Last edited by VIP1; 10-13-2021 at 12:53 AM.
The following users liked this post:
Jmantx (10-13-2021)
10-14-2021, 01:14 AM
#277
TECH Resident
Thread Starter
iTrader: (9)
This week I've been working on a topographical 3D map of downtown NOLA. Excited about that one. I post most of my stuff on Instagram as coreyprints.
He noticed lol. We had a good chuckle and he left them on


The following 2 users liked this post by CoreyD:
ramairjohn2000 (10-25-2021), WS6 #3392 (10-17-2021)