
MattGTO's Drift Car Build
 02-06-2014, 09:53 AM
#1
Teching In
Thread Starter

Join Date: Feb 2014
Posts: 14
Likes: 0
Received 0 Likes
on
0 Posts
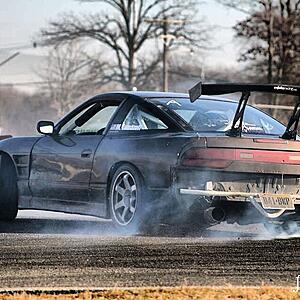
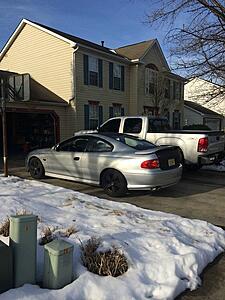
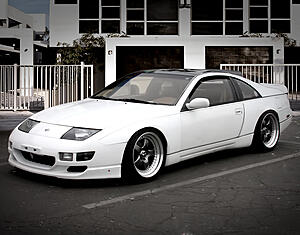
Hey guys, im pretty new on this particular forum but just to give you my personal run down, I originally owned a 2004 GTO from 2007 - 2011 i had it from 16,000 miles all the way up to 84,000 miles. I had over 300 passes on it at the drag strip, and in the last year i owned it i got very serious about drifting. after 1 season i decided i wanted to get rid of the GTO for a tow vehicle and build a 240SX. After building 2 of them (everything to FD competition specifications) i decided i was bored and wanted to build a GTO. This was my 240SX, i ran it with no bumpers this day because i forgot hardware for the front bumper and the rear bumper i scraped off on the wall at Englishtown NJ. I have tons more pics of driving tandem and what not but i'll spare you guys on that unless someone wants to see more.
So here's what we got....
2004 LS1 QSM M6 Red interior 80K miles
-SLP Loudmouth 1 Catback
-a poorly done cat delete
-Diablosport Handheld Tuner
-CXRacing Coilovers brand new in box never installed
-Whiteline Strut Mounts
-OEM Strut mount bearings
-Banshee Guage pod with Aeroforce Interceptor and Autometer ProComp A/F Gauge
-Pioneer Double Din touchscreen head unit
-K&N Intake
I picked this car up for $6,000 on 2/1/14 and was told the 2 major problems was the trans grinding into 3rd and the front right strut mount was obliterated.
It had tons of plastidip all over it, the entire sidskirts were still plastidipped black when i got it, and so was the skirt on the rear bumper as well as the trunk and the roof. i've since removed the plastidip from the skirt and the rear bumper but i left the trunk and roof because ill do that later.
What i've done so far Was changed out the suspension to the brand new coilovers he gave me with the car and put the Whiteline strut mounts and bearings in. i also put new shockmount bushings on there even though the original ones were ok. I also changed out the red tails to some smoked ones i still had laying around from my old GTO snd just gutted the trunk, i wont be needing anything in there anways.
What i would like to do next is have the trans repaired and upgraded (any recommendations on a trans shop in the south jersey area?), replace the wobble stick factory driveshaft with a one piece and probably go with an LS7 clutch/flywheel. while im down there and the car is off insurance i want to do some longtubes and catless mids as well. I'll probably be going with the cheap alternative. Ebay headers on that. Reason for that is i spent two hours trying to find the advantage to spending 1000+ on headers versus 505 shipped. If i were going for raw drag racing performance the extra 2 or 3 hp i might pick up from the crazy expensive headers might be worth it. Maybe someone can sway my opinion on that but so far thats where i stand. I also want to install an accusump oiling system to keep the engine safe. From what i hear the LS1 prefers straight lines to horizontal ones.
Im waiting on my tax refund and for the remaining stuff i have left from my S13 to sell. I'd like to try and build this car as far as i can using money ive already spent before i start tapping into my bank accounts because im going out on medical short term disability for a few months from work. Maybe i'll tell you guys that funny story one day =P to make a long story short, drifting saved my life. thanks for checking this out so far!!!


 05-06-2014, 08:39 PM
#2
Teching In
Thread Starter
Join Date: Feb 2014
Posts: 14
Likes: 0
Received 0 Likes
on
0 Posts
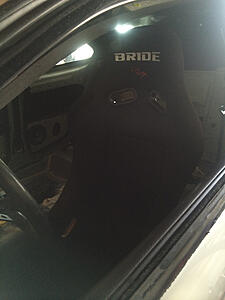
I went ahead and ordered the Whiteline adjustable radius rod bushings, Whiteline radius rod to control arm bushings, and the Whiteline front lower control arm bushings. I also ordered a Planted seat bracket for my bride drivers seat. It will be just fixed mounted with no rail. A couple of my friends helped me decide this and every rail ive ever owned has given the seat a little bit of play which can be a nuisance sometimes and it also raises the seat up a bit. I think fixed will be just fine. I have a passenger side Planted bracket from my 240SX ill probably just modify to work.
The next things to buy are a couple more bushings, long tube headers, wheels, accusump, probably a hurst shifter and then the fun begins with fabrication. I'm gonna run the hurst shifter regardless of reviews because it seems like people have long term issues with them not short term, this car will not be getting daily driven so i figure it's acceptable.


The next things to buy are a couple more bushings, long tube headers, wheels, accusump, probably a hurst shifter and then the fun begins with fabrication. I'm gonna run the hurst shifter regardless of reviews because it seems like people have long term issues with them not short term, this car will not be getting daily driven so i figure it's acceptable.

 05-06-2014, 08:40 PM
#3
Teching In
Thread Starter
Join Date: Feb 2014
Posts: 14
Likes: 0
Received 0 Likes
on
0 Posts
Whiteline goodies just showed up. Hopefully ill be getting my Accusump and accessories as well today. still more stuff on the way.
Radius Rod Bushings, Inner Control Arm Bushings and the Radius Rod to Control arm Bushings.

Radius Rod Bushings, Inner Control Arm Bushings and the Radius Rod to Control arm Bushings.
05-06-2014, 08:40 PM
#4
Teching In
Thread Starter
Join Date: Feb 2014
Posts: 14
Likes: 0
Received 0 Likes
on
0 Posts
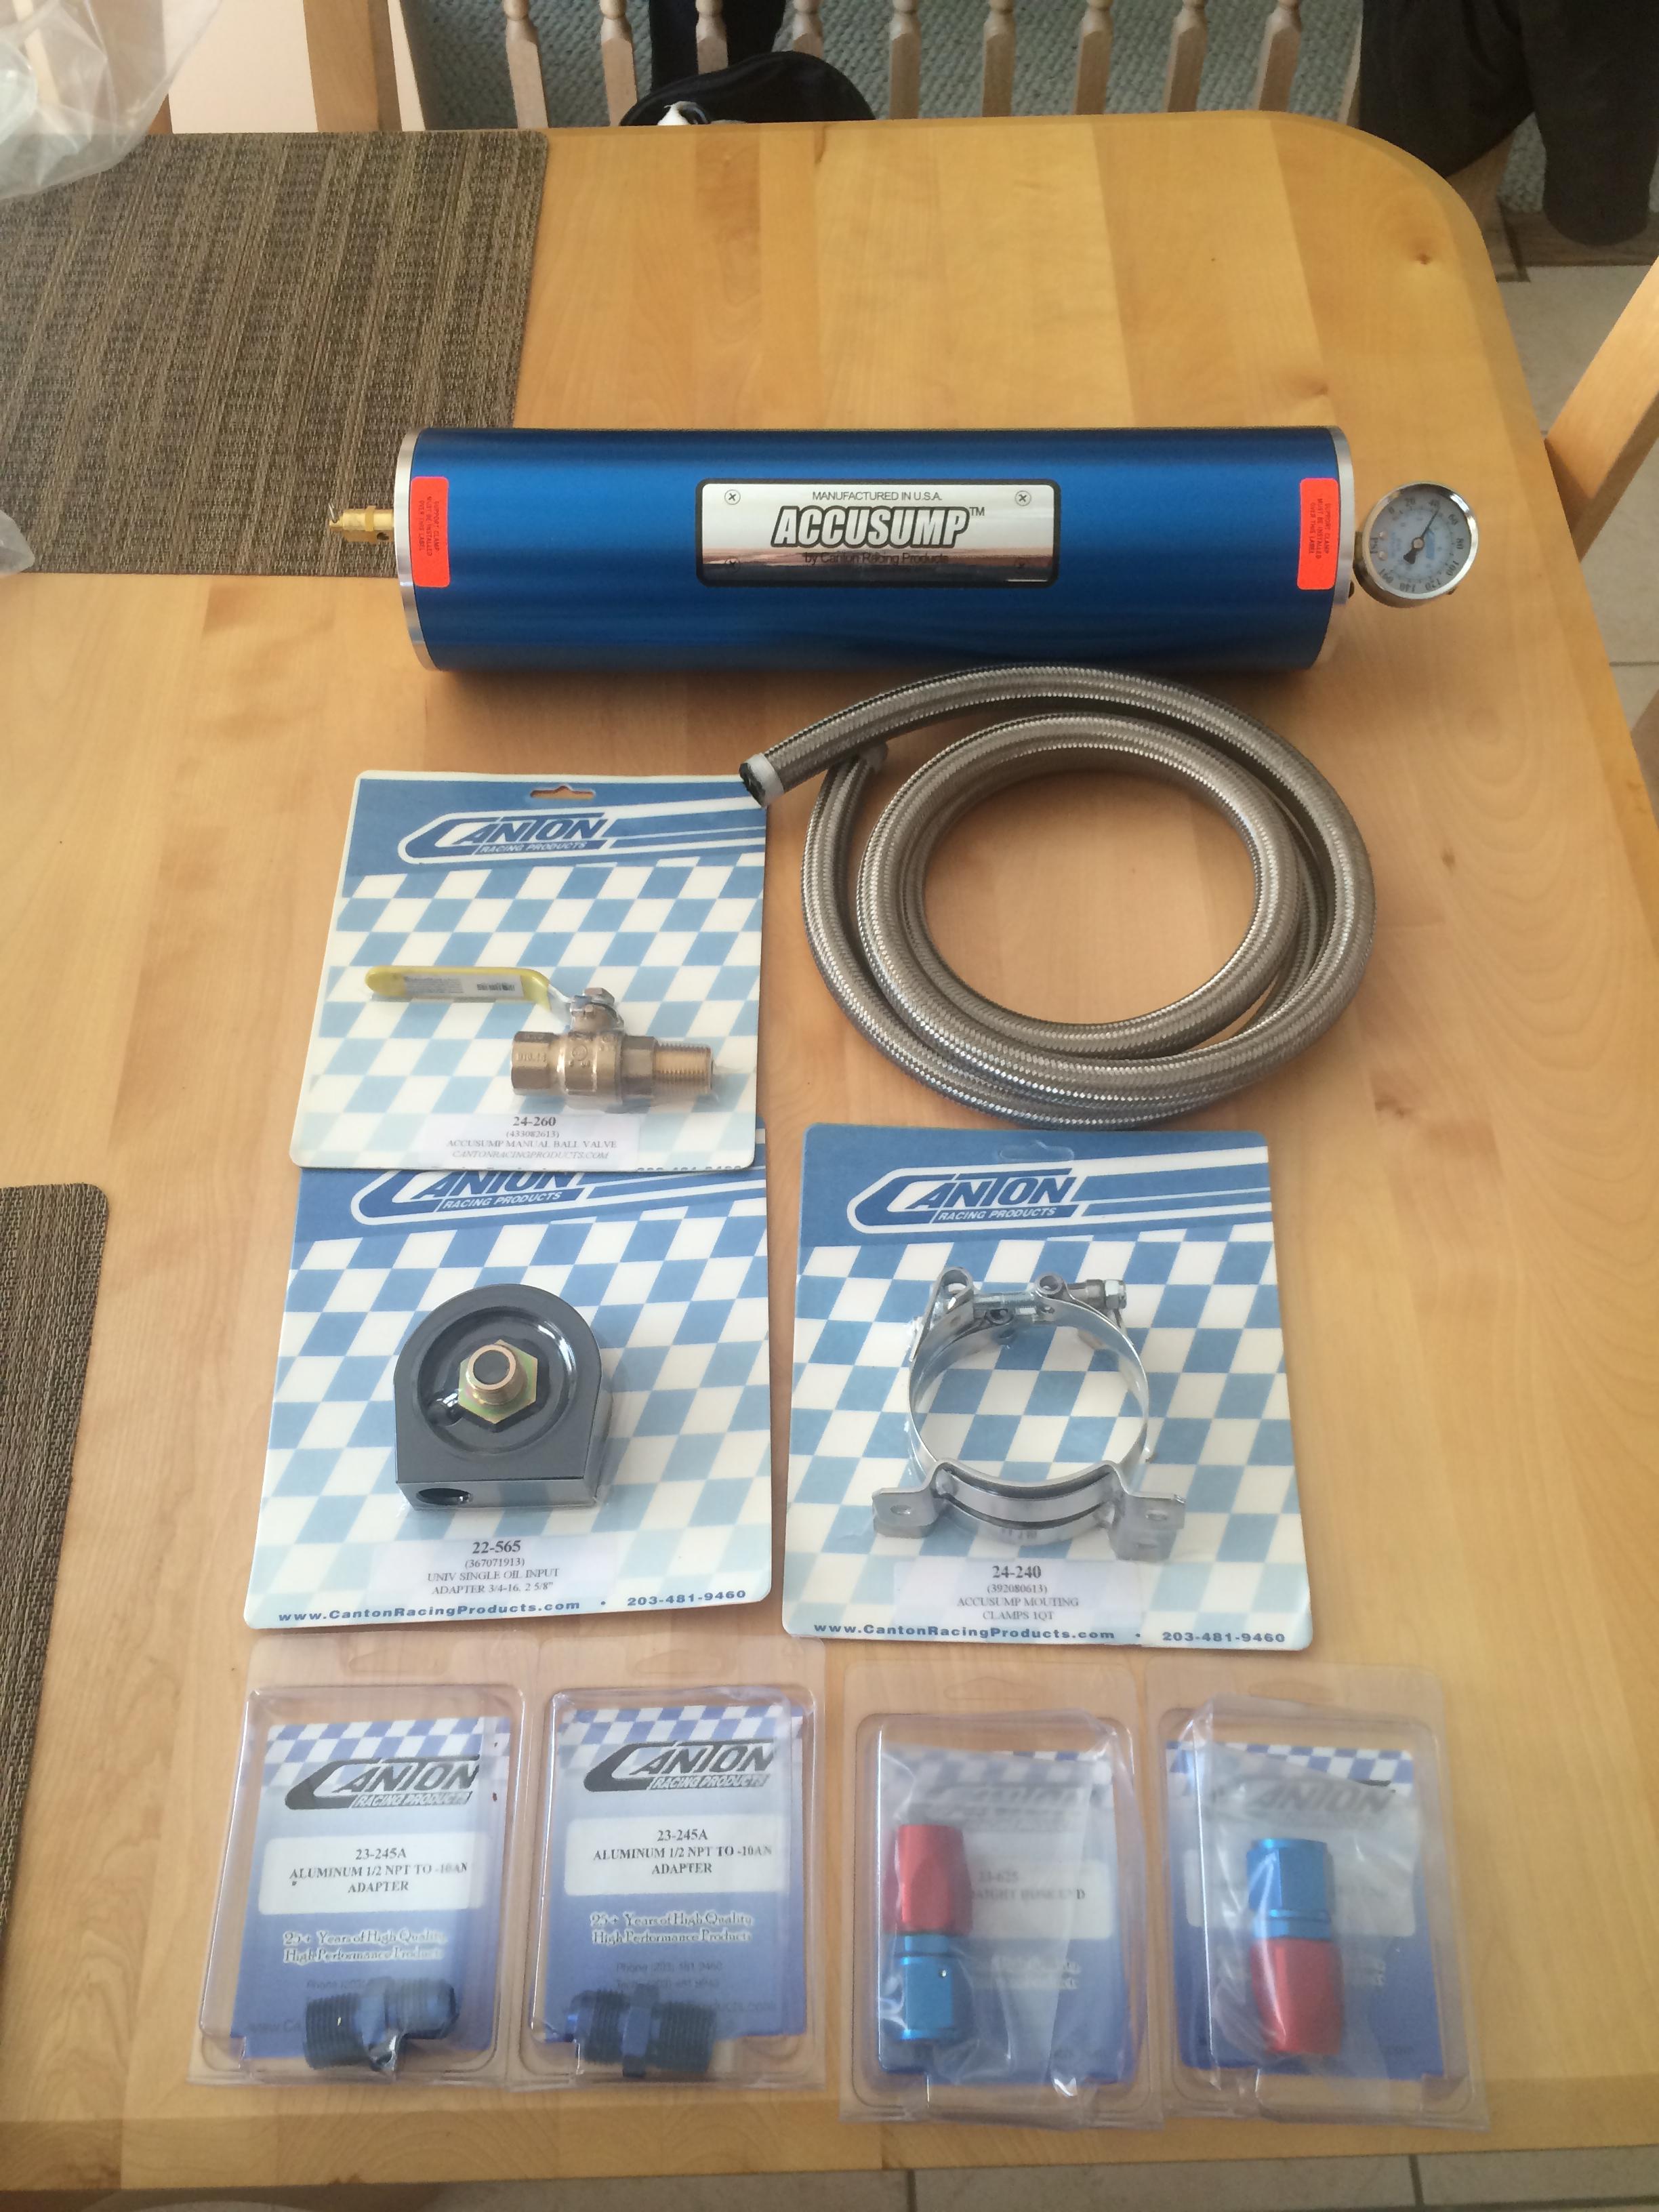
Cool, got this Accusump yesterday from Summit racing. 3 Qt, manual valve, install kit and clamps. i think i should be recieving my steering wheel adapter from Gforce today also.
05-06-2014, 08:40 PM
#5
Teching In
Thread Starter
Join Date: Feb 2014
Posts: 14
Likes: 0
Received 0 Likes
on
0 Posts

This gforce1320 steering wheel hub adapter came in today also, the only thing that sucks about all of this is knowing it all has to get installed and it's so damn cold in the garage haha
05-06-2014, 08:41 PM
#6
Teching In
Thread Starter
Join Date: Feb 2014
Posts: 14
Likes: 0
Received 0 Likes
on
0 Posts
oooooooooookay these pics uploaded wayyyy faster than i expected.
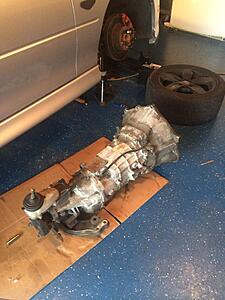
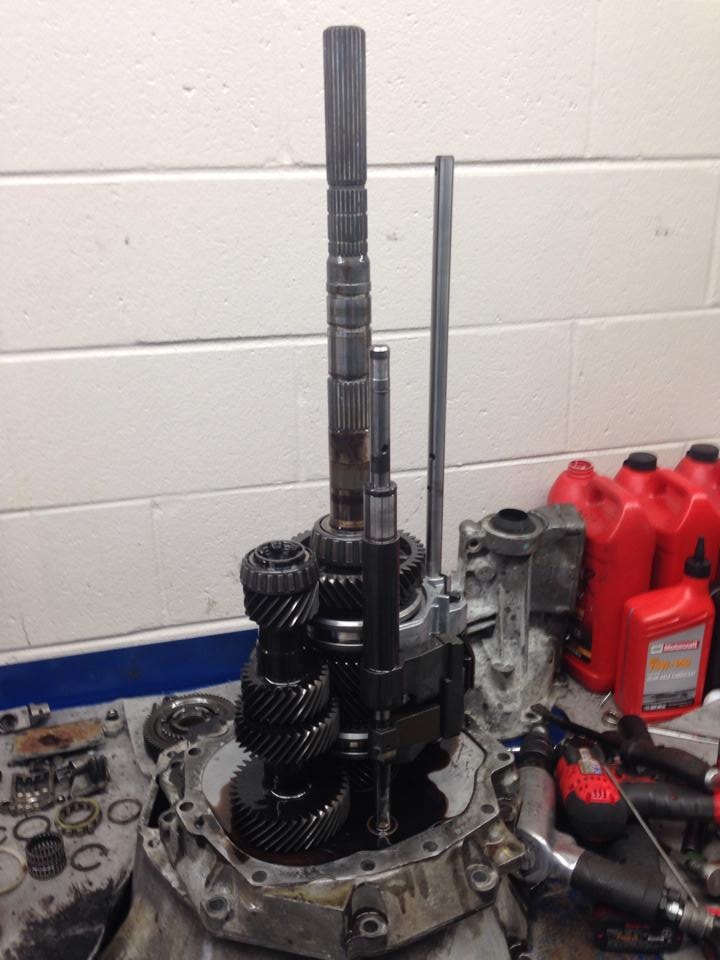
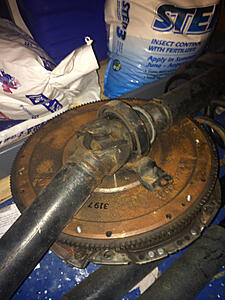
here's my trans out of the car, i know pretty pointless pic everyone here has seen this before

This is the trans in the middle of the break down

This is a shot of the 3rd Gear damage, what caused the grinding was the cracked blocker ring, the gear was slightly ground down, not much
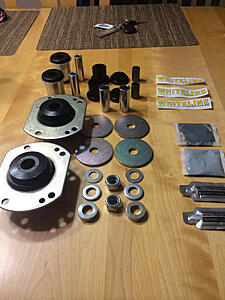
Here's what i purchased to get this thing back to health and upgraded :hbang::hbang:
-All Synchro and Blocker rings (carbon kevlar)
-3-4 Synchro Assembly (damaged)
-3rd Gear with 2.97 ratio first gear
-1st-4th Billet Shift Keys
-Bronze Fork Pads All Gears
-Bronze Shifter Bushing
-All New Snap Rings
-Front Seal
-Rear Seal
from what ive read this is a little more than a typical Stage 2 build with ALL the fork pads done, all carbon kev blockers and 1st-4th billet keys. Hopefully this does the trick.


Picked up an LS7 Clutch and flywheel
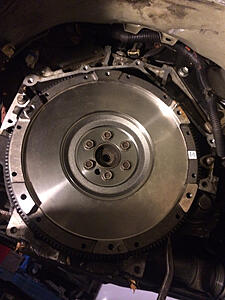
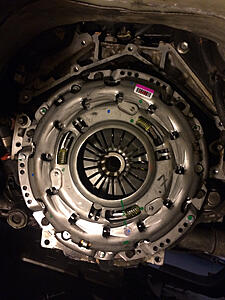
Installed it

here's my trans out of the car, i know pretty pointless pic everyone here has seen this before
This is the trans in the middle of the break down


This is a shot of the 3rd Gear damage, what caused the grinding was the cracked blocker ring, the gear was slightly ground down, not much
Here's what i purchased to get this thing back to health and upgraded :hbang::hbang:
-All Synchro and Blocker rings (carbon kevlar)
-3-4 Synchro Assembly (damaged)
-3rd Gear with 2.97 ratio first gear
-1st-4th Billet Shift Keys
-Bronze Fork Pads All Gears
-Bronze Shifter Bushing
-All New Snap Rings
-Front Seal
-Rear Seal
from what ive read this is a little more than a typical Stage 2 build with ALL the fork pads done, all carbon kev blockers and 1st-4th billet keys. Hopefully this does the trick.

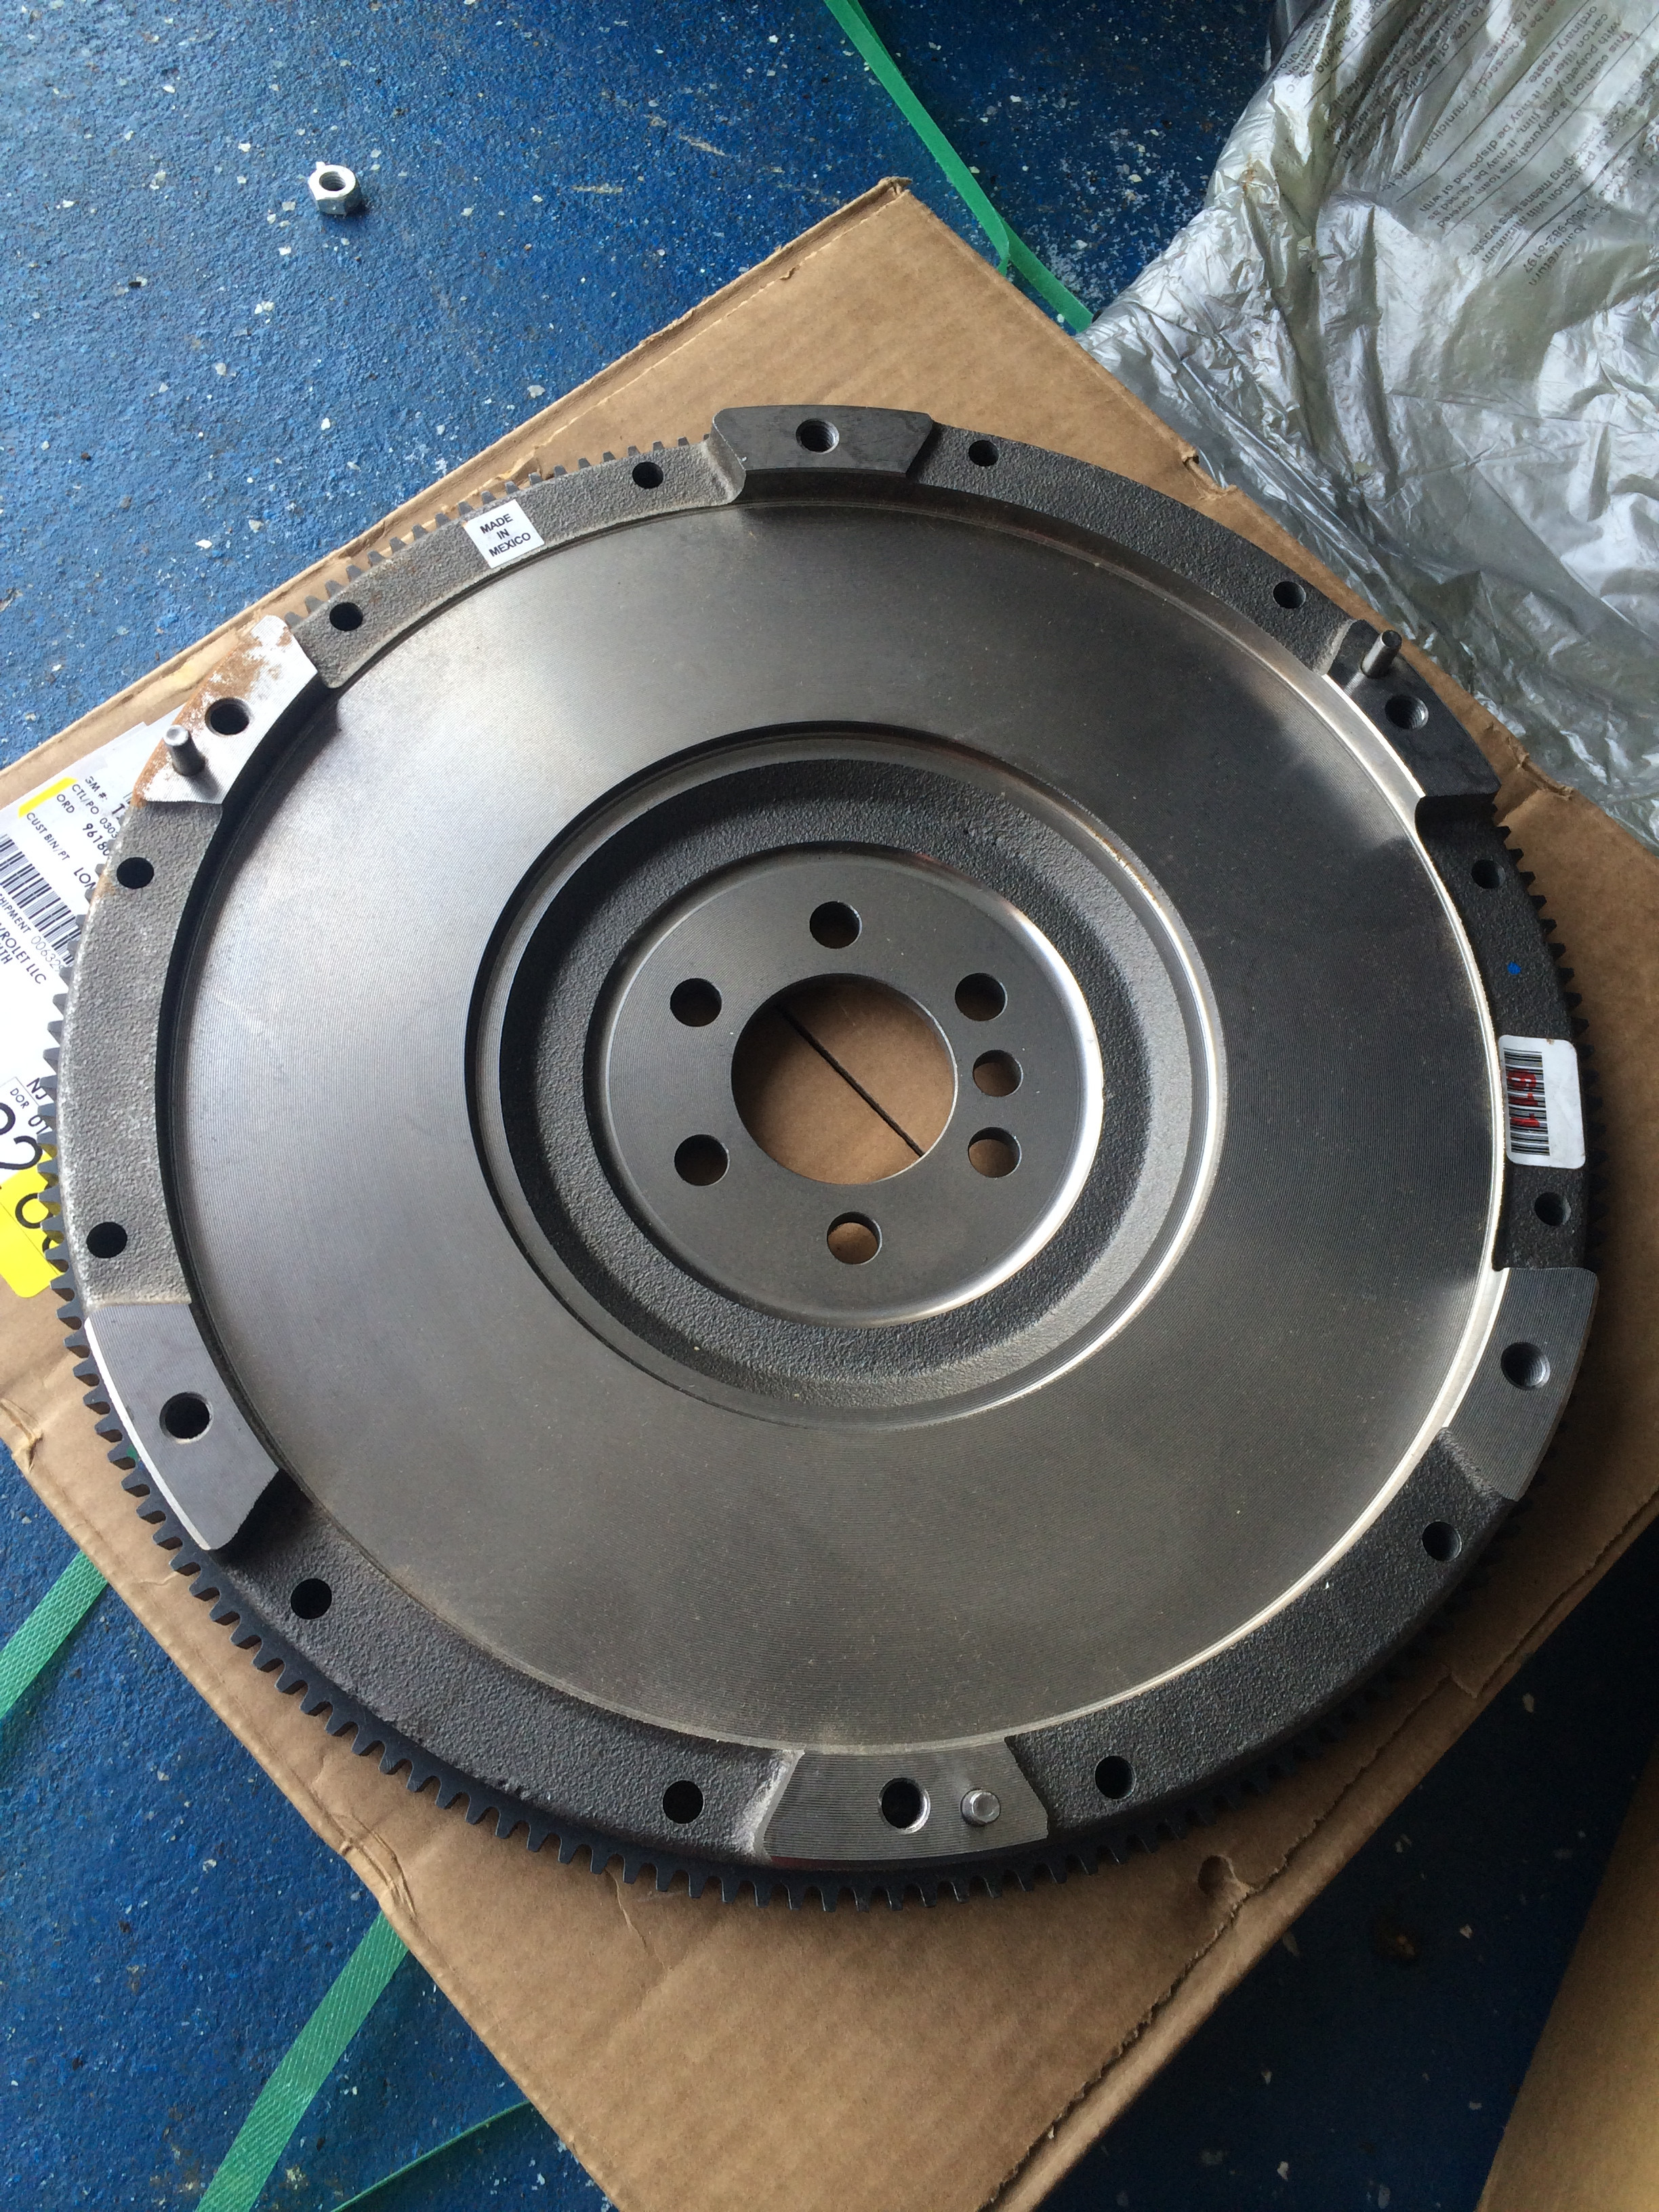
Picked up an LS7 Clutch and flywheel


Installed it
05-06-2014, 08:41 PM
#7
Teching In
Thread Starter
Join Date: Feb 2014
Posts: 14
Likes: 0
Received 0 Likes
on
0 Posts

This is a fake NRG steering wheel quick release. It's funny because sparco doesnt make nor has ever made anything that looks like this, it even came in a sparco box! haha. These are things that through experience ive learned there is no difference in name brand or fake. My last quick release was this same one and i had it for 3 years and sold it with my 240sx.

Thats the GForce hub, quick realease, and a MOMO steering wheel ive had laying around for 2 years now. It's signed by Vaughn Gittin Jr. Himself thats why it just sat around. Jr. comes to all of the local Clubloose events practically so i'll have to get him to update the signature since it's fading haha.

Theres a shot of the hub adapter
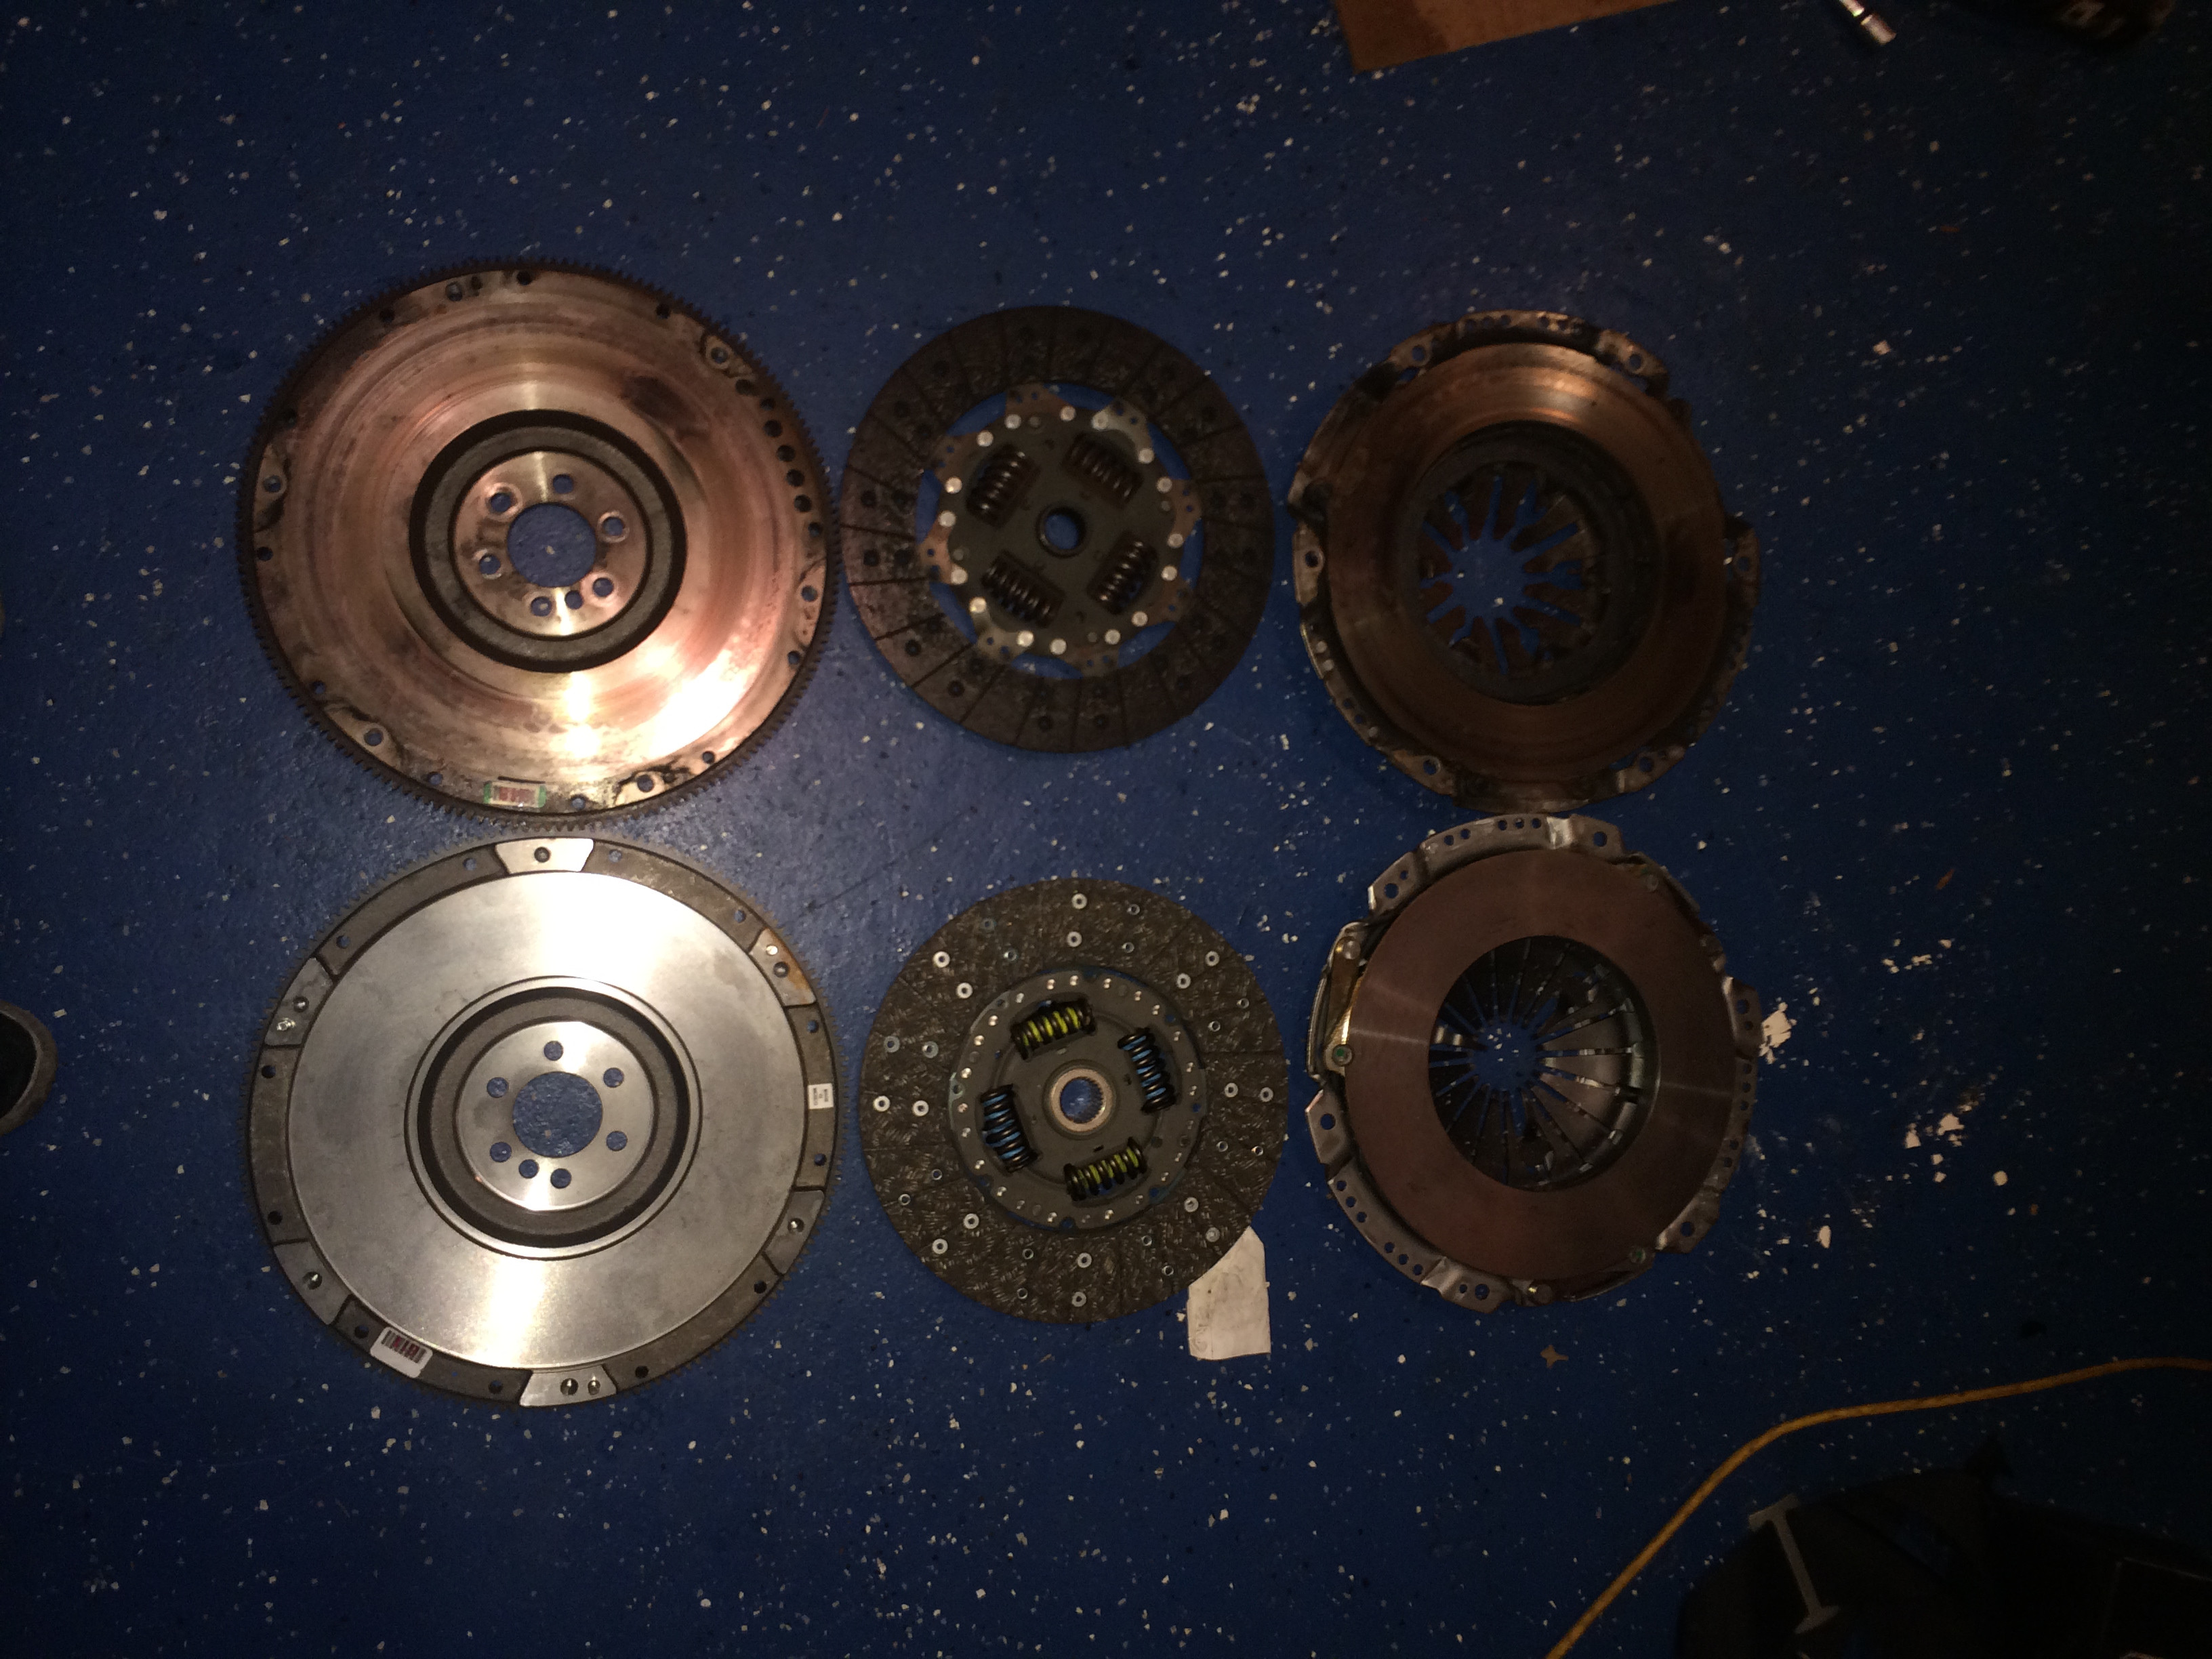
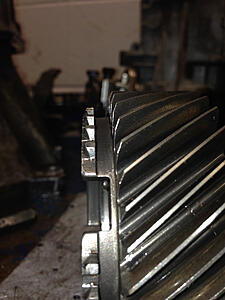
This is a side by side comparison of an LS1 clutch and an LS7 clutch
Well thats the update for today, ive got more going on for it tomorrow, i have the seat bracket for the drivers side so i should be getting my bride in there shortly too! Also just ordered the long tubes which is good because i broke the studs on the original manifolds so i cant put my exhaust back on until i put the LT's on.
Trending Topics
05-06-2014, 08:42 PM
#8
Teching In
Thread Starter
Join Date: Feb 2014
Posts: 14
Likes: 0
Received 0 Likes
on
0 Posts
thanks guys!!
Here's another update, I havent done a crazy amount of stuff, i prepped the car to get the long tube headers and while doing that i removed 5 out of 6 bolts holding the headers on and on both sides the back stud was broken off into the head. I'm not too sure how the hell the factory manfolds werent leaking? Well i got one of the studs out and the other one is awaiting a stud extractor. my stud extractor didnt work surprisingly (MAC tools).
The long tubes are. from ebay. Now before i get flamed for this, i did a lot of research before consciously making this decision. In drifting anything that is under the car is at risk of being destroyed. I would cry if i destroyed a 1300 dollar set of kooks, these were 535 shipped. In my research on these there were actually tons of really good reviews on them. I couldnt find much on the GTO forums about them but on LSTech there were a ton of people running them and proven similar gains to Kooks, they even did a side by side comparison and they seemed ok. I may do a seperate write up on these for anybody else interested.

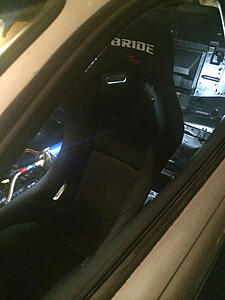
I mocked up my bride seat, fixed mount i have my own gripes about sliders.
I removed the plastidip that was all over the car. Car probably could be washed, but its still too cold to turn the water on at the house.

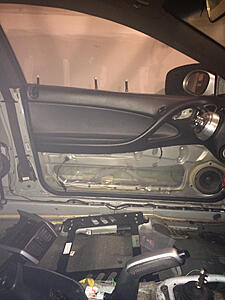
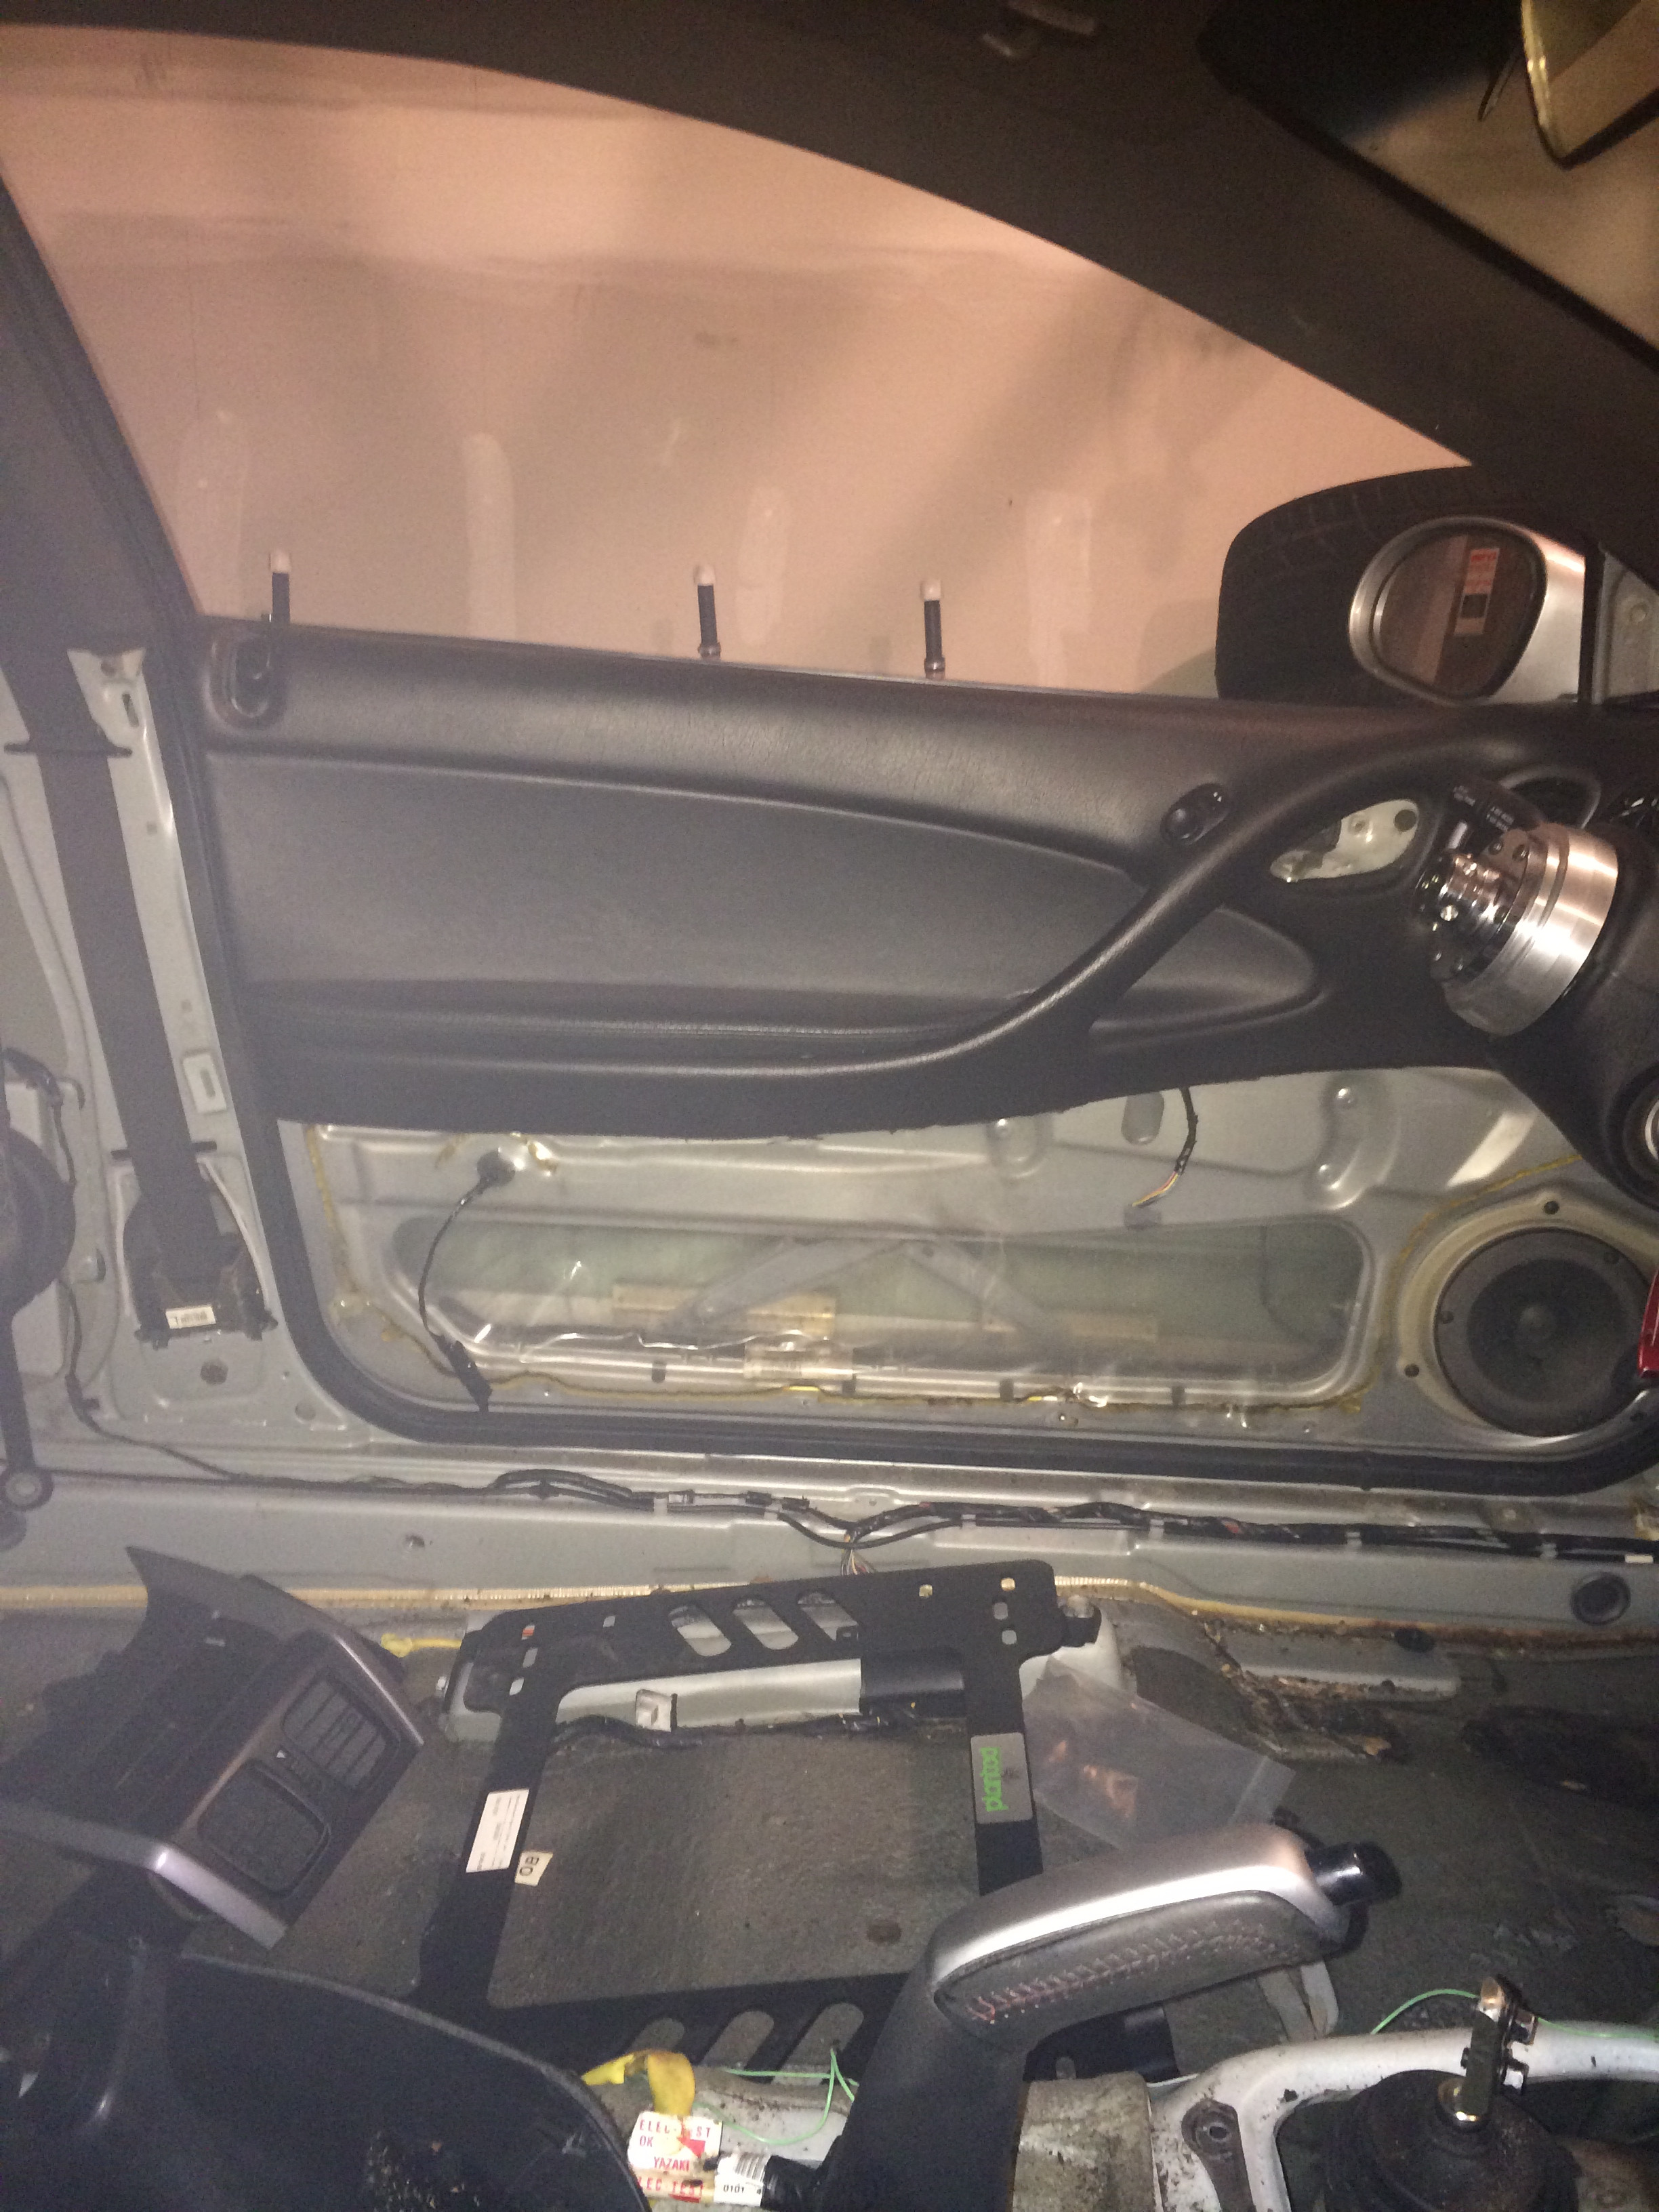
I started mocking up door panels for the car. When i sold my red interior part of the deal was cash and trade for black door panels. There was a seem right along the middle of the panel on the backside. I used that as a guidline for where to cut and this was the result. The reason im running door panels is because i want to make this car as streetable as possible and in order to run them i had to cut them to fit door bars. Thats why i got rid of my Pro-Am car, i wanted a car i could drive to car meets reliably while being decently comfortable. Plus my girlfriend was already pissed i took out the red interior haha
I began mocking up my Accusump and realized i bought the wrong install kit, so now i probably have to make my own line and get a different adapter. but i can at least get the canister installed. My seat fell off the bracket while i was taking this photo actually haha, on the back bracket of the sump im going to have to put spacers to make it work, there isnt alot of places to put an accusump in these cars, i probably should have gotten the 2 quart but oh well.

After i had reinstalled my transmission i went to go put the driveshaft in and found that the carrier bearing was completely shot, i only drove the car a few miles after i bought it and felt no vibration which i found strange. I really didnt want to have to put a one piece in there but it looks like i am now.
Thats where i am with it now. I still have to go to Runnemede NJ to pick up some dry ice to get the sound deadening material out of the car. The fabricator for my roll cage is almost read for me as well so i have to get moving on this bad boy.
The fabricator is actually my best friend who is building a whole new car for full on competition this year. i'm particularly excited for this because he asked me to be his spotter. He's a national SCCA autocross champ and hes extremely good in a drift car too. His car is an E36 M3 with a toyota 1JZ 2.5L straight 6 with BC cams and valvetrain, ARP studs and a GTX turbo setup. Were searching for around 500+ HP out of it. Here's a couple pictures from the setup so far.
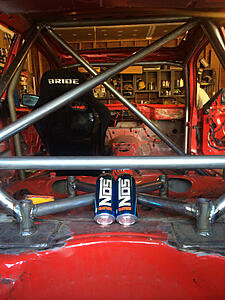
This was while he was doing his roll cage. Thought the NOS cans were a good touch haha.

Thats the driftworks turbo setup on there
Thanks for reading guys!!
Here's another update, I havent done a crazy amount of stuff, i prepped the car to get the long tube headers and while doing that i removed 5 out of 6 bolts holding the headers on and on both sides the back stud was broken off into the head. I'm not too sure how the hell the factory manfolds werent leaking? Well i got one of the studs out and the other one is awaiting a stud extractor. my stud extractor didnt work surprisingly (MAC tools).
The long tubes are. from ebay. Now before i get flamed for this, i did a lot of research before consciously making this decision. In drifting anything that is under the car is at risk of being destroyed. I would cry if i destroyed a 1300 dollar set of kooks, these were 535 shipped. In my research on these there were actually tons of really good reviews on them. I couldnt find much on the GTO forums about them but on LSTech there were a ton of people running them and proven similar gains to Kooks, they even did a side by side comparison and they seemed ok. I may do a seperate write up on these for anybody else interested.

I mocked up my bride seat, fixed mount i have my own gripes about sliders.

I removed the plastidip that was all over the car. Car probably could be washed, but its still too cold to turn the water on at the house.
I started mocking up door panels for the car. When i sold my red interior part of the deal was cash and trade for black door panels. There was a seem right along the middle of the panel on the backside. I used that as a guidline for where to cut and this was the result. The reason im running door panels is because i want to make this car as streetable as possible and in order to run them i had to cut them to fit door bars. Thats why i got rid of my Pro-Am car, i wanted a car i could drive to car meets reliably while being decently comfortable. Plus my girlfriend was already pissed i took out the red interior haha
I began mocking up my Accusump and realized i bought the wrong install kit, so now i probably have to make my own line and get a different adapter. but i can at least get the canister installed. My seat fell off the bracket while i was taking this photo actually haha, on the back bracket of the sump im going to have to put spacers to make it work, there isnt alot of places to put an accusump in these cars, i probably should have gotten the 2 quart but oh well.

After i had reinstalled my transmission i went to go put the driveshaft in and found that the carrier bearing was completely shot, i only drove the car a few miles after i bought it and felt no vibration which i found strange. I really didnt want to have to put a one piece in there but it looks like i am now.

Thats where i am with it now. I still have to go to Runnemede NJ to pick up some dry ice to get the sound deadening material out of the car. The fabricator for my roll cage is almost read for me as well so i have to get moving on this bad boy.
The fabricator is actually my best friend who is building a whole new car for full on competition this year. i'm particularly excited for this because he asked me to be his spotter. He's a national SCCA autocross champ and hes extremely good in a drift car too. His car is an E36 M3 with a toyota 1JZ 2.5L straight 6 with BC cams and valvetrain, ARP studs and a GTX turbo setup. Were searching for around 500+ HP out of it. Here's a couple pictures from the setup so far.

This was while he was doing his roll cage. Thought the NOS cans were a good touch haha.

Thats the driftworks turbo setup on there
Thanks for reading guys!!
05-06-2014, 08:42 PM
#9
Teching In
Thread Starter
Join Date: Feb 2014
Posts: 14
Likes: 0
Received 0 Likes
on
0 Posts
UPDATE: update time, I installed the longtubes and to my surprise the fit on the 535 dollar ebay brand I eat my own poo. header is spot on. The finish is great, i didnt have them coated so im sure they arent going to be beautiful for a long time but i'm not building a show car. For now, i am very happy with them! I'll probably do a seperate write up on these in the exhaust section and probably get flamed for it but i could only find info on these headers for camaros on LSTech.

These headers DO NOT have a venturi/vortex cone in the collector but im not surprised.
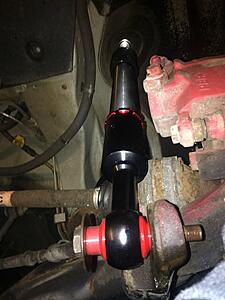
I then began disassembling my front end and installing bushings. I got the radius rod bushings from whiteline, these are the adjustable ones which are really just a bunch of different sized washers (spacers) but overall very nice. The way they are adjusted is using a different sequence of washers for different degrees of caster. I chose to run +.5 degrees, typically this can help in steering wheel return when at full lock. This is especially important because cars with modified steering knuckles tend to bind up and steering return can be very difficult.


thats the radius rod bushing installed. I jumped the gun on these because it makes more send to do the control arms first but you can do it either way. Next i removed the steering knuckles and control arms to replace the tired bushings in the rest of the front end. I'll explain why i didnt do sway bushings just yet later in this post.
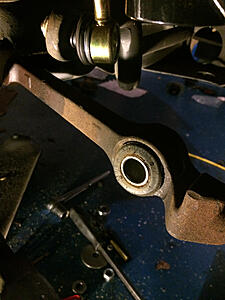
^^ thats the old radius rod to control arm bushing, i forgot to take a pic of the inner bushing but it was just as bad. and here are the new bushings, they were a hell of a project to press out. OH! and if anybody was wondering, the nut on the back side of the radius to control arm bushing is a 1 3/16 inch. maybe a 32mm? its a big girl.


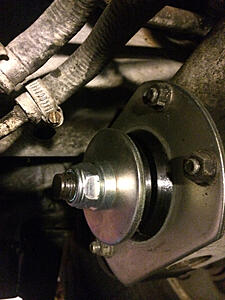
Ive removed the hubs from the steering knuckles and now that they are bare, they are ready to be modified for upgraded steering angle and faster steering ratios.
thanks for reading guys!


These headers DO NOT have a venturi/vortex cone in the collector but im not surprised.

I then began disassembling my front end and installing bushings. I got the radius rod bushings from whiteline, these are the adjustable ones which are really just a bunch of different sized washers (spacers) but overall very nice. The way they are adjusted is using a different sequence of washers for different degrees of caster. I chose to run +.5 degrees, typically this can help in steering wheel return when at full lock. This is especially important because cars with modified steering knuckles tend to bind up and steering return can be very difficult.


thats the radius rod bushing installed. I jumped the gun on these because it makes more send to do the control arms first but you can do it either way. Next i removed the steering knuckles and control arms to replace the tired bushings in the rest of the front end. I'll explain why i didnt do sway bushings just yet later in this post.

^^ thats the old radius rod to control arm bushing, i forgot to take a pic of the inner bushing but it was just as bad. and here are the new bushings, they were a hell of a project to press out. OH! and if anybody was wondering, the nut on the back side of the radius to control arm bushing is a 1 3/16 inch. maybe a 32mm? its a big girl.


Ive removed the hubs from the steering knuckles and now that they are bare, they are ready to be modified for upgraded steering angle and faster steering ratios.
thanks for reading guys!
05-06-2014, 08:43 PM
#10
Teching In
Thread Starter
Join Date: Feb 2014
Posts: 14
Likes: 0
Received 0 Likes
on
0 Posts
This is part one of a two part update, my driveshaft actually came in monday. GForce1320 thank you very much for your EXCELLENT service! The product was top notch and install was exceptionally easy.
So yesterday I put this driveshaft in, started putting my front end back together, even though i'm still waiting for my knuckles, figured i might as well get it all together and get everything straight while i wait.

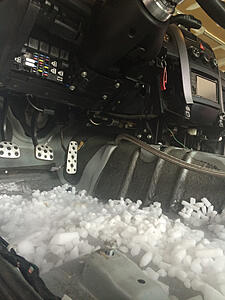
I also started to chip away at the sound deadening using dry ice, a flathead and a screwdriver. In my area we have Mack the Ice Man for dry ice and the day i went was right after someone cleaned him out for dry ice and the day before he got a shipment in so we could only scrape together 6 lbs of it but i figured ahh what the hell its enough to get started.
I'll take some more pics of that later its starting to looks really good. so far in weight savings id say roughly 15lbs and i only did the passenger side floor. i saved all the sound deadening that chipped off so i can get an accurate measurement of how much weight savings this actually is.
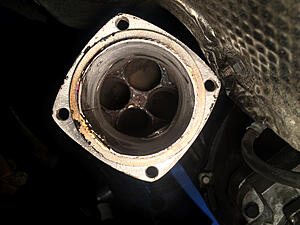
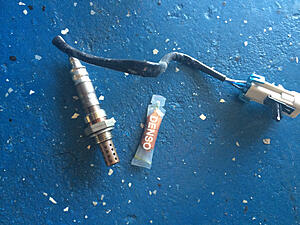
whoever the jackalope is that made the previous owners cat deleted mid pipes welded too close to the O2 sensors and i was only able to recover 1 of the sensors out of the pipes. I did some searching and called a local commercial parts distributor and i was able to get the other 3 O2 sensors for 102 bucks total and they were OEM Denso.
I decided that on a cold night when i didnt want to work on the car id try to figure out what the second guage in my Banshee pod was since it wasnt wired in and didnt turn on.

I figured out that its an Autometer Pro-Comp DPIC which i had never heard of but is pretty cool. It measures things like 0-60mph, est WHP, lateral g-forces, etc. I'm not sure if i'm going to use it or not but still thought it was pretty cool. I really want to put an Oil PSI gauge there but maybe i can find another spot to mount one of those.
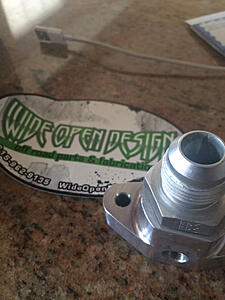
I'll probably have another update later today and maybe a sound clip of my O. B. X. headers and SLP LM1. I'm currently bolting things back together and Getting my Accusump ready for use. Tomorrow i should be getting the Wide Open Motorsports Oil adapter for my accusump and the 90 degree -10AN fitting ill need as well. so updates are coming with the warmer weather! haha.
Thanks for reading!
So yesterday I put this driveshaft in, started putting my front end back together, even though i'm still waiting for my knuckles, figured i might as well get it all together and get everything straight while i wait.


I also started to chip away at the sound deadening using dry ice, a flathead and a screwdriver. In my area we have Mack the Ice Man for dry ice and the day i went was right after someone cleaned him out for dry ice and the day before he got a shipment in so we could only scrape together 6 lbs of it but i figured ahh what the hell its enough to get started.

I'll take some more pics of that later its starting to looks really good. so far in weight savings id say roughly 15lbs and i only did the passenger side floor. i saved all the sound deadening that chipped off so i can get an accurate measurement of how much weight savings this actually is.
whoever the jackalope is that made the previous owners cat deleted mid pipes welded too close to the O2 sensors and i was only able to recover 1 of the sensors out of the pipes. I did some searching and called a local commercial parts distributor and i was able to get the other 3 O2 sensors for 102 bucks total and they were OEM Denso.

I decided that on a cold night when i didnt want to work on the car id try to figure out what the second guage in my Banshee pod was since it wasnt wired in and didnt turn on.

I figured out that its an Autometer Pro-Comp DPIC which i had never heard of but is pretty cool. It measures things like 0-60mph, est WHP, lateral g-forces, etc. I'm not sure if i'm going to use it or not but still thought it was pretty cool. I really want to put an Oil PSI gauge there but maybe i can find another spot to mount one of those.
I'll probably have another update later today and maybe a sound clip of my O. B. X. headers and SLP LM1. I'm currently bolting things back together and Getting my Accusump ready for use. Tomorrow i should be getting the Wide Open Motorsports Oil adapter for my accusump and the 90 degree -10AN fitting ill need as well. so updates are coming with the warmer weather! haha.
Thanks for reading!
05-06-2014, 08:43 PM
#11
Teching In
Thread Starter
Join Date: Feb 2014
Posts: 14
Likes: 0
Received 0 Likes
on
0 Posts
alrighty then, i guess its time for another update!
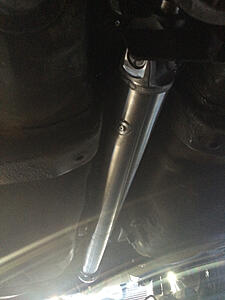
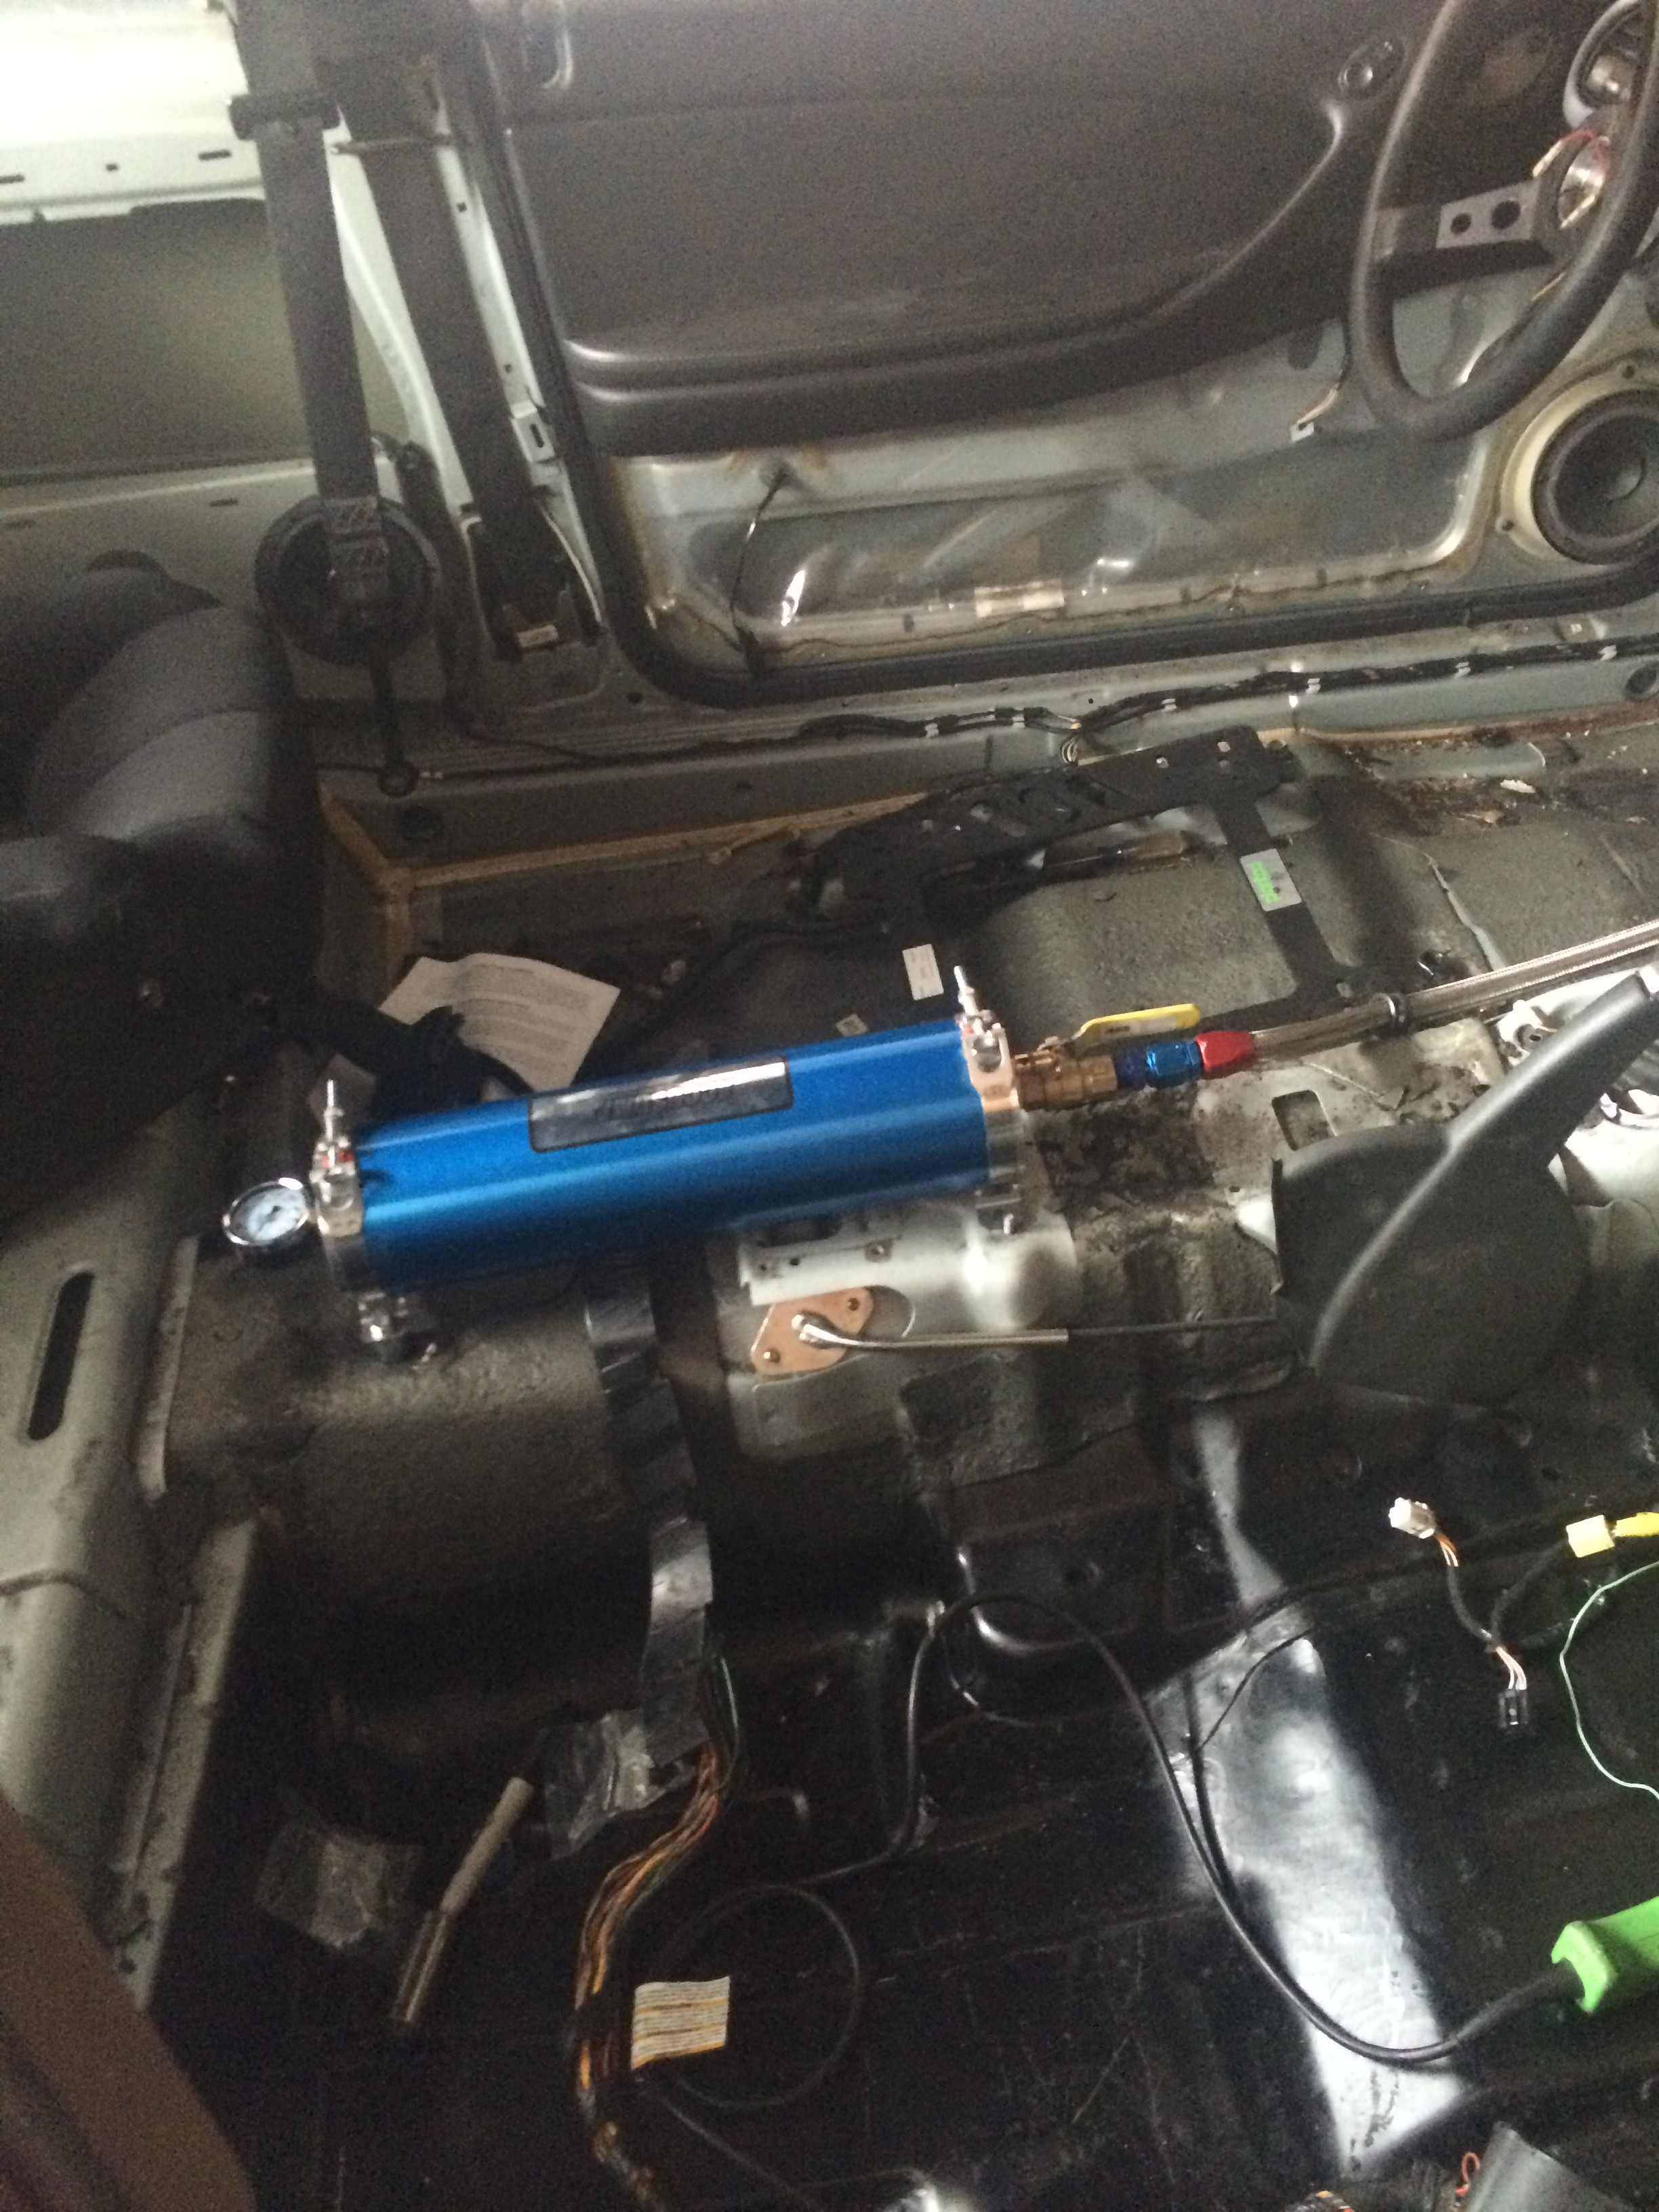
The accusump is fully installed now, i used the wide open design adapter which is a really nice piece. i recommend anyone that goes this route delete your AC, mine is sitting against one of the lines and i had to carefully try to bend it out of the way, im not too happy with it so ill probably delete it as well but i would really like to try to keep it.

I've spent weeks looking at wheels and i really wanted to stay 17's for the purpose of in expensive drifting wheels. well i found it's just easier to succumb to the power of 18's. i've found an inexpensive set for $700 on ebay that im going to run. they are 18x9.5 in the rear and 18x8.5 in the front both +35. fitment should be tight but i like that.

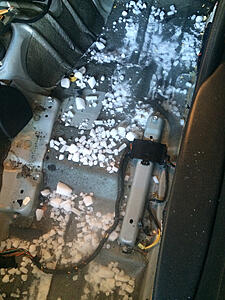
I finally removed all of the sound deadening material, well as much as i could, the trans tunnel was extremely hard to rid of the sound deadening. If i had to do it again i would pass my weight savings were only 18lbs and it was a tremendous amount of work. the awesome part about it is when i rev the car, it sounds like an old muscle car on the inside haha.

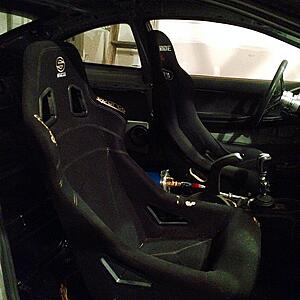
next i got my drivers seat fully mocked up and bolted in. Im really happy with the drivers seat, i fixed mounted it which means no sliders. Drifters tend to like this better because it makes for a lower seating position and i have a personal vendetta with sliders because alot of them have play after using them for a little while. this may not bother most but when you're entering a turn at 60-100 mph and transitioning through turns, you can really feel that little bit of play.

Thats my update for now, i really only need a few more things then shes off to fabrication
I need:
1. Steering knuckles modified for angle
2. Extended tie rods to compensate for the new knuckles
3. Hydraulic Ebrake (ASD most likely)
4. Grippy front tires (either Hankook RS3's or Falken RT615K)
When it goes in for fabrication i will have done:
1. Roll Cage
2. Weld Differential
3. Sway Bar link mount relocated to the control arm
I'm happy with the progress ive made in such little time with this car. I was on disability but today i will be returning to work as to state of NJ and the company i work for have really bent me over. Hopefully with the better income i will be making even faster progress on this.
Thanks for reading guys!
The accusump is fully installed now, i used the wide open design adapter which is a really nice piece. i recommend anyone that goes this route delete your AC, mine is sitting against one of the lines and i had to carefully try to bend it out of the way, im not too happy with it so ill probably delete it as well but i would really like to try to keep it.

I've spent weeks looking at wheels and i really wanted to stay 17's for the purpose of in expensive drifting wheels. well i found it's just easier to succumb to the power of 18's. i've found an inexpensive set for $700 on ebay that im going to run. they are 18x9.5 in the rear and 18x8.5 in the front both +35. fitment should be tight but i like that.


I finally removed all of the sound deadening material, well as much as i could, the trans tunnel was extremely hard to rid of the sound deadening. If i had to do it again i would pass my weight savings were only 18lbs and it was a tremendous amount of work. the awesome part about it is when i rev the car, it sounds like an old muscle car on the inside haha.


next i got my drivers seat fully mocked up and bolted in. Im really happy with the drivers seat, i fixed mounted it which means no sliders. Drifters tend to like this better because it makes for a lower seating position and i have a personal vendetta with sliders because alot of them have play after using them for a little while. this may not bother most but when you're entering a turn at 60-100 mph and transitioning through turns, you can really feel that little bit of play.


Thats my update for now, i really only need a few more things then shes off to fabrication
I need:
1. Steering knuckles modified for angle
2. Extended tie rods to compensate for the new knuckles
3. Hydraulic Ebrake (ASD most likely)
4. Grippy front tires (either Hankook RS3's or Falken RT615K)
When it goes in for fabrication i will have done:
1. Roll Cage
2. Weld Differential
3. Sway Bar link mount relocated to the control arm
I'm happy with the progress ive made in such little time with this car. I was on disability but today i will be returning to work as to state of NJ and the company i work for have really bent me over. Hopefully with the better income i will be making even faster progress on this.
Thanks for reading guys!
05-06-2014, 08:44 PM
#12
Teching In
Thread Starter
Join Date: Feb 2014
Posts: 14
Likes: 0
Received 0 Likes
on
0 Posts
alright so the interior WAS pretty much finished but Cebo called it and my accusump is leaking =X. it's leaking both from the wide open designs block fitting, i think its defective, it doesnt look like the -10AN adapter is seating properly, surprisingly my -10AN line ISNT leaking. It's also leaking at the valve on the accusump which is probably my fault. i'll post some pics of all this stuff later, here's the interior so far,
I also got my hydraulic handbrake in from ASD Motorsports, the unit is extremely nicely made. for 200 dollars this is the nicest made handbrake ive seen yet. this is a 3/4 pass through master cylinder.
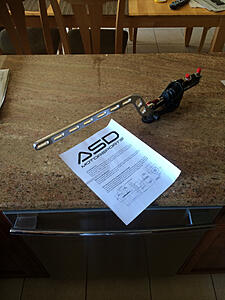
I also really like the fact that ASD offers this style ebrake as well as a straight pull. I once had a straight pull in an S13 and i really wasnt a fan, this will hopefully feel natural to me.
This is the approximate position the ebrake will be when its fully mounted

SidewayzGTO you requested pics of the adapter on the block which i completely forgot about, i owe you and this build thread those pics because it is a very nice piece so hang tight and ill be putting them up soon!
05-06-2014, 08:45 PM
#13
Teching In
Thread Starter
Join Date: Feb 2014
Posts: 14
Likes: 0
Received 0 Likes
on
0 Posts
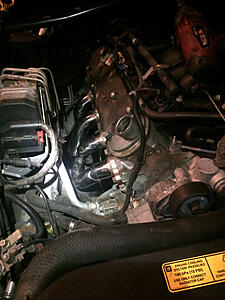
Alright, i took some pics of the wide open design adapter for the accusump on the engine, this is also a good time to say that i cant get the mothersmurfer to stop leaking, shane (GTODrifter) had the same issue when he ran his but he said he removed his alternator to get some leverage and was able to get it to stop so i may do that.
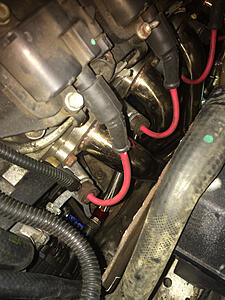
you can see the -10an line and where it hooks up sort of there
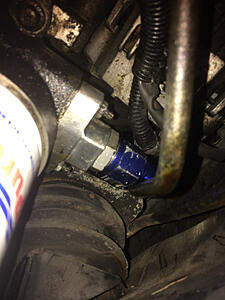
Next up is the beginning of me hooking up my hydraulic handbrake. I decided that since i'm a little short on time, im going to run it straight through the distribution block. A lot of 350Z owners have to do this and i'm just not ready to remove my entire ABS system yet. Nobody in the GTO community does this, or so i havent seen any, so i'm going to try to be as detailed as possible.

Thats the distribution block right there with one of the lines for the Ebrake. Labeled on the block, there or 6 lines, two out of the top labeled LF and LR. the other two say MC1 and MC2 (one of these lines are 1/4 inch and the other is 3/8) and two on the back side labeled RR and RF. MC1 is the smaller 3/8 line that comes out of the master cylinder and controls the front lines. This is the line that is modified to install a staging brake or line lock. MC2 is the 1/4 inch line that controls the rear brakes.
MC2 is the only line that will be touched the rest will remain in the same location. The way the pass through hydraulic handbrake works is very simple, it is put "in line " with the brake line that comes out of the master cylinder that controls the rear brakes. So basically one line for the HYdro has to come from the master and the other goes to the distribution block. So realistically what i'm doing is just interrupting the line however in order to do that i have to make new line thats all. Very simple.
In that pic you can see the brake line coming out of the distribution block and going accross the firewall, i'm mounting my ebrake next to the drivers seat, so i have to make sure the lines go to that side of the cockpit.
PRO TIP - the fitting that goes into the distribution block AND master cylinder are M12x1.0. They DO NOT make a union for this fitting so i highly suggest making your own line with a fitting that will mate up to your hydraulics for the Ebrake!
thats underneath the car where the fitting will be met by a -3AN line which is the equivalent of 3/8 -24. this is another pain in the *** because 3/8 - 24 is only made for a 3/8 inch line. so i'm at a stand still with the fittings but i'm sure ill get it figured out.
thanks for reading!

you can see the -10an line and where it hooks up sort of there

Next up is the beginning of me hooking up my hydraulic handbrake. I decided that since i'm a little short on time, im going to run it straight through the distribution block. A lot of 350Z owners have to do this and i'm just not ready to remove my entire ABS system yet. Nobody in the GTO community does this, or so i havent seen any, so i'm going to try to be as detailed as possible.

Thats the distribution block right there with one of the lines for the Ebrake. Labeled on the block, there or 6 lines, two out of the top labeled LF and LR. the other two say MC1 and MC2 (one of these lines are 1/4 inch and the other is 3/8) and two on the back side labeled RR and RF. MC1 is the smaller 3/8 line that comes out of the master cylinder and controls the front lines. This is the line that is modified to install a staging brake or line lock. MC2 is the 1/4 inch line that controls the rear brakes.
MC2 is the only line that will be touched the rest will remain in the same location. The way the pass through hydraulic handbrake works is very simple, it is put "in line " with the brake line that comes out of the master cylinder that controls the rear brakes. So basically one line for the HYdro has to come from the master and the other goes to the distribution block. So realistically what i'm doing is just interrupting the line however in order to do that i have to make new line thats all. Very simple.

In that pic you can see the brake line coming out of the distribution block and going accross the firewall, i'm mounting my ebrake next to the drivers seat, so i have to make sure the lines go to that side of the cockpit.
PRO TIP - the fitting that goes into the distribution block AND master cylinder are M12x1.0. They DO NOT make a union for this fitting so i highly suggest making your own line with a fitting that will mate up to your hydraulics for the Ebrake!

thats underneath the car where the fitting will be met by a -3AN line which is the equivalent of 3/8 -24. this is another pain in the *** because 3/8 - 24 is only made for a 3/8 inch line. so i'm at a stand still with the fittings but i'm sure ill get it figured out.
thanks for reading!
05-06-2014, 08:46 PM
#14
Teching In
Thread Starter
Join Date: Feb 2014
Posts: 14
Likes: 0
Received 0 Likes
on
0 Posts
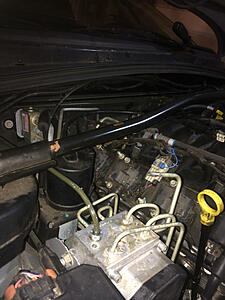
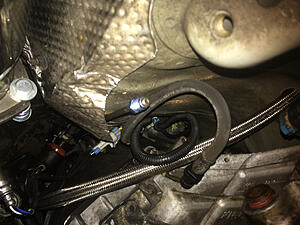
alrighty, i finished the hydro ebrake setup. The next chance i get to perfect the lines i will but for now this is whats going to have to work. Hmm maybe i can design a GTO hydro e-brake install kit......
anywho, the line that goes into the master cylinder was a genuine pain in the *** to bend. the amount of room i had to make the bend i needed was just barely enough. This was easily the hardest part of making the lines. It's the line on the left which is towards the front of the master cylinder.

The end of the line was bit farther back than i wanted it to be, at the ends of the lines i used a M12x1.0 Union with a 3/16ths brake line that had an M12x1.0 on one end and a 3/8 -24 fitting on the other side. the side with the 3/8 -24 had a standard flare so i also bought an adapter fitting that converts it to ISO bubble. The line that was longer i ended up curling around just to keep the AN line away from the driveshaft. I'm ok with this, unfortunately i dont have any flaring tools or cutting tools so i had to use premade lines. If i had flaring tools i definitely would have went a different route but i am overall satisfied with my end product.

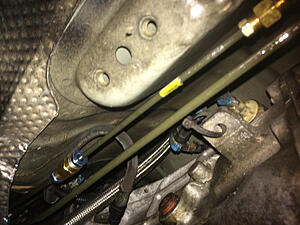
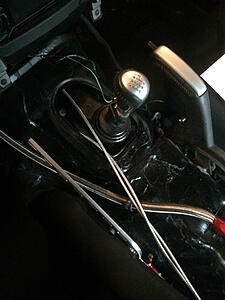
The abrake is completely hooked up, im waiting for my knuckles to come in and then i can bleed the brakes and the clutch and as long as everything is good its off to get the roll cage, diff, and steering end links done!
anywho, the line that goes into the master cylinder was a genuine pain in the *** to bend. the amount of room i had to make the bend i needed was just barely enough. This was easily the hardest part of making the lines. It's the line on the left which is towards the front of the master cylinder.

The end of the line was bit farther back than i wanted it to be, at the ends of the lines i used a M12x1.0 Union with a 3/16ths brake line that had an M12x1.0 on one end and a 3/8 -24 fitting on the other side. the side with the 3/8 -24 had a standard flare so i also bought an adapter fitting that converts it to ISO bubble. The line that was longer i ended up curling around just to keep the AN line away from the driveshaft. I'm ok with this, unfortunately i dont have any flaring tools or cutting tools so i had to use premade lines. If i had flaring tools i definitely would have went a different route but i am overall satisfied with my end product.


The abrake is completely hooked up, im waiting for my knuckles to come in and then i can bleed the brakes and the clutch and as long as everything is good its off to get the roll cage, diff, and steering end links done!
04-19-2024, 09:22 AM
#15
Registered User

Join Date: Apr 2024
Posts: 1
Likes: 0
Received 0 Likes
on
0 Posts
I�m new to GTO ownership and have decided to build a drift car out of my 2005. Great comprehensive build break down. Thank you for sharing all of this. I�m in the process of setting up a hydro brake and wanted to know what you used for rear calipers and what how did you mount them? Hopefully you still have the car!
hydro ebrake setup. The next chance i get to perfect the lines i will but for now this is whats going to have to work. Hmm maybe i can design a GTO hydro e-brake install kit......
anywho, the line that goes into the master cylinder was a genuine pain in the *** to bend. the amount of room i had to make the bend i needed was just barely enough. This was easily the hardest part of making the lines. It's the line on the left which is towards the front of the master cylinder.
Attachment 725621
The end of the line was bit farther back than i wanted it to be, at the ends of the lines i used a M12x1.0 Union with a 3/16ths brake line that had an M12x1.0 on one end and a 3/8 -24 fitting on the other side. the side with the 3/8 -24 had a standard flare so i also bought an adapter fitting that converts it to ISO bubble. The line that was longer i ended up curling around just to keep the AN line away from the driveshaft. I'm ok with this, unfortunately i dont have any flaring tools or cutting tools so i had to use premade lines. If i had flaring tools i definitely would have went a different route but i am overall satisfied with my end product.
Attachment 725622
Attachment 725623
Attachment 725624
The abrake is completely hooked up, im waiting for my knuckles to come in and then i can bleed the brakes and the clutch and as long as everything is good its off to get the roll cage, diff, and steering end links done![/QUOTE]
I
[ QUOTE=MattGTO;18194370]alrighty, i finished thehydro ebrake setup. The next chance i get to perfect the lines i will but for now this is whats going to have to work. Hmm maybe i can design a GTO hydro e-brake install kit......
anywho, the line that goes into the master cylinder was a genuine pain in the *** to bend. the amount of room i had to make the bend i needed was just barely enough. This was easily the hardest part of making the lines. It's the line on the left which is towards the front of the master cylinder.
Attachment 725621
The end of the line was bit farther back than i wanted it to be, at the ends of the lines i used a M12x1.0 Union with a 3/16ths brake line that had an M12x1.0 on one end and a 3/8 -24 fitting on the other side. the side with the 3/8 -24 had a standard flare so i also bought an adapter fitting that converts it to ISO bubble. The line that was longer i ended up curling around just to keep the AN line away from the driveshaft. I'm ok with this, unfortunately i dont have any flaring tools or cutting tools so i had to use premade lines. If i had flaring tools i definitely would have went a different route but i am overall satisfied with my end product.
Attachment 725622
Attachment 725623
Attachment 725624
The abrake is completely hooked up, im waiting for my knuckles to come in and then i can bleed the brakes and the clutch and as long as everything is good its off to get the roll cage, diff, and steering end links done![/QUOTE]
Spoiler!