When you click on links to various merchants on this site and make a purchase, this can result in this site earning a commission. Affiliate programs and affiliations include, but are not limited to, the eBay Partner Network.
LS3 to LSA conversion, wiring the extra sensors on the supercharger.
I'm swapping in a LSA out of a '13 ZL1 in the place of the LS3, I have noticed that there are quite a few extra sensors that I need to hookup, like the extra 2 MAP sensors, the boost control solenoid and vacuum control for the vacuum actuator. Is there any diagram/manual to explain how to hook these sensors to the E67 PCM?, I know adding the LSA supercharger to the LS3 engines becomes very common, so I know its doable with the stock LS3 harness.
I am sure others have the exact answers you are looking for, however, if it was me, I would sell whatever you have for the LS3 and get the GMPP LSA harness and ECU. Sure beats taking the harness apart, adding wires, adding pins at the ECU, etc...Just my 2 cents...
I am sure others have the exact answers you are looking for, however, if it was me, I would sell whatever you have for the LS3 and get the GMPP LSA harness and ECU. Sure beats taking the harness apart, adding wires, adding pins at the ECU, etc...Just my 2 cents...
Andrew
That was my initial plan, but being in a country where everyone got european/asian cars, its so hard to find a buyer for the LS3 harness that I have. So my best bet is to do it myself.
That was my initial plan, but being in a country where everyone got european/asian cars, its so hard to find a buyer for the LS3 harness that I have. So my best bet is to do it myself.
Have you checked the GMPP documentation for the LSA kit? Pretty sure they have pinouts...
there's one MAP sensor, you extend your wired and use your original as a plug for the snout, either that or the IAT2 sensor. same deal with the IAt on the lid, extend the wires. you don't need the boost solenoid, that's for the ZL1/CTS-V FPCM. I gotta see if I can find some pics from my LS3 to LSA blower install...
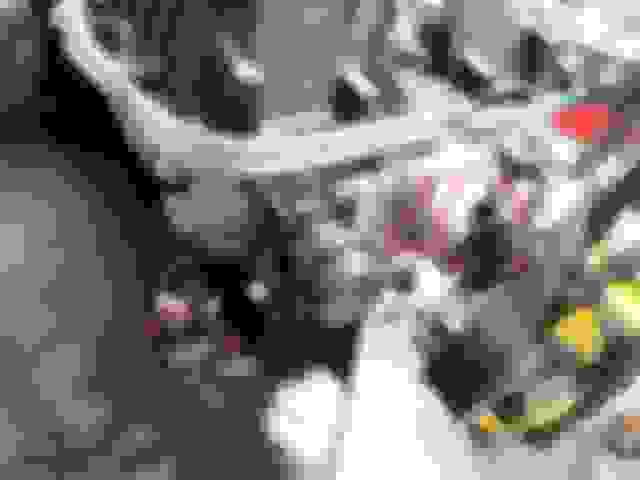
I'm very familiar with LS swaps, but unfortunately this is my first time to tackle with a forced induction system, so everything here is totally new to me. What confusing me most is seeing 3 MAP sensors!, I don't know which one to connect to my normal MAP wire, and why there are another 2 more?, as you see in this pic :
Also there are two more connectors that seems like controlling boost level or something that I also don't know what to do with them :
Please accept my apology if I'm asking some silly questions, it seems I'm getting old enough (47) to loose my ability to figure things out alone
I just bought a truck with one of these on it. I am also 47, I also know my way around LS1s, but am new to these suerchargers and even newer to automatics. I have also noticed extra sensors that are just not in use. I will be watching this thread and learning along with you.
Last edited by transam1998; 09-15-2017 at 11:30 AM.
Reason: removing extra pics
1 is the boost solenoid - don't need that. 2 is the evap solenoid. 3 is the 3 bar MAP, extend the wires from the 2 bar connector, you won't need it anymore. 4 is the IAT2, same deal. 5 is IAT1, which isn't used for anything but a plug for the hole that's there underneath. Stock LS3 grabs inlet temp at the MAF
EDIT: made a slight mistake. 4 is also used as a plug. The sensor just to the right is IAT2 - sorry about that
As others have said delete the boost solenoid, EVAP, and 2 bar map sensors. Get a break out harness for your MAF so you can use the IAT sensor in the lid, you also want to extend you MAP wiring to use the 3 bar sensor in the lid. Run a vacuum line to the bypass actuator after you delete the solenoid lines.
1 is the boost solenoid - don't need that. 2 is the evap solenoid. 3 is the 3 bar MAP, extend the wires from the 2 bar connector, you won't need it anymore. 4 is the IAT2, same deal. 5 is IAT1, which isn't used for anything but a plug for the hole that's there underneath. Stock LS3 grabs inlet temp at the MAF
EDIT: made a slight mistake. 4 is also used as a plug. The sensor just to the right is IAT2 - sorry about that
Good information, thanks.
Looks like there is a temp sensor near the bottom of the supercharger that is also not in use.
I think I got everything sorted now. So I need to extend the MAP connector and connect it to the MAP sensor in number 3 and take two wires from the LS3 MAF connector and hook them to the IAT located in the lid, and just delete everything else. besides connecting a vacuum line to the boost actuator.
Thank you so much guys, I was really puzzled when I got the engine and saw all these sensors, I didn't know which is which!!
I think I will creat a new thread to show my project, as I'm sure there will be a lot of questions as I go
I used this harness Caspers Electronics MAF/IAT Breakout Harnesses 108165
Originally Posted by Kamaro
I think I got everything sorted now. So I need to extend the MAP connector and connect it to the MAP sensor in number 3 and take two wires from the LS3 MAF connector and hook them to the IAT located in the lid, and just delete everything else. besides connecting a vacuum line to the boost actuator.
Thank you so much guys, I was really puzzled when I got the engine and saw all these sensors, I didn't know which is which!!
I think I will creat a new thread to show my project, as I'm sure there will be a lot of questions as I go
Evap solenoid. We made a vacuum line, The LS3 line refused to cooperate lol
Boost acuator with solenoid removed. Solenoid sends a boos referenced signal that only the LSA cars' fuel pump control module uses. That small vacuum line in the pic above my finger is from a port on the blower to my gauge, but it could go to a BAP.
IAT1 used as a plug
LS3 2 Bar used as a plug...IAT2 on lid is in use (gray connector in pic)
3 bar on lid with extended wires from LS3 2 bar.<br/>side note: I used a stock brake booster to snout vacuum hose from a ZL1
Looks like you got it sorted out. I do a lot of LSA swaps. All the extra sensors are only used in the E67 ECM, the E38s that most have connected to their LS3s and such when they do a conversion do not have inputs for the sensors.
For reference, in the two pics in post #7:
#1 is the boost control solenoid. On and E67, it opens the bypass actuator to limit boost in stock applications. On conversions, just delete the solenoid, it also simplifies the vacuum hookup.
#2 is the EVAP solenoid, mounted on the passenger cylinder head on most LS3 applications. Extend lines and wires to use the solenoid on a conversion.
#3 is the 3-bar MAP sensor, used to measure manifold pressure after the rotors and intercoolers. On a conversion, extend stock wires to this location, change parameters in PCM to match the new sensor, assuming your PCM can use this particular sensor. Some E38 truck applications cannot take over 255 kpa in the OS, nor a negative offset, so the MAP sensor linear calibration will be off. You will need to source a different sensor in these applications. A stock LS3 MAP sensor only reads 4PSI above atmospheric, so I don't recommend using it.
#4 is the baro sensor, used in the E67 to read barometric pressure to calculate airflow and fueling requirements real time, vs a key-on-engine-off recalibration at different altitudes and such. this is open the atmosphere, it can be removed.
#5 is the MAP sensor used to calculate engine vacuum behind the TB, it does not read manifold pressure. single bar sensor, leave in place to plug the hole.
Several have also referenced the IAT sensor in the lid. When moving the wires from the MAF sensor (IAT1 on a E67), to the sensor in the lid (IAT2 in an E67), the calibration is different between the two. In HPT, you can change the resistance values axis to match a stock LSA so that the temperature values are correct. In some spots it is only a degree or two, but if you don't change the resistance values, it is off by 10 degrees or more.
I know this is an old thread but I want the stock zl1 boost gauge in the 4pack pod to work in a non zl1. I have the 3bar sensor installed already does anyone know if there needs to be anything else done?

 09-14-2017, 07:27 PM