
 04-29-2016, 05:39 PM
Last edit by: IB Advertising
See related guides and technical advice from our community experts:
- Camaro and Firebird How to Add AUX Input MP3 Player without Adapter<br>Step by step instructions for do-it-yourself repairs.

How you can add an aux input/mp3 player without an adapter
04-21-2015, 02:44 PM
#621
Launching!
Thread Starter


Can you post a picture? If you look at the first post/picture in this thread it shows what it should look like with the bottom taken off (stereo is upside down)
 04-21-2015, 04:40 PM
#622
I won't be home from work til about 10:00 tonight so I probably can't post up any pictures tonight. If i can't, I definitely will tomorrow. It is the exact same radio that is in post #606 though. In the picture in that post where he has the face off and looking in, you can see the heat thing on the left that I was able to get off, but the wires that I need to get to are the ones on the right on that picture I believe. Looking at that picture, I'm honestly not sure how he spliced into thos wires even with the face off! lol
04-21-2015, 05:26 PM
#623
Launching!
Thread Starter
I won't be home from work til about 10:00 tonight so I probably can't post up any pictures tonight. If i can't, I definitely will tomorrow. It is the exact same radio that is in post #606 though. In the picture in that post where he has the face off and looking in, you can see the heat thing on the left that I was able to get off, but the wires that I need to get to are the ones on the right on that picture I believe. Looking at that picture, I'm honestly not sure how he spliced into thos wires even with the face off! lol

 04-21-2015, 06:20 PM
#624
Thanks for the pictures. It was mentioned that the newer units had a different connection but the signal wires were the same, but I've never seen one. Good to see it and have it confirmed, I'm sure they'll help other people.
Here are some pics from the install I did on 99'CajunFirehawk157's cassette deck:

There are two connectors, the smaller one has the audio. It's the same two pins, but the channels seem to be reversed. I don't believe the wire on the end is a ground, I grounded it to the chassis.
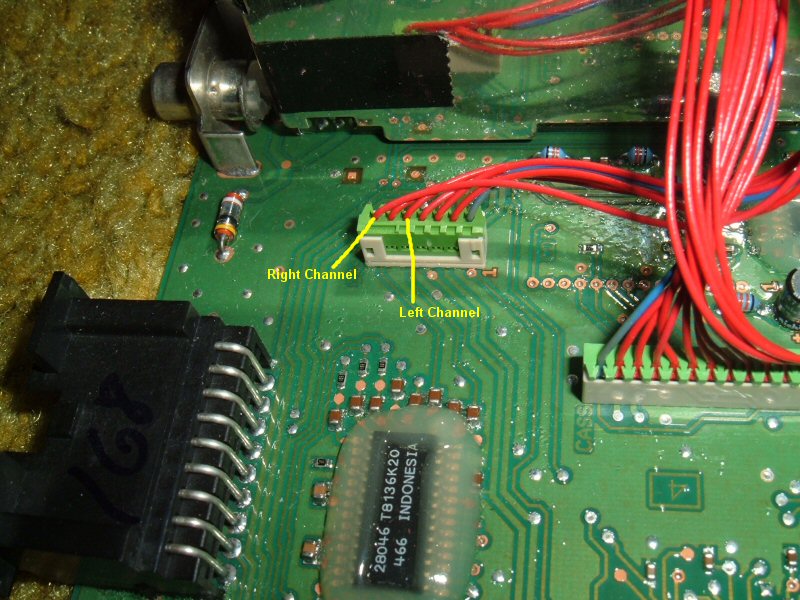
Here it is all done. I drilled a hole in the back and used a grommet, and a big piece of heat shrink tubing on the connector for a cleaner install.

Here are some pics from the install I did on 99'CajunFirehawk157's cassette deck:
There are two connectors, the smaller one has the audio. It's the same two pins, but the channels seem to be reversed. I don't believe the wire on the end is a ground, I grounded it to the chassis.
Here it is all done. I drilled a hole in the back and used a grommet, and a big piece of heat shrink tubing on the connector for a cleaner install.
04-21-2015, 08:01 PM
#625
Launching!
Thread Starter
I remembered I still had a pontiac tape deck - you don't need to take it apart quite as much as the picture, basically take off the front, all held on with plastic clips. Once out, unhook the wire.
Then take off the bottom, two little brass screws on each side, three on the back, and then one more in the back by the antenna. Then there are two larger screws on the top and bottom of the heatsink. Then the board slide out the bottom.
You don't need to take out the small screws on the top, they hold on the tape/cd to the top of the case, and a small metal clip that holds the long circuit board extending from the front face. The large star screws on the back are just for holding the tape/cd to the case as well.
May be slightly different tape vs CD
04-21-2015, 08:13 PM
#626
I remembered I still had a pontiac tape deck - you don't need to take it apart quite as much as the picture, basically take off the front, all held on with plastic clips. Once out, unhook the wire.
Then take off the bottom, two little brass screws on each side, three on the back, and then one more in the back by the antenna. Then there are two larger screws on the top and bottom of the heatsink. Then the board slide out the bottom.
You don't need to take out the small screws on the top, they hold on the tape/cd to the top of the case, and a small metal clip that holds the long circuit board extending from the front face. The large star screws on the back are just for holding the tape/cd to the case as well.
May be slightly different tape vs CD
Then take off the bottom, two little brass screws on each side, three on the back, and then one more in the back by the antenna. Then there are two larger screws on the top and bottom of the heatsink. Then the board slide out the bottom.
You don't need to take out the small screws on the top, they hold on the tape/cd to the top of the case, and a small metal clip that holds the long circuit board extending from the front face. The large star screws on the back are just for holding the tape/cd to the case as well.
May be slightly different tape vs CD
04-21-2015, 09:41 PM
#627
Staging Lane

Join Date: Oct 2014
Posts: 71
Likes: 0
Received 0 Likes
on
0 Posts
My '95 Z28 has the Bose Premium Sound system with the single CD player. Anyone attempt to add an aux jack to one of these? Just wondering if the internal wiring would be the same.
Thanks,
Jim
Thanks,
Jim
04-23-2015, 06:48 PM
#628
Launching!
Thread Starter
I don't know much about the earlier models - there are some posts around #31 and #33 with a 96, it had a flat flex ribbon cable which is much more difficult to splice into
03-22-2016, 08:18 PM
#629
Teching In
iTrader: (17)

Join Date: Nov 2008
Location: Mtn Home AFB, Idaho
Posts: 45
Likes: 0
Received 0 Likes
on
0 Posts

as this thread has gone on for 9 years i am no going to feel bad about posting in it...
Jason, electronics are not my forte though i have no issues digging in or soldering. That said, the link for your input connector no longer works and a search for the part number doesn't either.
I assume this one will do?
and btw, its great that you not only provided this upgrade information but have continued to assist people in their efforts over such a long period of time!
03-22-2016, 09:22 PM
#630
as this thread has gone on for 9 years i am no going to feel bad about posting in it...
Jason, electronics are not my forte though i have no issues digging in or soldering. That said, the link for your input connector no longer works and a search for the part number doesn't either.
I assume this one will do?
Amazon.com: 3.5mm Stereo Panel Mount Jack: Electronics
and btw, its great that you not only provided this upgrade information but have continued to assist people in their efforts over such a long period of time!
https://www.radioshack.com/products/...ant=5717419141
03-22-2016, 10:15 PM
#631
Launching!
Thread Starter
The Amazon one won't work, it needs to be an closed circuit jack with 5 pins. Harder to find now that most radio shacks have closed up. You can also check eBay, this one looks very similar (2 pack), part number is basically the same - typo I think
http://www.ebay.com/itm/401065778704
http://www.ebay.com/itm/401065778704
 06-23-2016, 01:49 PM
#635
Teching In

Join Date: May 2015
Location: Allensville, KY
Posts: 2
Likes: 0
Received 0 Likes
on
0 Posts
I've read several threads and looked at several pics. But I've yet to come across my monsoon. I've tapped into the first and third wire as shown. But when playing I lose signal when switching songs on Pandora. Any advise would be great. Thanks
 10-10-2016, 06:50 PM
#637
Teching In

Join Date: Oct 2016
Posts: 2
Likes: 0
Received 0 Likes
on
0 Posts
At at this point, there is a nifty AUDIO Bluetooth board that you might as well install in this signal substitution. It's by Sure at a place named Parts Express. It has good reviews, and is ~$25. My idea to take this one step further is to touch up an optical fiber cable to its LED, and terminate it in the dash/radio somewhere. Then you'll get visual feedback. Power with switched 12 volts, and probably use a double pole, double throw switch instead of the switched jack (or do both sources).
My 2�
12-28-2016, 12:41 PM
#638
Teching In

Join Date: Dec 2016
Posts: 5
Likes: 0
Received 0 Likes
on
0 Posts
Hi guys,
I've been looking for a long time how to connect an MP3 player onto my audio system. I understand that MP3 adapters require XM radio capability, option I don't have.
Before fooling around with my system, I just wanted to know if I will encounter any issues my this audio system?
Thanks for your advise
12-28-2016, 01:08 PM
#639
Installing an auxiliary adapter (such as the GM12-AUX) does not require the optional XM radio to work. Much like f-body systems need to have CD changer capability (without needing the changer itself), your Tahoe requires XM capability but not the XM adapter itself. The auxiliary adapter merely plugs in to the XM port on the back of the head unit. You can tell if your head unit has XM support by the Band/CD AUX button (yours has it).