
My Custom Air Suspension Install - 99 Trans Am
 06-24-2009, 05:36 PM
#121

I found a bracket kit to mount the R4 compressor to a LS1. The big question is - Will it clear the shocktower? (Nope)
R4 on LS1 Bracket


R4 on LS1 Bracket
After a ton of time in design they are finally done. I fabricated a bracket kit that allows me to use an R4 style compressor (third gen camaro and firebird and possibly a few other applications) with my LS1. I am currently using them in my 82 Corvette. I designed the brackets for the F-body accessories and the Corvette accessories. These are far superior to the nearest competitor and they were very reasonable for me to make. The kit includes the brackets, spacers, hardware, smooth pulley, and serp belt. Please drop me a pm or e-mail me if you have any questions.
Last edited by JasonWW; 06-27-2009 at 10:12 AM.
 06-24-2009, 08:21 PM
#122
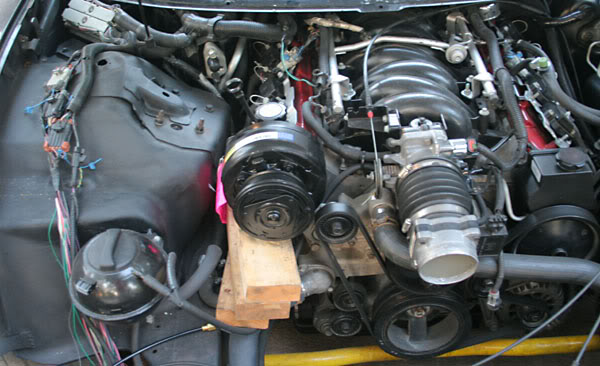
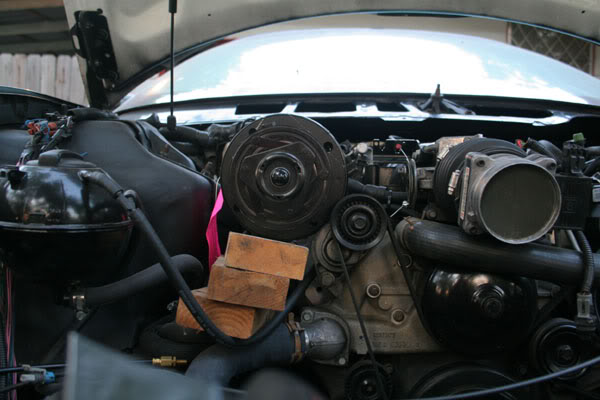
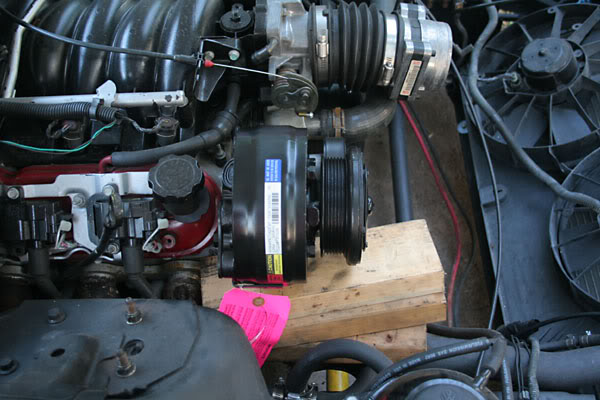
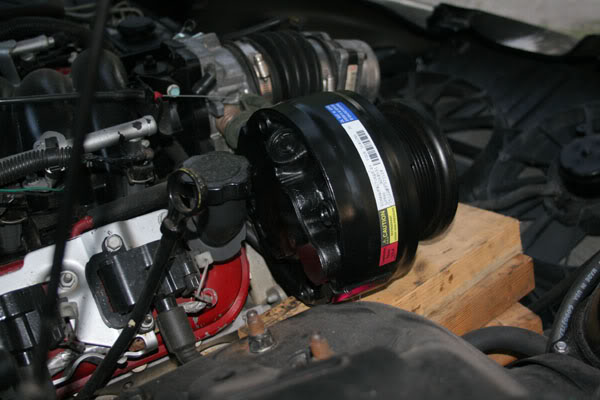
Since I'm a big geek, I ran down to Autozone and picked up an R4 compressor (93 chevy PU with 5.7L).
Yeah! It will fit. It clears the hood and the shock tower. The premade bracket kit above looks like it has the compressor too far to the side and it will hit the shock tower. That means I will have to make my own brackets.
Here are some pics:
Yeah! It will fit. It clears the hood and the shock tower. The premade bracket kit above looks like it has the compressor too far to the side and it will hit the shock tower. That means I will have to make my own brackets.
Here are some pics:
Last edited by JasonWW; 06-24-2009 at 11:45 PM.
06-24-2009, 10:49 PM
#123
OK, so we have 2 pulleys. The smooth and the ribbed. (why am I reminded of condoms?) Anyway, all we need to do is buy a smooth pulley and swap it onto the tensioner arm and then take that ribbed pulley and fix mount it slightly higher.


You put an oiler on the intake, with an air filter, then put an oil/water separator after the output, hook up pressure switch and relay and pump away.
You put an oiler on the intake, with an air filter, then put an oil/water separator after the output, hook up pressure switch and relay and pump away.
Last edited by JasonWW; 06-25-2009 at 02:57 AM.

 06-26-2009, 07:17 AM
#126
I also found some excellent looking toggle valves.
They are a little pricy at $36, but they have very high flow rates. 27 SCFM @ 50psi and 57 SCFM @ 100psi. That's more than twice the flow of a similar SMC valve and 5 times more than the Clippard. It should blow away any valve using barbed fittings for a 1/4" air line such as the common black plastic paddle valve. I think 4 of them in the cupholder area right behind the shifter (6 speed console) would be perfect.
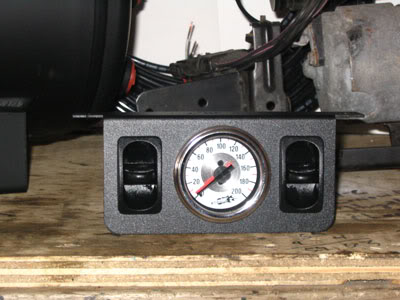
Interior Pic
.
They are a little pricy at $36, but they have very high flow rates. 27 SCFM @ 50psi and 57 SCFM @ 100psi. That's more than twice the flow of a similar SMC valve and 5 times more than the Clippard. It should blow away any valve using barbed fittings for a 1/4" air line such as the common black plastic paddle valve. I think 4 of them in the cupholder area right behind the shifter (6 speed console) would be perfect.
Interior Pic
.
Last edited by JasonWW; 06-26-2009 at 08:02 AM.
06-27-2009, 09:41 AM
#128
No one has anything to say?
Well, I'm moving ahead and have ordered one of the above toggle valves to test out. Maybe one of you guys can help me out. Technically, this manual valve is rated for 125-150 psi and I plan to run about 100psi in the Aero Sport front bags while driving. Do you think hitting a bump, pothole, etc... could cause the pressure to spike in the 175-200 range?
I'm also going to take the new R4 compressor back to Autozone and then pick up a used one along with it's lines and mounting bracket from a junkyard. Then I can get to work mating it to the engine.
I've got Drew's rear bag templates made up and I plan to get those cut out today along with new front upper pieces. That way I can flip the Aero Sport and run the air line out the top. This new fixed position should improve reliabilty.
 06-29-2009, 02:32 AM
#130
Ekstensive Metal Works will have my new front brackets and Drews rear brackets done in a few days.
I'm having some bad luck with 2 bags leaking down over a day and a half. I tried some liquid sealant at first, but it stayed soft and leaked. Then I cleaned the threads and wrapped the fittings with 3 or 4 wraps of Teflon tape (in the proper direction). One of the rears used to be fine until I swapped the 1/2" fittings over to 1/4. So it has to be either the fitting or it's threads. On one of my Aero Sports I replaced everything but the bag. So either both new fittings are leaky, the threads aren't sealing or the bag itself has a leak. These Norgren fittings are nickel plated brass and rated to 260psi.
I'm getting a bit irritated. All pressure is lost so I'm thinking the threads are the culprit. How can I make damn sure to seal the threads? Maybe I better liquid sealer and let it set overnight before pressuring them up? I wonder if Goop would work?
So any tips or advice on this would be really appreciated.
Last edited by JasonWW; 06-29-2009 at 02:51 AM.
06-29-2009, 09:44 AM
#131
Yeah, Keep 'em soft and let the sealant dry. Had to do that for my N20 fittings. Just some words of encouragement...This project is SO awesome Jason. I, like you, Love the Trans Am and don't plan on getting rid of mine ever. I intend on it being my DD, but I also intend on it being MUCH nicer than it came from the factory using today's technology, materials and styling. The car slammed on 19's with the right exterior combo show this thing can look like one of the nicest cars to date. The best thing about them is they're easy to work on. Keep up the AWESOME work and you'll get exactly what you're looking for bro...People saying "I used to have a trans am...but it didn't look like that!" will be coming out of everyone's mouth.
~Austin
~Austin
06-29-2009, 12:10 PM
#132
TECH Resident
iTrader: (2)

Join Date: Mar 2006
Location: England
Posts: 899
Likes: 0
Received 0 Likes
on
0 Posts
I like the look of the little Firestone bags.
I could mount them anywhere, not just on the shock, correct?
So I need to rig it so the switch turns on the compressor, which fills the bags, to raise the height.
And to empty the bags and return to normal ride height swich back to vent out into the exhaust?
Do they have to vent out into the exhaust, can't I just vent them out anywhere??
The amount of custom work required for the R4 EDC would scare me. Great work though, and it looks good too BTW
Thanks for the pointer.
Hope to start this project soon.......
06-29-2009, 04:22 PM
#133
Thanks for the kind words Austin. I'm going to try and remember that.
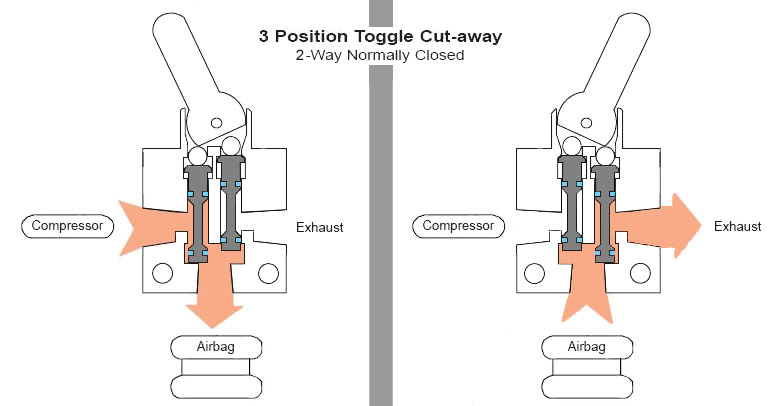
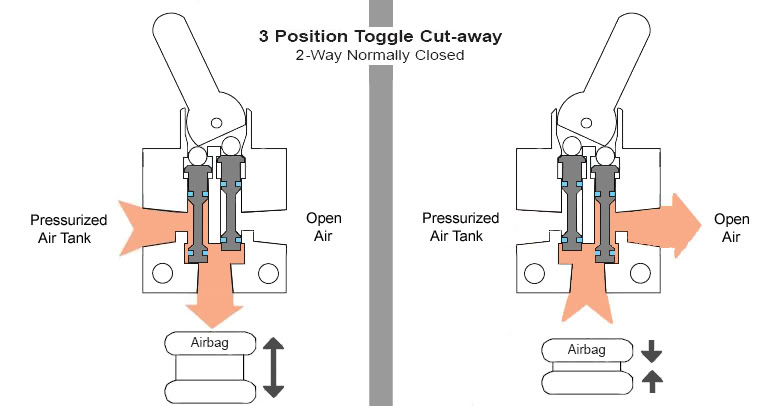
Taws6, you would need to mount the small bags (or the short cylinders) between the frame and the lower control arm. That way it will push the arm down and raise the car.
You have to check out some airbag sites so you know how these systems work. Basically your small electric air pump is going to pressurize a small holding tank of say 1 or 2 cubic feet. This may take a few minutes to do. Without a tank to store up some pressurized air, the little pump would be too slow to lift the car. Most cars with factory air springs don't use a tank and it can take a minute or so for them to raise up. With a small tank, the pump can fill it while your driving and when you want to lift the car it will take only a few seconds.
You will have an airline from the tank to the small bag or cylinder at the suspension. Then you will install 2 valves that controls the air flow in this line. When you open 1 valve it let's the pressurized air go from the tank to the bag. This lifts the car. When you want to lower the car, you open the other valve and it let's the air pressure escape into the atmosphere. These are sometimes called exhaust valves (not engine exhaust) because they get rid of air pressure.
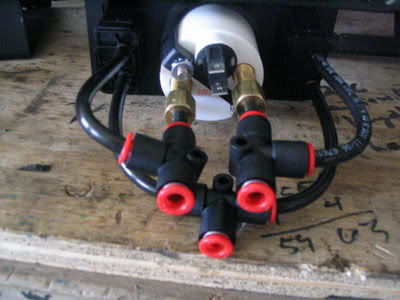
The little red valve I'm ordering has both the fill (air into the bag) and the bleed (air out of the bag) valves built into it. This is simpler, cheaper and more reliable than running 2 seperate electric valves like most folks use. You would need one of these manual valves or else 2 electric valves.
In my car I plan to run 4 red manual valves instead of the typical 8 electric valves so I have seperate control for each corner if the car.
Taws6, you would need to mount the small bags (or the short cylinders) between the frame and the lower control arm. That way it will push the arm down and raise the car.
You have to check out some airbag sites so you know how these systems work. Basically your small electric air pump is going to pressurize a small holding tank of say 1 or 2 cubic feet. This may take a few minutes to do. Without a tank to store up some pressurized air, the little pump would be too slow to lift the car. Most cars with factory air springs don't use a tank and it can take a minute or so for them to raise up. With a small tank, the pump can fill it while your driving and when you want to lift the car it will take only a few seconds.
You will have an airline from the tank to the small bag or cylinder at the suspension. Then you will install 2 valves that controls the air flow in this line. When you open 1 valve it let's the pressurized air go from the tank to the bag. This lifts the car. When you want to lower the car, you open the other valve and it let's the air pressure escape into the atmosphere. These are sometimes called exhaust valves (not engine exhaust) because they get rid of air pressure.
The little red valve I'm ordering has both the fill (air into the bag) and the bleed (air out of the bag) valves built into it. This is simpler, cheaper and more reliable than running 2 seperate electric valves like most folks use. You would need one of these manual valves or else 2 electric valves.
In my car I plan to run 4 red manual valves instead of the typical 8 electric valves so I have seperate control for each corner if the car.
Last edited by JasonWW; 06-29-2009 at 04:39 PM.
06-29-2009, 04:42 PM
#134
TECH Resident
iTrader: (2)
Join Date: Mar 2006
Location: England
Posts: 899
Likes: 0
Received 0 Likes
on
0 Posts
Ahh I see, thanks for explaining.
Does this mean that once the car is lowered back down to it's original height after a lift, it then takes a couple of minuites to gain enough pressure to lift the car again (i.e once you lift the car up, then down, you can't lift it up again straight away, as there is not enough pressure?)
Does this mean that once the car is lowered back down to it's original height after a lift, it then takes a couple of minuites to gain enough pressure to lift the car again (i.e once you lift the car up, then down, you can't lift it up again straight away, as there is not enough pressure?)
06-29-2009, 05:24 PM
#136
Staging Lane
Join Date: Sep 2007
Posts: 64
Likes: 0
Received 0 Likes
on
0 Posts
Does this mean that once the car is lowered back down to it's original height after a lift, it then takes a couple of minutes to gain enough pressure to lift the car again (i.e once you lift the car up, then down, you can't lift it up again straight away, as there is not enough pressure?)
06-29-2009, 05:30 PM
#137
Ahh I see, thanks for explaining.
Does this mean that once the car is lowered back down to it's original height after a lift, it then takes a couple of minuites to gain enough pressure to lift the car again (i.e once you lift the car up, then down, you can't lift it up again straight away, as there is not enough pressure?)
Does this mean that once the car is lowered back down to it's original height after a lift, it then takes a couple of minuites to gain enough pressure to lift the car again (i.e once you lift the car up, then down, you can't lift it up again straight away, as there is not enough pressure?)
In your situation, the small bags or cylinders have a small volume, but you want to keep the tank pressure high, plus your not trying to hop the car or anything, so I figure maybe 2 lifts per tank or so would be fine. This is why I'm thinking you would need a 1 to 2 cu ft tank. Any bigger and you would need a more expensive pump or maybe even 2 pumps. So a smaller tank means less money spent on pumps.
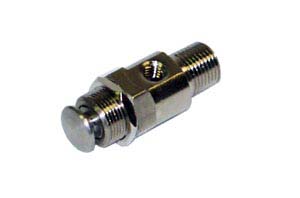
Now you want the pump to come on at a certain low pressure point and then turn off at a certain high pressure point. So you install a pressure switch in the tank. This what it looks like.

This one connects the 2 wire terminals at pressures below 110psi and then seperates them at pressures above 145psi. So when you wire this switch inline between an ignition key source and the pump (using a relay) the empty tank will turn on the pump until the pressure climbs to 145psi and then the pump will turn off. When you lift the car, the tank pressure will drop. When it drops down to 110psi, the pump will turn back on and fill the tank back up to 145psi. See how that works?
06-29-2009, 06:20 PM
#138
I should point out that you can get a variety of different pressure switches. They are all labeled with their on and off pressures.
110-145
145-175
165-200
These are the most common, but their are some adjustable units that you can set your own limit on.
Here are some links that better explain how air bag setups work.
How to wire up one or two pumps PDF file
A detailed PDF pic showing a front to rear air bag setup (not FBSS or 4 wheel independant control)
There are several video's here at Air Ride Tech. Check those out.
Good article
Since you need a basic air delivery setup, check out train horn kits. You will need all those parts except the actual horns. Something like this for $150:

http://cgi.ebay.com/ebaymotors/1-5-G...Q5fAccessories
It's a low duty cycle compressor, but since you won't need it often, it should last a good while. Then you just need a fill and bleed valve (one manual unit or 2 electric units).
Or this:
cYWBKR+CZsccw~~_1.JPG)
I checked on the little Firestone bag and it has a 100 psi limit. This will give it a force of 410 lbs which isn't going to lift the car very high.http://www.firestoneindustrial.com/p.../EMDG_4001.pdf
I think we are back to using a cylinder of some sort.
The bigger the cylinder diameter and the higher the pressure, the more force your going to get.
.
110-145
145-175
165-200
These are the most common, but their are some adjustable units that you can set your own limit on.
Here are some links that better explain how air bag setups work.
How to wire up one or two pumps PDF file
A detailed PDF pic showing a front to rear air bag setup (not FBSS or 4 wheel independant control)
There are several video's here at Air Ride Tech. Check those out.
Good article
Since you need a basic air delivery setup, check out train horn kits. You will need all those parts except the actual horns. Something like this for $150:
http://cgi.ebay.com/ebaymotors/1-5-G...Q5fAccessories
It's a low duty cycle compressor, but since you won't need it often, it should last a good while. Then you just need a fill and bleed valve (one manual unit or 2 electric units).
Or this:
I checked on the little Firestone bag and it has a 100 psi limit. This will give it a force of 410 lbs which isn't going to lift the car very high.http://www.firestoneindustrial.com/p.../EMDG_4001.pdf
I think we are back to using a cylinder of some sort.
The bigger the cylinder diameter and the higher the pressure, the more force your going to get.
.
Last edited by JasonWW; 06-29-2009 at 08:16 PM.
06-29-2009, 08:38 PM
#139
Here's a slightly updated pic. I hope this is easier to understand.
I can order these with 4 different types of seals.
Buna-N
Viton
EPDM
Silicone
The guys at Ekstensive don't recommend engine driven compressors because they say the residual oil in the air can degrade the rubber in the electric valves. I'm not discouraged by that, but it is something to think about. The Buna-N and Viton are resistant to petroleam oil, the other 2 are not. The simplest fix, but expensive, is to run a high end oil seperator like that used in paint booths.
Last edited by JasonWW; 06-29-2009 at 09:46 PM.
06-30-2009, 12:15 AM
#140
Here is a very simple setup using $5 ball valves to fill and bleed some rear bags.
http://www.youtube.com/watch?v=6X6zB...eature=related
Here's an bulky and ugly looking setup using lots of ball valves.
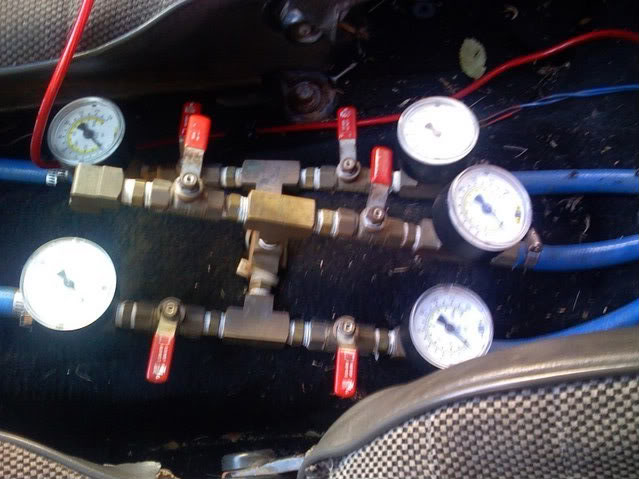
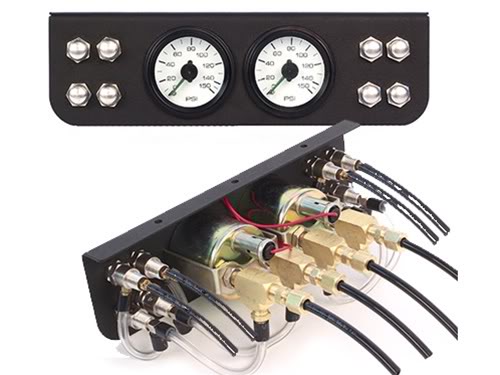
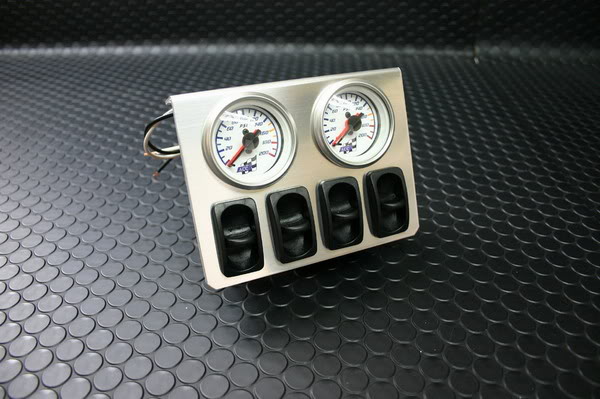
Here's a 4 wheel (4-way) setup with push buttons and dual needle gauges.
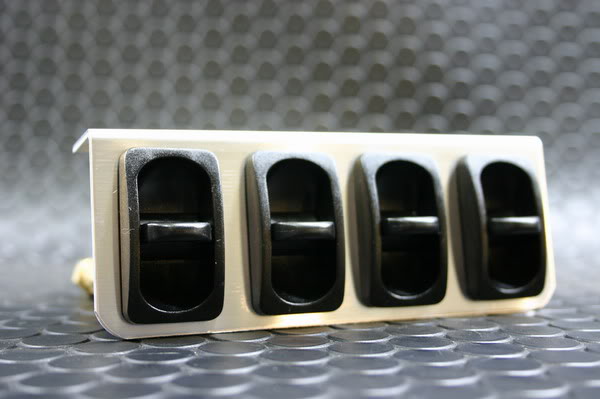
Paddle valve setups.
Here is a 2 way setup.
http://www.youtube.com/watch?v=6X6zB...eature=related
Here's an bulky and ugly looking setup using lots of ball valves.
Here's a 4 wheel (4-way) setup with push buttons and dual needle gauges.
Paddle valve setups.
Here is a 2 way setup.
Last edited by JasonWW; 06-30-2009 at 12:35 AM.