


Keyless Ignition & Entry Like the C6
Maybe I have this wrong because I haven't finished my research. But my plan is you use a xpresskit bypass. Same as would be done with a remote starter.
The way i understand it is when I walk up to the car the advanced keys system will activate the xpress kit and disable vats allowing the ignition to activate.
When I walk away it will re activate vats. It does this by a module that learns your register code. The key I leave in the ignition will not have a resistor in it. Granted its another box to mount and a bit more wire but added security. And the bypass module was only 25$.
I won't be messing with the steering lock any time soon. I do it will be to completely eliminate the key cylinder. And I need to be sure I can trust the push start system before I go that route.
Maybe I have this wrong because I haven't finished my research. But my plan is you use a xpresskit bypass. Same as would be done with a remote starter.
The way i understand it is when I walk up to the car the advanced keys system will activate the xpress kit and disable vats allowing the ignition to activate.
When I walk away it will re activate vats. It does this by a module that learns your register code. The key I leave in the ignition will not have a resistor in it. Granted its another box to mount and a bit more wire but added security. And the bypass module was only 25$.
The way i understand it is when I walk up to the car the advanced keys system will activate the xpress kit and disable vats allowing the ignition to activate.
When I walk away it will re activate vats. It does this by a module that learns your register code. The key I leave in the ignition will not have a resistor in it. Granted its another box to mount and a bit more wire but added security. And the bypass module was only 25$.
I would't disable the key cylinder, just in case your push to start button fails...
I can't seem to follow the conversation.
From what I know , Anyone Installing any aftermarket alarm/keyless entry system needs to do the VATS bypass using resistors.
To use this kit like an oem c6 kit, the steering wheel lock has to be disabled permanently.
Whats the talk about disabling the key cylinder?
From what I know , Anyone Installing any aftermarket alarm/keyless entry system needs to do the VATS bypass using resistors.
To use this kit like an oem c6 kit, the steering wheel lock has to be disabled permanently.
Whats the talk about disabling the key cylinder?
I intend for this to be one of my next purchases, and I plan on removing the steering wheel/air bag in order to remove the steering lock. So if I'm the first one to get this and install it (besides emmeny81), then I'll try my best to document the installation process and do a write up.
My only question is, does the VATS absolutely have to be tuned out? I need to take my car to a tuner for other things anyways. Just trying to figure out if I need to take her to a tuner before I install this or not.
My only question is, does the VATS absolutely have to be tuned out? I need to take my car to a tuner for other things anyways. Just trying to figure out if I need to take her to a tuner before I install this or not.
VATS can't be tuned out on an f-body. It's controlled by the BCM which is not programmable (as opposed to the PCM which is what tuners work on). You can program the PCM to ignore the missing fuel enable signal from VATS in the BCM but you can't program out the starter relay disable in the BCM. So you're stuck with the resistor method.
LS1 Tech Stories
The Best V8 Stories One Small Block at Time

Gas Monkey Built a 6-Wheel Ferrari Testarossa With a Corvette LT4 Engine
Verdad Gallardo
7 Most Reliable High-Performance Engines GM Has Ever Built
Verdad Gallardo
Amazing '71 Camaro Restomod Is Modern Muscle Car Under the Skin
Verdad Gallardo
6 Common C5 Corvette Failures and What's Involved In Repairing Them
Pouria Savadkouei
Retro Modern Bandit Pontiac Trans AM Comes With Burt Reynolds' Autograph
Verdad Gallardo
Top 10 Greatest Cadillac V Series Performance Models Ever, Ranked
Pouria Savadkouei
Top 10 Most Powerful Chevy Trucks Ever Made!

Hennessey's New Supercharged Silverado ZR2 Has 700 HP
Verdad Gallardo
Coachbuilt N2A Anteros Is an LS2-Powered C6 Corvette In Italian Clothes
Verdad Gallardo
Okay, I suppose my question has been answered. I'm fine with using the resistor method to bypass the VATS. And my car is typically either at a car show/meet or locked up in the garage, so I don't care about the added security that VATS might provide.
I can't seem to follow the conversation.
From what I know , Anyone Installing any aftermarket alarm/keyless entry system needs to do the VATS bypass using resistors.
To use this kit like an oem c6 kit, the steering wheel lock has to be disabled permanently.
Whats the talk about disabling the key cylinder?
From what I know , Anyone Installing any aftermarket alarm/keyless entry system needs to do the VATS bypass using resistors.
To use this kit like an oem c6 kit, the steering wheel lock has to be disabled permanently.
Whats the talk about disabling the key cylinder?


Lol its not easy. You have to dig into the column. I accidentally broke the spring when I was messing with my column and removed the lock. Guess it was actually beneficial if I decide to do this haha.
Guys I was able to find my installation manuals, this is were I made all the notes as to which cables I was was tapping into.
Here is the info:
for the Alarm/Proximity Controller
Main Harness (8-Pin)
Brown: Not Used
Grey(2 wires): Tapped into Brown cable on Headlight switch
Red: Red on Ignition
Green: Red/Black @ BCM Green PLUG
Blue: Orange/Black & Gray/Black @ BCM Green PLUG with Diodes
Black: Ground
Purple: Black @ BCM Blue PLUG
Accessory Harness (7-PIN)
Purple: to push to start module
Brown: Light Blue @ brake pedal switch
Green: white @ BCM
Red: Orange ACC @ ignition
Push to Start Module
Main Harness(Attached)
white: Starter(yellow cable @ ignition)
Red (two wires): Red @ ignition
Green: ON1 (pink @ ignition)
Black: ground
Yellow: orange ACC @ ignition
Accessory Harness (6 Pin)
Purple: to keyless(proximity)
Brown: Light Blue on Brake pedal
Yellow: to tach 2002 camaro its a white cable on Blue connector pin #10
I did this on a 2002 camaro, I know that 2000 and below colors will vary on the BCM and tach.
I had multiple wiring diagrams to compare.
Let me know if I missed anything or if any questions come up.
Thanks.
Thanks emenny little late for me but will be helpful for others in the future. I have the keyless part done and will probably finish in the next day or so. I only work on it a little bit a day so im not rushing.
Ok for who ever asked about the xpresskit well just add .com to learn more.
As far as disabling the wheellock. I'll post when I get home on how I did it. But I will say its very easy to do along as you have a few cheap tools. I think most just fear removing the air bag.
Ok for who ever asked about the xpresskit well just add .com to learn more.
As far as disabling the wheellock. I'll post when I get home on how I did it. But I will say its very easy to do along as you have a few cheap tools. I think most just fear removing the air bag.
ok heres how i disabled the steering column. first let me say if you do this. do it at your own risk and i make no guarantee this will work for you
ok next give a big thanks to wssix99 for his write up How-To; Steering Column Repair
first make sure you disconnect the battery i disconnected mine about a hour before i did anything. you will see in wssix99's write up one of the first things he does is unplug the air bag. use some common sense here and keep it pointed away from you or any where it would cause damage if it goes off.(unlikely i wasnt all that gentle with mine)
follow his write up untill you remove the lock plate. once you remove the lock plate you will see all the grooves along the edge where the pin locks the wheel.
from here you have 2 options. i first tried to see if i could twist the pin and pull it out. i used a little to much pressure and something behind the pin let go and the pin would no longer move out when i turned the key. ta da steering wheel lock disabled .
.
now the thought of this pin vibrating up into the lock plate when i was doing 70 down the highway freaked me out so i put a little epoxy over it to be safe. as you can see in the pics.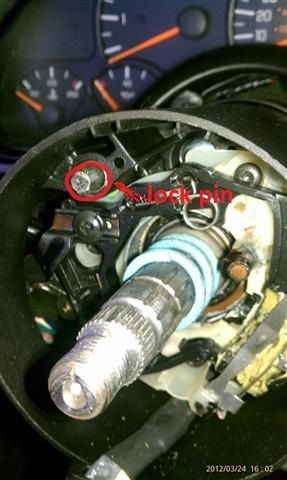 and you can see in the second pic where i covered it in epoxy.
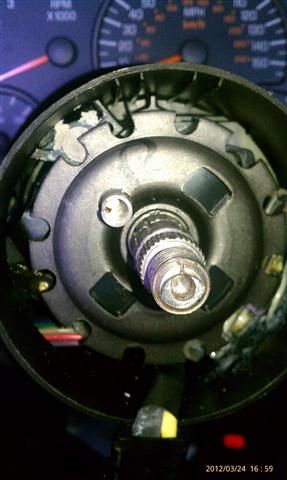
ok i dont recommended doing it that way but thats what happend to me.
the second way and the way i would do it next time(just so its easier to fix if needed) is to grind all the notches off the lock plate. basically grind everything out side the red circle.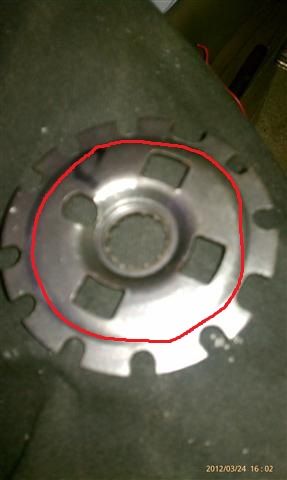
the only issue i see with this is it will be a pain to get the lock plate back on. you may have to bend your lock plate remover tool a little bit to get it to fit and have some paitence getting the retaining clip back on. but doing it this way will allow you to buy a new lock plate to return to stock if you ever want.
this is honestly only about a 30 minute job but take your time and be carefull with the air bag and dont lose the smaller parts(retaining clip and snap ring)
ok next give a big thanks to wssix99 for his write up How-To; Steering Column Repair
first make sure you disconnect the battery i disconnected mine about a hour before i did anything. you will see in wssix99's write up one of the first things he does is unplug the air bag. use some common sense here and keep it pointed away from you or any where it would cause damage if it goes off.(unlikely i wasnt all that gentle with mine)
follow his write up untill you remove the lock plate. once you remove the lock plate you will see all the grooves along the edge where the pin locks the wheel.
from here you have 2 options. i first tried to see if i could twist the pin and pull it out. i used a little to much pressure and something behind the pin let go and the pin would no longer move out when i turned the key. ta da steering wheel lock disabled
.now the thought of this pin vibrating up into the lock plate when i was doing 70 down the highway freaked me out so i put a little epoxy over it to be safe. as you can see in the pics.
and you can see in the second pic where i covered it in epoxy. ok i dont recommended doing it that way but thats what happend to me.
the second way and the way i would do it next time(just so its easier to fix if needed) is to grind all the notches off the lock plate. basically grind everything out side the red circle.
the only issue i see with this is it will be a pain to get the lock plate back on. you may have to bend your lock plate remover tool a little bit to get it to fit and have some paitence getting the retaining clip back on. but doing it this way will allow you to buy a new lock plate to return to stock if you ever want.
this is honestly only about a 30 minute job but take your time and be carefull with the air bag and dont lose the smaller parts(retaining clip and snap ring)
ok heres how i disabled the steering column. first let me say if you do this. do it at your own risk and i make no guarantee this will work for you
ok next give a big thanks to wssix99 for his write up How-To; Steering Column Repair
first make sure you disconnect the battery i disconnected mine about a hour before i did anything. you will see in wssix99's write up one of the first things he does is unplug the air bag. use some common sense here and keep it pointed away from you or any where it would cause damage if it goes off.(unlikely i wasnt all that gentle with mine)
follow his write up untill you remove the lock plate. once you remove the lock plate you will see all the grooves along the edge where the pin locks the wheel.
from here you have 2 options. i first tried to see if i could twist the pin and pull it out. i used a little to much pressure and something behind the pin let go and the pin would no longer move out when i turned the key. ta da steering wheel lock disabled.
now the thought of this pin vibrating up into the lock plate when i was doing 70 down the highway freaked me out so i put a little epoxy over it to be safe. as you can see in the pics. and you can see in the second pic where i covered it in epoxy.
ok i dont recommended doing it that way but thats what happend to me.
the second way and the way i would do it next time(just so its easier to fix if needed) is to grind all the notches off the lock plate. basically grind everything out side the red circle.
the only issue i see with this is it will be a pain to get the lock plate back on. you may have to bend your lock plate remover tool a little bit to get it to fit and have some paitence getting the retaining clip back on. but doing it this way will allow you to buy a new lock plate to return to stock if you ever want.
this is honestly only about a 30 minute job but take your time and be carefull with the air bag and dont lose the smaller parts(retaining clip and snap ring)
ok next give a big thanks to wssix99 for his write up How-To; Steering Column Repair
first make sure you disconnect the battery i disconnected mine about a hour before i did anything. you will see in wssix99's write up one of the first things he does is unplug the air bag. use some common sense here and keep it pointed away from you or any where it would cause damage if it goes off.(unlikely i wasnt all that gentle with mine)
follow his write up untill you remove the lock plate. once you remove the lock plate you will see all the grooves along the edge where the pin locks the wheel.
from here you have 2 options. i first tried to see if i could twist the pin and pull it out. i used a little to much pressure and something behind the pin let go and the pin would no longer move out when i turned the key. ta da steering wheel lock disabled
.now the thought of this pin vibrating up into the lock plate when i was doing 70 down the highway freaked me out so i put a little epoxy over it to be safe. as you can see in the pics.
and you can see in the second pic where i covered it in epoxy. ok i dont recommended doing it that way but thats what happend to me.
the second way and the way i would do it next time(just so its easier to fix if needed) is to grind all the notches off the lock plate. basically grind everything out side the red circle.
the only issue i see with this is it will be a pain to get the lock plate back on. you may have to bend your lock plate remover tool a little bit to get it to fit and have some paitence getting the retaining clip back on. but doing it this way will allow you to buy a new lock plate to return to stock if you ever want.
this is honestly only about a 30 minute job but take your time and be carefull with the air bag and dont lose the smaller parts(retaining clip and snap ring)
Thanks for posting this, my car is completely gutted might as well take more pieces off.
Thanks.
