Painting LS6 intake. Need advice.
 05-04-2009, 08:53 AM
#1
TECH Apprentice
Thread Starter
iTrader: (7)
Join Date: Mar 2005
Location: Louisiana
Posts: 318
Likes: 0
Received 0 Likes
on
0 Posts

This coming weekend, I'd like to undertake a project. I'm interested in painting my LS6 intake, possibly a red color. I'd like it to look clean, somewhat professional, and most importantly, last for a while. I have seen a few people on here, that have done it themselves, and came out great.
I'm looking for tips. I plan on sanding down the top of the intake to make it smooth. Would it come out looking good by just using spray paint? Or is there a better option? I'm new to painting parts, and this would be my first project of this sort.
I'm looking for tips. I plan on sanding down the top of the intake to make it smooth. Would it come out looking good by just using spray paint? Or is there a better option? I'm new to painting parts, and this would be my first project of this sort.
 05-04-2009, 09:10 AM
#3
TECH Fanatic
iTrader: (7)
Join Date: May 2007
Location: Arab, Al
Posts: 1,735
Likes: 0
Received 0 Likes
on
0 Posts
It's going to take a long time to sand the intake smooth. If I remember correctly, I just:
Scuffed it with 400 grit
Washed it in the sink with hot water and dish soap to get all the **** off
After it dried, cleaned it with acentone
Sprayed Duplicolor Adhesion promoter
Dupli color primer
Dupli color paint
It turned out great and the more coats you spray, the smoother it will look.
Scuffed it with 400 grit
Washed it in the sink with hot water and dish soap to get all the **** off
After it dried, cleaned it with acentone
Sprayed Duplicolor Adhesion promoter
Dupli color primer
Dupli color paint
It turned out great and the more coats you spray, the smoother it will look.
05-04-2009, 09:12 AM
#4
TECH Apprentice
Thread Starter
iTrader: (7)
Join Date: Mar 2005
Location: Louisiana
Posts: 318
Likes: 0
Received 0 Likes
on
0 Posts
Thanks for the detailed write up!
Do you have any pics of your finished product? Sounds like it came out great. I can't wait to try it out for myself. I haven't really had free time to do something like this in a LOOOONNNGGG time.
Do you have any pics of your finished product? Sounds like it came out great. I can't wait to try it out for myself. I haven't really had free time to do something like this in a LOOOONNNGGG time.
05-04-2009, 09:27 AM
#5
TECH Fanatic
iTrader: (7)
Join Date: May 2007
Location: Arab, Al
Posts: 1,735
Likes: 0
Received 0 Likes
on
0 Posts
Actually I don't. I painted it white and it looked AWESOME...for a couple weeks until the clear started to have a yellow tint. I painted it gloss black and my coil packs red last week. My car is in the shop getting a cam installed  so I'll take some pics when I get it back!
so I'll take some pics when I get it back!
05-04-2009, 09:45 AM
#6
TECH Apprentice
Thread Starter
iTrader: (7)
Join Date: Mar 2005
Location: Louisiana
Posts: 318
Likes: 0
Received 0 Likes
on
0 Posts
The coil packs you painted were stock? Painting them wouldn't hurt anything? That sounds like another cool project, if it doesn't effect performance.
05-04-2009, 10:02 AM
#7
TECH Fanatic
iTrader: (7)
Join Date: May 2007
Location: Arab, Al
Posts: 1,735
Likes: 0
Received 0 Likes
on
0 Posts
Nope, there has been plenty of people paint them. It's more of a bitch than the intake though. I hung them up with some string and hooked them to a clothes hanger. I was just doing 2 at a time so it took a while.
Trending Topics

 05-04-2009, 10:34 AM
#11
TECH Apprentice
Thread Starter
iTrader: (7)
Join Date: Mar 2005
Location: Louisiana
Posts: 318
Likes: 0
Received 0 Likes
on
0 Posts

I'll post pics when its complete. Hopefully I don't fudge things up.
05-04-2009, 10:42 AM
#12

Just throw some 80 grit on a belt sander and sand away!! J/K don't do that, seriously. I'm in the process of sanding mine down for paint and it is a very time consuming process. Getting the circles out is the hardest part, thats what takes the longest. Getting the rest so smooth isn't too bad. All of it takes a little elbow grease though.
 good luck dude!
05-04-2009, 11:25 AM
good luck dude!
05-04-2009, 11:25 AM
#14
TECH Addict
iTrader: (3)
Join Date: Oct 2007
Location: Orange County
Posts: 2,543
Likes: 0
Received 0 Likes
on
0 Posts
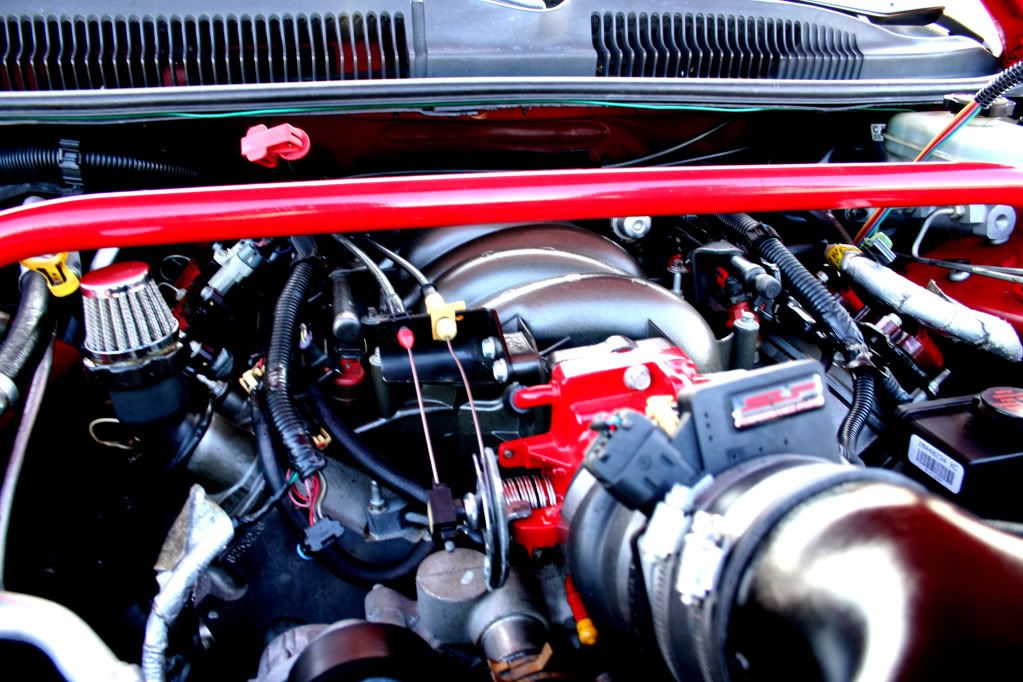
here are some pics of mine. prep is key, like everyone says. after you wash and wash your intake, it should have no shine whatsoever.
make sure to use a 2 - 3 coats of adhesion promoter, then do your primer, let it dry over night, sand and wash again. then do your base, very light coats, and finally a clear coat. i used a ceramic clear for the heat, but mostly because it resists oils well.

these are all pictures of the intake in the car months and months later
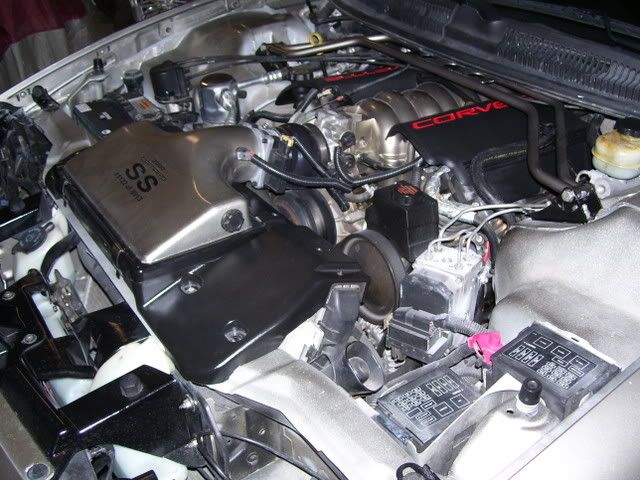

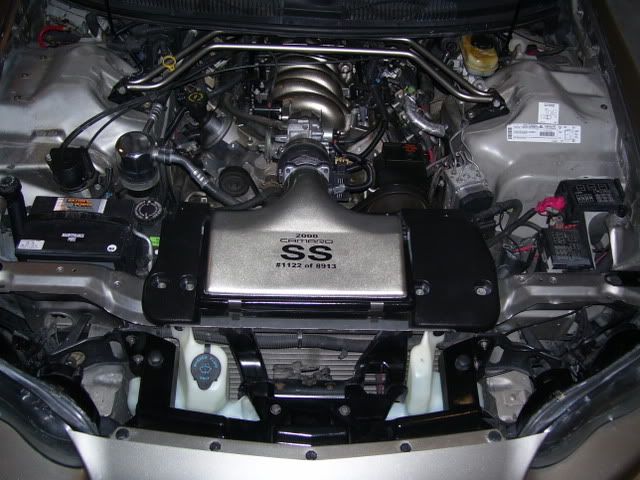
make sure to use a 2 - 3 coats of adhesion promoter, then do your primer, let it dry over night, sand and wash again. then do your base, very light coats, and finally a clear coat. i used a ceramic clear for the heat, but mostly because it resists oils well.
these are all pictures of the intake in the car months and months later
05-04-2009, 12:55 PM
#15
TECH Apprentice
Thread Starter
iTrader: (7)
Join Date: Mar 2005
Location: Louisiana
Posts: 318
Likes: 0
Received 0 Likes
on
0 Posts
that is nice work. Looks like I will have to start before this weekend, with prep work. I guess I learned, that the most important thing is, to take your time.
05-04-2009, 02:47 PM
#16
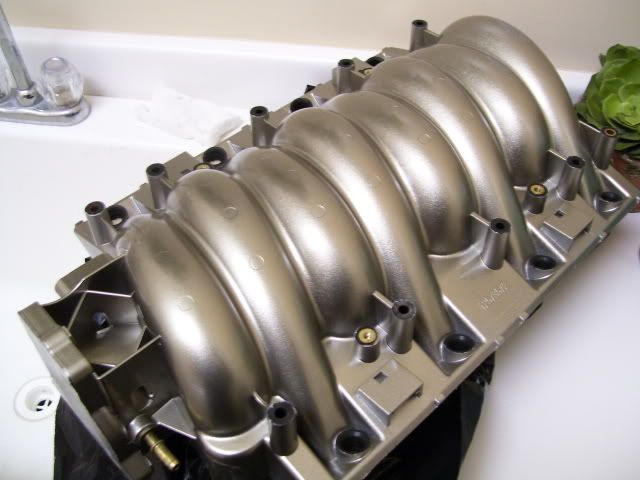
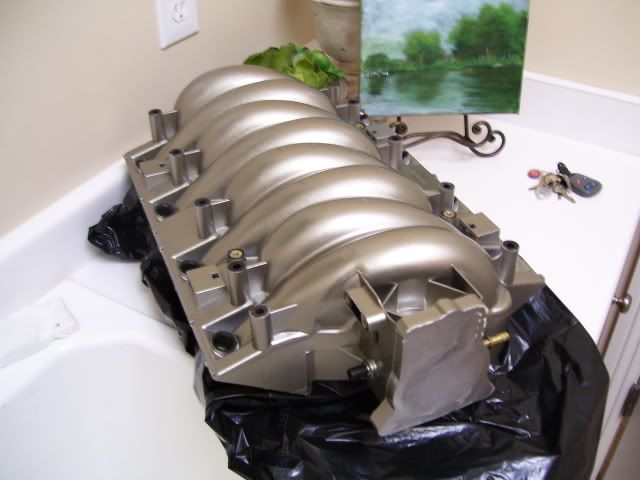
Hey man,
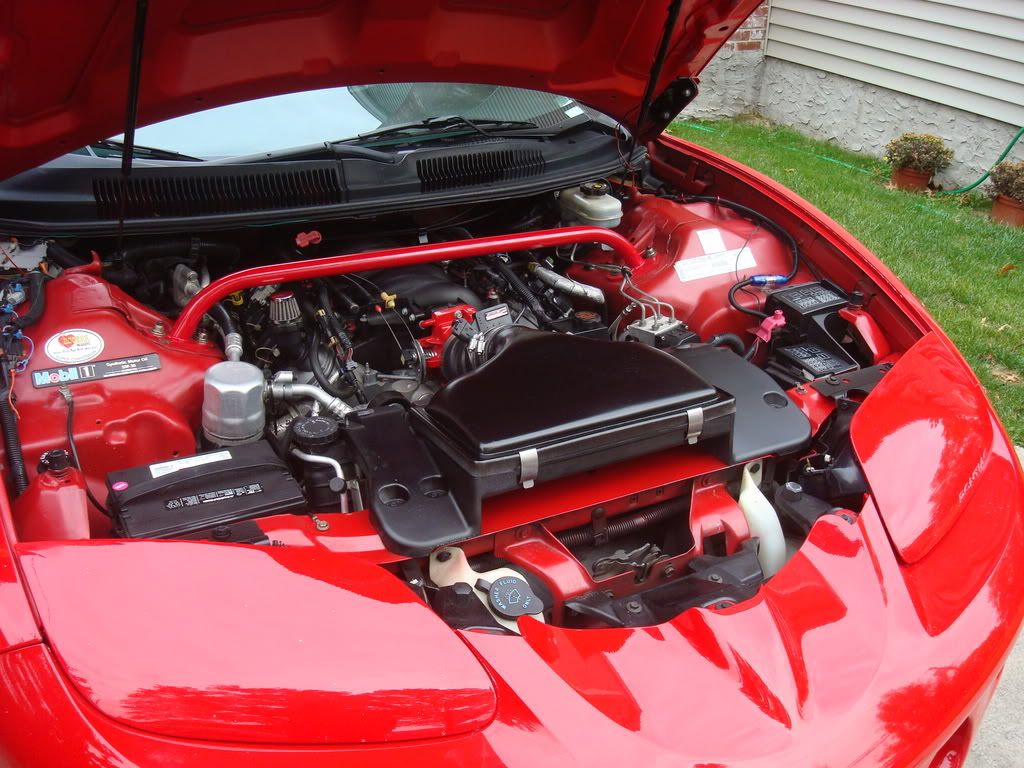
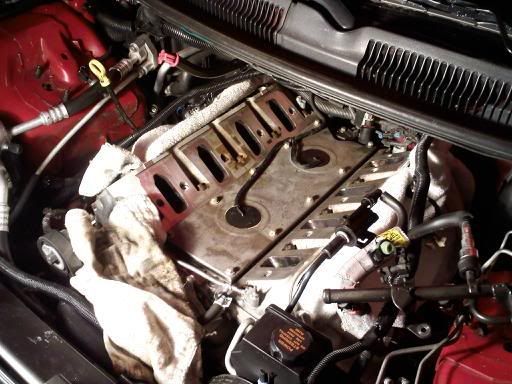
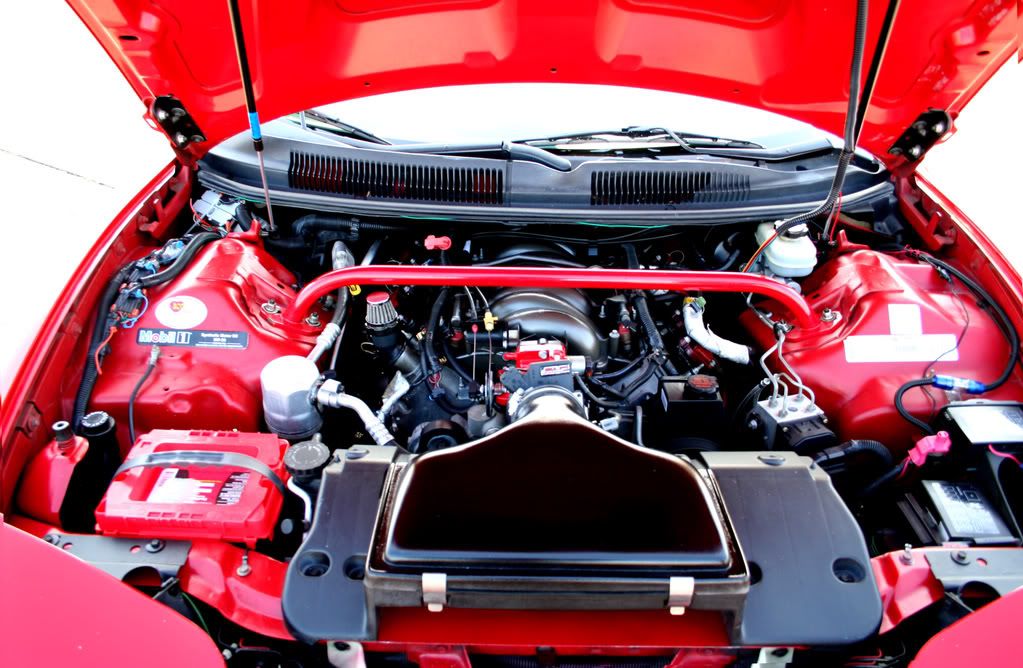
I painted mine not too long ago while the car was away. Here's the pics first:
Before:
During:
Final result, (painted other things too):
You may not believe what I did, but, here 'goes
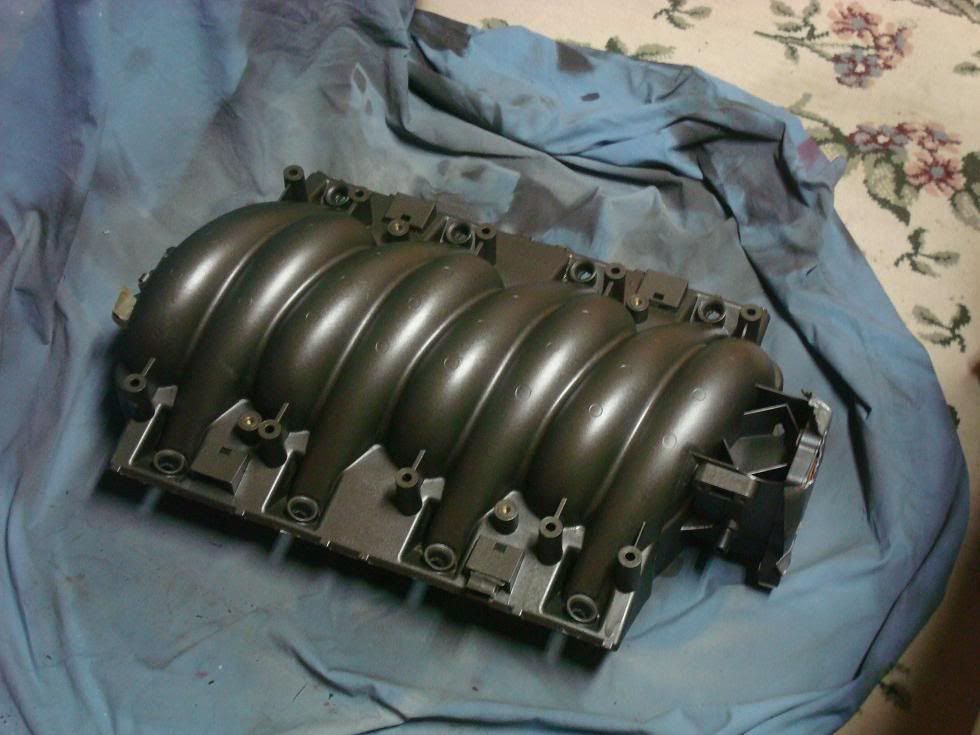
Wiped down intake, cleaned the surface
2 or 3 Coats of Duplicolor Adhesion promoter (clear primer for plastics)
2/3 Coats of Duplicolor Gunmetal Color
3 Coats Duplicolor Clear
That's it. I didn't sand a thing, and it came out flawless.
I painted mine not too long ago while the car was away. Here's the pics first:
Before:
During:
Final result, (painted other things too):
You may not believe what I did, but, here 'goes
Wiped down intake, cleaned the surface
2 or 3 Coats of Duplicolor Adhesion promoter (clear primer for plastics)
2/3 Coats of Duplicolor Gunmetal Color
3 Coats Duplicolor Clear
That's it. I didn't sand a thing, and it came out flawless.