Write-Up: How to install seatbelt guides onto MRC/Arizen/Recaro seats...
 04-29-2007, 11:23 PM
#1

EDIT: Go here for updates/questions... http://6litereaterdesigns.com/forum/...php?topic=35.0
Yup, I finally got bored enough to mess with it
For awhile I just taped them on there (through the harness holes) and then I used a velcro strap...
Well, after MUCH procrastination I took a trip to the hardware store to brainstorm. My first, COMPLICATED, idea turned out to be overkill so I scratched it and went with the KISS (Keep It Simple Stupid) method...
It turns out it is VERY EASY to mount seatbelt guides to these seats... There is a bar underneath the cloth you can screw into but it is 1/2" under the surface so you have to add spacers so that it looks right and so the guide has something to tighten on to... Here's how:
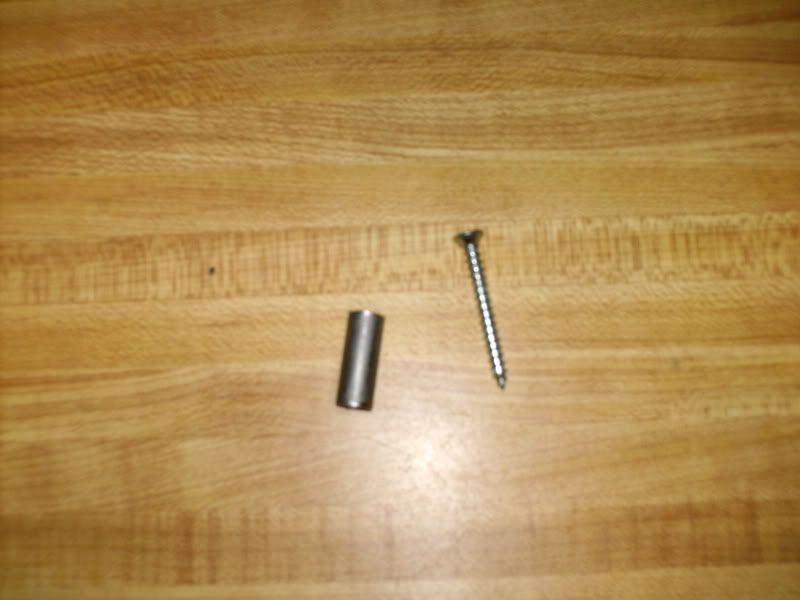
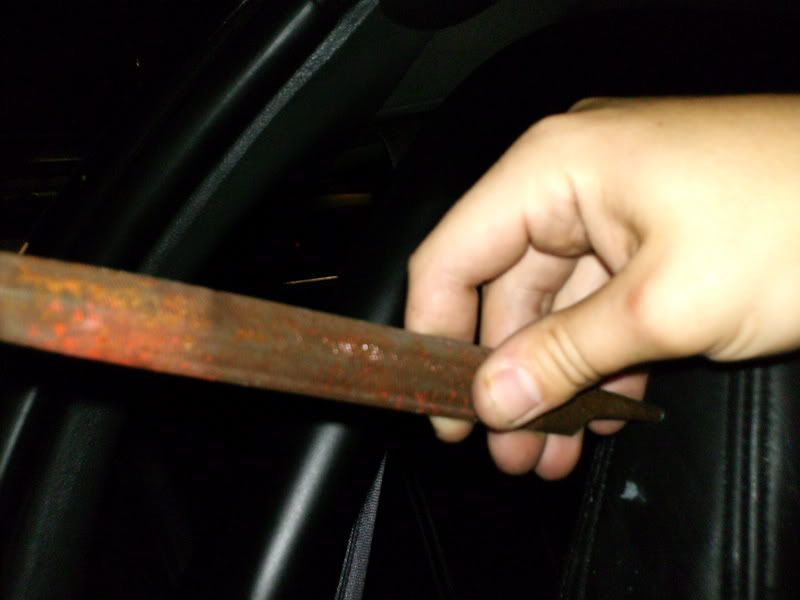
First you need supplies... ALL YOU NEED are screws and a couple of spacers !!!
!!!
Here's what I bought (I bought new screws because I have no clue where my originals might be):
You will also need a drill with a metal drill bit, slightly smaller than the screws you use, and a razor blade.
The spacer was the shortest I could find in a diameter only slightly larger than the screw so I just bought it and cut it in half with my Dremel (you need it to be between 1/4" and 1/2"):
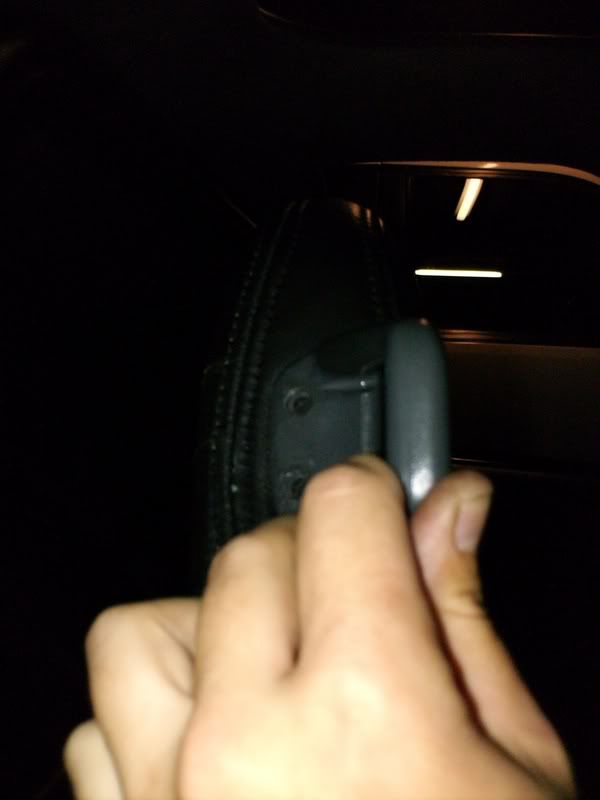
The first step is to mark the holes in the leather. I put the seatbelt guide up and pushed it hard into the leather so I could feel the metal bar underneath. Once I knew it was in place and over the bar I drilled a couple of small holes in the leather (easier than marking it and you're going to drill it anyways):
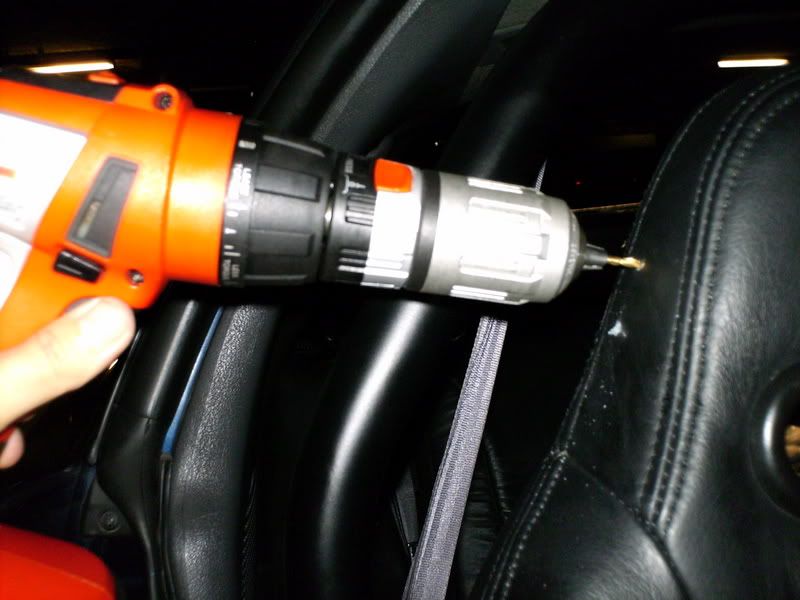
The next step involves drilling holes into a VERY ROUND bar... MAJOR PITA! I stuck a screw up against the bar and hammered it hard (trying to make a dimple)...
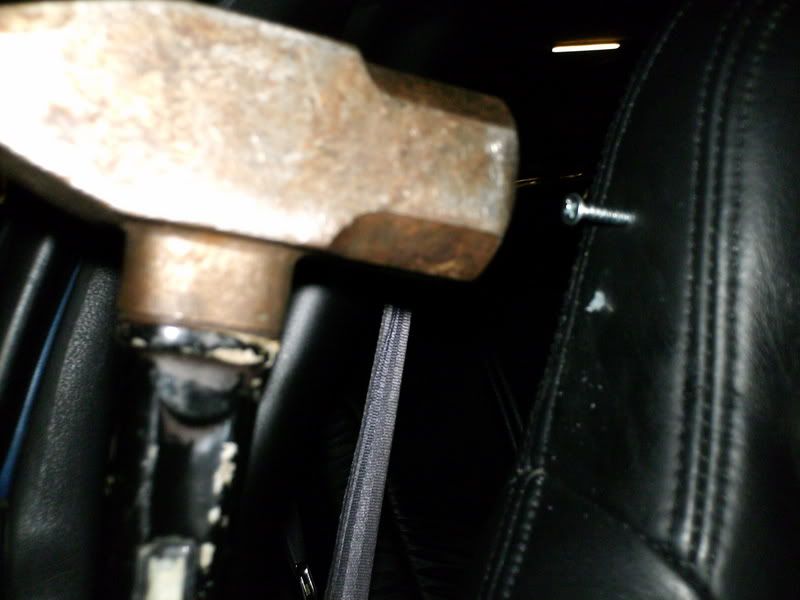
...and then followed it with a file that I hammered into it (I don't have a punch/awl)...
...and then I SLOWLY (so it wouldn't slip off) drilled my holes:
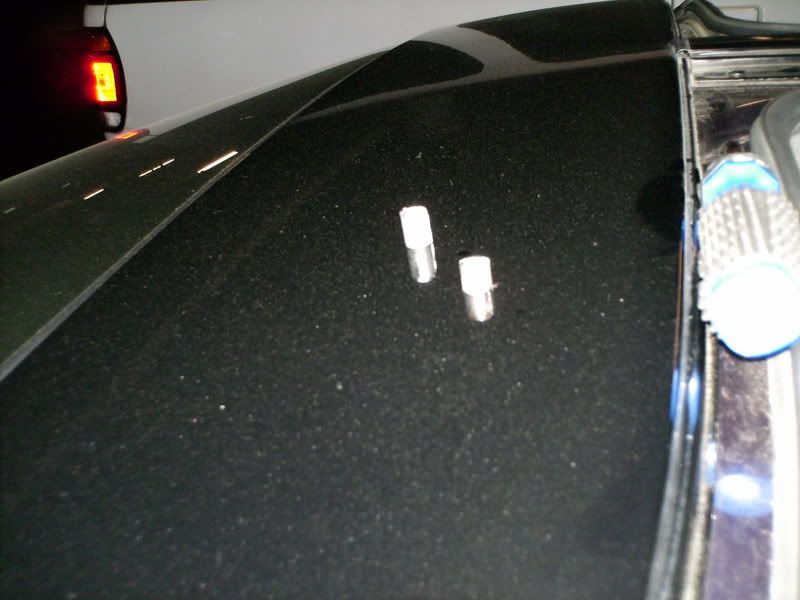
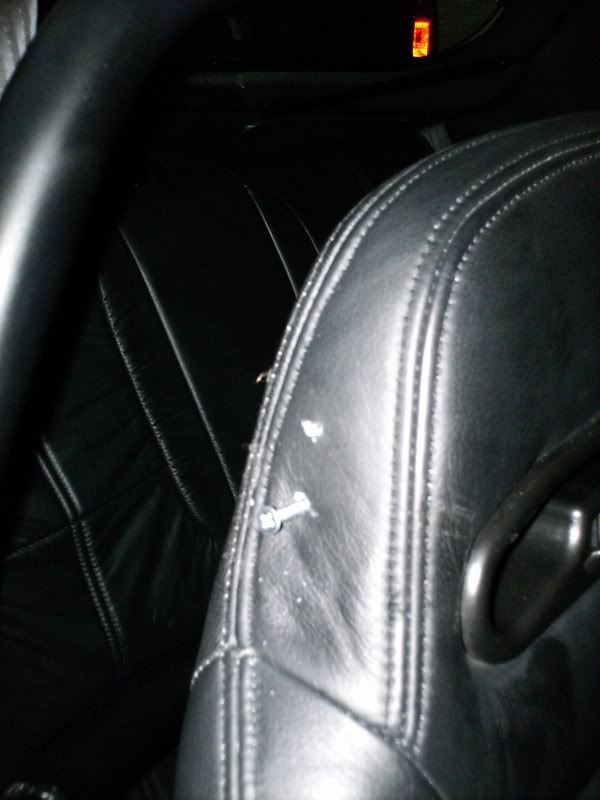
Next I checked to see the screws (metal screws I bought) tightened into the holes and they did:
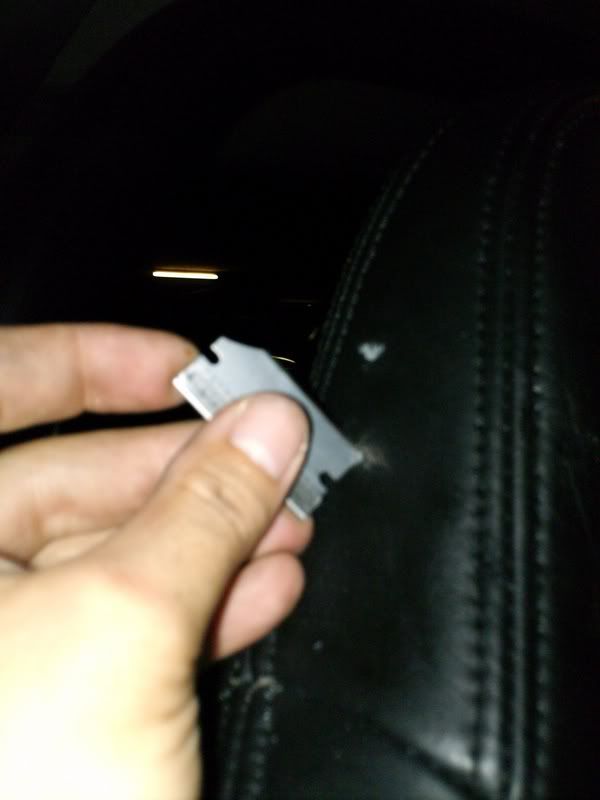
Next you have to make the holes in the leather SLIGHTLY larger so that you can put the spacers in. I used a razor blade to cut a small slit on the top of the bottom hole and the bottom of the top hole (this way all cuts/holes in the leather are covered by the seatbelt guide, just like factory):
Then you push your spaceres in (not all the way, don't want to loose them):
Put the guide up, put the screws through and screw it in:

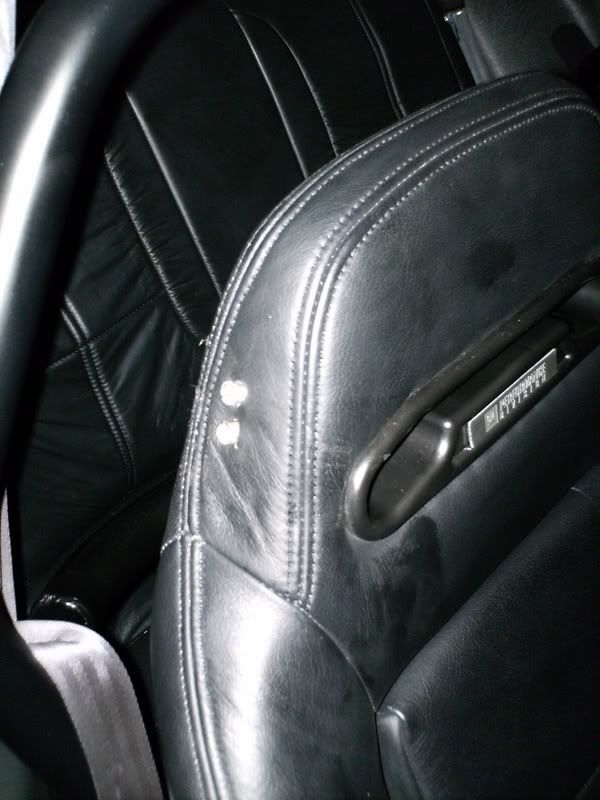
Here's the finished products:
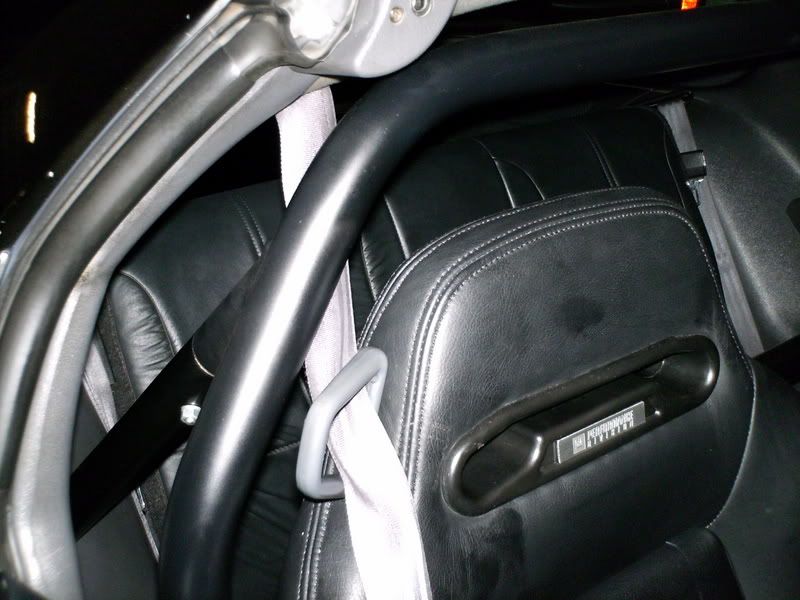
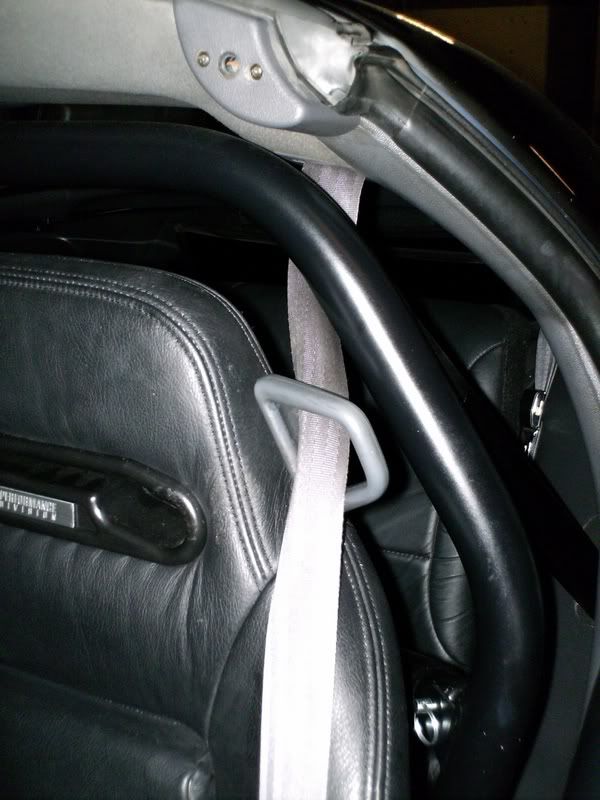
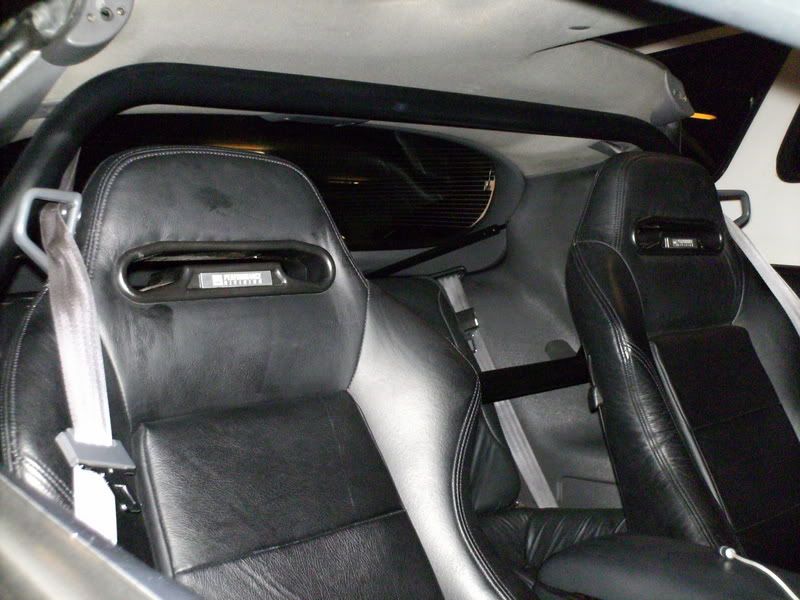
Mine's actually NOT finished... My screws are about 1/2"-1/4" TOO LONG and it tightens but it doesn't tighten the guide against the spacers and push them back under the leather yet:

Nothing a trip to the hardware store tommorrow won't fix
Anyways, just figured I would post this up so I would stop getting PM's EVERY day saying, "Did you mount your guides yet?"
I guess I was the only one with ***** enough to be the first to cut their own leather
Alright you kids, now go out there, install yours and post some pics
Yup, I finally got bored enough to mess with it
For awhile I just taped them on there (through the harness holes) and then I used a velcro strap...
Well, after MUCH procrastination I took a trip to the hardware store to brainstorm. My first, COMPLICATED, idea turned out to be overkill so I scratched it and went with the KISS (Keep It Simple Stupid) method...
It turns out it is VERY EASY to mount seatbelt guides to these seats... There is a bar underneath the cloth you can screw into but it is 1/2" under the surface so you have to add spacers so that it looks right and so the guide has something to tighten on to... Here's how:
First you need supplies... ALL YOU NEED are screws and a couple of spacers
!!!Here's what I bought (I bought new screws because I have no clue where my originals might be):
You will also need a drill with a metal drill bit, slightly smaller than the screws you use, and a razor blade.
The spacer was the shortest I could find in a diameter only slightly larger than the screw so I just bought it and cut it in half with my Dremel (you need it to be between 1/4" and 1/2"):
The first step is to mark the holes in the leather. I put the seatbelt guide up and pushed it hard into the leather so I could feel the metal bar underneath. Once I knew it was in place and over the bar I drilled a couple of small holes in the leather (easier than marking it and you're going to drill it anyways):
The next step involves drilling holes into a VERY ROUND bar... MAJOR PITA! I stuck a screw up against the bar and hammered it hard (trying to make a dimple)...
...and then followed it with a file that I hammered into it (I don't have a punch/awl)...
...and then I SLOWLY (so it wouldn't slip off) drilled my holes:
Next I checked to see the screws (metal screws I bought) tightened into the holes and they did:
Next you have to make the holes in the leather SLIGHTLY larger so that you can put the spacers in. I used a razor blade to cut a small slit on the top of the bottom hole and the bottom of the top hole (this way all cuts/holes in the leather are covered by the seatbelt guide, just like factory):
Then you push your spaceres in (not all the way, don't want to loose them):
Put the guide up, put the screws through and screw it in:
Here's the finished products:
Mine's actually NOT finished... My screws are about 1/2"-1/4" TOO LONG and it tightens but it doesn't tighten the guide against the spacers and push them back under the leather yet:
Nothing a trip to the hardware store tommorrow won't fix
Anyways, just figured I would post this up so I would stop getting PM's EVERY day saying, "Did you mount your guides yet?"
I guess I was the only one with ***** enough to be the first to cut their own leather
Alright you kids, now go out there, install yours and post some pics
Last edited by 6LITEREATER; 10-11-2008 at 01:30 PM.


 04-30-2007, 02:44 AM
#6
Originally Posted by hawk232
good job on being the first to do something!! always feels good doesnt it?
Still haven't topped that "oh ****" feeling as when I first cut the roof off of my hardtop 1994 Z in the parking lot of my college apartment complex with a skill saw in 1999...
I was the first (on camaroz28 at least which was the only really major board at the time) and did it only after seeing the underside of a hardtop in a junkyard...
Little harder to get up the nerve to do something like that blind as opposed to nowadays where there are countless online web pages to walk you through it
Trending Topics
04-30-2007, 12:45 PM
#8
Originally Posted by 02EBZO6
Great write up! I had rigged mine up with tape like your original plan...once the car is back from the shop bein tuned I'll give this method a try. Do you think Corbeau's have a metal bar around that area also?
04-30-2007, 02:59 PM
#9
FormerVendor
iTrader: (15)

Join Date: Jun 2006
Location: Los Angeles, CA
Posts: 2,689
Likes: 0
Received 0 Likes
on
0 Posts
Originally Posted by DEMONBIRD
I'm sure they would have to... Try to find a website that shows a pic of their frame. Arizen used to have a pic of ours and that's what I had remembered.
04-30-2007, 07:08 PM
#11
TECH Addict
iTrader: (61)
Join Date: Mar 2002
Location: USA
Posts: 2,304
Likes: 0
Received 0 Likes
on
0 Posts

Not trying to be a smart a$$, but if you have a roll bar, and those excellent seats made for harness setup - why oh why use the factory seat belts - why not go with harness setup?
I still have the factory seats, but a Wolfe 6-pt I couldn't wait to get rid of the stock belts and put the harnesses in - even with the stock seats.
I like the harness setup because during 'normal' driving I can wear only the lap belt and technically still be legal as far as to wearing seatbelt - but don't have to put up with the annoying stock shoulder harness.
During 'abnormal' driving - I use the entire harness setup for more security.
I still have the factory seats, but a Wolfe 6-pt I couldn't wait to get rid of the stock belts and put the harnesses in - even with the stock seats.
I like the harness setup because during 'normal' driving I can wear only the lap belt and technically still be legal as far as to wearing seatbelt - but don't have to put up with the annoying stock shoulder harness.
During 'abnormal'
driving - I use the entire harness setup for more security.
04-30-2007, 07:20 PM
#12
Originally Posted by 1QUIKWS6
Not trying to be a smart a$$, but if you have a roll bar, and those excellent seats made for harness setup - why oh why use the factory seat belts - why not go with harness setup?
I still have the factory seats, but a Wolfe 6-pt I couldn't wait to get rid of the stock belts and put the harnesses in - even with the stock seats.
I like the harness setup because during 'normal' driving I can wear only the lap belt and technically still be legal as far as to wearing seatbelt - but don't have to put up with the annoying stock shoulder harness.
During 'abnormal' driving - I use the entire harness setup for more security.
I still have the factory seats, but a Wolfe 6-pt I couldn't wait to get rid of the stock belts and put the harnesses in - even with the stock seats.
I like the harness setup because during 'normal' driving I can wear only the lap belt and technically still be legal as far as to wearing seatbelt - but don't have to put up with the annoying stock shoulder harness.
During 'abnormal'
driving - I use the entire harness setup for more security.I get pulled over enough in this tree-hugging hippie state I didn't want to give them another reason
 .
04-30-2007, 07:39 PM
.
04-30-2007, 07:39 PM
#13
Originally Posted by DEMONBIRD
I bought the seats and bar with intentions of harnesses... ALTHOUGH, it's a daily driver and apparently it's illegal to use harnesses on the street. I know, it makes no sense...
I get pulled over enough in this tree-hugging hippie state I didn't want to give them another reason.
I get pulled over enough in this tree-hugging hippie state I didn't want to give them another reason
. 05-04-2007, 04:37 AM
#17
Launching!

Join Date: Sep 2004
Location: Las Vegas, NV
Posts: 295
Likes: 0
Received 0 Likes
on
0 Posts

Get a set of Schroth ASM harnesses. They have the reel action like stock belts, but are 3 or 4 pnt harness? plus they have a switch you can mount to lock out the retraction of the belts for racing. Plus, They are DOT approved. I had to show the cop the stupid little tag while i was in Cali visiting a few years back. Saw it, and said Cool...
05-04-2007, 04:44 AM
#18
Originally Posted by Nite_Hawk
Get a set of Schroth ASM harnesses. They have the reel action like stock belts, but are 3 or 4 pnt harness? plus they have a switch you can mount to lock out the retraction of the belts for racing. Plus, They are DOT approved. I had to show the cop the stupid little tag while i was in Cali visiting a few years back. Saw it, and said Cool...
05-04-2007, 04:48 AM
#19
Launching!
Join Date: Sep 2004
Location: Las Vegas, NV
Posts: 295
Likes: 0
Received 0 Likes
on
0 Posts
Yeah...Sorry bout that...If buy chance you get some. Look for the black magic ones. All black w/black lettering. Regular is Black/yellow lettering Red/Black lettering Blue/Black lettering.
05-04-2007, 04:49 AM
#20
Launching!
Join Date: Sep 2004
Location: Las Vegas, NV
Posts: 295
Likes: 0
Received 0 Likes
on
0 Posts
Originally Posted by Nite_Hawk
Yeah...Sorry bout that...If buy chance you get some. Look for the black magic ones. All black w/black lettering. Regular is Black/yellow lettering Red/Black lettering Blue/Black lettering.