When you click on links to various merchants on this site and make a purchase, this can result in this site earning a commission. Affiliate programs and affiliations include, but are not limited to, the eBay Partner Network.
Hello, Gentlemen, I was hoping we could do a thread similar to this one, where we trade ideas about the best things to increase the longevity and performance of an old TH700.
Backstory: I'm currently driving a '90 R1500 Suburban as my daily, and this week is started leaking from the dipstick tube seal. The pan gasket isn't looking too hot, so I figured I'd drop the pan and fix all of it.
The fluid doesn't look/ smell terrible, but it isn't that great, either. It shifts/ downshifts well, without any flaring or slippage.
My plan so far is thus:
-Sonnax boost valve
-New Delco separator plate to drill accordingly
-New fluid , filter and gaskets
- Profit?
What do you guys think? I know that there are shift kits made for the TH700, but I'm not really trying to get it to shift more aggressively, I just want to make sure I've got adequate pressure on the clutch packs/ band/ etc.
Any recommendations on hole size changes for the separator plate?
I know that changing to a Corvette servo would be an easy mod, but I wasn't really planning on it (unless someone talks me into it...)
Let me know what y'all think, thanks a lot for all of your help!
new separator plate w/ torlon checkballs, sonnax LB1 valve+spring, Vette servo + check pin travel, mod PR valve or install late GM valve, block 4th accumulator + discard spring and piston, i like to mod the shift valve roll pins so they can be installed opposite direction. this makes it so they can be removed with v/b in place. the transgo SK700R4 kit is not bad and gives you a lot of stuff for tuning shifts and their TV mods are good.... if you just want Tv mod buy the sk jr it's cheap on rock auto.
EDIT: make the shift valves easily removable so you don't have to drop the v/b if you want to play with the part throttle shift points. you can change the sleeve and/or spring. mess with the governor for WOT. I recently changed the 3-4 spring in my truck as it was shifting too soon into 4th.
Hello, Gentlemen, I was hoping we could do a thread similar to this one, where we trade ideas about the best things to increase the longevity and performance of an old TH700.
Backstory: I'm currently driving a '90 R1500 Suburban as my daily, and this week is started leaking from the dipstick tube seal. The pan gasket isn't looking too hot, so I figured I'd drop the pan and fix all of it.
The fluid doesn't look/ smell terrible, but it isn't that great, either. It shifts/ downshifts well, without any flaring or slippage.
My plan so far is thus:
-Sonnax boost valve
-New Delco separator plate to drill accordingly
-New fluid , filter and gaskets
- Profit?
What do you guys think? I know that there are shift kits made for the TH700, but I'm not really trying to get it to shift more aggressively, I just want to make sure I've got adequate pressure on the clutch packs/ band/ etc.
Any recommendations on hole size changes for the separator plate?
I know that changing to a Corvette servo would be an easy mod, but I wasn't really planning on it (unless someone talks me into it...)
Let me know what y'all think, thanks a lot for all of your help!
Don't forget the 296 Rev./Int. boost valve. I use the recommended plate hole sizes that the SK kit recommends. The Vette servo is a decent modification and the TransGo SK helps tie all the modifications together
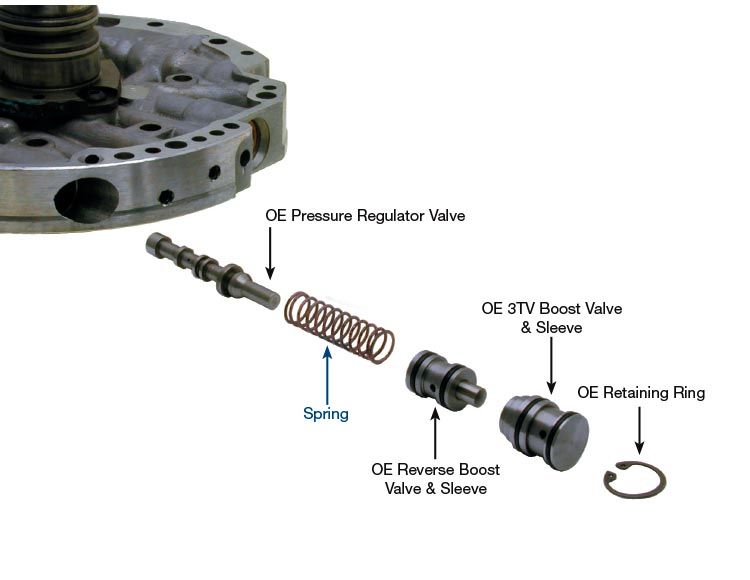
Guys, I'm a little confused about the boost valves.
So far there is Sonnax 700R4LB1 - What I was planning on using
But then Tranzman mentioned the reverse boost valve, and I found Sonnax #K77898
Then there is also Sonnax #77917500, the TV boost valve.
They all go in the same location, which is the best one to use?
These are WIT (wittrans.com) part #'s
A74507RGK (this is the .296 valve) reverse intermediate boost valve.
A74507TK (aftermarket) or S74507T (Sonnax factory style), S74507TK (Sonnax o-ring style) all of these are .500 TV boost.
The Sonnax LB1 is a kit with the o-ringed .500 valve & their 10% stringer boost valve spring.
If you choose an SK to go with the job. More than likely that kit will come with their own P/R spring. That is why I never order the LB1 kit myself.
Thank you for the clarification.
I will be ditching the LB1 kit, and get:
- SONNAX 77917500 O-ringed .5" boost valve
- SONNAX K77898 reverse boost valve
Also, you guys twisted my arm, and I'm going to get the Corvette servo and Transgo SK700 kit.
Okay guys, I've got all the parts now, but I can't find any vacuum test specs for the TH700 valvebody. I looked up and down on the Sonnax site, and didn't find anything.
Can anybody help with a source?
Okay guys, I've got all the parts now, but I can't find any vacuum test specs for the TH700 valvebody. I looked up and down on the Sonnax site, and didn't find anything.
Can anybody help with a source?
Because a 700R4 VB is cast iron. I don't think Sonnax ever Vac tested it. They have proven to be very reliable that way.
Your hole sizes are in line with the recommended shift kit sizes. Hole B is 2nd A is 3rd & E is 4th. F is band release. You cant go wrong with the SK recommendations.
On the 4L60Esome times the 2-3 is a little soft. I have not ever figured out why. When I built my 2004 trailblazer unit I used a TransGo SK, a .500 boost valve & a Corvette servo. I thought they would be a little firmer that they are. Not that they are super soft, just would like to have them 15-20% firmer. I did the same on my son's 2000 Yukon and they are on the firm side. he would like them to be about 10-15% softer. Neither one of us is willing to pull the VB to make those changes. Like the old yellow dog laying on the nail. Doesn't bother them enough to move, but will let out a yelp every now and then...
If you want to make this more of a Performance unit or Heavy Duty. Remove the spring from the 3-2 control, "F" hole .093". "C" hole .135", "E" .135", "A" .110" - .125". Line Bias Red spring. Use the Red TV spring with the aluminum shim. .471" - .500" main boost valve. Intermediate/reverse boost valve .296". Make sure the spacer that goes inside the spring is flat. Most of the time there is a slight bend in them. With the "B" accumulator valve, always install the Black spring. On the second accumulator setup, grind the 10 nubs off the back of the accumulator piston, then flat sand it for a flat surface. To use Torlon check *****. Where the check ***** seat, you need to set it up check ball hole to accept them. Take 3 or 4 pieces of writing paper and place it under the separator plate on a very hard flat surface. Take a 5/16" (.3125") steel check ball and place it over the check ball hole. With a small hammer, hit the check ball squarely (not to hard) to make a surface for the Torlon check ball to seat against. The oem plate was designed for steel check *****. They make there own seat quickly. Make sure the gaskets are not covering any holes, even slightly. There is more to do, but for you have here, this should be fine.
Removing the spring and opening up the "C" hole, will speed up the 3-2 downshift. If you want it even faster, drill "C" to .155". Make sure the partition in the case is not in the way of the oil flow. A Dremel might be needed to remove a little of the partition here if necessary.
Almost forgot. In the photo of the separator plate at the top you will see about half of the Blue shop towel showing through. Just to the left of that hole there is a very small hole. Peen it closed.
By the way. That is Damn It!
Okay, I just leave the 3-2 valve floating in there? I don't block it to one side or another (like the 3-2 valves on a 4L60E)?
EDIT: And just for the record, everyone is fine with the .070" band clearance?
Yes, the 3-2 valve floats. As long as the hard way of turning the driveshaft does not get harder. Then .070" is fine. With the welding of tip of the pin. The tip should be round, otherwise the band clearance can change quickly.
[QUOTE=PBA;20502309
Almost forgot. In the photo of the separator plate at the top you will see about half of the Blue shop towel showing through. Just to the left of that hole there is a very small hole. Peen it closed.
[/QUOTE]
The hole you speak of here is TV oil. What is your thought process to peening it closed? my thoughts are that it is part of the TV balance system. Although not the one most builders open to .055 to move the valve back to idle.
The hole you speak of here is TV oil. What is your thought process to peening it closed? my thoughts are that it is part of the TV balance system. Although not the one most builders open to .055 to move the valve back to idle.
Okay guys, here's the latest update: I tried peening the hole closed, but after several tries, all I did was make it smaller. I'm going to leave it as is, for now.
In my haste today, I actually forgot to remove the 3-2 valve spring; the valvebody is already torqued on (95 in/lbs), and I'm not going to risk tearing a gasket to take it out.
After installing the servo piston assembly with all of the seals*, I double checked the band clearance, and it tightened up considerably to about .030".
I ground the pin down (leaving a rounded tip), and ended up with about .077". I'm going to run it.
I redrilled the holes that Dana recommended, but since my 9/64" drill bit is broken, I only drilled them to 1/8" (.125" instead of .135. I think I'll live).
Here's a picture of the final plate hole layout:
Here are some final shots of the valvebody and case right before I put them together, that way everyone can see where I put the check-***** (or lack thereof):
I'm sorry that you can't see all of the case, but this was a very difficult shot to get:
I'll let y'all know how this goes.
Thanks for all the help!
* I did my initial checks with no gaskets/ O-rings; Much easier to get the assembly in and out that way.
Gas Monkey Built a 6-Wheel Ferrari Testarossa With a Corvette LT4 Engine
Slideshow: The controversial Ferrari F6 swaps its original flat-12 for a Corvette Z06-derived LT4 V8 and sends power to four rear wheels through a custom-built drivetrain.
7 Most Reliable High-Performance Engines GM Has Ever Built
Slideshow:These GM engines didn't just make huge power, they survived abuse, boost, track days, and six-digit mileage with a reputation for refusing to quit.
6 Common C5 Corvette Failures and What's Involved In Repairing Them
Slideshow: From wobbling harmonic balancers to failed EBCMs, these are the issues that define long-term C5 ownership and what repairs typically involve.
Retro Modern Bandit Pontiac Trans AM Comes With Burt Reynolds' Autograph
Slideshow: A modern Camaro transformed into a retro icon, this limited-run "Bandit" build blends nostalgia with brute force in a way few revivals manage.
Top 10 Greatest Cadillac V Series Performance Models Ever, Ranked
Slideshow: Cadillac didn't just crash the high-performance luxury vehicle party, it showed up loud, supercharged, and occasionally a little unhinged...