When you click on links to various merchants on this site and make a purchase, this can result in this site earning a commission. Affiliate programs and affiliations include, but are not limited to, the eBay Partner Network.
Volant box. I unfortunately just had to remove the fast 92. It had previous sealing issues that I thought were finished, nope.
Found the shop that did the cam work removed the button head screws and installed stock bolts.
Gaskets down below are toast, rope gasket is toast and I'll be ordering a full replacement set up now that I've confirmed it's not cracked on the lower shell.
FYI for those who are looking to mount ls6 length injectors on an LS2 manifold, you need a 1/2" spacer. Thankfully the fast spacers were suitable. Also of worth is know that the steam vent bolts are exactly down to the MM the right length to install the fuel rails.
Don't make mind the degreaser. Whoever ported this did a really nice job. If y'all see anything in the images that look off, please let me know so I can give it a solid inspection.
Got everything in hand and replaced the seal. The length wasn't long enough to do all the runner seals, so I reused the better condition ones and am hoping for the best.
I also received the wrong part number for the intake to head seals. I'll be reusing the old ones as they appear to be serviceable.
I'm shooting a diy video to show people how to replace the rope gasket properly.
-Byron I had the inspect and reuse the 3 center runner gaskets as the fast replacement isn't long enough.
She is up and running again. Got everything done and am processing the video for both the install and the buildup of the Fast 92 into an assembled unit.
Fuel trims indicate no vacuum leaks. I'll give it a few days and double check the torque on the intake bolts to make sure everything is happy, then next Fri hopefully install the 4" ls7 setup back and get the final tuning done in prep for a long anticipated Dyno session.
Got everything torque checked Friday morning, sure enough the fast bolts were 1/4 turn loose, all of them including the 6 end bolts uniformly. I'm hoping this is just the seal settling and not a sign of additional problems.
I will be applying a strip of torq seal for a visual reference if they do back off.
If they move again, I will replace the manifold bolts with stock bolts and hopefully it won't be an issue. She runs amazing again, so it didn't leak as it would have been reflected in my AFR and fuel trims as it was previously.
I finally got the clutch to bleed but not in a traditional way. Nothing still coming out of the slave bleeder but it does now drip from the bottom of the bell housing. Don�t know if the bleeder is clogged or if the tube and valve are fused together but there is new fluid in the system finally. Test drive resulted in nice smooth shifts for the first time owning the car but it only lasted half the drive. I think there is still something up so LS7 clutch swap will be happening soon unless there is a new go to swap.
I finally got the clutch to bleed but not in a traditional way. Nothing still coming out of the slave bleeder but it does now drip from the bottom of the bell housing. Don�t know if the bleeder is clogged or if the tube and valve are fused together but there is new fluid in the system finally. Test drive resulted in nice smooth shifts for the first time owning the car but it only lasted half the drive. I think there is still something up so LS7 clutch swap will be happening soon unless there is a new go to swap.
mine was like this as well. I gave up and just changed out the reservoir a few times with a couple days of driving in between each and called it good. I wasn�t sure if I�d want all that stuff running down my clutch.
I finally got the clutch to bleed but not in a traditional way. Nothing still coming out of the slave bleeder but it does now drip from the bottom of the bell housing. Don�t know if the bleeder is clogged or if the tube and valve are fused together but there is new fluid in the system finally. Test drive resulted in nice smooth shifts for the first time owning the car but it only lasted half the drive. I think there is still something up so LS7 clutch swap will be happening soon unless there is a new go to swap.
Check the quick disconnect fitting on the fluid line and make sure it's fully seated and returning fluid to the reservoir.
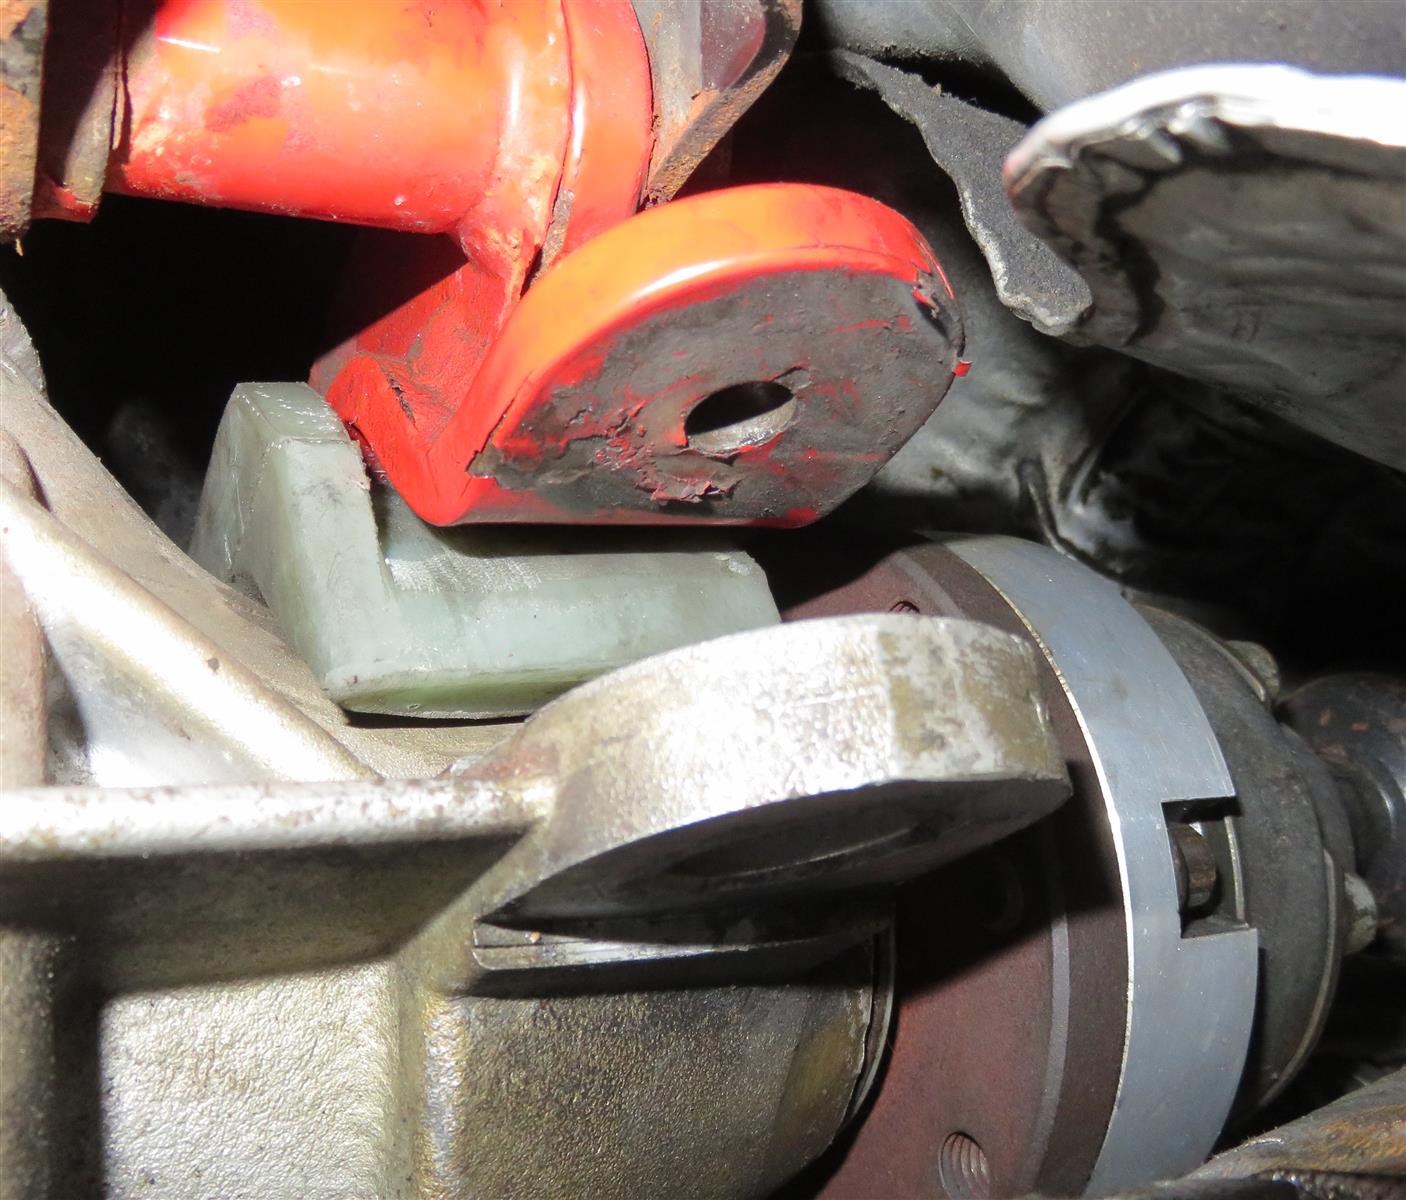
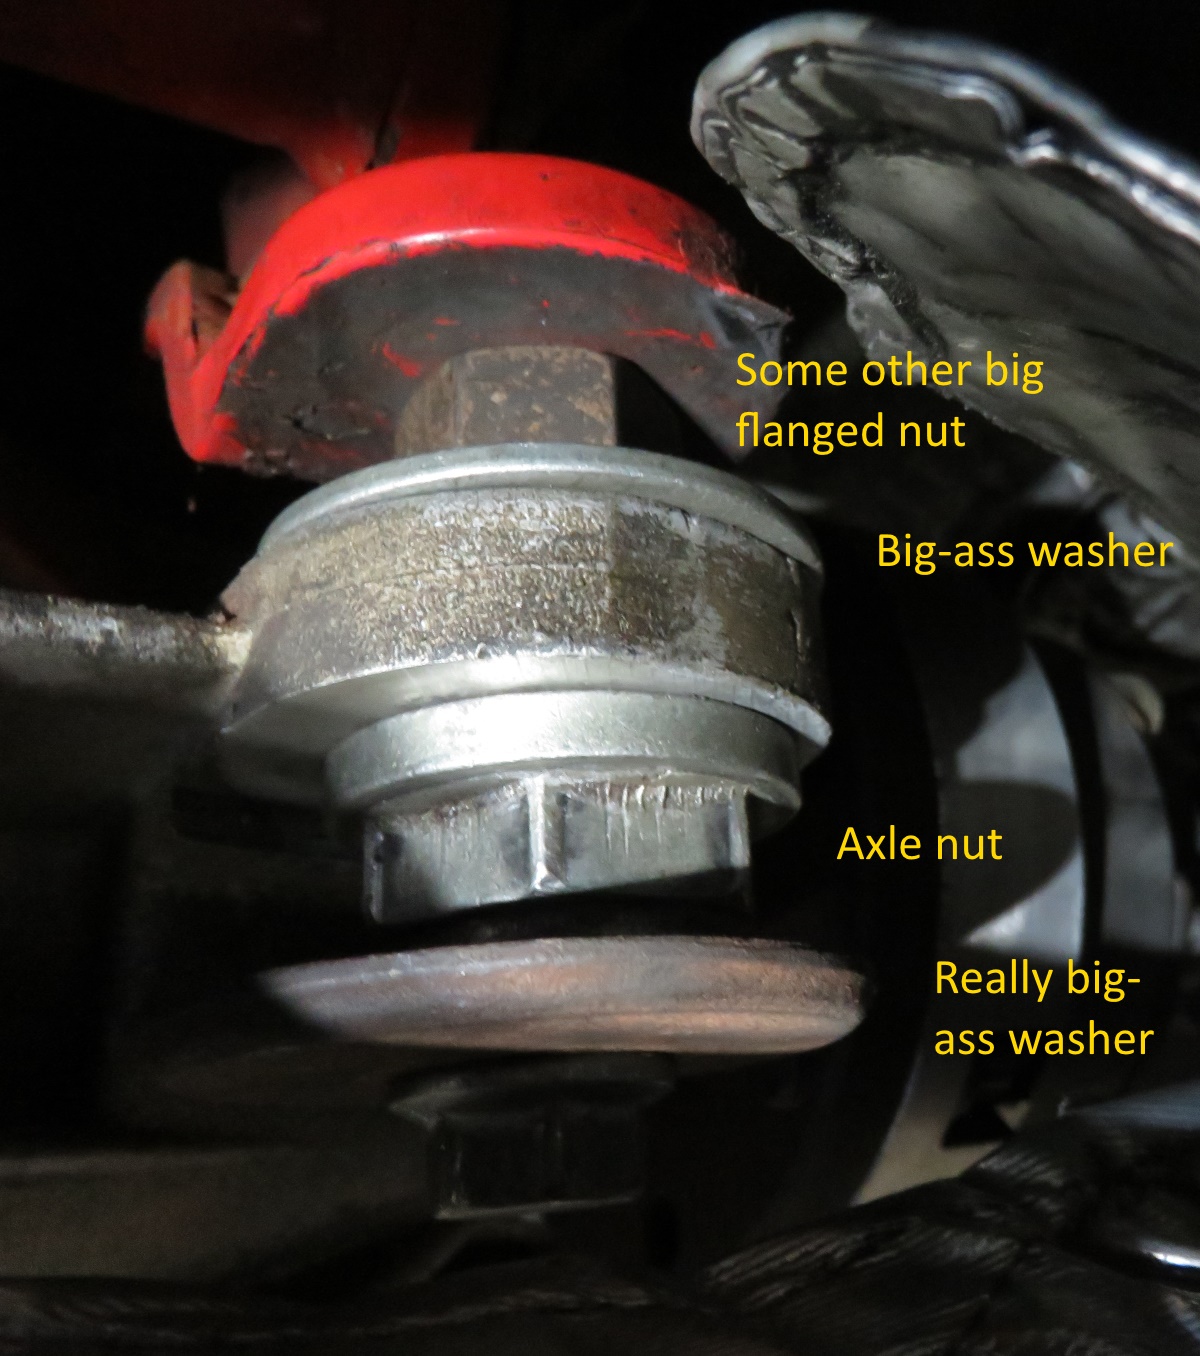
My car sat for a long time while I took my sweet time finding and then fixing the chipped cam. Once I got it running again a few months ago, I was driving it pretty easy, because I wanted to get it re-tuned before really driving it. Got the tune taken care of a couple/few weeks ago, and then discovered I had some nasty rear end clunk. I've had the bushings on the snout of the 8.8" go bad once before, so I figured that's what it was.
Yesterday I put the car up on a lift and took a look. Turns out I was wrong - the bushings hadn't gone bad.
Nope, the bushings hadn't gone bad - the passenger side ones had gone completely missing! Driver side still looked good, so that's nice.
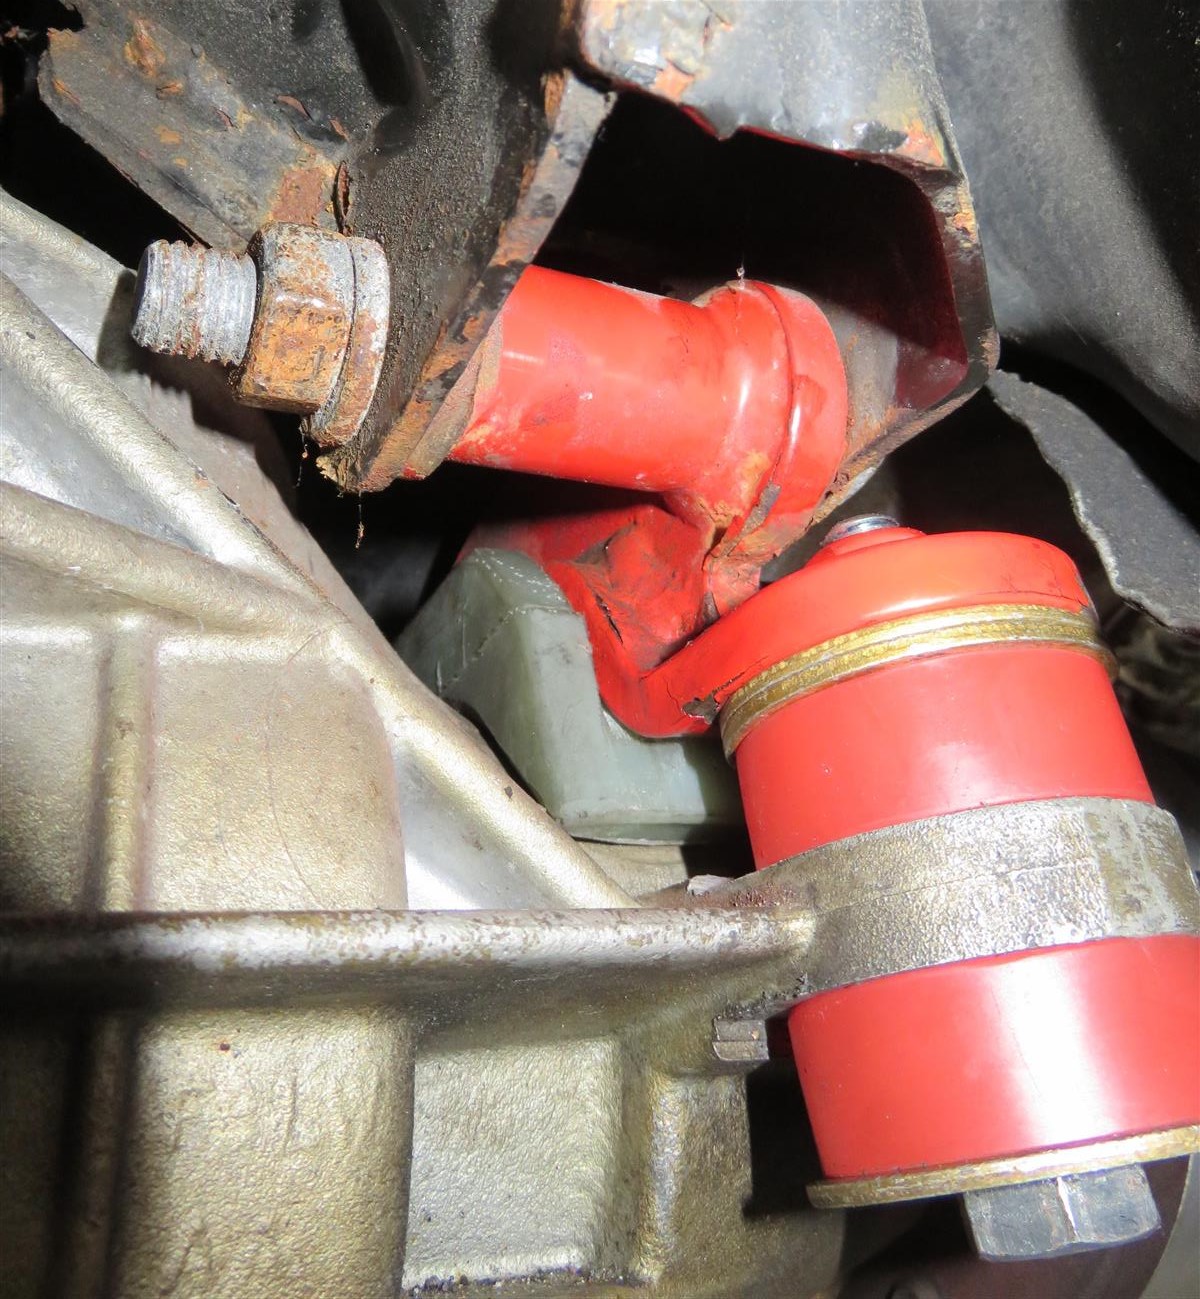
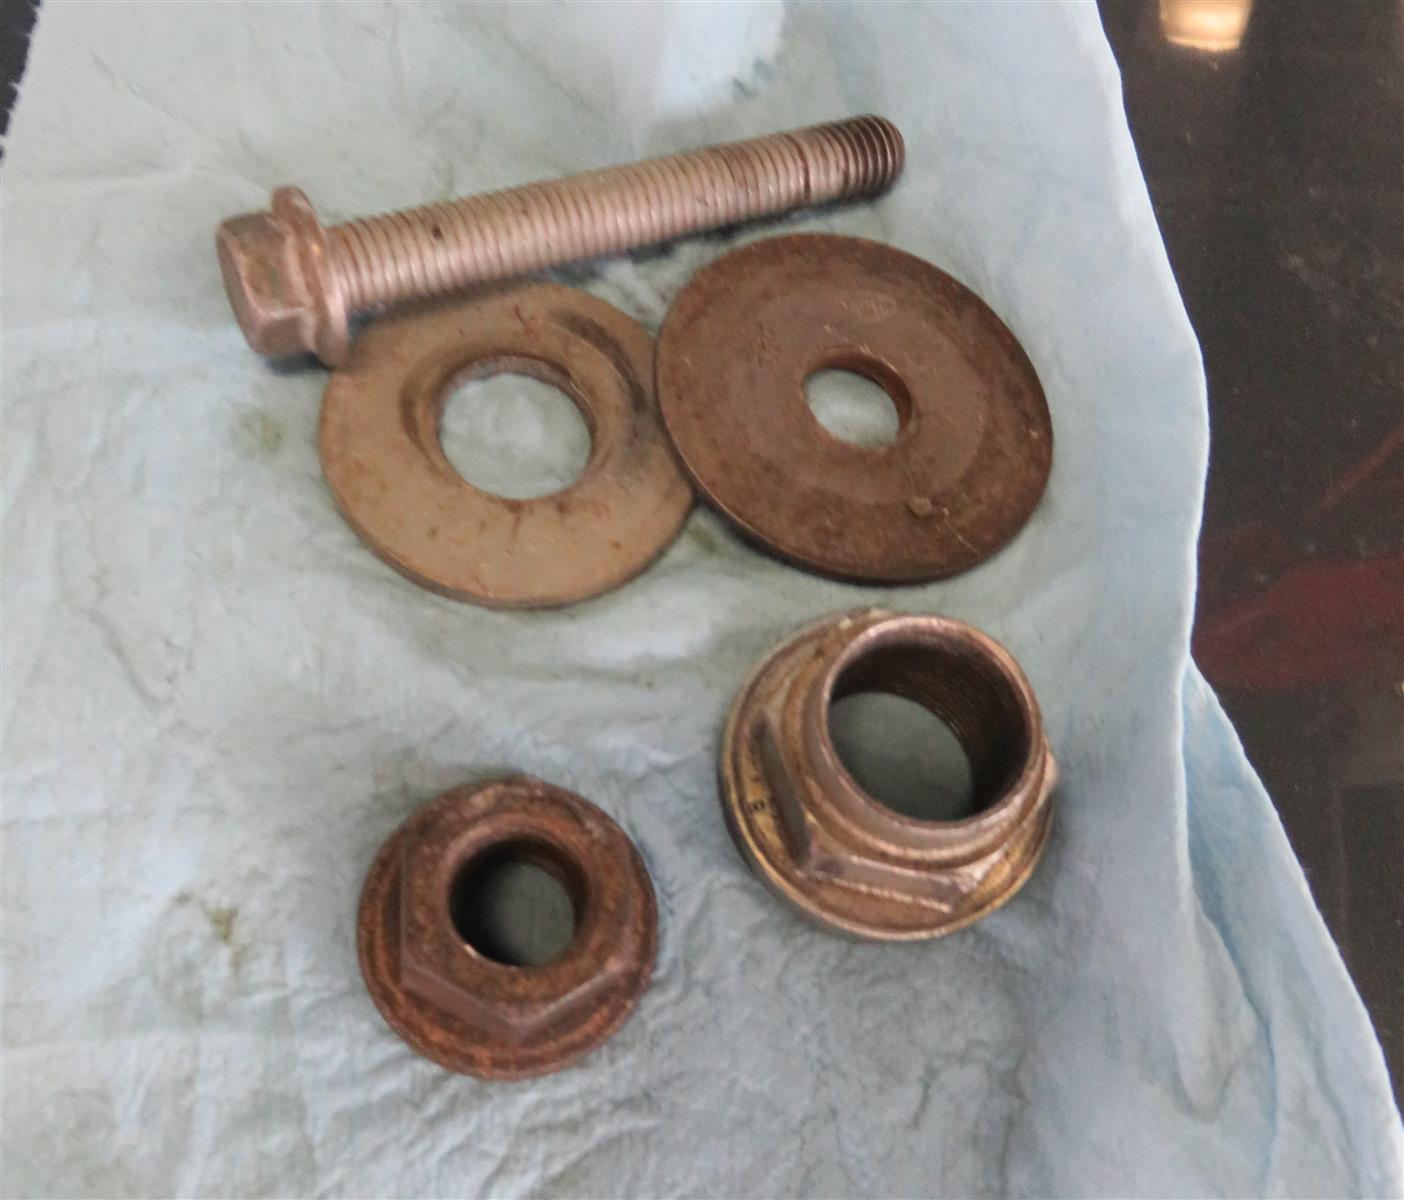
Not surprisingly, I don't keep replacement 8.8" snout bushings in my glove box, so I had to come up with something. I was doing this at the auto hobby shop on base, and generally at the hobby shop there's a bin somewhere of spare nuts 'n' bolts. First big bolt I saw was the right thread pitch - huzzah! That still left me with no bushings, so I grabbed some big nuts and washers and just went solid for the time being.
I really miss the auto hobby stores on base. Used to make decent cash doing a quick brake jobs and the like for people.
Nice solution. Question I have for you is how does it drive with the solid solution?
I'm still having issues with intake bolts backing out, so I will now be ordering new hardware, a thread cleaning tap and removing the intake yet again.
I've got it down to 30 min flat now from loosening the first bolt to removed, to reinstalled.
I apologize if you already tried this, didn�t read everything, but maybe some blue locktite will help your situation?
Derek
Yep. Every time I remove them, I keep a bottle of loctite 243 on hand.
I used some alcohol and pipe cleaners to clean up the threads, and it seems to be holding now. I'm still again removing the intake in a week or so to replace the gaskets as I had ended up reusing the old ones to complete the install.
I'll make it a point to get in there with some hexane at that point and really get them good and clean.
I really miss the auto hobby stores on base. Used to make decent cash doing a quick brake jobs and the like for people.
Nice solution. Question I have for you is how does it drive with the solid solution?
Driving home from the hobby shop it seemed fine. Driving yesterday it was not fine - definitely clunking again. Maybe the bolt loosened up already? And I feel like the axle nut isn't a great solid option, because it has that thinner section at the top of the nut so you can stake the nut to the axle - I feel like that thinner section might be deforming and allowing some play, and then that play causes more deformation. I need to get some real bushings in there.
Still waiting on my gaskets to arrive, but at least the material for the heat shield arrived.
I'll be installing it when I yank the manifold yet again to install new lower port seals. The ones on it are serviceable, however they are my old ones and I'm paranoid.
This is perfect, and should help somewhat with keeping heat out of the intake.
There is however a far more important point, which is an additional barrier to prevent any contact with the lower manifold shell. There will still be an air gap as this is 1/8" thick installed and compressed.
It's very nice material. Will it add power? I'm not expecting it to. Will it look pretty and add a potential benefit? Yes I think it will.
If it does indeed work as well as advertised, I'll be adding their Cai shield to my intake tube and logging the results, if any, and then doing the outer sides of the Volant box with a different version of this that is much harder for abrasion resistance.
Ordered bushings and bolts from Creative Steel early in the week. They also modified a differential block for me to fit my aluminum diff. [I had bought one a while back, but never got around to modifying it for the aluminum housing, so I sold it to someone else.] Got the parts Thursday and went back to the auto hobby shop on base to fix things today.
The temporary "solid bushing" fix had not lasted long at all - the bolt had already unthreaded itself. It couldn't fall out completely because of the exhaust nearly right below, so all the parts were still there:
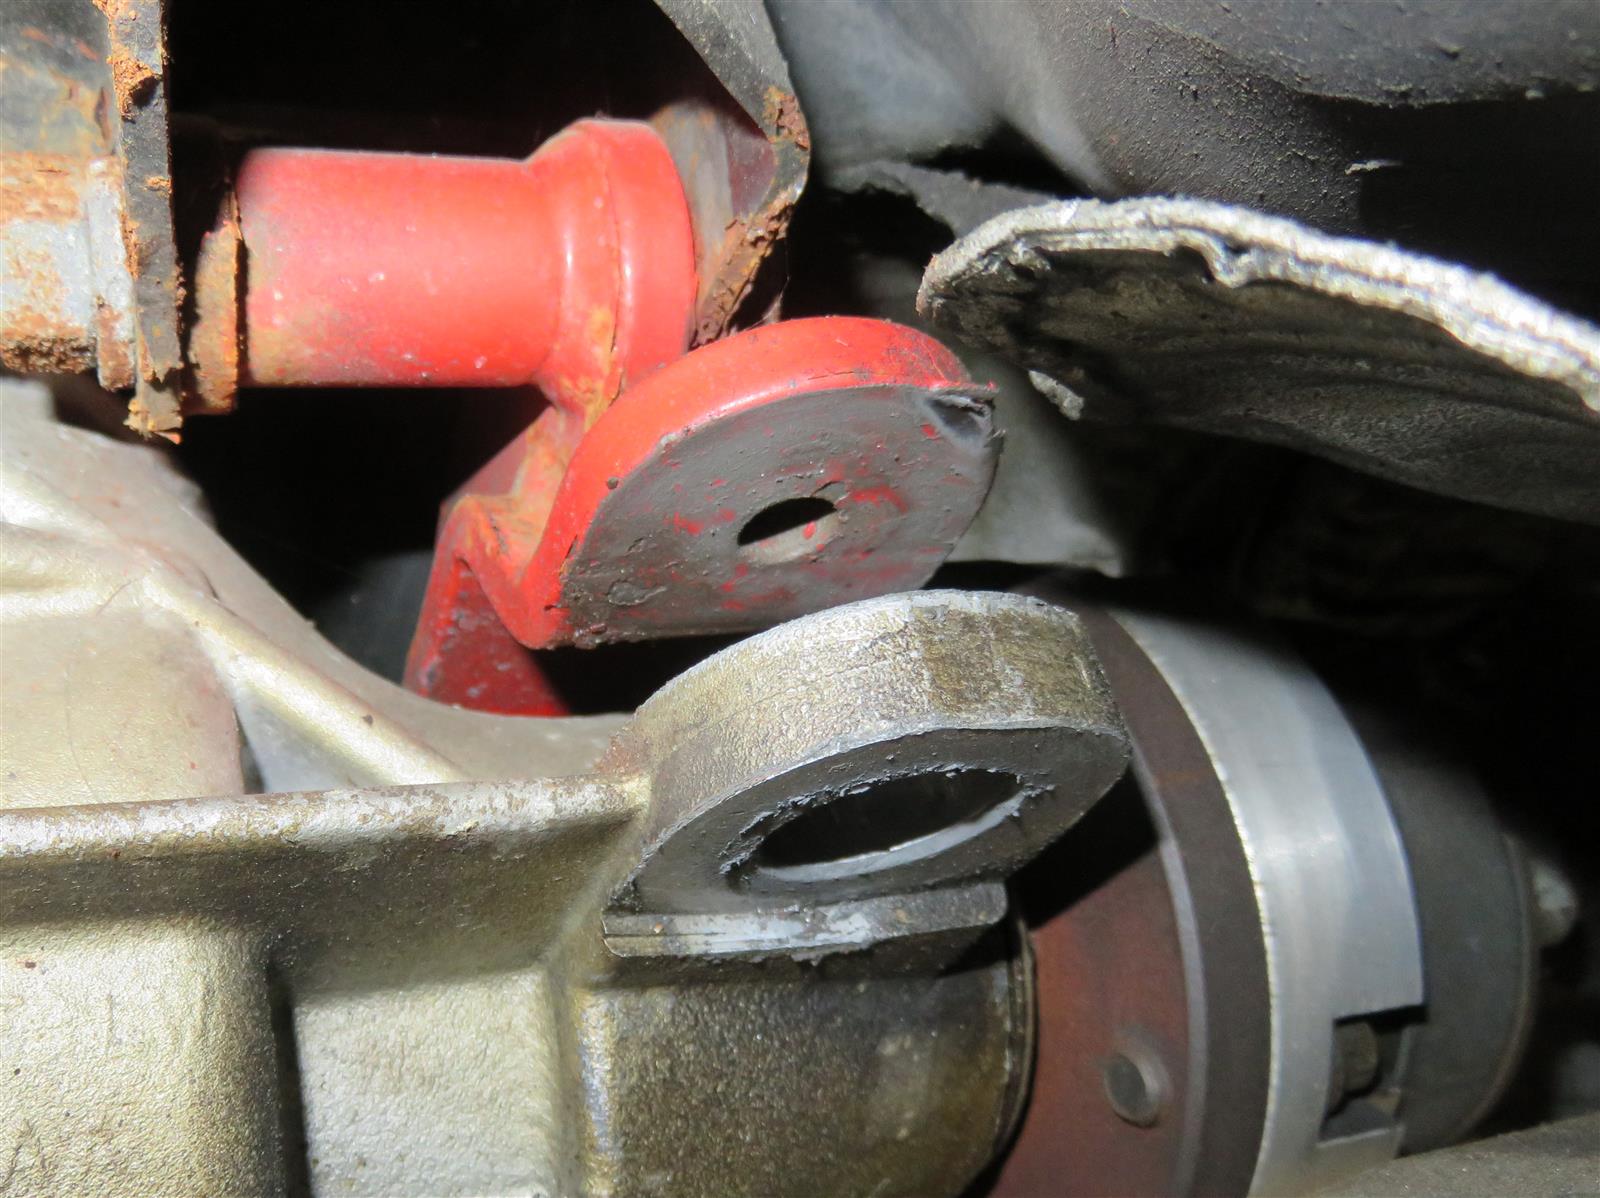
Took me a bit to get the differential block in there. I was fighting to try to slide it in from the passenger side, since the bushing was already gone on that side. After trying that unsuccessfully a few times, I figured out that if I removed the driver side mount bushing, then loosened the horizontal bolt that holds the adapter bracket in place, I could rotate the adapter bracket up and provide a bigger opening on the driver side to slide the diff block in from that side. Pretty easy once I had that revelation. Got the diff block in:
[I also discovered that horizontal bolt was a little loose, enough that I could jiggle the forward adapter/mount bracket a bit. When I put things back together I made sure to gronk that down nice and tight.]
And then the new bushings in:
The existing driver side bushing looked fine, so I re-used that, and kept the 2nd new bushing (and new bolt) as a spare.
Amazing what a difference fixing this made. The whole car seemed to ride smoother on the way home. I'll have to check the bolts again to make sure they don't loosen up like the temporary "solid bushing" fix did.


 01-29-2020, 10:35 PM


 Now to order some replacement bushings.


 Got the diff block in: