When you click on links to various merchants on this site and make a purchase, this can result in this site earning a commission. Affiliate programs and affiliations include, but are not limited to, the eBay Partner Network.
Ordered bushings and bolts from Creative Steel early in the week. They also modified a differential block for me to fit my aluminum diff. [I had bought one myself a while back, but never got around to modifying it for the aluminum housing, so I sold it to someone else.] Got the parts Thursday and went back to the auto hobby shop on base to fix things today.
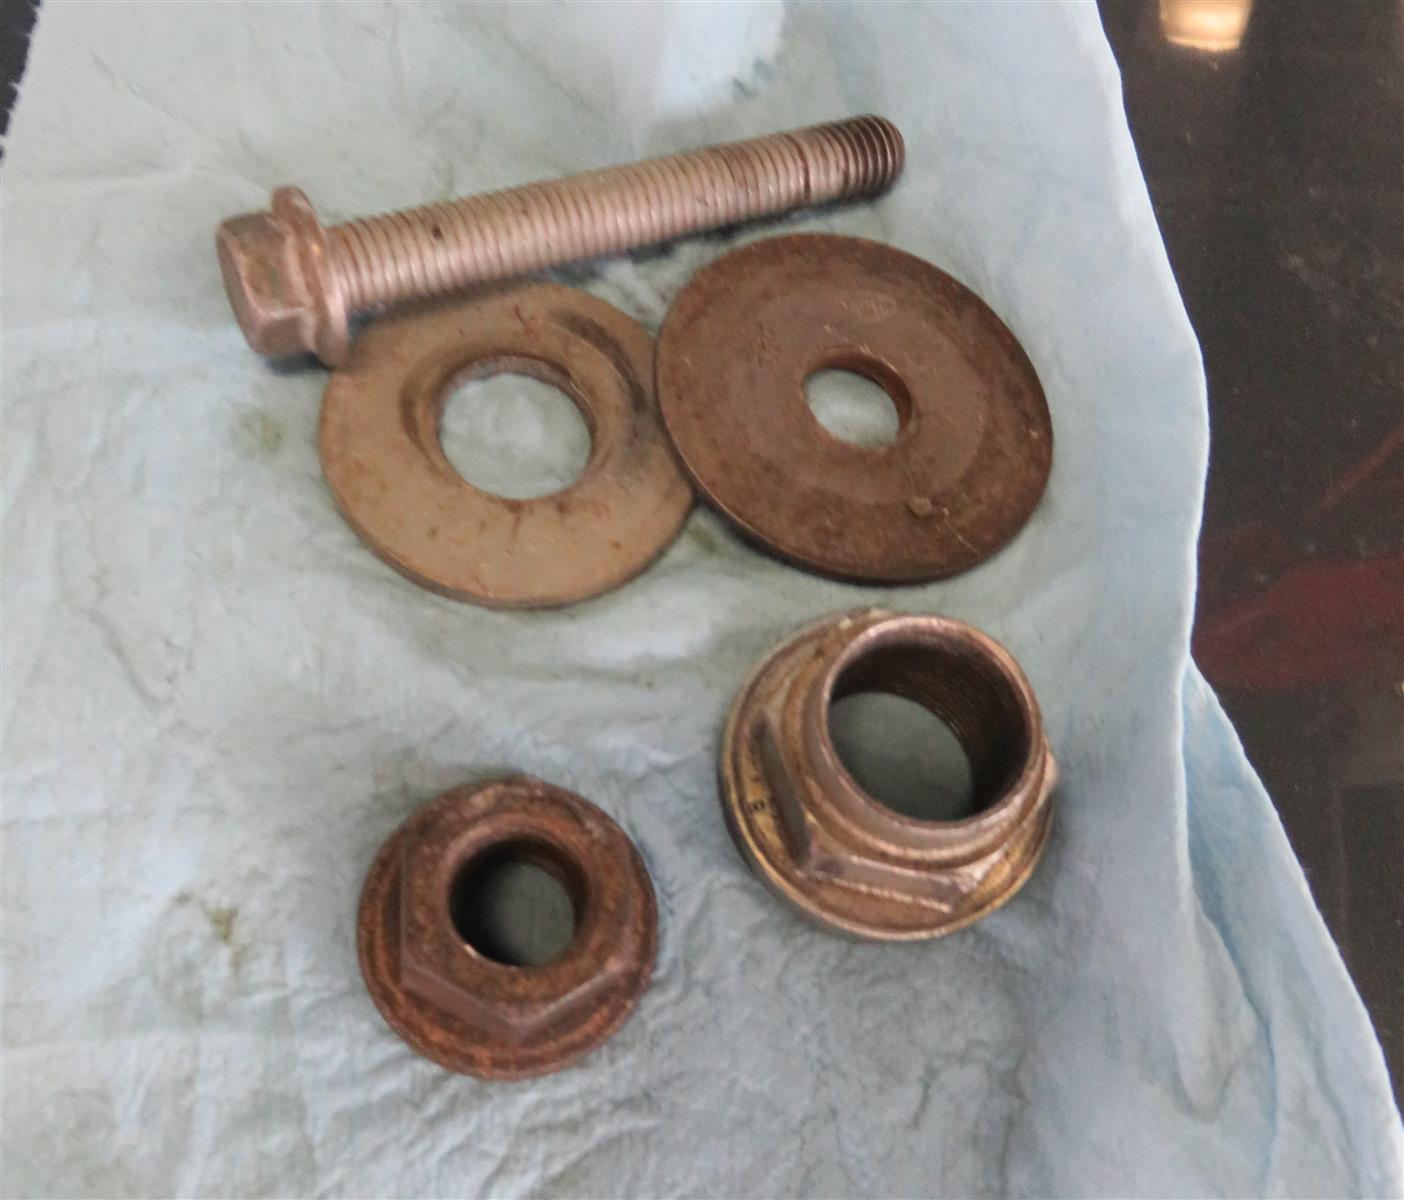
The temporary "solid bushing" fix had not lasted long at all - the bolt had already unthreaded itself. It couldn't fall out completely because of the exhaust nearly right below, so all the parts were still there:
Took me a bit to get the differential block in there. I was fighting to try to slide it in from the passenger side, since the bushing was already gone on that side. After trying that unsuccessfully a few times, I figured out that if I removed the driver side mount bushing, then loosened the horizontal bolt that holds the adapter bracket in place, I could rotate the adapter bracket up and provide a bigger opening on the driver side to slide the diff block in from that side. Pretty easy once I had that revelation. Got the diff block in:
[I also discovered that horizontal bolt was a little loose, enough that I could jiggle the forward adapter/mount bracket a bit. When I put things back together I made sure to gronk that down nice and tight.]
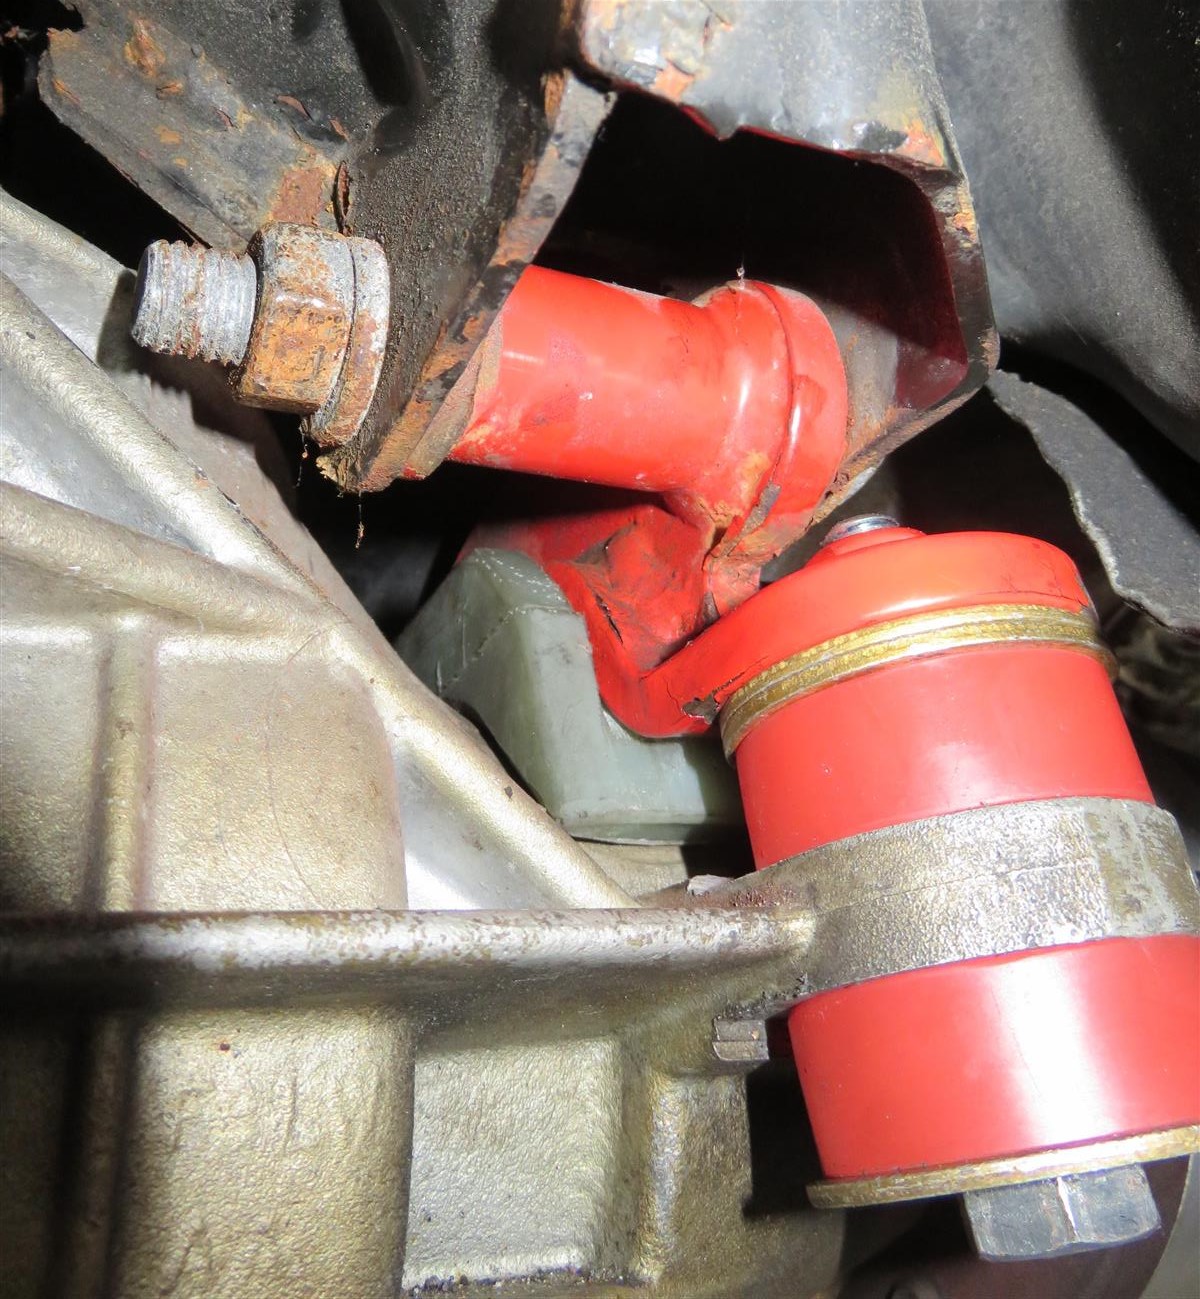
And then the new bushings in:
The existing driver side bushing looked fine, so I re-used that, and kept the 2nd new bushing (and new bolt) as a spare.
Amazing what a difference fixing this made. The whole car seemed to ride smoother on the way home. I'll have to check the bolts again to make sure they don't loosen up like the temporary "solid bushing" fix did.
I'm going to have to check mine now, got me paranoid. I think I'll do a block also. I've been considering one for a while now.
When you accelerate, the pinion tries to climb the ring gear, which means the snout of the diff wants to lift up. That puts a lot of load on the front mount bushings. The diff block just spreads the load over a larger area, which should help the bushings survive longer.
I actually drove mine today. My Raptor went in at the dealership to get a new rain sensor that had leaked, treatment for the door lock cables that keep freezing when the weather switches from wet to frozen (which in Pittsburgh is often) and I paid them for an oil change too. Was about to rev it out at one point and saw a cop early enough to shut it down. Did get a good 1-2 into an easy 3 just to hear the exhaust later on. Solid 2nd chirp too. Felt good on the first day over 60 since fall. Reminds me why I keep it even though I don’t need it. Gotta get my bikes out more too before I start thinking about selling them.
You young guys, just don’t get married and have kids. Toddlers are brutal as it is and you still have no time left to recover by enjoying yourself on occasion. .
When you accelerate, the pinion tries to climb the ring gear, which means the snout of the diff wants to lift up. That puts a lot of load on the front mount bushings. The diff block just spreads the load over a larger area, which should help the bushings survive longer.
Coming up on 6th months with the V soon. Hate to say it but I've racked up over 10k miles on it already, even with its quirks and all I think I enjoy driving it more than my Camaro. Should be getting headers, short throw and a tune within the next month here so I'm excited for that. Car already feels pretty quick for what it is but I know those few things will really make a nice difference.
Got the heatshield installed and so far it's made a heck of a good change. It's not pulling timing out like it was, so there is absolutely something to this.
I have a bunch left over, so I'm going to do the outside of the Volant box. If I can get ambient temp IAT I'll definitely consider it a success.
I also replaced every farkin fuel injector harness clip. I really like the new style, it seems much more robust. Kinda looks like a smiley face when looking at the bottom.
Might have to pick up one of those for the Coyote that will be going into my track car. I'm going to have to remove the IM at some point, anyway, might as well install the heat shield while it's off.
All this sitting at home is making me itch to tinker, so tinker I will.
I never could find an aftermarket solution that did exactly what I was doing, nor did I come across a guide to help out with this, thought I post this micro-tutorial here.
My V came with a modded Hurst shifter (6.38") and a worn Tremec ball.
I like the comfort of shifting with Hurst shifter *****, but look wise in a Cadillac, I really like how the stock shifter looks with a V2 **** so a while back I put on a new boot and I modded a new V2 **** for it.
I ran into a problem though, the V2 **** is not a ball shifter, it's really uncomfortable to grab from the top (that's what she said).
I needed the shifter to go up a couple of inches so I can shift with the **** grip vs shifting with the rough top which is not how this **** is used.
I couldn't find an adjustable 3/8"-16 male female extension that is under 3" and since I don't have a welder at my new place I decided to get creative and make an extension that is adjustable and easy to make.
Now this is not the most elegant solution but it's sturdy as can be.
I have been using it for a week like that, also it hides under the boot so it's got my approval:
All you'll need is:
- 1 x Everlast 3/8"-16 coupling nut you'll find these at Home Depot by the metal rod and bar stock
- I used a hand saw to saw off a straight small nut from the coupling nut. The slim nut portion is at the very bottom, the remaining is right above it.
Now the shorter coupling allowed me to bring the boot height lower so it doesn't stretch very far.
Secondly the slim nut portion provides adjustability to lock the shifter **** dead center, at the desired height & without sacrificing too much of the thread of the Hurst shifter which the coupling nut threads into which in turn has the rod thread into it (pictures below will help illustrate).
- 3 x 3/8"-16 nuts (I needed the 3rd one on top because I didn't mod the **** like I should have, made the nut in it go too deep inside the ****)
- 1 x sawed off piece of a 3/8"-16 rod to give me the exact length I want (a sawed off long 3/8"-16 bolt would do as well but I had a rod handy)
- 1 x thin nylon washer to hold boot and and conform to the boot hole as needed (had a metal washer before didn't like the slight swelling it creates at the neck of the boot.
End result is exactly what I wanted, the **** sits exactly 6.5" high (measured from the trim bezel black area)
I'm also swapping in the arm rest from my base 07 CTS so another benefit is that it should be almost perfect to lay my arm on the arm rest and shift comfortably, I can always adjust it for more height once I install it if it's not just right.
Here are some pics for illustration, very happy with this, a custom adjustment for less than $5 of hardware lying around my garage. Hope it helps anyone in the same boat
Last edited by CTSM; 03-18-2020 at 09:48 PM.
Reason: typo
They make a preformed one, already cut to shape for LS engines. I just didn't want to ship it to Abu Dhabi and this was locally available.
It's made a heck of a difference with how my car drives now! It's not psychology, it's showing on the logs too.
-Byron
I'll be doing this on the Fast 102 going onto V. I'm surprised it was effective enough to show in the logs. I would have put it in the can't hurt but might not help category.
It's not the massive number I was hoping for, but 20F reduction of IAT is still a good thing.
The history:
Started with a new K&N Cai. It pulls better, but has 176f IAT.
Went back to the second hand Volant box and tube. 156f IAT, but would drop to ambient at WOT. Anything in-between wot and idle was 156-160f.
Added in a intake manifold heat shield. Car IAT stayed the same, but it no longer removes timing, so that's a solid win in my book.
Added the leftover materials and a simple aluminum tape to cover the remaining areas, or where the barrier would be impractical.
Idle/3k is 136f. Above 3k it starts dropping until WOT.
It's definitely doing something, but still not a win in my book. I want constant or near constant IAT to ambient to call it done.
Next I will order a heat shield industries 4" tube Sleeve to further these benifits.
After proof of concept I will return to the 4" ls7 maf. I want to be able to document what non ls7 maf will show for normal guys still running a stock MAF/tube. Then I will document any changes or IAT reduction after going to the 4" ls7 setup.
If I show improvement, and achieve ambient temp IAT then and only then will I consider it a full success.
I used aluminum tape to keep the edges neat and provide additional heat shielding. I covered the whole box with material, and a few tape stripes where additional material would not allow install of the box.
This one is more like what did you do in your V today.
Was out running an errand, half way into my 45 min trip, was cruising on a very empty stretch of non-highway road, all the sudden a new looking Audi S6 V8 Turbo (2018-2019 most likely) merges onto the road.
He merged as I passed him, I think recognized that it was a V. So immediately he caught with me then slowed down, he immediately downshifted and started revving it up, he wanted to play..I was in the mood too I have to say.
3 honks later I downshift to 2nd and send it from a 40ish roll. To my great surprise I couldn't believe that he couldn't catch me.
He was impressed. I mean a V8 Turbo with a DCT, I'm confused. So much advantage over a stockish V1. So one more roll same result.
He was gentleman though, we parted ways at the next intersection with the thumbs up salute
Hopefully he is heading to the Caddy dealer to trade it on a lightly used V3
Naturally this all happened in Mexico...on Taco Tuesday nonetheless!
New sealed relay for Intercooler pump installed, loomed and spliced in using oem connectors. Maybe do some more engine bay wiring cleanup and one of these days flipping the maggie fuel loop block.
Ready for Summer weather to hit. 40F on Super Sports is spin city and pretty useless right now.
 03-08-2020, 10:43 PM

 Got the diff block in:
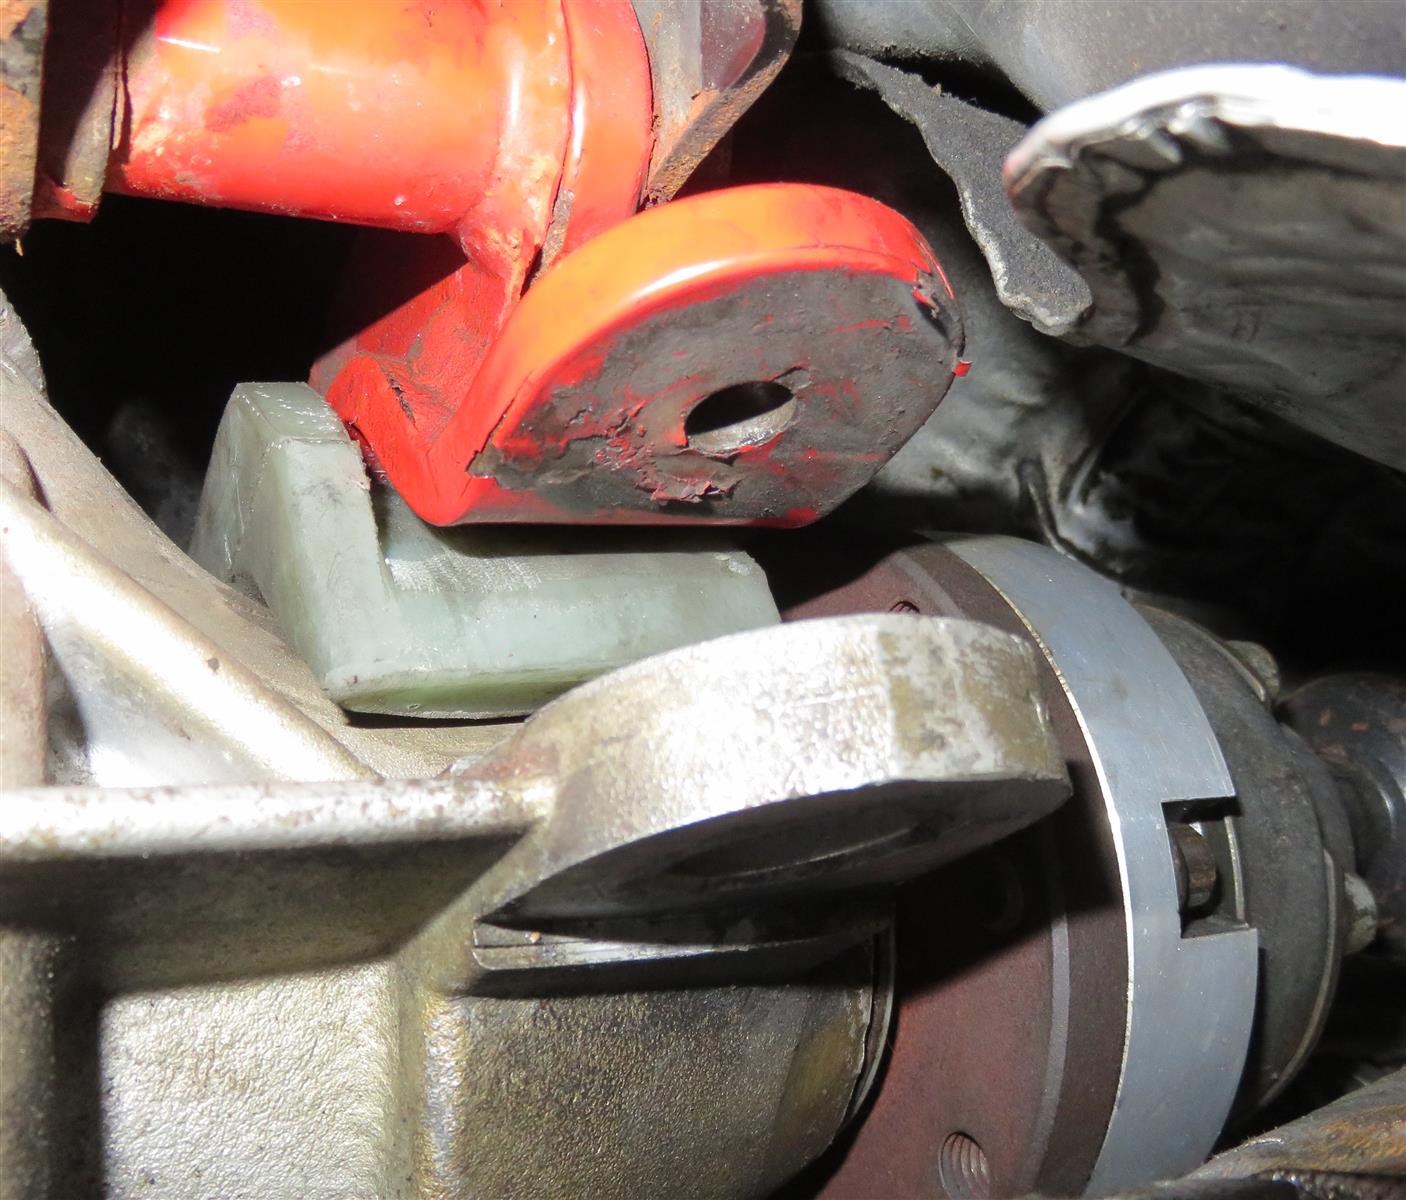


 Looks like 140020 for the LS1/2/6 style.