


Automatic to manual window conversion!
Truekoa�s Automatic to Manual Window Conversion
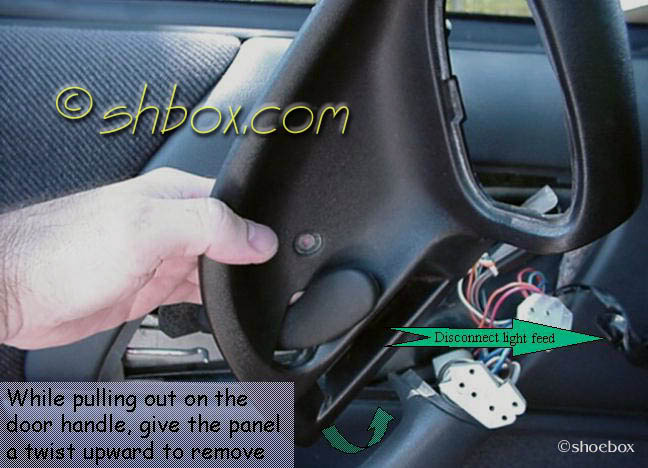
1. Interior door panel, door bezel, control pad with switch removal.
1A. Removing the interior parts of the door
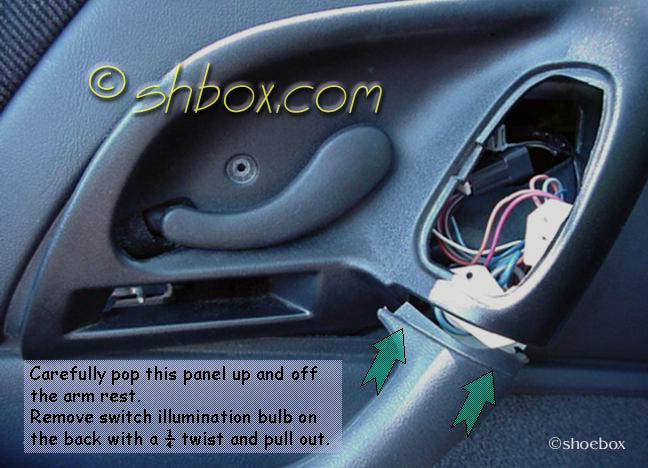
� I took the control pad off first, take a flat head screwdriver and pry it loose, disconnect the cables and take the control pad off.
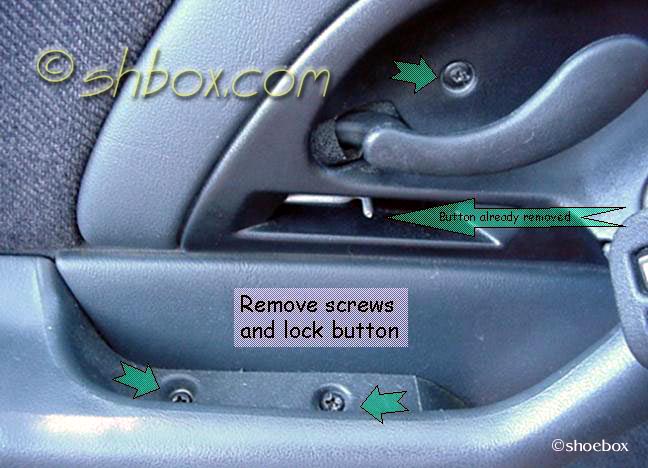
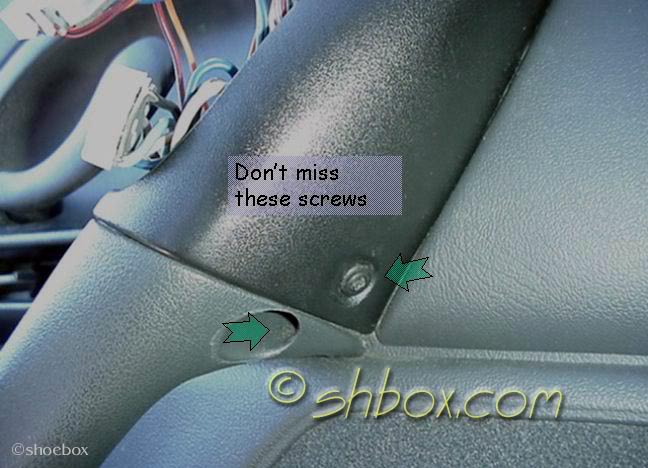
� Then I took off the door bezel, there�s one screw in the middle, and one on the bottom right side of the bezel. Removal is a little tricky, I took the lock switch off by gently pulling on it towards the outside and once it cleared the metal hook pull it straight out. You�ll want to rotate the door bezel, from its current position, counter-clockwise so that it points upwards and it�ll easily clear the door handle through the opening.
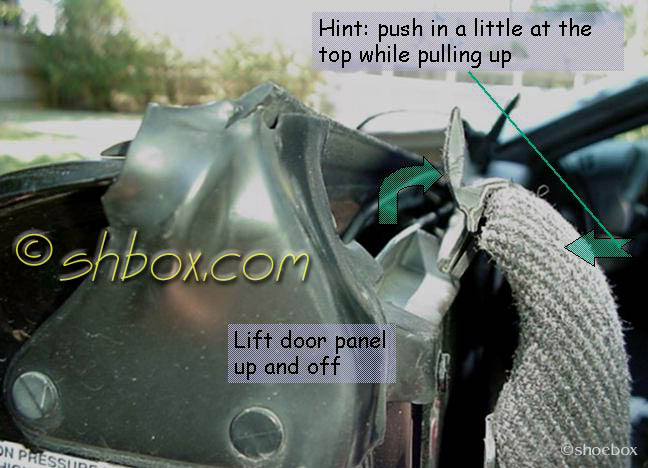
� Next is the interior door panel itself. There are 3 long bolts, 2 in the cubby hole next to the arm rest, and one on the bottom side of where you would hold on to the door to close it. Once the bolts are out, push the door panel up and pull out to remove it.
2. Bracket removal, sliding out the regulator, disconnecting the speaker, unbolting and unhooking the window motor assembly.
2A. What’s on the inside of the door?
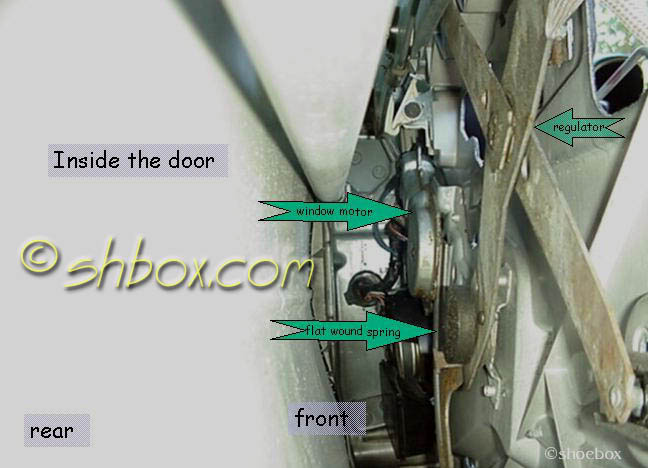

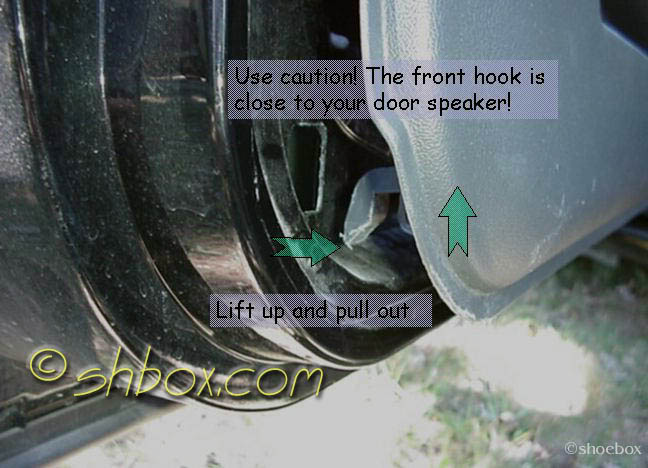
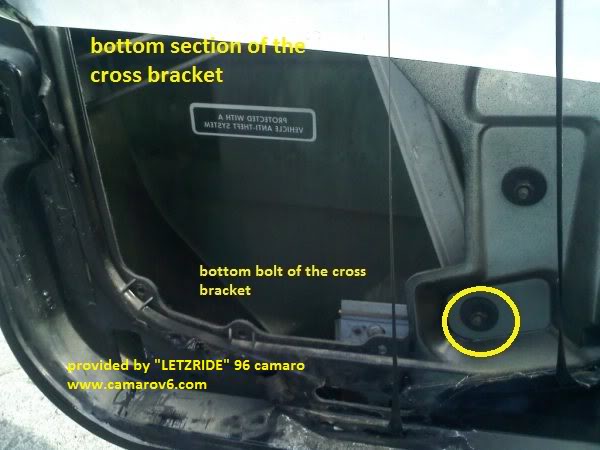
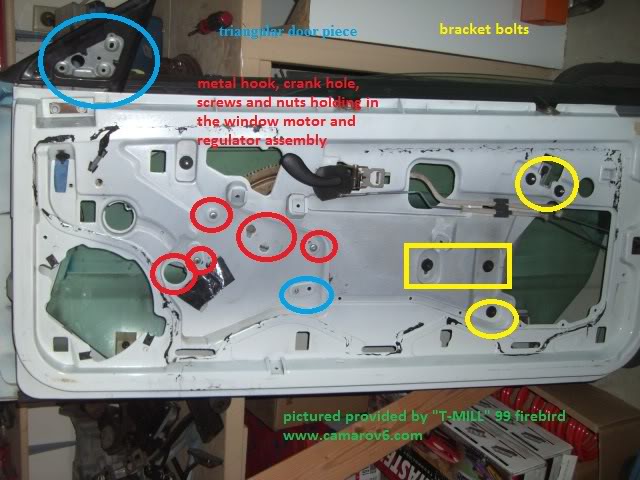
• First there are two brackets, one is shaped like a cross and is visible through the bigger opening towards the outside of the door. It is held in by 3 bolts, two on the cross, one at the bottom, and one bolt is in the middle of the cross holding in a square piece that keeps the cross in place when it slides up and down.

2A. What’s on the inside of the door?
• Before unbolting things, get a feel for how the regulator sits. Since you can’t see what you’re doing on the inside, you have to feel your way through and know where each component is.
• First there are two brackets, one is shaped like a cross and is visible through the bigger opening towards the outside of the door. It is held in by 3 bolts, two on the cross, one at the bottom, and one bolt is in the middle of the cross holding in a square piece that keeps the cross in place when it slides up and down.
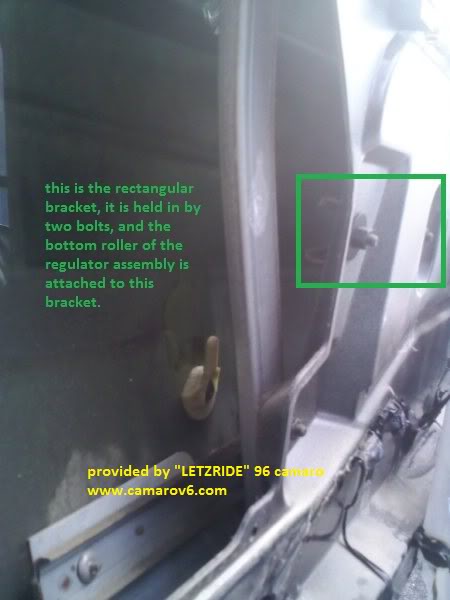
• Second bracket is much smaller, it is rectangular in shape and is held in by two bolts, my bracket had one bolt that was attached to the bracket and the other bolt was held on the inside with a nut. There is one roller of the regulator assembly on this bracket, once you unbolt the bracket; just firmly push the roller towards the side WITHOUT the bolt attached to the bracket and it will come off.
2B. Regulator assembly with window motor removal
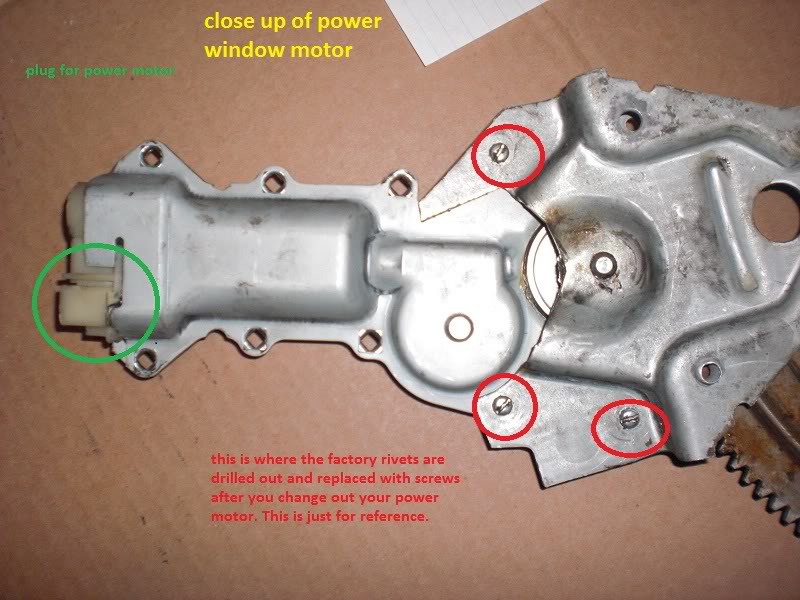
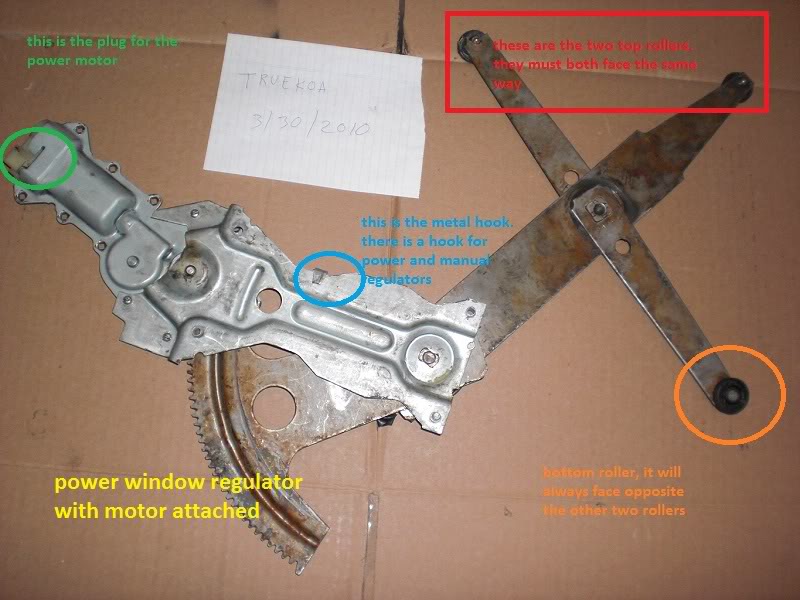
• I started off by first removing the bolts holding the window motor in place, there is one bolt right next to the hook of the window motor. Mine was held in with a washer in the back.
• Then remove the rectangular bracket.
• Then the cross bracket. Remove the 2 bolts on the cross section, and the 1 on the bottom. When you remove the middle bolt in the cross, carefully slide the cross at an angle so that the top of the cross goes up and left and the bottom down and to the right. As you slide it down this way, the rectangle piece that you unbolted will be exposed, remove it and put it away. Carefully maneuver the cross out of the door panel. Yes it is bent at an angle; do not try to bend it straight!
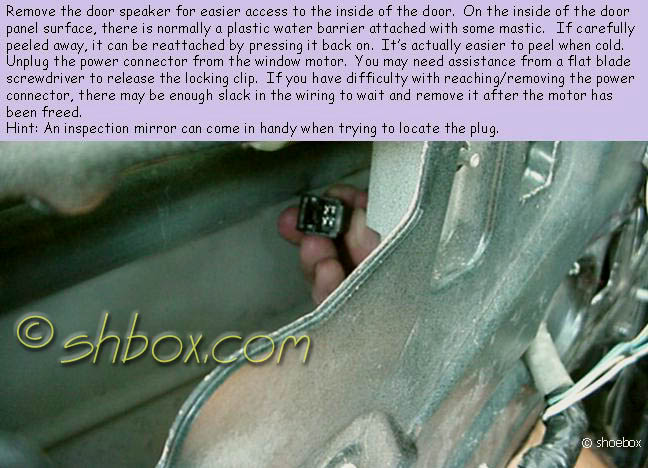
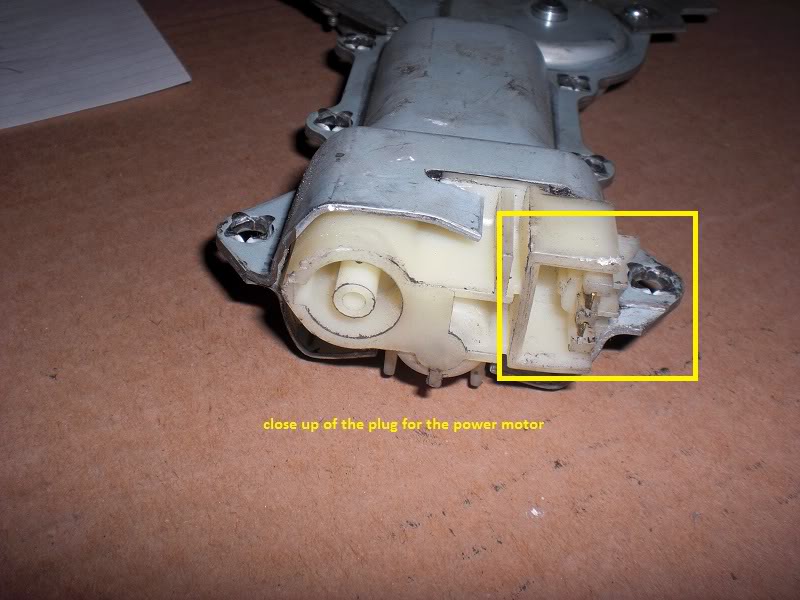
• Through the opening for your speaker, find your way to the window motor, there is a plug in the very top corner of it, push in on the tab and pull it out.
• I started off by first removing the bolts holding the window motor in place, there is one bolt right next to the hook of the window motor. Mine was held in with a washer in the back.
• Then remove the rectangular bracket.
• Then the cross bracket. Remove the 2 bolts on the cross section, and the 1 on the bottom. When you remove the middle bolt in the cross, carefully slide the cross at an angle so that the top of the cross goes up and left and the bottom down and to the right. As you slide it down this way, the rectangle piece that you unbolted will be exposed, remove it and put it away. Carefully maneuver the cross out of the door panel. Yes it is bent at an angle; do not try to bend it straight!
• Through the opening for your speaker, find your way to the window motor, there is a plug in the very top corner of it, push in on the tab and pull it out.
2C. Supporting the window
• At this time it’s a good idea to start supporting your window since the next step is to remove the top two rollers of the regulator. I took some wrenches and placed them in ideal locations where the lowest point of the window will make contact with the wrench first. I used about 3 wrenches, you can use C-clamps, or anything else you find useful.
2D. Regulator assembly with window motor removal continued
• Next are the top two rollers. They will both slide towards the outside of the door. That first roller you removed will come in handy since you can rotate it and it will move the roller that’s furthest inside the door. Once you get both the rollers off you’ll have to use some force to remove the entire regulator. You can rotate the bottom roller until the inside roller and the bottom roller are in line, it’ll make it easier to remove. Now you have to move the regulator up and out, up to unhook the entire assembly from the hook near the speaker.
• The assembly should be loose now, pull it out the door, and rotate it as you move it out so that it’ll clear the opening.
3. Installing the manual window regulator, test fitting, adjusting brackets, rotating the assembly
3A. Regulator differences
• Just from the look of the two, the power window regulator looks heavier due to the motor attached to it.
• The two are pretty much similar except for the crank on the manual regulator and the motor on the power regulator lack of each on the other.
3B. Bolting in the assembly
• The power window assembly did not have some areas bolted in since there is a different pattern than the manual regulator.
• Two of the holes are to the left of the crank and one is a little under the crank.
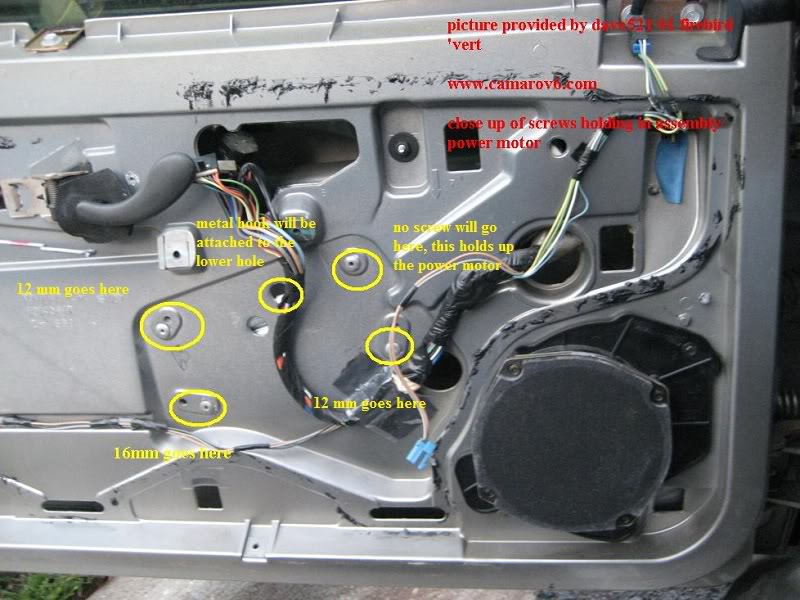
• I used two 12MM and 4 16MM bolts and 1.0 hex nuts on all of them. (Both doors)
• The 16MM goes in location 1.
• The 12MM goes in location 2 and 3.
3C. Installing the regulator
• Use a set of vice grips to clamp onto the window crank, try to keep it on the teeth. Rotate the crank so that the crank assembly is on the bottom.
• Remember which regulator is for which door! If the manual crank is on the bottom, it should poke out towards the inside of the car, the hook that is near it should also hook to the inside of the car. It only fits one way, if you are having trouble; chances are you have the wrong side.
• Rotate the two smaller rollers so that they are in line with each other for easier fitting into the door opening.
• The first thing to align is the top two rollers. They both go on the top bracket right under the window itself. The smaller, rotatable one goes in first followed by the bigger one.
• Now push the entire assembly, with the top two rollers intact, as far back inside the door as possible. Now to line up the manual crank. There is a circular opening right next to where the speaker should be. This is where you will insert the manual crank. Try to get the crank and the circular plate behind it to fit flush in the circular opening.
• Now attach your vice grips to the crank again and begin to roll the window up and down SLOWLY until the metal hook lines in place with the second hole near the crank opening and attaches down firmly, you might have to press on the back of the assembly and push it towards you.
• Now put the last roller back on the rectangular bracket and bolt it back in place. You might have to use some force on the bracket to line up the holes.
• Bolt the cross bracket back in, be sure to put the square piece back in the groove of the cross and bolt it in between the cross section.
4. Check your bolts, test fit your interior door panel, bolting in the assembly, remove your window supports
4A. Double check your work!
• Check the two brackets, bolts, hook, crank in the hole, and make sure no tools or anything else is left in the door.
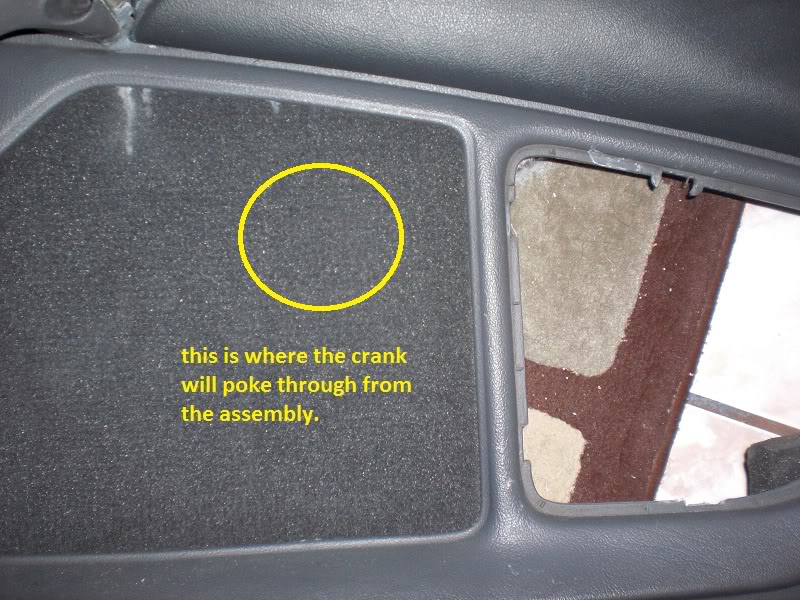
4B.Test fit your interior door panel
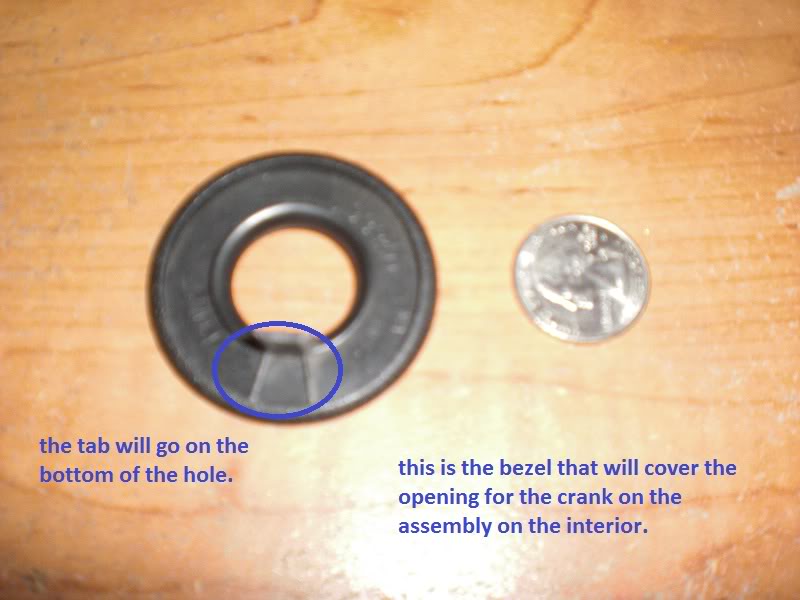
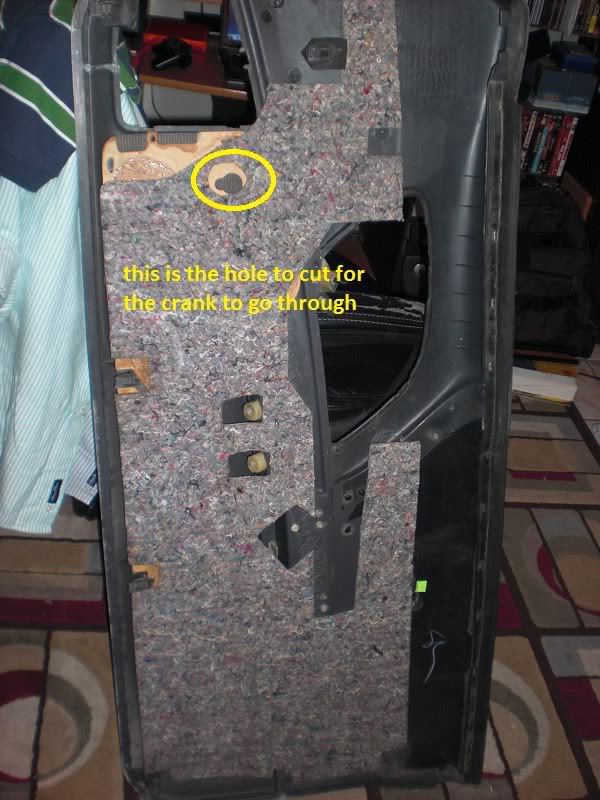
• On the back of your door panel, there is a circular opening near the speaker where the window crank will go through. You can simply make a slit and cut through or drill a hole.
• Don’t worry about over doing it, as long as you stay in the circle the small bezel that holds the hand crank in will cover it up.
• Go ahead and put your door panel back on, being sure to let the window crank poke through. I find it easier to put the panel on with the window down and the triangular piece near the side mirror off. You want to push down and in to put the panel in place.
• Put your hand crank bezel with the tab on the bottom, attach your crank firmly and press in until you hear a click. You might have to push in on the door panel near the crank area to expose more of the internal crank.
• Slowly rotate the handle, if it clicks then you need to push the crank in more.
• The window will not go up and down smoothly yet so take it easy just test it out if it goes up and down correctly and that the window goes up all the way and is aligned correctly.
3A. Regulator differences
• Just from the look of the two, the power window regulator looks heavier due to the motor attached to it.
• The two are pretty much similar except for the crank on the manual regulator and the motor on the power regulator lack of each on the other.
3B. Bolting in the assembly
• The power window assembly did not have some areas bolted in since there is a different pattern than the manual regulator.
• Two of the holes are to the left of the crank and one is a little under the crank.
• I used two 12MM and 4 16MM bolts and 1.0 hex nuts on all of them. (Both doors)
• The 16MM goes in location 1.
• The 12MM goes in location 2 and 3.
3C. Installing the regulator
• Use a set of vice grips to clamp onto the window crank, try to keep it on the teeth. Rotate the crank so that the crank assembly is on the bottom.
• Remember which regulator is for which door! If the manual crank is on the bottom, it should poke out towards the inside of the car, the hook that is near it should also hook to the inside of the car. It only fits one way, if you are having trouble; chances are you have the wrong side.
• Rotate the two smaller rollers so that they are in line with each other for easier fitting into the door opening.
• The first thing to align is the top two rollers. They both go on the top bracket right under the window itself. The smaller, rotatable one goes in first followed by the bigger one.
• Now push the entire assembly, with the top two rollers intact, as far back inside the door as possible. Now to line up the manual crank. There is a circular opening right next to where the speaker should be. This is where you will insert the manual crank. Try to get the crank and the circular plate behind it to fit flush in the circular opening.
• Now attach your vice grips to the crank again and begin to roll the window up and down SLOWLY until the metal hook lines in place with the second hole near the crank opening and attaches down firmly, you might have to press on the back of the assembly and push it towards you.
• Now put the last roller back on the rectangular bracket and bolt it back in place. You might have to use some force on the bracket to line up the holes.
• Bolt the cross bracket back in, be sure to put the square piece back in the groove of the cross and bolt it in between the cross section.
4. Check your bolts, test fit your interior door panel, bolting in the assembly, remove your window supports
4A. Double check your work!
• Check the two brackets, bolts, hook, crank in the hole, and make sure no tools or anything else is left in the door.
4B.Test fit your interior door panel
• On the back of your door panel, there is a circular opening near the speaker where the window crank will go through. You can simply make a slit and cut through or drill a hole.
• Don’t worry about over doing it, as long as you stay in the circle the small bezel that holds the hand crank in will cover it up.
• Go ahead and put your door panel back on, being sure to let the window crank poke through. I find it easier to put the panel on with the window down and the triangular piece near the side mirror off. You want to push down and in to put the panel in place.
• Put your hand crank bezel with the tab on the bottom, attach your crank firmly and press in until you hear a click. You might have to push in on the door panel near the crank area to expose more of the internal crank.
• Slowly rotate the handle, if it clicks then you need to push the crank in more.
• The window will not go up and down smoothly yet so take it easy just test it out if it goes up and down correctly and that the window goes up all the way and is aligned correctly.
Trending Topics
LS1 Tech Stories
The Best V8 Stories One Small Block at Time

Gas Monkey Built a 6-Wheel Ferrari Testarossa With a Corvette LT4 Engine
Verdad Gallardo
7 Most Reliable High-Performance Engines GM Has Ever Built
Verdad Gallardo
Amazing '71 Camaro Restomod Is Modern Muscle Car Under the Skin
Verdad Gallardo
6 Common C5 Corvette Failures and What's Involved In Repairing Them
Pouria Savadkouei
Retro Modern Bandit Pontiac Trans AM Comes With Burt Reynolds' Autograph
Verdad Gallardo
Top 10 Greatest Cadillac V Series Performance Models Ever, Ranked
Pouria Savadkouei
Top 10 Most Powerful Chevy Trucks Ever Made!

Hennessey's New Supercharged Silverado ZR2 Has 700 HP
Verdad Gallardo
Coachbuilt N2A Anteros Is an LS2-Powered C6 Corvette In Italian Clothes
Verdad Gallardo 4C Bolting in your assembly continued
• Now that you have a manual regulator in there you will need to bolt in 3 different areas to secure the assembly completely and make the movement of the window smoother.
• Check back on section 3B.
• Remember, you will have to feel your way behind to get the nuts on them. Rotate the crank up and down slowly so you can line the holes up correctly.

4D.Remove your window supports
• Once your bolts are in, test your crank again, if the window rolls up nice and smooth then carefully remove your window supports and give it a test run. If all is well and your window lines up perfectly then it’s time to reassemble.
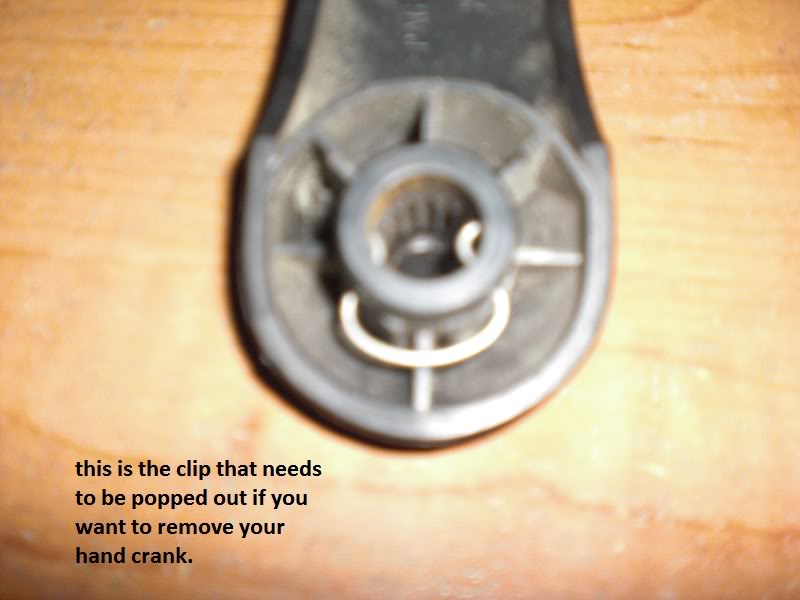
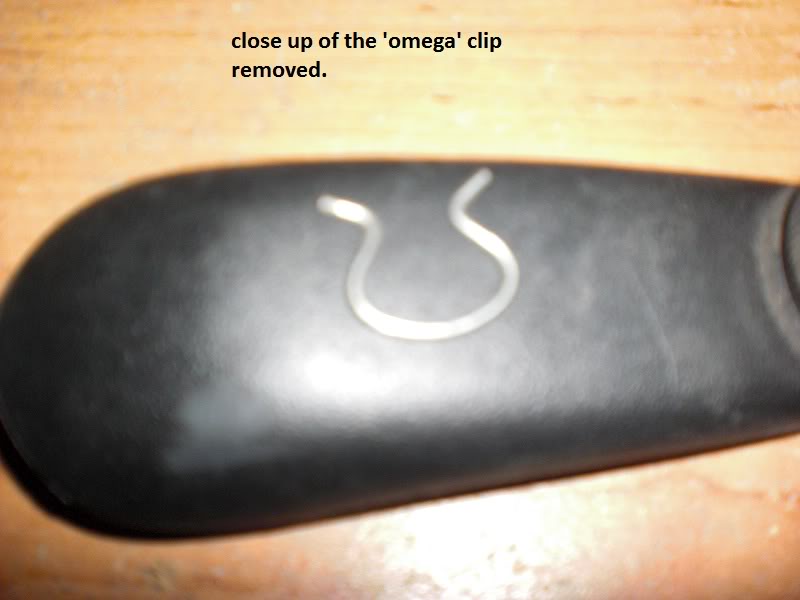
• If you need to remove the crank from the door panel, rotate it so that the **** is facing up, pull back on the handle towards you, push the door panel in if you need to, and expose a C clamp shaped like an omega sign. Use a paper clip or wire hanger and bend it to use it as a hook and pull it out. Careful, once that clip comes out, it’ll fly.
• Jiggle the crank back and forth until it falls off.
4E. Re-assembly
• Plug your speaker in, bolt it back in
• Wrap your electrical cables around the door handle
• Put your door panel back on
• Bolt it back in
• Put your door bezel back on, don’t forget the small courtesy light, and put the door lock back on the hook.
• Plug up your control switch and pop it back in place, careful with your metal clips
• Put the ring bezel for the crank in the opening you cut, push back on the panel and attach your hand crank.
• Test out your window and make sure the window and your interior are lined up.
• Enjoy your ever-lasting manual window!
• Now that you have a manual regulator in there you will need to bolt in 3 different areas to secure the assembly completely and make the movement of the window smoother.
• Check back on section 3B.
• Remember, you will have to feel your way behind to get the nuts on them. Rotate the crank up and down slowly so you can line the holes up correctly.
4D.Remove your window supports
• Once your bolts are in, test your crank again, if the window rolls up nice and smooth then carefully remove your window supports and give it a test run. If all is well and your window lines up perfectly then it’s time to reassemble.
• If you need to remove the crank from the door panel, rotate it so that the **** is facing up, pull back on the handle towards you, push the door panel in if you need to, and expose a C clamp shaped like an omega sign. Use a paper clip or wire hanger and bend it to use it as a hook and pull it out. Careful, once that clip comes out, it’ll fly.
• Jiggle the crank back and forth until it falls off.
4E. Re-assembly
• Plug your speaker in, bolt it back in
• Wrap your electrical cables around the door handle
• Put your door panel back on
• Bolt it back in
• Put your door bezel back on, don’t forget the small courtesy light, and put the door lock back on the hook.
• Plug up your control switch and pop it back in place, careful with your metal clips
• Put the ring bezel for the crank in the opening you cut, push back on the panel and attach your hand crank.
• Test out your window and make sure the window and your interior are lined up.
• Enjoy your ever-lasting manual window!
Tools List
• Phillip screwdriver
• Flathead screwdriver
• Vice grips
• Wrenches, c-clamps, something to hold up the window
• Razor blade or drill for cutting the hole in the interior panel
• Two 16MM bolts
• Four 12MM bolts
• Six 1.0 hex nuts( get extra, you WILL drop a few inside the door)
• Socket wrench set with different sizes to remove the brackets( I had different size bolts on my door)
• Left and right side manual window regulator
• Two hand cranks
• Two crank bezels
To those that have made it possible!
He has a detailed, write up with pictures on how to replace a window motor. I used some of his pictures in this guide as a reference. I have contacted him via email to post his information. Thanks again Rob.
• Phillip screwdriver
• Flathead screwdriver
• Vice grips
• Wrenches, c-clamps, something to hold up the window
• Razor blade or drill for cutting the hole in the interior panel
• Two 16MM bolts
• Four 12MM bolts
• Six 1.0 hex nuts( get extra, you WILL drop a few inside the door)
• Socket wrench set with different sizes to remove the brackets( I had different size bolts on my door)
• Left and right side manual window regulator
• Two hand cranks
• Two crank bezels
To those that have made it possible!
www.ls1tech.com “The_Merv”
I did some searches on tech for my conversion and found him selling manual regulators to a few members, he sold me my manual regulators and hand cranks at a reasonable price. Also proof read my guide. Great guy!www.camarov6.com “LETZRIDE”
He gave me pictures of his manual window assembly with his door panel off. Some of his pictures are used in this guide!He has a detailed, write up with pictures on how to replace a window motor. I used some of his pictures in this guide as a reference. I have contacted him via email to post his information. Thanks again Rob.
www.camarov6.com “T-Mill”
He provided me a few pictures of his 99 Firebird with power windows. Thanks!www.camarov6.com “Dave521”
He provided me a few pictures of his 01 Firebird convertible with power windows before replacing his power motor for the first time. Thanks! 


I used the same door panel; made a hole in the bottom for the hand crank; and they sell window switches as blanks and with just power locks if you want to get them on ebay. I just reused my window switches and left them unplugged except for the door lock.

