


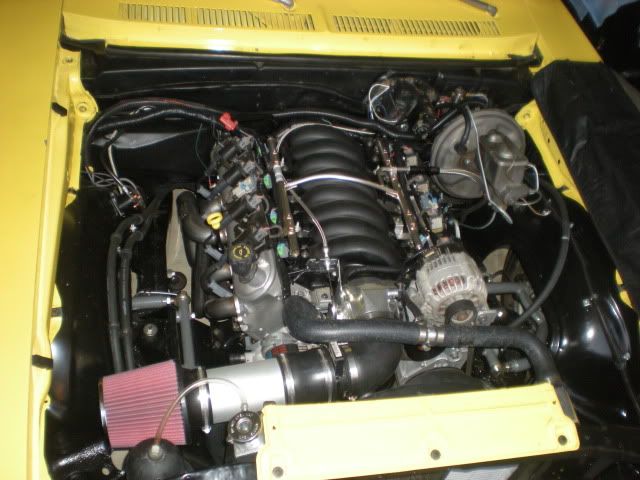
LQ4 in a 1971 Nova
I babied it off the line in the 3rd video. Still only managed a 2.08 60'. The previous run I had broken the tires loose before launch with my line lock on at about 3200 rpm.
update on the build, sort of. I took her out a couple times after taking her to the track, and managed to fry the fuel pump relay right at ASU's campus. I bandaided it, planning to do a better rewire in the future. Well, I tried to take her out about a month ago, and had the same issue in my garage.
Full disclosure: I did the LS harness not knowing how to solder. I built the fuse/relay setup per lt1swap.com, but I'll admit that I did a horrendous job - I merely zip-tied the fuse block to the brake booster, and held the relays to that via electrical tape. Well, the tape (obviously) gave, and the fuel pump relay fell onto the steering shaft. Bad times resulted. At least I didn't burn her to the ground.
Anyway, I picked up a fuse block out of an early 90s van, and finally got it fully wired in. It had 6 relays and a myriad of maxi- and mini-fuses, so I ran the headlights through a pair of relays, as well as the LS main and fuel pump relays. I planned on using the other two for the vintage air setup, but determined it was easier to keep those as they were.
Before
Note the Ford starter solenoid on the passenger's fender as well as the loom on the driver's fender. Also note the giant bundle to the passenger's side of the engine on the firewall. It was ugly.
After
No Ford solenoid, the wires on the driver's fender are now between the inner and outer fenders, and the two wire bundles (LS harness and American Autowire underhood harness) have been consolidated. AKA much cleaner.

Underhood fuse block

Cleaned-up
The firewall behind the intake manifold is much cleaner now. Rather than two harnesses, there's now just the one. Edit: that indent in the firewall was a BFH mod the PO did to fit an HEI on the original 307.

Full disclosure: I did the LS harness not knowing how to solder. I built the fuse/relay setup per lt1swap.com, but I'll admit that I did a horrendous job - I merely zip-tied the fuse block to the brake booster, and held the relays to that via electrical tape. Well, the tape (obviously) gave, and the fuel pump relay fell onto the steering shaft. Bad times resulted. At least I didn't burn her to the ground.
Anyway, I picked up a fuse block out of an early 90s van, and finally got it fully wired in. It had 6 relays and a myriad of maxi- and mini-fuses, so I ran the headlights through a pair of relays, as well as the LS main and fuel pump relays. I planned on using the other two for the vintage air setup, but determined it was easier to keep those as they were.
Before
Note the Ford starter solenoid on the passenger's fender as well as the loom on the driver's fender. Also note the giant bundle to the passenger's side of the engine on the firewall. It was ugly.
After
No Ford solenoid, the wires on the driver's fender are now between the inner and outer fenders, and the two wire bundles (LS harness and American Autowire underhood harness) have been consolidated. AKA much cleaner.
Underhood fuse block
Cleaned-up
The firewall behind the intake manifold is much cleaner now. Rather than two harnesses, there's now just the one. Edit: that indent in the firewall was a BFH mod the PO did to fit an HEI on the original 307.
Last edited by hookemdevils22; Aug 10, 2012 at 06:22 PM.
Nice job with the tidy work. I've fallen victim myself to temporary wiring becoming permanent until the predictable moment that it becomes a problem. Not burning the car down is a good thing! It looks great.
LS1 Tech Stories
The Best V8 Stories One Small Block at Time

6 Common C5 Corvette Failures and What's Involved In Repairing Them
Pouria Savadkouei
Retro Modern Bandit Pontiac Trans AM Comes With Burt Reynolds' Autograph
Verdad Gallardo
Top 10 Greatest Cadillac V Series Performance Models Ever, Ranked
Pouria Savadkouei
Top 10 Most Powerful Chevy Trucks Ever Made!

Hennessey's New Supercharged Silverado ZR2 Has 700 HP
Verdad Gallardo
Coachbuilt N2A Anteros Is an LS2-Powered C6 Corvette In Italian Clothes
Verdad Gallardo
Awesome K5 Blazer Restomod Comes With C7 Corvette Power
Verdad Gallardo
10 Camaros You Should Never Buy

10 LS Engine Myths That Refuse to Die
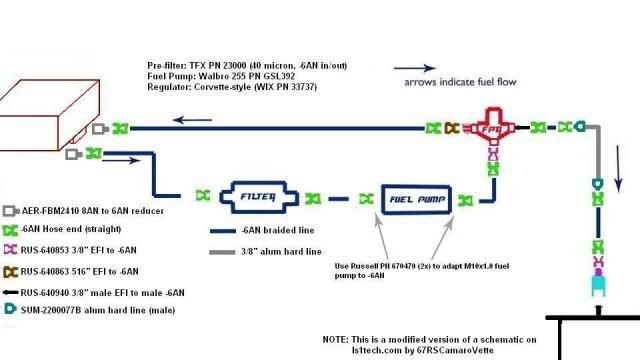
Verdad Gallardo Clint, I originally had the fuel cell, and ran braided AN line to a pre-filter/Walbro pump/Vette filter-regulator, then hard line up to the front, with a relatively short piece of braided AN to connect to the engine. The lines were run along the inside of the driver's-side frame, although I bent the hard line to run outside the frame starting at the rear of the subframe connector, which I'm pretty sure is not NHRA legal  (I forget why I did that... I'm sure there's a legitimate reason though, right???). The return from the vette FPR ran alongside the feed line.
Here's a schematic with PNs from that setup.
After replacing the cell with a modified OEM tank and in-tank fuel pump, I sold off the Walbro and pre-filter and used AN adapters on the pump outlet (top of the picture below). I used a Tanks Inc adapter with an Aeromotive Stealth 340 pump. The return goes to one of the OEM vent lines - I believe the one on the bottom of the picture.
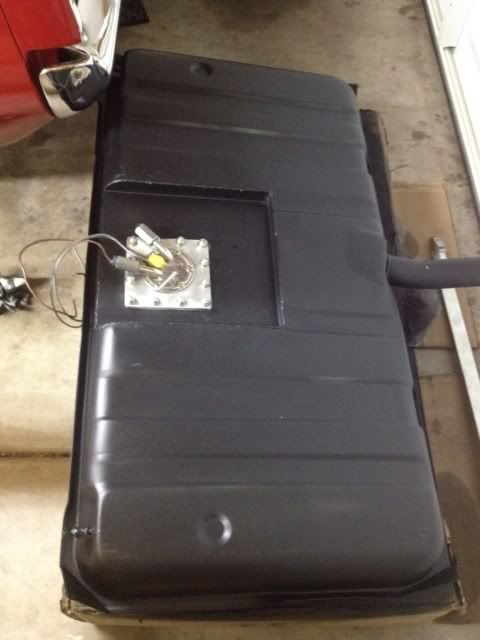
Here's a couple pics of how it was run with the Walbro setup. The Vette FPR is not installed in the pics, and is located just forward of the pump. I left it alone when switching to the OEM tank. I can snap more photos next time I'm out in the (new and much larger!) garage if you'd like.


(I forget why I did that... I'm sure there's a legitimate reason though, right???). The return from the vette FPR ran alongside the feed line.Here's a schematic with PNs from that setup.
After replacing the cell with a modified OEM tank and in-tank fuel pump, I sold off the Walbro and pre-filter and used AN adapters on the pump outlet (top of the picture below). I used a Tanks Inc adapter with an Aeromotive Stealth 340 pump. The return goes to one of the OEM vent lines - I believe the one on the bottom of the picture.
Here's a couple pics of how it was run with the Walbro setup. The Vette FPR is not installed in the pics, and is located just forward of the pump. I left it alone when switching to the OEM tank. I can snap more photos next time I'm out in the (new and much larger!) garage if you'd like.
Thanks for the description and photos! I am trying to decide how I want to run my fuel lines . My car has a 5/16" line running along the body just outside of the driver's frame rail. This was a return line for the charcoal canister. If the routing looks okay thinking about replicating the bends on a piece of 3/8" hardline and maintaining the routing.
If you can snap some photos, I'd like to see how you ran the line near the front body mount and back around into the engine bay to the flexible line. There's a lot of random stuff in that area.
If you can snap some photos, I'd like to see how you ran the line near the front body mount and back around into the engine bay to the flexible line. There's a lot of random stuff in that area.
I think that's why I ended up going outside the frame rail - that was likely where the OEM line was. Man, I don't know if I want you to see the front of the hard line. I bent it by hand to follow the sub-frame where it bends upward, and it's not an awesome job, but definitely gets the job done. The braided line is long enough to hide the hard line when looking from the engine bay.
LOL okay I will use my imagination. It is all mandrel bent polished stainless steel in my imagination and it looks sweet. Nice job!
What beef does the NHRA have with it? Seems like outside of the rail is best so it doesn't get hit with debris from exploding u-joints, flywheels, etc.
What beef does the NHRA have with it? Seems like outside of the rail is best so it doesn't get hit with debris from exploding u-joints, flywheels, etc.
[QUOTE=hookemdevils22;17024054]
After replacing the cell with a modified OEM tank and in-tank fuel pump, I sold off the Walbro and pre-filter and used AN adapters on the pump outlet (top of the picture below). I used a Tanks Inc adapter with an Aeromotive Stealth 340 pump. The return goes to one of the OEM vent lines - I believe the one on the bottom of the picture.
Do you think a MIG be used when welding up a fuel tank like that? If not, what did you use?
MIG should be okay. I spoke to Tanks Inc recently and they now offer a prebuilt recess panel for mounting their PA series pumps in a recess like what was done here.
Per the NHRA rule book,
Whether you consider it within the confines of the body is debatable. It definitely goes outside the frame. I've never been hassled about it though, since the lower body lip conceals it.
I had the tank fabbed for me, so I don't know what he used. But I'm pretty sure frojoe used MIG for his tank.
Clint, I forgot to get pics of the car last night. I'm in the middle of putting together the remains of a 2005 Acura my fiancee let her cousin burn to the ground for the past year and a half (literally - I get to do a head gasket!), so I'm in the garage a lot, just not focused on the Nova.
1:5 FUEL SYSTEMS
Location: All fuel tanks, lines, pumps, valves, etc. must be outside
of the driver’s compartment and within the confines of the frame
and/or steel body.
Location: All fuel tanks, lines, pumps, valves, etc. must be outside
of the driver’s compartment and within the confines of the frame
and/or steel body.
Do you think a MIG be used when welding up a fuel tank like that? If not, what did you use?
Clint, I forgot to get pics of the car last night. I'm in the middle of putting together the remains of a 2005 Acura my fiancee let her cousin burn to the ground for the past year and a half (literally - I get to do a head gasket!), so I'm in the garage a lot, just not focused on the Nova.

Launching!
Joined: Jan 2011
Posts: 200
Likes: 0
From: Arizona
when i modded my tank, I used a mig welder. Emptied all the fuel and washed two or three times with dawn dish soap and water. Then let it sit for about an hour full of a heavy concentration of dawn and water. rinsed it out and went to work. I put in a ford pump and had trouble sealing it up due a warped plate and the stock stiff gasket. But the mig welding worked great and looks just like the tank you have - but with a bigger hole in the middle of it.
I used a MIG on my tank. Looked ok but worked great. Hookem your engine bay looks great! Clean and neat! I am tossing around a few ideas on mine but haven't put nothing in motion yet.
small update... I picked up a set of 17s from a buddy for pretty cheap. these beat the hell out of the pizza-cutters I've been running for so long. Fronts are 17x9 and rears are 17x11. Tires are 205/50r17 (which will be replaced with something wider as soon as I get the wheel centered in the well) and 275/something-17 (which will be replaced with something wider as soon as I burn them off). They came with 1.25" spacers due to the deep offset; however, I'm going to mill those down to push the wheels inward (there's at least 1/2" between the inner rim and the tie rod). rears aren't installed yet, since the OEM wheel well is just under 11.5" wide, which brings me to my next project...

Note the other side was jacked-up so I could remove the wheel and cut the studs to the correct length (had put on loooong studs previously). Thus why she looks jacked-up.

also, I've got another project I've been slowly getting to.


Note the other side was jacked-up so I could remove the wheel and cut the studs to the correct length (had put on loooong studs previously). Thus why she looks jacked-up.
also, I've got another project I've been slowly getting to.


The black wheels on the yellow Nova look good!
After seeing the console in your car, I may have to dig around in the junk yard to see what I can come up with. I always liked the plain Jane look with a gear shifter coming out of the floor, but damn it is a pain when going on trips. I usually have to get a bottled drink and that works ok until I hit the gas and slide it off in the rear floor board. I have short arms and its almost impossible for me to reach it once it leaves my side.
What are you doing with the LED's? Marker lights?
Are you going to mini-tub the Nova?