

LQ4/T56 into my 69 Camaro
 02-18-2011 | 07:38 PM
#321

Thread Starter
TECH Addict
iTrader: (3)
Joined: Jul 2010
Posts: 2,458
Likes: 1
From: Germanton, N.C.
I purchased a CPP master cylinder for the brakes. It has a 1" bore since I am using manual brakes. It also has a built in metering valve, built in proportioning valve and an access for a brake switch. I am not using the brake switch as I will know when my brakes have no pressure. This unit is an all in one deal to clean up that side of the firewall. I like the Wilwood appearance better but I want it simple and clean. I wish there was a way of changing the rag joint out on the column. I would love to have u-joint style. Does anyone know if this can be done to the factory column??? There is an issue with this new master though, It is a little thicker at the mount and with the adapter for the clutch master it doesnt leave much room for a nut and lock washer. I may use a flat washer and a nylock nut or I may pull the pedal bracket back out and weld in longer bolts still debating that one. The CPP master has a lifetime warranty as well.
[IMG] [/IMG]
[IMG]
[/IMG]
02-18-2011 | 07:44 PM
#322
Thread Starter
TECH Addict
iTrader: (3)
Joined: Jul 2010
Posts: 2,458
Likes: 1
From: Germanton, N.C.
Here is a morsel of information that may or may not benefit you. This is how you check the ohms reading on the sending unit in the fuel tank. Ground one end to the frame of the sending unit and touch the positive to the connection from the unit and move the float up or down. At full it should read 90 ohms and empty it should be around zero. This would be important to people using the Spectra tank as there is some debate on what sending unit it comes with. Some say 114, others say 140 ohms and then there are some that say it is a 0-90. If you are using the stock gauge it needs to be a 0-90 sending unit.
[IMG] [/IMG]
[IMG]
[/IMG]
02-18-2011 | 08:00 PM
#323
Thread Starter
TECH Addict
iTrader: (3)
Joined: Jul 2010
Posts: 2,458
Likes: 1
From: Germanton, N.C.
Is there anyone out there looking for a LS1 85mm polished throttle body that is cable actuated? I sold one to a guy along with a Professional Products aluminum intake. It has had the hole in the butterfly opened up for a larger cam. The guy that bought it didnt change his cam and it was causing a surge at idle when he came to a stop. There is nothing wrong with the throttle body it just needs to be used on a larger cammed engine or a larger cubic inch motor like a 6.0. You can enrichen the mixture at idle in the computer to combat the surge but at the point he was, he didnt bother since he was going to change everything at a later point. It has the IAC and the TPS already attached. The IAC is around $50 by itself, I know because I forgot to take it off when I sold this throttle body. He wants $100 for the complete throttle body. Not a bad deal if you need one as they are around $175 just for the throttle body alone. I think he even has the spacer for it that will move it away if your intake hole is too small so that the butterfly will move freely and wont interfere with the intake. Let me know and I will hook you two up and yall can work it out. I told him I would try and post it in the classifieds but thought I would try it here first. He is a member on LS1Tech but I forgot to ask him his username. Let me get back to you on that one. Damn I am long winded, sorry.
02-21-2011 | 08:41 PM
#324

Teching In
Joined: Aug 2010
Posts: 5
Likes: 0
From: Abilene, TX
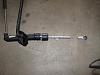
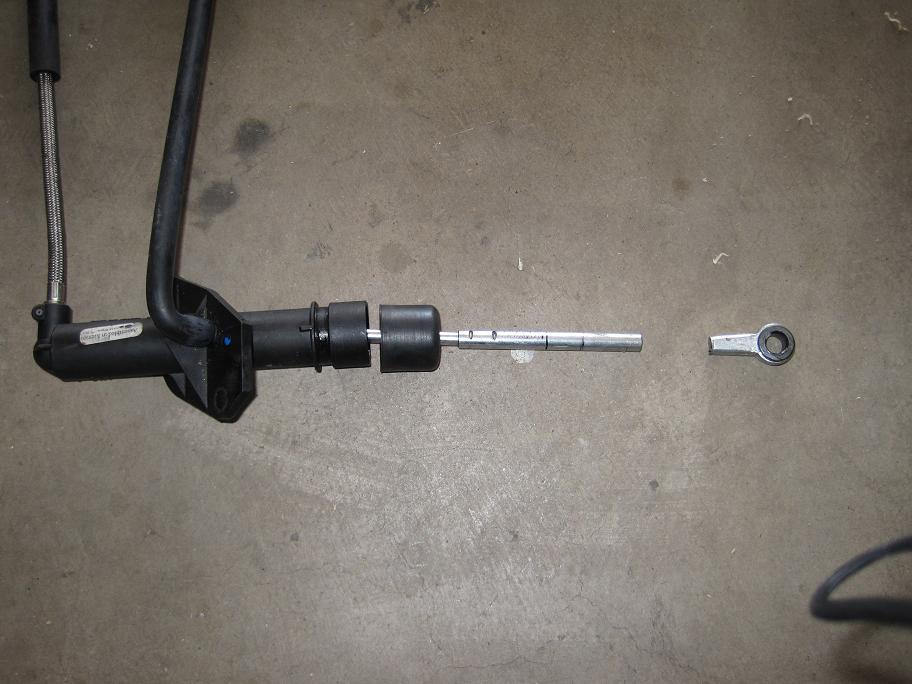
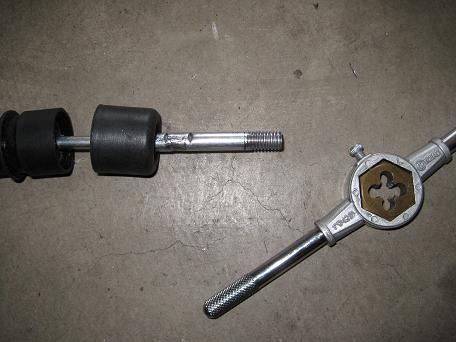
Hey, here is what I came up with for the hydraulic clutch. I stuck with the bracket the way it was because it was almost perfectly aligned with the pedal. The push rod was a little long so I just cut it down (making sure there was still enough throw to disengage the clutch), threaded the end and built a clevis. Poor mans adjustable clutch. Good info on working on those masters here-- https://ls1tech.com/forums/manual-tr...r-writeup.html


 02-22-2011 | 04:00 AM
#325
Thread Starter
TECH Addict
iTrader: (3)
Joined: Jul 2010
Posts: 2,458
Likes: 1
From: Germanton, N.C.
Looks good! I like the end you made for the pedal attachment. Did you check your stroke that low on the pedal? I opted to raise the mounting point because the lower I went the longer the stroke. You could always use a stop if the stroke is in excess of 1". Mine as high as it is is still over an inch. I like the adjustablilty of your master. Sort of takes the guess work out of mount location. Beats buying the expensive ones that are out there to get the same result! Appreciate the information. Are you going to replace the rubber bumper on the pedal bracket for the clutch pedal?
02-22-2011 | 04:59 PM
#327
Teching In
Joined: Aug 2010
Posts: 5
Likes: 0
From: Abilene, TX
Yea Im going to get a new bumper, just havnt looked for it yet. The throw is a little long but not too bad. Like everything it was a little bit of a compromise. I might tweak it a bit to see if I cant get higher on the pedal but I think Im going to try it the way it is before I make much of a change. For your fuel system, are you sticking with hard lines or going with braided?
02-22-2011 | 06:20 PM
#329
Thread Starter
TECH Addict
iTrader: (3)
Joined: Jul 2010
Posts: 2,458
Likes: 1
From: Germanton, N.C.
I do that all of the time. No problems here. As far as the pedal travel you could put an adjustable stop where the pedal contacts the fire wall or would contact the fire wall. I had thought about doing this as a matter of fact just as a safe guard. I am a little over the 1" myself. You could get an adjuster like you use for the hood. Leave the rubber end on it for quiet operation. Just a thought.
02-22-2011 | 08:15 PM
#330
Thread Starter
TECH Addict
iTrader: (3)
Joined: Jul 2010
Posts: 2,458
Likes: 1
From: Germanton, N.C.
I try to help anyone and you are well on your way to having one fine ride. I cant say on exactly what at this moment but I have learned from you too. I have learned so much from so many people on here its unbelievable. I wish I had learned about the Spectras before I bought mine. I had people warn me right after I bought it and I was hoping they were wrong but turns out they were right.
02-22-2011 | 08:27 PM
#331
Thread Starter
TECH Addict
iTrader: (3)
Joined: Jul 2010
Posts: 2,458
Likes: 1
From: Germanton, N.C.
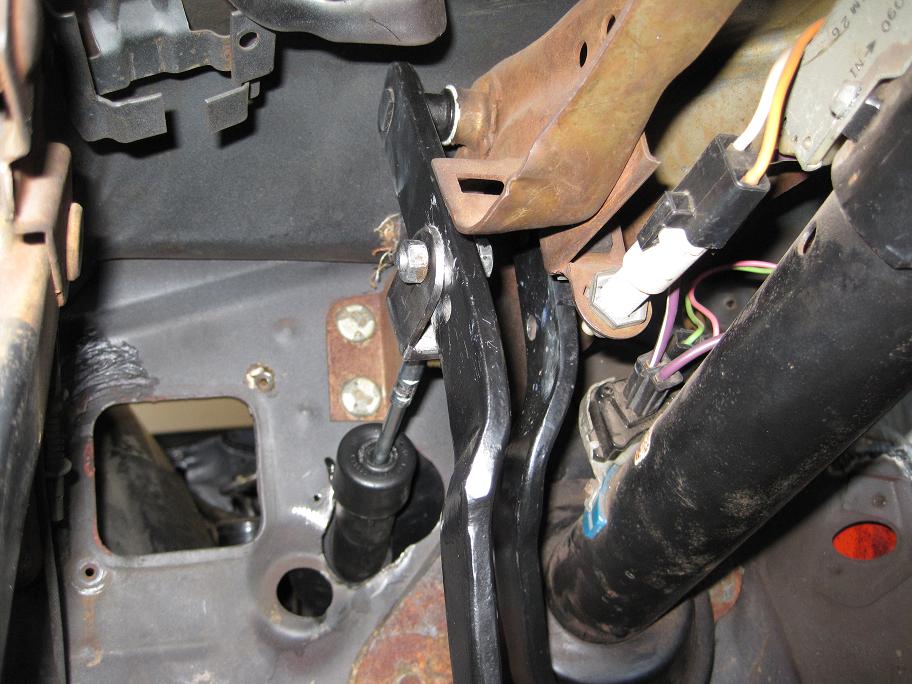
Ok I didnt keep up with the man hours it has taken me to get this engine bay cleaned up but here is the final result. All of the holes are welded shut, clutch master is located, master for the brakes was test fitted, speedometer cable removed and exit hole welded, factory A/C hole covered with DSE firewall plate, all seam sealer was removed and ground free of rust, any rust was treated, new seam sealer applied, clutch master bracket bent to fit, all wires removed as much as possible anyways, battery tray out for replacement, most of the frame was stripped to bare metal, brake lines removed except the rear line and fit to the master, blah blah blah. I tried several different brands of spray paint and was dissappointed to find out that Krylon was one of the worse I used! Krylon was always my fav growing up as I would paint everything, even the stuff that didnt need painting. If I huffed it, it wasnt on purpose. Had I know I could have gotten high off of it I prolly would have back in the day. Who thinks up that **** anyways. I thought that was what drugs were for. At least thats what worked for me. Sorry back to the topic. I like Rustoleum the best now but theyre semi-gloss might as well be gloss so I used it to lay the foundation and topped it with the crappy Krylon semi-flat. I do like their spray tip on the "rust tough" series as it is a fan spray rather than a burst of color. I know 30 minutes of reading about some stupid spray paint. I should have broke out the gun and laid down some sweet *** Urethane from Dupont but with the confined space of the engine bay it would have been a nightmare.
[IMG] [/IMG]
[IMG]
[/IMG] 
 02-22-2011 | 08:31 PM
#333
Thread Starter
TECH Addict
iTrader: (3)
Joined: Jul 2010
Posts: 2,458
Likes: 1
From: Germanton, N.C.
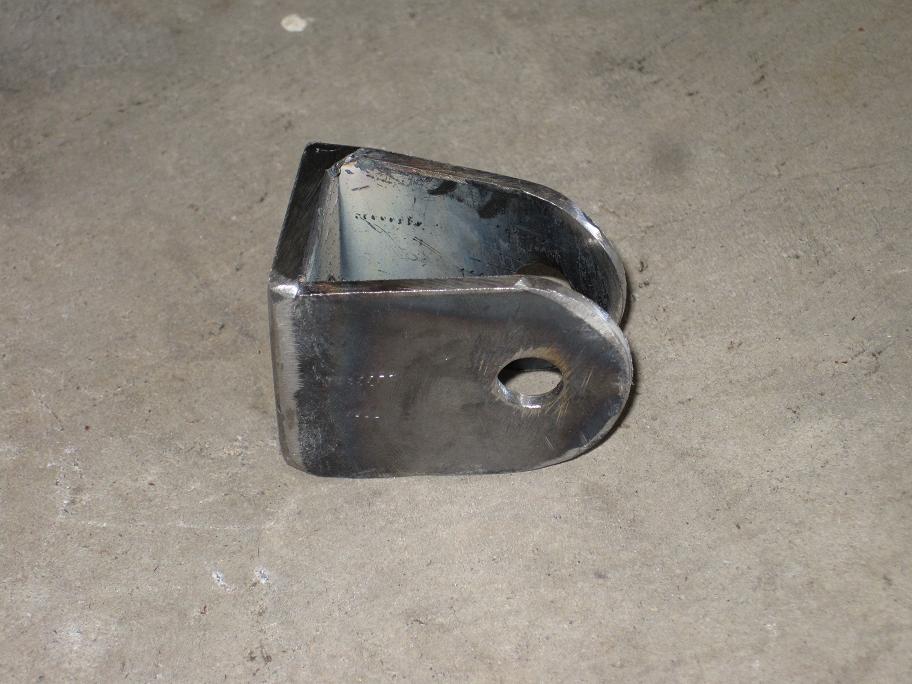
One thing I forgot to mention, when I was welding everything up I decided to add metal to where the throttle cable exits the firewall. I cut a piece out and welded the perimeter to add strength from all of the tugging at the gas pedal. I left enough weld to grind smooth for a cleaner finish. Prolly not needed but hey I like my stuff to last. This project is only being done for one main reason, reliability!!! Well more power too but without reliability power isnt worth a damn!!!
02-22-2011 | 08:38 PM
#334
Thread Starter
TECH Addict
iTrader: (3)
Joined: Jul 2010
Posts: 2,458
Likes: 1
From: Germanton, N.C.
Its not as far as I know of. All of the gaskets are soild and should need sealer. I have seen some people use it around the water pump but I did not. I try to get out of the "old school" thinking and not use it. All of the head bolts are blind so please do not use it there or you might just end up with a cracked block. If it looks to be questionable about the seal then I would use some sealer. Make sure when you put the front and back covers on you not only center them on the crank you also get them square across the oil pan rail.
02-23-2011 | 12:51 AM
#335

TECH Fanatic
Joined: Nov 2010
Posts: 1,679
Likes: 0
Ok I didnt keep up with the man hours it has taken me to get this engine bay cleaned up but here is the final result. All of the holes are welded shut, clutch master is located, master for the brakes was test fitted, speedometer cable removed and exit hole welded, factory A/C hole covered with DSE firewall plate, all seam sealer was removed and ground free of rust, any rust was treated, new seam sealer applied, clutch master bracket bent to fit, all wires removed as much as possible anyways, battery tray out for replacement, most of the frame was stripped to bare metal, brake lines removed except the rear line and fit to the master, blah blah blah. I tried several different brands of spray paint and was dissappointed to find out that Krylon was one of the worse I used! Krylon was always my fav growing up as I would paint everything, even the stuff that didnt need painting. If I huffed it, it wasnt on purpose. Had I know I could have gotten high off of it I prolly would have back in the day. Who thinks up that **** anyways. I thought that was what drugs were for. At least thats what worked for me. Sorry back to the topic. I like Rustoleum the best now but theyre semi-gloss might as well be gloss so I used it to lay the foundation and topped it with the crappy Krylon semi-flat. I do like their spray tip on the "rust tough" series as it is a fan spray rather than a burst of color. I know 30 minutes of reading about some stupid spray paint. I should have broke out the gun and laid down some sweet *** Urethane from Dupont but with the confined space of the engine bay it would have been a nightmare.
[IMG][/IMG]
[IMG]
[/IMG]
02-23-2011 | 08:34 AM
#336

good job on the firewall, that is first on my list when I get started...I plan to pull the front cap...I am thinking of moving the wiper motor to over under the drivers fender...I will reiterate..."thinking"
 02-23-2011 | 04:41 PM
#339
Thread Starter
TECH Addict
iTrader: (3)
Joined: Jul 2010
Posts: 2,458
Likes: 1
From: Germanton, N.C.
Thanks Steve!
So I was having a normal day today until I pulled up to the house and bam! Its like Christmas all over. If anything will get me motivated it is new parts!
The list keeps getting smaller and smaller.
[IMG] [/IMG]
So I was having a normal day today until I pulled up to the house and bam! Its like Christmas all over. If anything will get me motivated it is new parts!
The list keeps getting smaller and smaller.
[IMG]
[/IMG]