

69 Camaro LS2/4L70E install


 12-02-2012, 03:33 PM
#283
I haven't been posting much lately, but a lot has been going on with the car. For starters I bought HP Tuners Pro and a PLX Wideband/Air Fuel Gauge Previously I had a friend look at the tune put on my car by SSP Wiring and it is just horrid. We spent a few hours yesterday adjusting the tables (timing and fuel). There is still quite a bit that needs to be finalized on the tune, but the car just screams now!
I also pulled the trigger on an early Christmas present. I bought a Ridetech Level 2 Coilover front and rear suspension with the Front Musclebar. I also opted for the Tru Turn package, which will allow me to run up to 275s on the front.

I also pulled the trigger on an early Christmas present. I bought a Ridetech Level 2 Coilover front and rear suspension with the Front Musclebar. I also opted for the Tru Turn package, which will allow me to run up to 275s on the front.
12-09-2012, 10:28 AM
#286
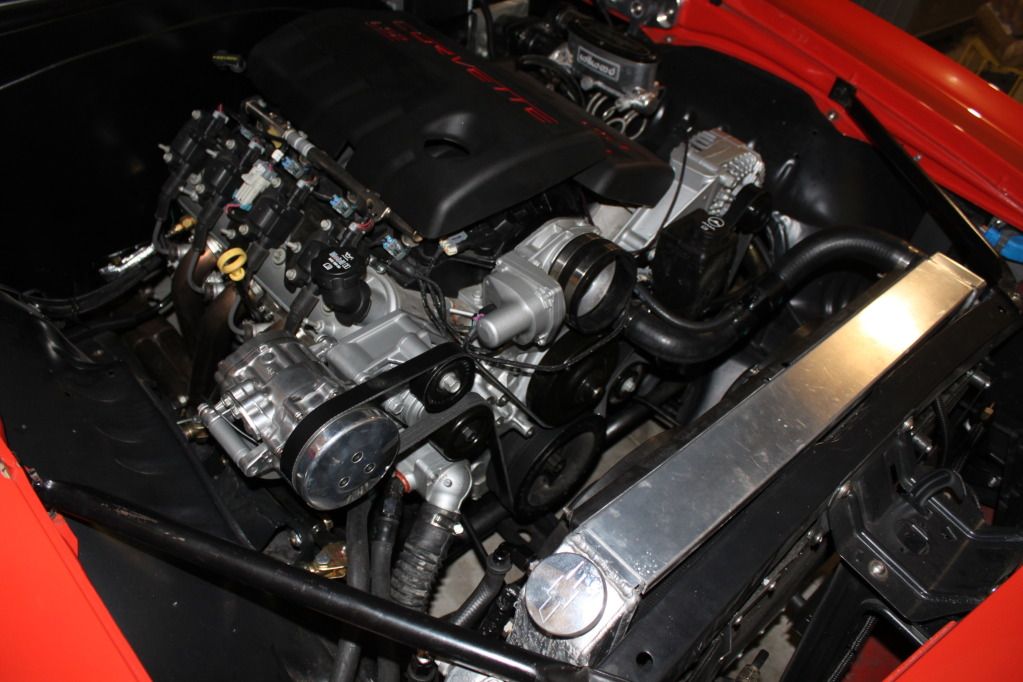
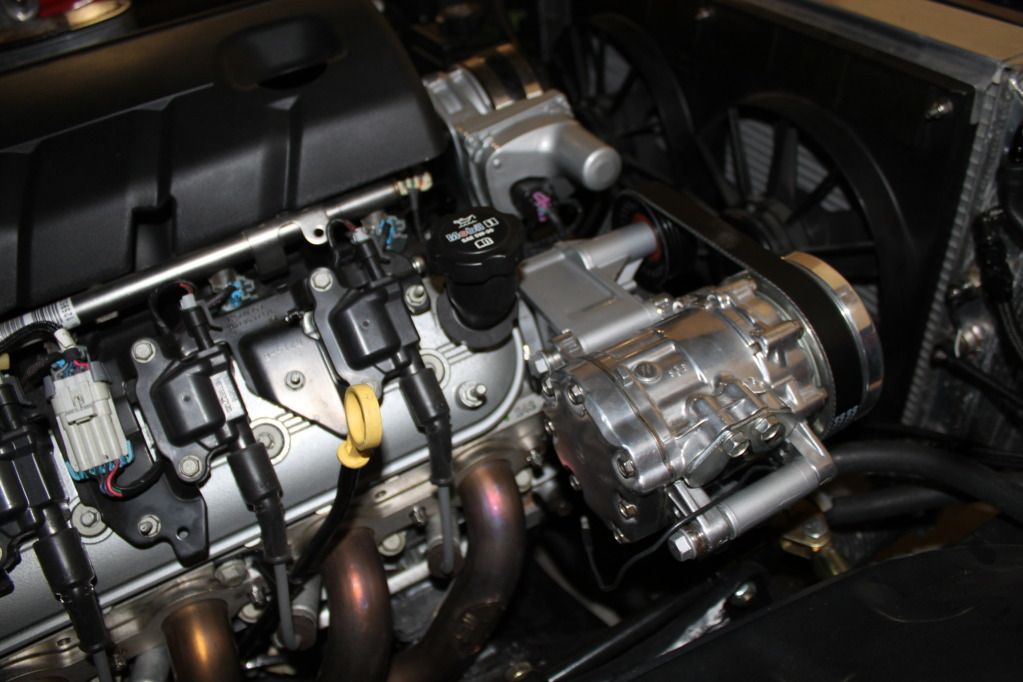
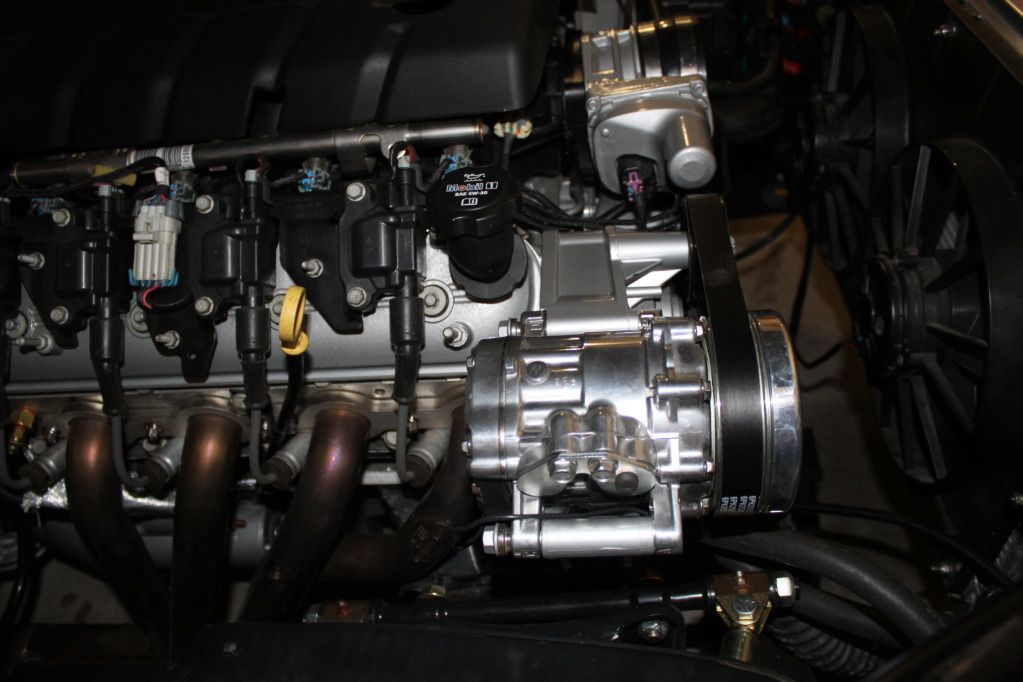
I installed the Holley bracket with a SD7 A/C compressor this weekend. The install was pretty straight forward and Holley's instructions were spot on! It was refreshing to actually have instructions that matched reality.
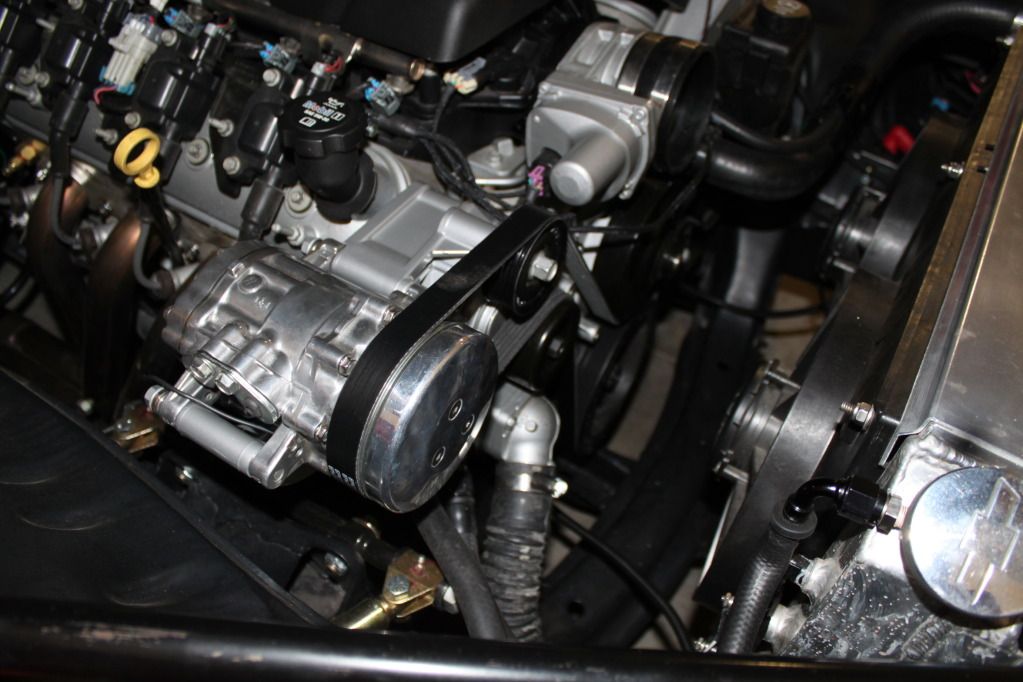
I still need to still need to check the clearance of the water pump boss and serpentine belt after running the motor as it is pretty close (this was mentioned in Holley's instructions). I also need to find another location to mount the the PVC catch and trim the engine cover to fit. Overall I am very happy with the quality and looks of the bracket, but I did paint it before I installed it.
The only frustration was getting the correct belt. I ended up going to Auto Zone because they were the only ones locally that could look up the belt based on length, 6PKxxxx (where xxxx is the length of belt in millimeters) versus specific application. I ended up buying four different length belts.
I have installed the Kwik and Holley A/C bracket and personally the Holley bracket is a much easier install (fewer pieces), but I doubt you could go wrong with either.
Here is a list of the parts I used, bear in mind I was using a GM 19155067 Corvette accessory drive setup. All of the part number listed, except the belt, were obtained by cross referencing the part numbers listed in Holley's instructions.. I'll post more pics once I get te PVC, CAI and engine cover installed.
Here is a pic of the bracket after I painted it

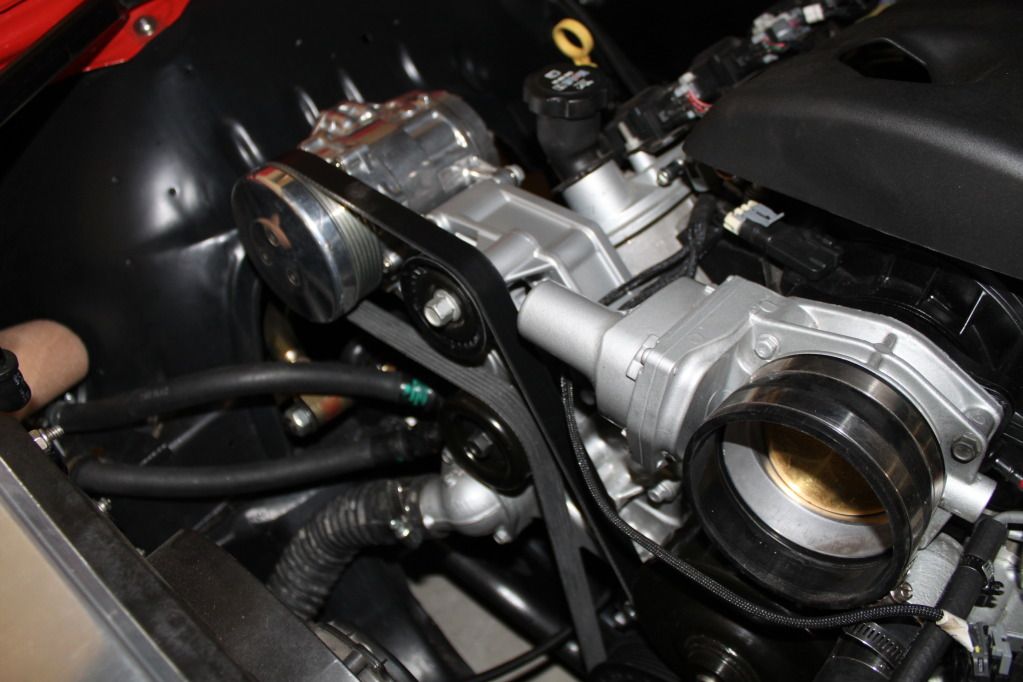
The boss on the water pump directly below the throttle body may have to be ground down a bit as the clearance is pretty tight.

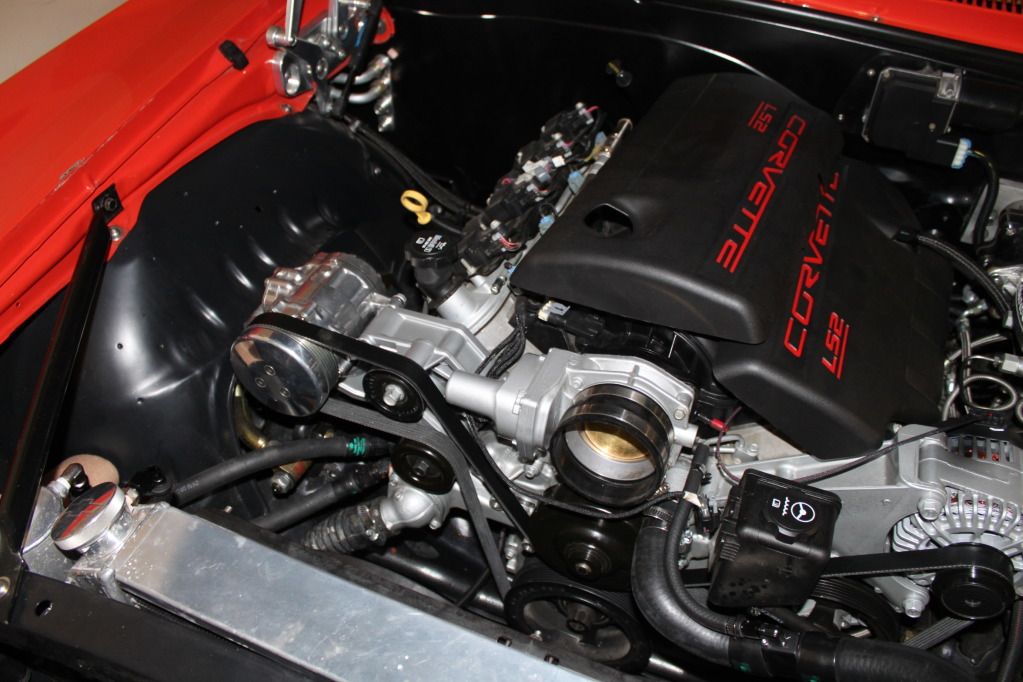
I still need to still need to check the clearance of the water pump boss and serpentine belt after running the motor as it is pretty close (this was mentioned in Holley's instructions). I also need to find another location to mount the the PVC catch and trim the engine cover to fit. Overall I am very happy with the quality and looks of the bracket, but I did paint it before I installed it.
The only frustration was getting the correct belt. I ended up going to Auto Zone because they were the only ones locally that could look up the belt based on length, 6PKxxxx (where xxxx is the length of belt in millimeters) versus specific application. I ended up buying four different length belts.
I have installed the Kwik and Holley A/C bracket and personally the Holley bracket is a much easier install (fewer pieces), but I doubt you could go wrong with either.
Here is a list of the parts I used, bear in mind I was using a GM 19155067 Corvette accessory drive setup. All of the part number listed, except the belt, were obtained by cross referencing the part numbers listed in Holley's instructions.. I'll post more pics once I get te PVC, CAI and engine cover installed.
- Holley 20-134 LS AC bracket, high mount passenger side
- Holley 21-1 LS Installation kit, basically an adapter to mount bracket to engine based on accessory backspacing
- Dayco p/n 89337, main drive belt tensioner
- Dayco p/n 89059, smooth idler pulley
- Gates p/n 6PK2525, Serpentine belt
Here is a pic of the bracket after I painted it
The boss on the water pump directly below the throttle body may have to be ground down a bit as the clearance is pretty tight.
12-09-2012, 12:58 PM
#287

That looks great. ALOT better than the Kwik mounts IMO
 12-09-2012, 07:49 PM
#290
I understand I am just a little **** on those types of things as "I" know it's there on my car. Sometimes I am too much of a perfectionist on my stuff. I bent a coat hanger to the shape of hose I needed and took note of the radiator and thermostat sizes and went to the local autozone and they let me look through their vast selection of hoses and I found about 3-4 I thought would work or I could make work with minor trimming, and I got lucky with one and just returned the ones that I didn't need and put the part tag for the right one in my glove box for future reference.
12-09-2012, 07:58 PM
#291
I understand I am just a little **** on those types of things as "I" know it's there on my car. Sometimes I am too much of a perfectionist on my stuff. I bent a coat hanger to the shape of hose I needed and took note of the radiator and thermostat sizes and went to the local autozone and they let me look through their vast selection of hoses and I found about 3-4 I thought would work or I could make work with minor trimming, and I got lucky with one and just returned the ones that I didn't need and put the part tag for the right one in my glove box for future reference.
12-09-2012, 08:14 PM
#292
I did copy your CAI for my car, thanks for posting all the Spectre numbers.
However my car is a 66 GTO with a LS2 & T56 and my radiator is a Afco LS Swap radiator with both the inlet and outlet on the passenger side. If you think the lower hose may work I can get the part number for the hose I used in the morning. I did this swap about 2 years ago so I can't remember the thermostat and radiator size openings, but I have a spare water pump and I can measure the thermostat opening on that one.
Let me know if you think this info will help and I can get it for you.
12-09-2012, 08:18 PM
#293
I did copy your CAI for my car, thanks for posting all the Spectre numbers.
However my car is a 66 GTO with a LS2 & T56 and my radiator is a Afco LS Swap radiator with both he I key and outlet on the passenger side. If you think the lower hose may work I can get the part number for the hose I used in the morning. I did this swap about 2 years ago so I can't remember the thermostat and radiator size openings, but I have a spare water pump and I can measure the thermostat opening on that one.
Let me know if you think this info will help and I can get it for you.
12-09-2012, 08:35 PM
#294
Ok it was bugging me so I went outside and got the part number it is a Gates # 23185 and here are the specs on my tag. Good Luck and hope it helps.
• Centerline Length (in): 16.8
• Centerline Length (mm): 427
• Number of Branches: 0
• Inside Dia. 1 (in): 1.38
• Inside Dia. 1 (mm): 35
• Inside Dia. 2 (in): 1.54
• Inside Dia. 2 (mm): 39
• Lower
• Centerline Length (in): 16.8
• Centerline Length (mm): 427
• Number of Branches: 0
• Inside Dia. 1 (in): 1.38
• Inside Dia. 1 (mm): 35
• Inside Dia. 2 (in): 1.54
• Inside Dia. 2 (mm): 39
• Lower

 12-13-2012, 10:07 PM
#297
Staging Lane
iTrader: (2)
Join Date: Sep 2009
Location: Dallas, Texas
Posts: 92
Likes: 0
Received 0 Likes
on
0 Posts
Rocket - What gear ratio are you running? I've got basically the same setup in my 67 with a 3.31 posi and it is severely traction limited. I've had what I considered to be "fast" street cars in the past, but the power from my basically stock crate LS2 has really been quite the surprise (albeit a pleasant one).
As you described your driving experience, my car is a handful (fun but scary at the same time). No need for any more HP unless I invest in upgrades designed to put the power to the ground!
As you described your driving experience, my car is a handful (fun but scary at the same time). No need for any more HP unless I invest in upgrades designed to put the power to the ground!
12-14-2012, 07:41 PM
#298
Rocket - What gear ratio are you running? I've got basically the same setup in my 67 with a 3.31 posi and it is severely traction limited. I've had what I considered to be "fast" street cars in the past, but the power from my basically stock crate LS2 has really been quite the surprise (albeit a pleasant one).
As you described your driving experience, my car is a handful (fun but scary at the same time). No need for any more HP unless I invest in upgrades designed to put the power to the ground!
As you described your driving experience, my car is a handful (fun but scary at the same time). No need for any more HP unless I invest in upgrades designed to put the power to the ground!
12-16-2012, 05:05 PM
#299
On The Tree
Join Date: Oct 2010
Location: Melbourne, Fla
Posts: 113
Likes: 0
Received 0 Likes
on
0 Posts

I haven't been posting much lately, but a lot has been going on with the car. For starters I bought HP Tuners Pro and a PLX Wideband/Air Fuel Gauge Previously I had a friend look at the tune put on my car by SSP Wiring and it is just horrid. We spent a few hours yesterday adjusting the tables (timing and fuel). There is still quite a bit that needs to be finalized on the tune, but the car just screams now!
I also pulled the trigger on an early Christmas present. I bought a Ridetech Level 2 Coilover front and rear suspension with the Front Musclebar. I also opted for the Tru Turn package, which will allow me to run up to 275s on the front.
I also pulled the trigger on an early Christmas present. I bought a Ridetech Level 2 Coilover front and rear suspension with the Front Musclebar. I also opted for the Tru Turn package, which will allow me to run up to 275s on the front.

I just got back from an extended "trip"... took my baby out today for a run! How's your baby running??
TC
12-16-2012, 06:15 PM
#300
The car is running well after we tuned up the motor. The tune flashed by SSP Wiring was just horrid!! Still need to fine tune it and get it shifting properly, but it is a lot of fun to drive!!