
79 Cutlass Wagon, 5.3 G machine
 02-13-2012, 09:30 PM
#141
On The Tree
Thread Starter
Join Date: Aug 2010
Location: Eagle Mountain, Utah
Posts: 143
Likes: 0
Received 0 Likes
on
0 Posts
Thanks Ricky. I have a job waiting for me in Georgia at Bulldawg Muscle cars when I graduate. He specializes in pro-touring suspension upgrades and late model engine swaps. He's bringing me on as a designer and fabricator. Eventually I want to have my own shop but I figured it'd be better to start off for at least the first few years working for someone else. Joe (the owner) and I hit it off from the get go and have been discussing me coming out there since October. He's got a great business mind and his shop is growing quickly. I can see probably sticking with him for a while.
 02-18-2012, 04:45 PM
#142
On The Tree
Thread Starter
Join Date: Aug 2010
Location: Eagle Mountain, Utah
Posts: 143
Likes: 0
Received 0 Likes
on
0 Posts
Got my rear bracing finished up Friday. First I started by doing some measuring and with the table plasma cutter cut out some rectangular 1/8" thick plates. I tack welded them to the frame rails and then drilled some bolt holes.
Right side then left side...
Then I took some 1 5/8" tubing and bent it according to a design I've been working out. Got it welded in and started on the bars to connect the control arms. Again I started with cutting out some mounting plates and used the control arm bolts to hold them in place.
I used the tubing bender to slightly curve some 1" tube, then flattened the ends in the press, and then welded them all together. Here's the end result. The smaller tubes on the cross tube go to holes that are pre drilled in the frame. I'm patent pending working out mass producing this brace so hopefully I can sell some in the near future.
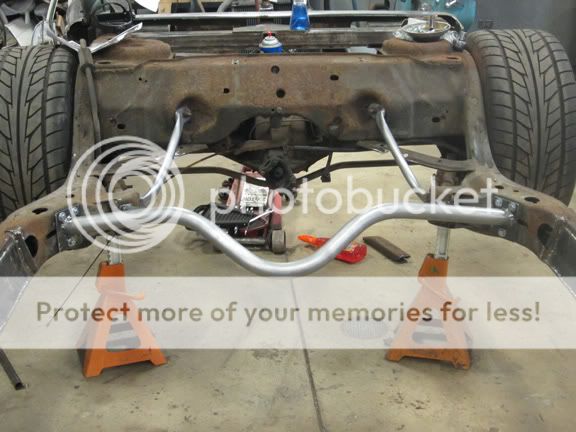
And I tried out some orange paint on them. On a black frame with orange suspension parts these should look pretty cool.

My last little bit Friday I started on the heavy trailer hitch brackets. No school Monday so I'll wrap them up Tuesday and start bracing the front. By the time I'm done this car should be one rigid bad doggie.
Right side then left side...
Then I took some 1 5/8" tubing and bent it according to a design I've been working out. Got it welded in and started on the bars to connect the control arms. Again I started with cutting out some mounting plates and used the control arm bolts to hold them in place.
I used the tubing bender to slightly curve some 1" tube, then flattened the ends in the press, and then welded them all together. Here's the end result. The smaller tubes on the cross tube go to holes that are pre drilled in the frame. I'm patent pending working out mass producing this brace so hopefully I can sell some in the near future.
And I tried out some orange paint on them. On a black frame with orange suspension parts these should look pretty cool.
My last little bit Friday I started on the heavy trailer hitch brackets. No school Monday so I'll wrap them up Tuesday and start bracing the front. By the time I'm done this car should be one rigid bad doggie.
02-19-2012, 06:48 AM
#143
Very nice work!
Thanks for sharing!
In the mid 80's I modified the trans crossmember the same way for a drag car.
Used 3/16" plate to cover the notch for the header collector/turndown clearance.
The trans member notch held up fine to 4,000 rpm transbrake launches. Lol!
Your trans modification notch should be fine.
Mike
Last edited by LongIsland63SS409; 02-19-2012 at 02:15 PM.
03-08-2012, 02:01 PM
#144
On The Tree
Thread Starter
Join Date: Aug 2010
Location: Eagle Mountain, Utah
Posts: 143
Likes: 0
Received 0 Likes
on
0 Posts
Thanks for the insight on the cross member!
Got some updates-
I picked up a couple new used items. Mark at SC&C gave me a great deal of info when we talked the other day. One of the things he talked about is how ineffective the g-body rear sway bar is and how a link style bar is way better. To keep it budget minded I went to the wrecking yard again and found a 7/8" bar (same as the largest factory g-body bar) on an early 90's f-body. I also bought a pair of Cutlass Salon grilles off ebay. I like them because they're deeper than my originals. Unfortunately they're beat up a little more than the seller led on. He said there were "light scratches" but forgot to mention one of the bolt tabs was broken off, one of the grilles is cracked front to back, one has been melted, the chrome is peeling in areas on both, and both are warped as seen in the photo. Why can't folks just be honest? At $55 "buy it now" I pretty much think I paid too much. Oh well, I'll try to salvage them.

I finished up the trailer hitch brackets. I bent a couple small lengths of 1 5/8" tubing and used some angle iron to make the bracket. To keep it sturdy I welded a 1/2" pipe through the frame for the 1/2" grade 8 bolts. It may not be suitable for a lot of tongue weight but it should pull (flat tow) just fine.

Got some updates-
I picked up a couple new used items. Mark at SC&C gave me a great deal of info when we talked the other day. One of the things he talked about is how ineffective the g-body rear sway bar is and how a link style bar is way better. To keep it budget minded I went to the wrecking yard again and found a 7/8" bar (same as the largest factory g-body bar) on an early 90's f-body. I also bought a pair of Cutlass Salon grilles off ebay. I like them because they're deeper than my originals. Unfortunately they're beat up a little more than the seller led on. He said there were "light scratches" but forgot to mention one of the bolt tabs was broken off, one of the grilles is cracked front to back, one has been melted, the chrome is peeling in areas on both, and both are warped as seen in the photo. Why can't folks just be honest? At $55 "buy it now" I pretty much think I paid too much. Oh well, I'll try to salvage them.
I finished up the trailer hitch brackets. I bent a couple small lengths of 1 5/8" tubing and used some angle iron to make the bracket. To keep it sturdy I welded a 1/2" pipe through the frame for the 1/2" grade 8 bolts. It may not be suitable for a lot of tongue weight but it should pull (flat tow) just fine.
03-08-2012, 02:07 PM
#145
On The Tree
Thread Starter
Join Date: Aug 2010
Location: Eagle Mountain, Utah
Posts: 143
Likes: 0
Received 0 Likes
on
0 Posts
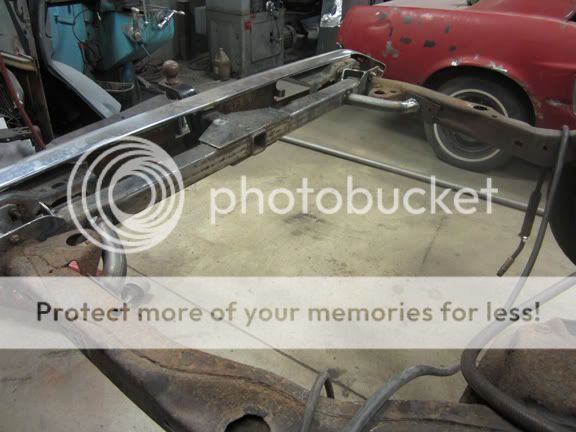
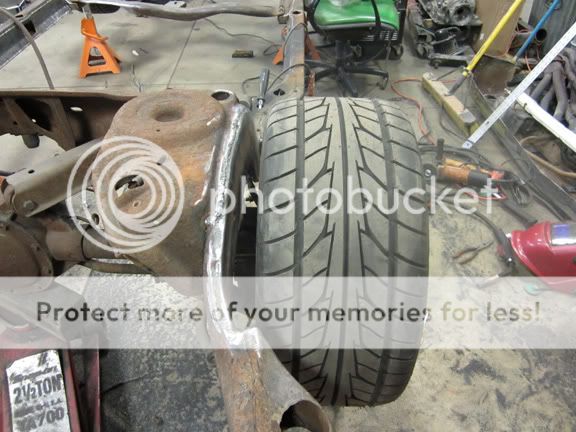
Got the frame notch knocked out. The plasma cutter made quick work of cutting it out. The cut out side was trimmed down just enough to slip between the top and bottom of the rail to help with support and to get a better weld. Again these are 274-40-17 on a 9.5" wheel with 5.5" of backspace and a 1/4" spacer between the wheel and drum. Before there was just a hair of clearance, now it has a little over an inch of extra clearance. While I was in there I beefed up the factory weld area on the top too.


03-08-2012, 02:12 PM
#146
On The Tree
Thread Starter
Join Date: Aug 2010
Location: Eagle Mountain, Utah
Posts: 143
Likes: 0
Received 0 Likes
on
0 Posts
Got some good and bad news...
First the bad- my professor has had some hereditary heart issues for most of his life but he never told any of us. After a recent check up the docs told him he needed a heart valve and part of his aorta replaced like yesterday. Sounds like it's common procedure but we may not see him for the rest of the semester. We're all praying for him that all will go well. On a side note the sub we have is there more to cover Cris' notes in lecture time and open the shop for us. They don't have Cris' knowledge and the shop now closes at 12:00 instead of 3:00 so I'll be dropping my weekly shop time by about 15 hours. As a result there will be a couple things, such as narrowing the 9" rear, I need to hold off on until I get out to Georgia and start working at Bulldawg. Joe has stepped up and has assured me that all the help I may need is waiting for me there. It's nice knowing I'm going from one shop to another, otherwise finishing my car would take a whole lot longer. I guess I just got a reminder of what it's like to build a car on the side as a hobby instead of basically full time. That's a bit humbling and a big pat on the back for all you guys who are persistent and get the garage builds done.
Now the good news...
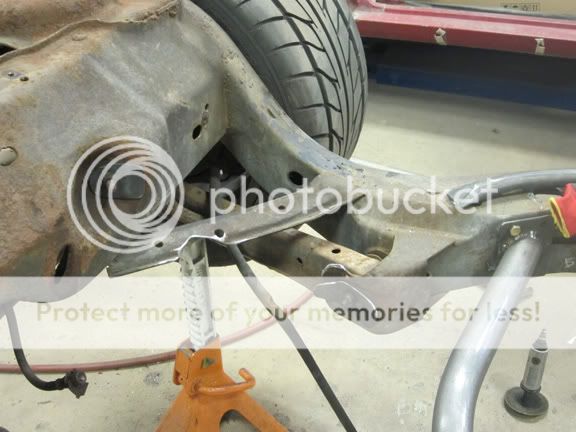
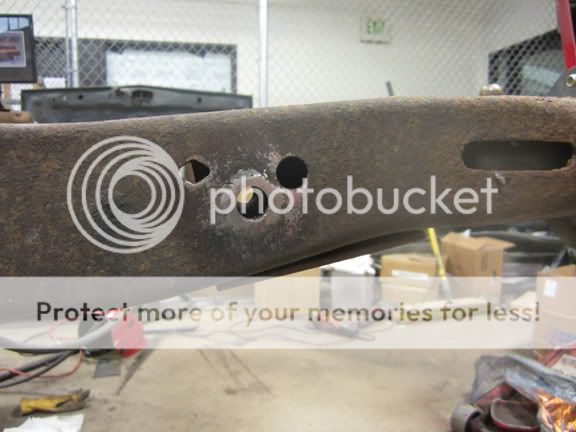
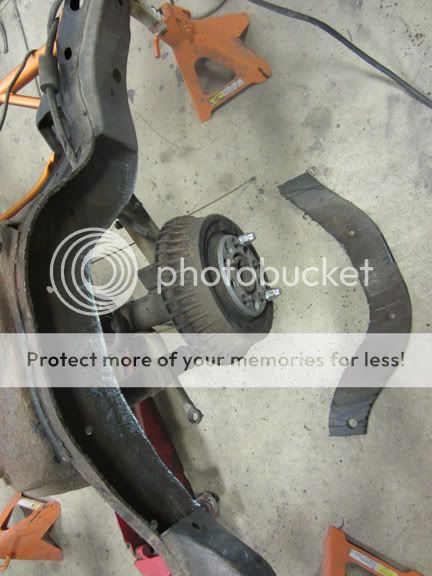
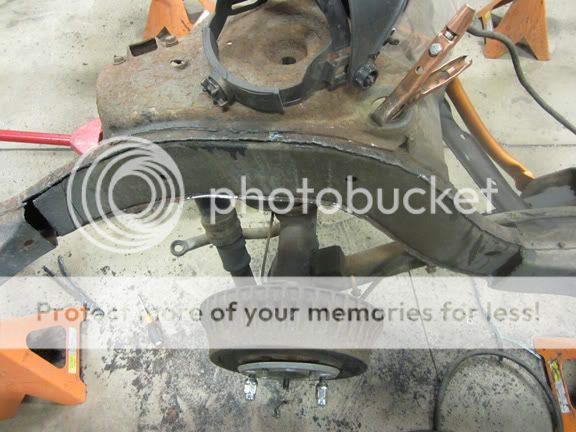
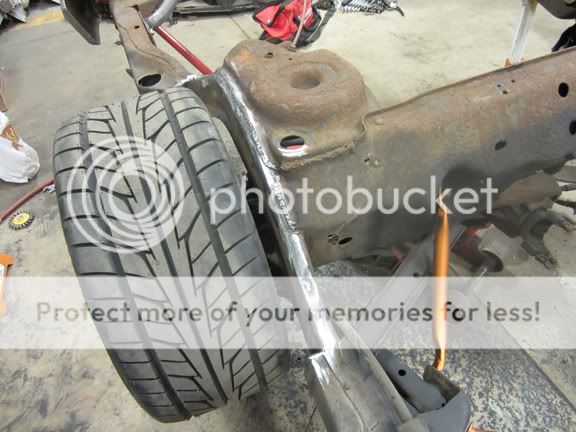
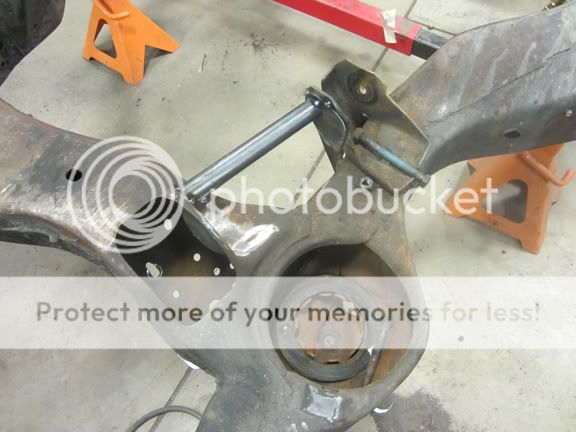
More chassis work completed. First off I took a break from the rear half and fixed a common G-body problem: LS headers hitting the right frame rail requiring the header tube to be modified. For now I have a set of cheapie used Flowtech headers I got for next to nothing. I really didn't want to bang them up and cause potential flow issues and eventually I will switch to Pacesetters, so I opted to fix the issue itself. With the motor out, a cut off wheel, a 5lb sledge hammer and a welder anybody can do this simple mod. First I used the plasma cutter to cut a triangle shape from the frame. Notice I cut a vertical line to make room for the two sides to come together, and I scored the rail with the cut off wheel on either side to control the bending motion and make sure I didn't affect the control arm mount position at all. Once to this point I simply banged on it a bit with the small sledge hammer which closed up all the gaps and created about 1/2" of clearance.
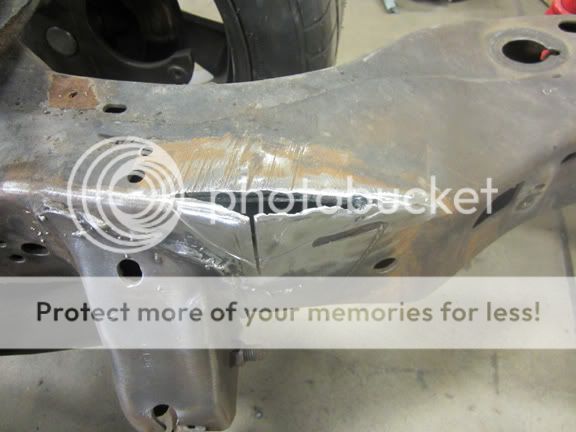
Next I did some preliminary welding and repeated the process to get a little more movement inward.
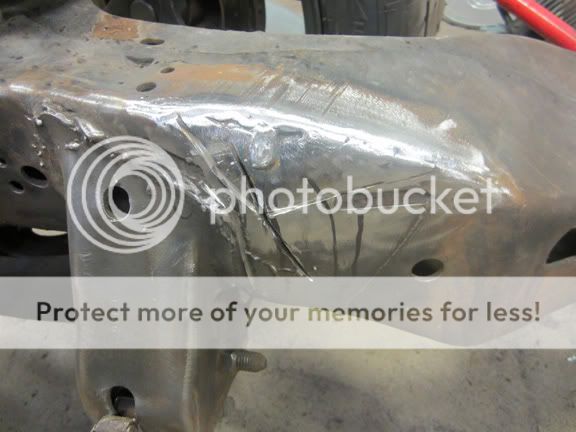
Here's the end result after welding all gaps, score lines, and grinding it all smooth. It made quite a difference.

First the bad- my professor has had some hereditary heart issues for most of his life but he never told any of us. After a recent check up the docs told him he needed a heart valve and part of his aorta replaced like yesterday. Sounds like it's common procedure but we may not see him for the rest of the semester. We're all praying for him that all will go well. On a side note the sub we have is there more to cover Cris' notes in lecture time and open the shop for us. They don't have Cris' knowledge and the shop now closes at 12:00 instead of 3:00 so I'll be dropping my weekly shop time by about 15 hours. As a result there will be a couple things, such as narrowing the 9" rear, I need to hold off on until I get out to Georgia and start working at Bulldawg. Joe has stepped up and has assured me that all the help I may need is waiting for me there. It's nice knowing I'm going from one shop to another, otherwise finishing my car would take a whole lot longer. I guess I just got a reminder of what it's like to build a car on the side as a hobby instead of basically full time. That's a bit humbling and a big pat on the back for all you guys who are persistent and get the garage builds done.
Now the good news...
More chassis work completed. First off I took a break from the rear half and fixed a common G-body problem: LS headers hitting the right frame rail requiring the header tube to be modified. For now I have a set of cheapie used Flowtech headers I got for next to nothing. I really didn't want to bang them up and cause potential flow issues and eventually I will switch to Pacesetters, so I opted to fix the issue itself. With the motor out, a cut off wheel, a 5lb sledge hammer and a welder anybody can do this simple mod. First I used the plasma cutter to cut a triangle shape from the frame. Notice I cut a vertical line to make room for the two sides to come together, and I scored the rail with the cut off wheel on either side to control the bending motion and make sure I didn't affect the control arm mount position at all. Once to this point I simply banged on it a bit with the small sledge hammer which closed up all the gaps and created about 1/2" of clearance.
Next I did some preliminary welding and repeated the process to get a little more movement inward.
Here's the end result after welding all gaps, score lines, and grinding it all smooth. It made quite a difference.
03-08-2012, 02:14 PM
#147
On The Tree
Thread Starter
Join Date: Aug 2010
Location: Eagle Mountain, Utah
Posts: 143
Likes: 0
Received 0 Likes
on
0 Posts
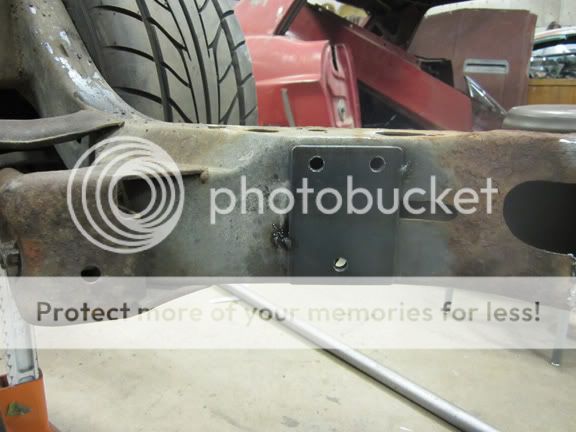
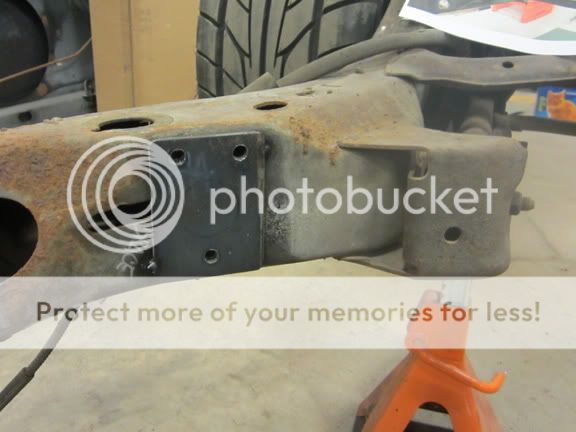
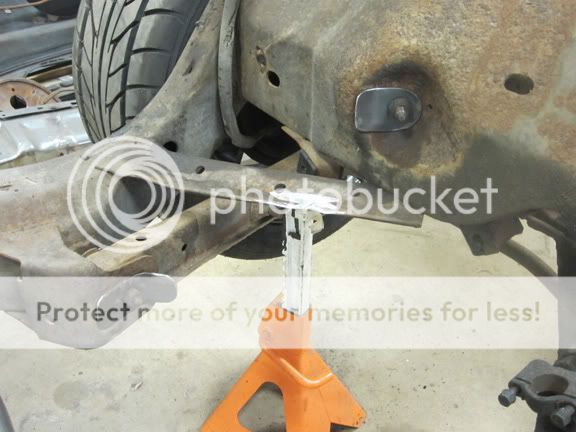
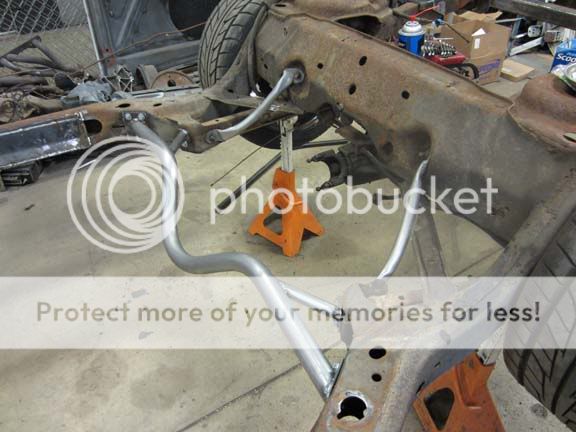
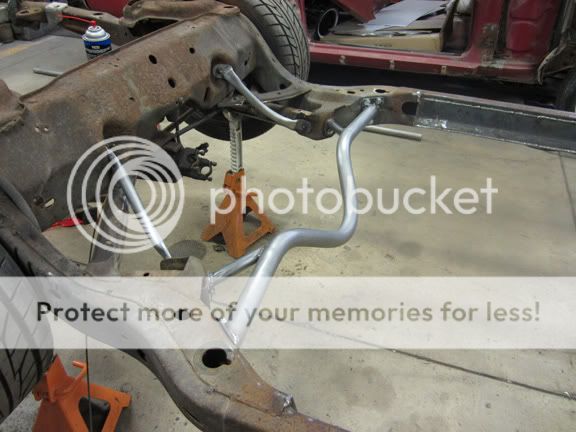
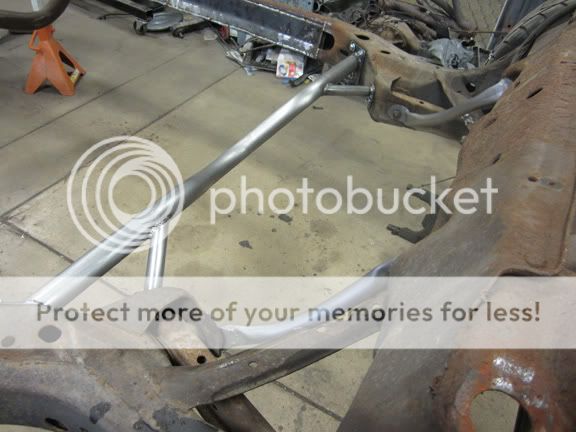
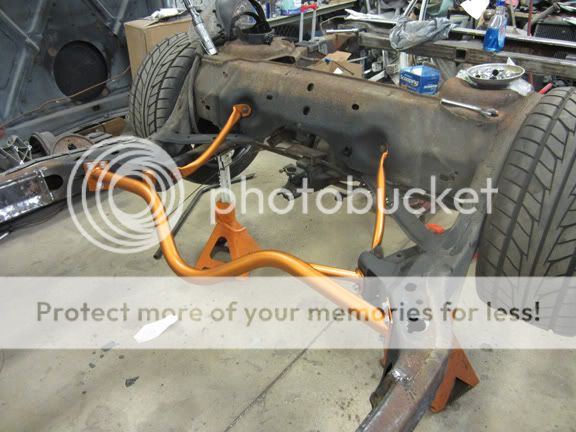
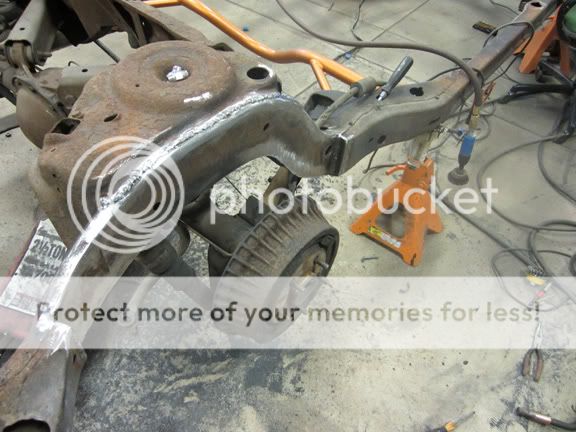
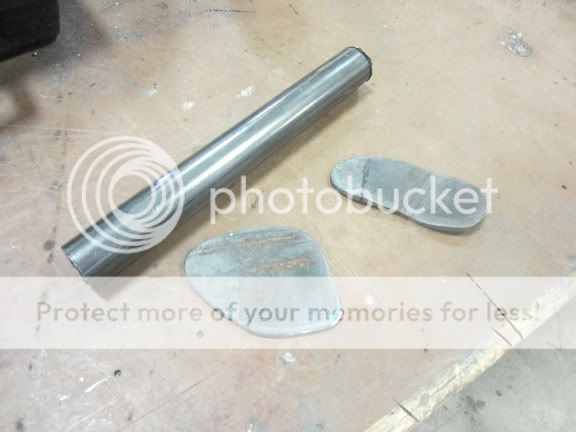
Talking to Joe at Bulldawg and Mark at SC&C they both told me anything I can do to stiffen a normally weak g-body chassis is a good thing. So I decided to create a rear triangulated shock mount brace. Same process as before, table plasma cut out the brackets, the press squished flat the ends of the 1" bars, tubing cutter made the angles fit tight and they were all welded together. This one will be getting painted orange too.

Today I started working on bracing the "floating" front lower control arm mount. Basically same process as above. On this one the forward mount bolt area on the frame cross member is indented, so a little persuasion with the sheet metal brake created a step so it sits good and snug against the frame. Orange paint coming for these too.
Here's the frame upside down and starting to weld in. I tacked the brackets to the frame so I can drill the bolt holes using the existing mount holes as a guide.


 03-10-2012, 12:47 PM
#150
On The Tree
Thread Starter
Join Date: Aug 2010
Location: Eagle Mountain, Utah
Posts: 143
Likes: 0
Received 0 Likes
on
0 Posts
Tipsy- Yes I have a 9" Ford rear I need to narrow and will be building brackets to mount 98-02 F-body 12" brakes on. Just haven't gotten to it yet. 
03-16-2012, 04:31 PM
#151
On The Tree
Thread Starter
Join Date: Aug 2010
Location: Eagle Mountain, Utah
Posts: 143
Likes: 0
Received 0 Likes
on
0 Posts
Updates- I have had this week off for spring break and I'm going through withdrawal symptoms for not being able to work on my car.  I am taking this time to get caught up on a bunch of client's car renderings though so it's been a good thing.
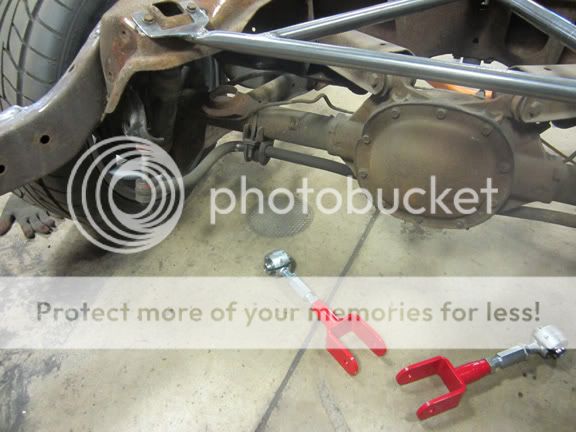
I did make a little progress on the car, sort of. The rest of my parts finally arrived from SC&C. I got the first shipment last week, in this photo you can see the Spohn adjustable rear upper control arms I ordered from them. I could have gotten them direct from Spohn but Marc assured me that when I buy from him it's a full package- not only do I get parts but I get tuning instruction / coaching. He encouraged me to set it all up, beat on it, call him and get some feedback and fine tuning instructions, and then repeat process until the car is doing what I want it too. We chatted for 2.5 hours on the first phone call and he filled me with knowledge and advice so I wouldn't doubt he meant that he'll be there to help dial the car in. You can't beat that type of customer service so I feel good about sending the $ his way. Spohn is still selling parts so it looks like a 3 way win here.
This week my front upper control arms arrived, they're the Stage 2 Plus kit, SPC adjustable arms with tall screw in upper ball joints and tall lower ball joints. These, besides the wheels and tires combined, have been my most spendy expense, over twice what I paid for the car itself, lol! They also weren't what I had wanted to buy when I called Marcus but after talking to him he obviously knows more about my car than I do so I eagerly accepted his suggestions. According to him these arms should bring my old lousy geometry pretty close to a new Vette, Camaro or Mustang. At this point I'm leaning more and more to make this thing a serious contender on the track rather than just a mild P-T car so as thrifty (read cheap and empty pocketed) as I am I'm feeling like the expense was worth it. At the very least I won't be spending more later on to upgrade from the less expensive upper arms I originally wanted.
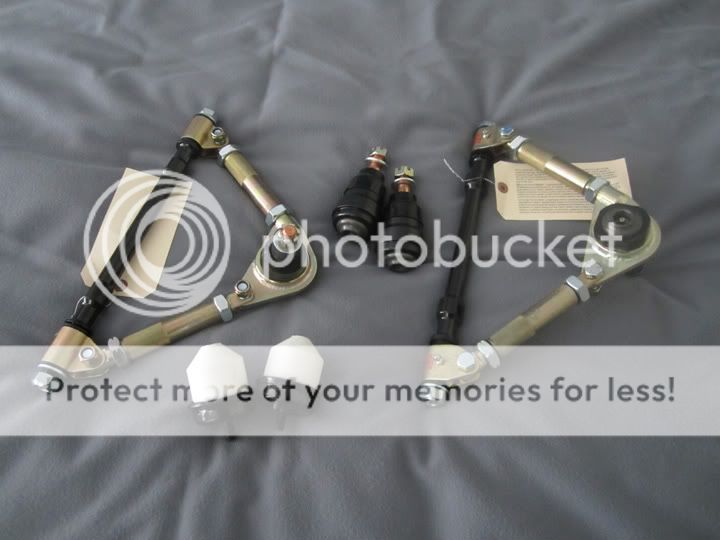
I also ordered a pair of these progressive rate control arm bumpers. As you guys know I first lowered my car about 3-3.5" by cutting springs. Eventually they sagged and they were resting on the now squashed rubber bumpers. Every decent bump in the road the car would rebound and bounce upwards. Marc said these absorb the bumps rather than rebounding and making the suspension bounce. The way it drove before got a little scary at speed so really that was a major factor in deciding on tearing everything down and starting fresh on the wagon rather than finishing my street-strip Nova.
I'm really excited about this project. I've had fast cars in the past but never have I done a build to this caliber. I think the day I parked the car in the shop at school, even then I didn't realize just how bad this car will be when I'm done. Recently I got a call from a friend that owns his own design agency and mentioned he had another friend that needs a graphic designer for his agency and asked if I was interested. I told him about school, my car project, and going to work for Joe at Bulldawg in a couple months. All he could say was, "wow, you're living the dream." I think it really hit me then how much my life has changed since last August and I got a real feel for what the future holds. Yeah, to say I'm stoked is an understatement.
I am taking this time to get caught up on a bunch of client's car renderings though so it's been a good thing. I did make a little progress on the car, sort of. The rest of my parts finally arrived from SC&C. I got the first shipment last week, in this photo you can see the Spohn adjustable rear upper control arms I ordered from them. I could have gotten them direct from Spohn but Marc assured me that when I buy from him it's a full package- not only do I get parts but I get tuning instruction / coaching. He encouraged me to set it all up, beat on it, call him and get some feedback and fine tuning instructions, and then repeat process until the car is doing what I want it too. We chatted for 2.5 hours on the first phone call and he filled me with knowledge and advice so I wouldn't doubt he meant that he'll be there to help dial the car in. You can't beat that type of customer service so I feel good about sending the $ his way. Spohn is still selling parts so it looks like a 3 way win here.
This week my front upper control arms arrived, they're the Stage 2 Plus kit, SPC adjustable arms with tall screw in upper ball joints and tall lower ball joints. These, besides the wheels and tires combined, have been my most spendy expense, over twice what I paid for the car itself, lol! They also weren't what I had wanted to buy when I called Marcus but after talking to him he obviously knows more about my car than I do so I eagerly accepted his suggestions. According to him these arms should bring my old lousy geometry pretty close to a new Vette, Camaro or Mustang. At this point I'm leaning more and more to make this thing a serious contender on the track rather than just a mild P-T car so as thrifty (read cheap and empty pocketed) as I am I'm feeling like the expense was worth it. At the very least I won't be spending more later on to upgrade from the less expensive upper arms I originally wanted.
I also ordered a pair of these progressive rate control arm bumpers. As you guys know I first lowered my car about 3-3.5" by cutting springs. Eventually they sagged and they were resting on the now squashed rubber bumpers. Every decent bump in the road the car would rebound and bounce upwards. Marc said these absorb the bumps rather than rebounding and making the suspension bounce. The way it drove before got a little scary at speed so really that was a major factor in deciding on tearing everything down and starting fresh on the wagon rather than finishing my street-strip Nova.
I'm really excited about this project. I've had fast cars in the past but never have I done a build to this caliber. I think the day I parked the car in the shop at school, even then I didn't realize just how bad this car will be when I'm done. Recently I got a call from a friend that owns his own design agency and mentioned he had another friend that needs a graphic designer for his agency and asked if I was interested. I told him about school, my car project, and going to work for Joe at Bulldawg in a couple months. All he could say was, "wow, you're living the dream." I think it really hit me then how much my life has changed since last August and I got a real feel for what the future holds. Yeah, to say I'm stoked is an understatement.
03-16-2012, 05:16 PM
#152

Don't sweat the heart valve, I know some guys who do this procedure, and it's like us changing spark plugs, it's amazing what those guys can do. Good Dr, it'll be minimal downtime. Plus, he'll feel better afterwards!
Nice build too!!!
Nice build too!!!
03-17-2012, 11:54 AM
#153
Looks wicked so far.
Hitch design looks good, I have flat towed more weight than you probably will with a weaker hitch design on my el camino and never had any issues or bending with it. Only thing that might become a concern is if you were going to have a lot of tongue weight, even the largest g-body reese hitch that I can find (now discontinued) was only rated for 3500 without weight distribution (5000 with weight distribution). The el camino`s and wagons have the long overhang behind the wheels so they can`t carry a lot of tongue weight, but they pull great.
On those grilles, if your going to try and remove the chrome in a cost conscious way try a pressure washer. Its not exactly fast, but it strips it off without damaging the plastic. The other thing I have read is to use bleach or oven cleaner cause the strong base will dissolve it. I tried bleach which really didn`t work at all, and drain cleaner (higher sodium hydroxide content than oven cleaner) and it didn`t work very well either. Pressure washer seemed to work the best......but be aware you will be picking up chrome peelings off the driveway for months. Heating the chrome with a propane torch till it blistered worked well, but it was very easy to overheat and melt the plastic underneath.
Hitch design looks good, I have flat towed more weight than you probably will with a weaker hitch design on my el camino and never had any issues or bending with it. Only thing that might become a concern is if you were going to have a lot of tongue weight, even the largest g-body reese hitch that I can find (now discontinued) was only rated for 3500 without weight distribution (5000 with weight distribution). The el camino`s and wagons have the long overhang behind the wheels so they can`t carry a lot of tongue weight, but they pull great.
On those grilles, if your going to try and remove the chrome in a cost conscious way try a pressure washer. Its not exactly fast, but it strips it off without damaging the plastic. The other thing I have read is to use bleach or oven cleaner cause the strong base will dissolve it. I tried bleach which really didn`t work at all, and drain cleaner (higher sodium hydroxide content than oven cleaner) and it didn`t work very well either. Pressure washer seemed to work the best......but be aware you will be picking up chrome peelings off the driveway for months.
Heating the chrome with a propane torch till it blistered worked well, but it was very easy to overheat and melt the plastic underneath.
03-17-2012, 03:50 PM
#154
On The Tree
Thread Starter
Join Date: Aug 2010
Location: Eagle Mountain, Utah
Posts: 143
Likes: 0
Received 0 Likes
on
0 Posts
Thanks for the words about my professor. Since we don't have school this week I won't know till Monday how things went. I haven't gotten any texts from any fellow students so I suspect surgery went well.
Thanks for the insight on the chrome. My original set got ruined because I tried to sand the chrome off. That was a mistake.
Last night on date night my wife and I stopped by a store to pick up a few T-shirts for my son. I saw one there I couldn't resist so I grabbed it for myself. Although I have a degree from BYU and soon to be a degree from UVU, in honor of all my new friends in GA (and to try to somehow, when I move there in May, blend in with all those folks that talk funny)...

If any of you guys are around the Atlanta area, I'll be in Acworth, NW of Atlanta, and I look forward to meeting "y'all" at events.

Thanks for the insight on the chrome. My original set got ruined because I tried to sand the chrome off. That was a mistake.
Last night on date night my wife and I stopped by a store to pick up a few T-shirts for my son. I saw one there I couldn't resist so I grabbed it for myself. Although I have a degree from BYU and soon to be a degree from UVU, in honor of all my new friends in GA (and to try to somehow, when I move there in May, blend in with all those folks that talk funny)...
If any of you guys are around the Atlanta area, I'll be in Acworth, NW of Atlanta, and I look forward to meeting "y'all" at events.
03-30-2012, 01:22 PM
#155
On The Tree
Thread Starter
Join Date: Aug 2010
Location: Eagle Mountain, Utah
Posts: 143
Likes: 0
Received 0 Likes
on
0 Posts
So far my professor is doing well, he had a new heart valve and part of his aorta replaced, is bored out of his mind not being in a car shop and he's going to try to make it back for the final exam day to say goodbye to everyone.
Today's Friday March 30th. Last day of classes is May 19th, so I have roughly 3 weeks, or around +/- 52 hours to get a car that's completely disassembled back to a driveable vehicle. I'm scheduled to head to Georgia around May 15th, so I have a couple weeks at home to finalize things but I have a ton of other stuff to do to get ready for the move so really not a lot of car time. My hope is to get it to the point that last day of school everything will be ready to hop in and drive cross country, only the alignment needing to be set will be left for outside of school. I'll trailer it from school to a friend's garage where he'll knock out the alignment and then I'll start driving it a bunch around here to make sure everything is working the way it should. The countdown begins Monday...
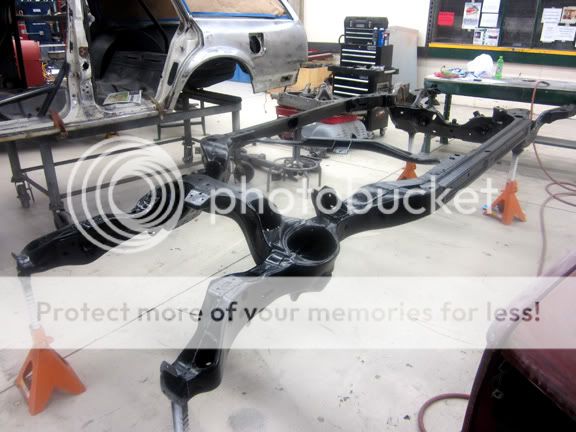
My latest updates are with getting the frame and associated parts sandblasted, FINALLY! Cost was $198 for 2 hours of blasting. Spendy but worth it, the frame was pretty rusty and a bit scaly before. Now I get to start with a clean slate. I first coated the frame with gray POR 15 undercoat. Most folks like black but I figured if I did gray, I could see if I missed any spots when I top coat. It worked out perfectly and helped ensure everything was coated. My professor swears by Rustoleum for frames, so following POR's top coat directions I saved the cost of of their top coat by using 3 rattle cans of Rustoleum semi-gloss black. It turned out really nice.
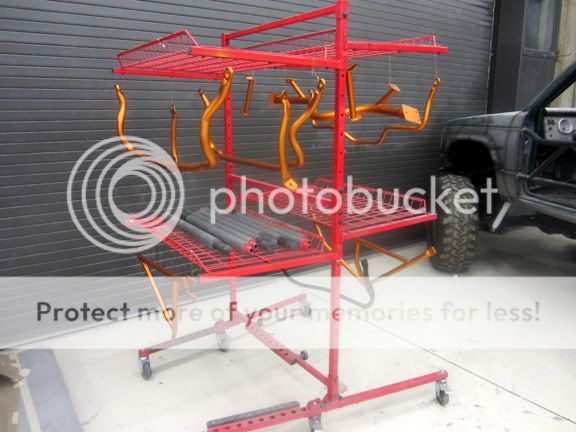
Next was the sway bars and chassis bracing. I had just a little black Por-15 left over from another project so I painted all these items with it. A little paint goes a long way.
Once they set up I sprayed them with the VHT "Burnt Copper". This paint is metallic but also has a semi-gloss sheen. This is the closest rattle paint I could find to the Dodge Toxic Orange. The end result looks great and on the black frame they look way cool! Pics of the complete frame coming soon...
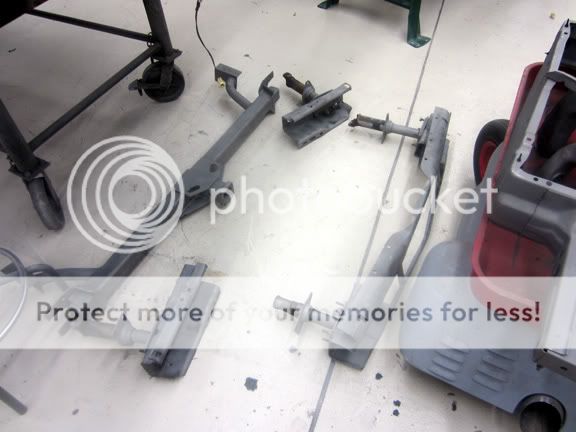
Finally a few more parts I will be painting at home next weekend, the bumper mounts, hitch, and rad support. More soon...
Today's Friday March 30th. Last day of classes is May 19th, so I have roughly 3 weeks, or around +/- 52 hours to get a car that's completely disassembled back to a driveable vehicle. I'm scheduled to head to Georgia around May 15th, so I have a couple weeks at home to finalize things but I have a ton of other stuff to do to get ready for the move so really not a lot of car time. My hope is to get it to the point that last day of school everything will be ready to hop in and drive cross country, only the alignment needing to be set will be left for outside of school. I'll trailer it from school to a friend's garage where he'll knock out the alignment and then I'll start driving it a bunch around here to make sure everything is working the way it should. The countdown begins Monday...
My latest updates are with getting the frame and associated parts sandblasted, FINALLY! Cost was $198 for 2 hours of blasting. Spendy but worth it, the frame was pretty rusty and a bit scaly before. Now I get to start with a clean slate. I first coated the frame with gray POR 15 undercoat. Most folks like black but I figured if I did gray, I could see if I missed any spots when I top coat. It worked out perfectly and helped ensure everything was coated. My professor swears by Rustoleum for frames, so following POR's top coat directions I saved the cost of of their top coat by using 3 rattle cans of Rustoleum semi-gloss black. It turned out really nice.
Next was the sway bars and chassis bracing. I had just a little black Por-15 left over from another project so I painted all these items with it. A little paint goes a long way.
Once they set up I sprayed them with the VHT "Burnt Copper". This paint is metallic but also has a semi-gloss sheen. This is the closest rattle paint I could find to the Dodge Toxic Orange. The end result looks great and on the black frame they look way cool! Pics of the complete frame coming soon...
Finally a few more parts I will be painting at home next weekend, the bumper mounts, hitch, and rad support. More soon...
03-31-2012, 11:00 PM
#156
Staging Lane

Join Date: Jan 2008
Posts: 54
Likes: 0
Received 0 Likes
on
0 Posts

Thanks for the words about my professor. Since we don't have school this week I won't know till Monday how things went. I haven't gotten any texts from any fellow students so I suspect surgery went well.
Thanks for the insight on the chrome. My original set got ruined because I tried to sand the chrome off. That was a mistake.
Last night on date night my wife and I stopped by a store to pick up a few T-shirts for my son. I saw one there I couldn't resist so I grabbed it for myself. Although I have a degree from BYU and soon to be a degree from UVU, in honor of all my new friends in GA (and to try to somehow, when I move there in May, blend in with all those folks that talk funny)...
If any of you guys are around the Atlanta area, I'll be in Acworth, NW of Atlanta, and I look forward to meeting "y'all" at events.
04-03-2012, 07:49 PM
#157
On The Tree
Thread Starter
Join Date: Aug 2010
Location: Eagle Mountain, Utah
Posts: 143
Likes: 0
Received 0 Likes
on
0 Posts
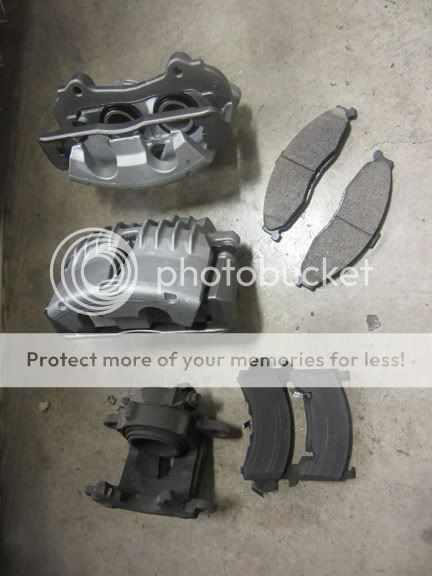
New parts came in...
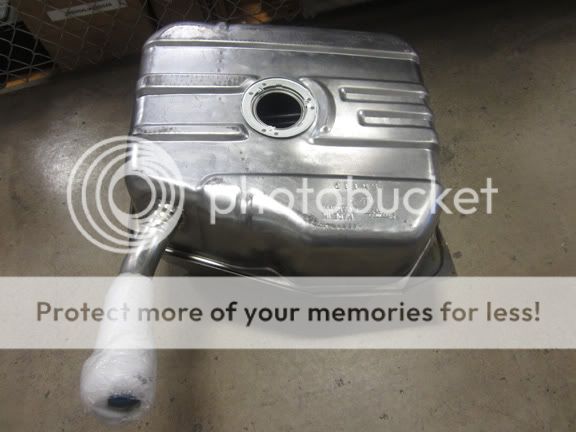
Inside my fuel tank was pretty nasty so I opted for a new one. Best price I could find was from Rock Auto. It came with the filler tube soldered in.
Next is my '98-02 F-body calipers, shown next to a g-body caliper. These also came from Rock Auto. Outright the calipers were slightly cheaper from the local parts stores but their core charge was as much as the calipers, whereas Rock Auto's core was only $10. I didn't have cores so I went with RA and saved a bunch overall.
04-03-2012, 08:03 PM
#158
On The Tree
Thread Starter
Join Date: Aug 2010
Location: Eagle Mountain, Utah
Posts: 143
Likes: 0
Received 0 Likes
on
0 Posts
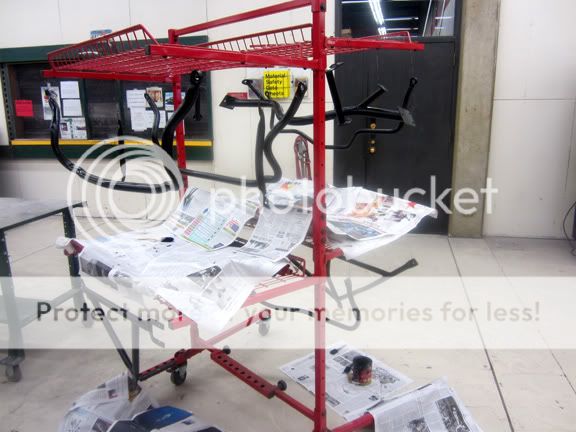
Today I moved the frame from the collision repair shop back to the street rod shop. It's a bit of a truck around the buildings, and this cart from innovativetools.com worked great! They claim it can handle 125 lbs per shelf, and folds up for easy storage. The shelves can be attached on either side and raised or lowered to a bunch of positions.
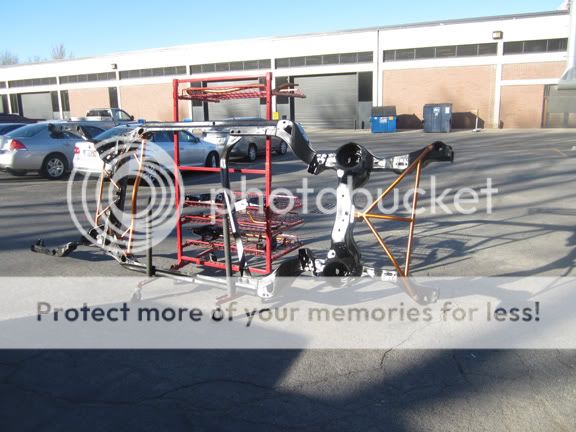
here it is back in it's happy home.
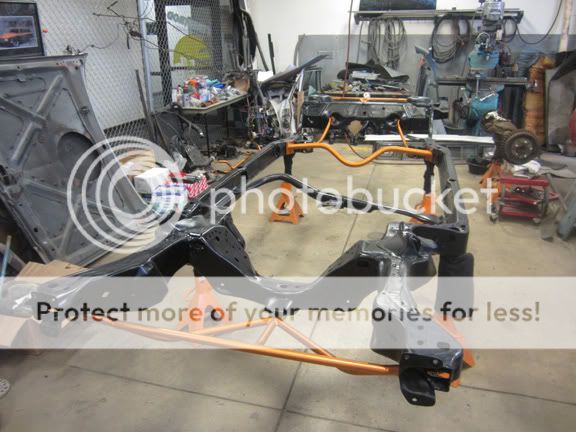
A little closer view of the front frame rail brace.

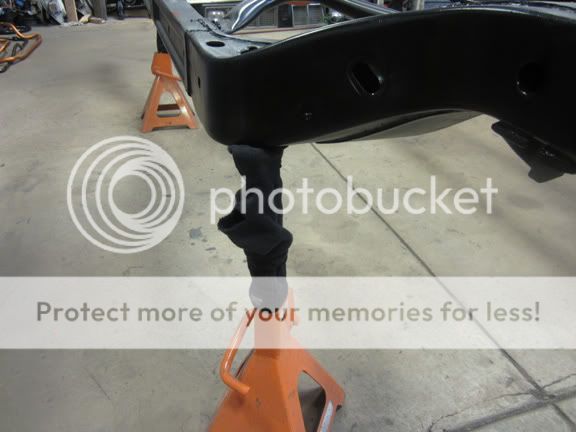
Here's a great idea for all those no partner or holes in the heel sport socks- they make great frame paint protectors for jack stands!
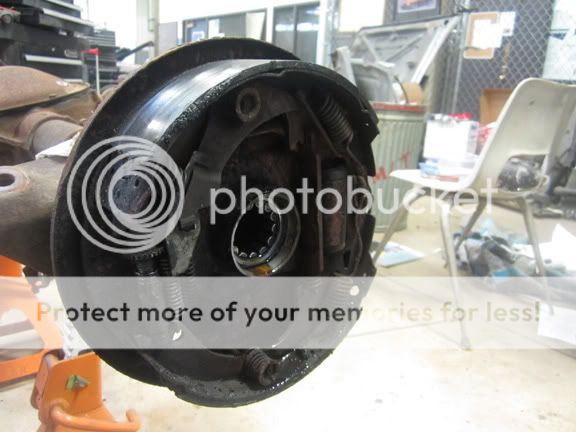
And last for today I took the 7.5 rear partially apart to change the right side axle seal. Although a very small leak it made a mess in there. Luckily I nabbed the good brakes off my parts wagon so to swap this out it'll only cost the price of the seal and top off the gear lube.
here it is back in it's happy home.
A little closer view of the front frame rail brace.
Here's a great idea for all those no partner or holes in the heel sport socks- they make great frame paint protectors for jack stands!
And last for today I took the 7.5 rear partially apart to change the right side axle seal. Although a very small leak it made a mess in there. Luckily I nabbed the good brakes off my parts wagon so to swap this out it'll only cost the price of the seal and top off the gear lube.
04-03-2012, 09:01 PM
#159
Registered User
iTrader: (10)
Join Date: Apr 2009
Location: Oviedo Fl
Posts: 320
Likes: 0
Received 0 Likes
on
0 Posts
Just read this whole thread...
absolutely AMAZING fab skills, along with just a fantastic vision.
Keep up the good work.. oh and finish up... It's making me want to build a car..
absolutely AMAZING fab skills, along with just a fantastic vision.
Keep up the good work.. oh and finish up... It's making me want to build a car..
