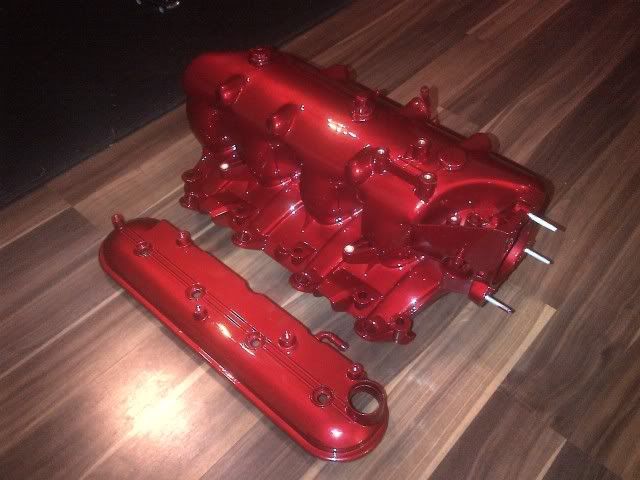
Smoothed Truck Intakes
#201
For what it's worth I smoothed out the valley covers on an LT1 and used bondo to fill the 'Vette logos and it held up for 13 years! I was worried that removing the covers they would flex and pop the bondo but they never did.
#202
It's not smooth, but I did blend a the ribs down.


I do have a question about how much material is in those plugs on the side. I'd like to tap the one that fed the fuel pressure regulator. Does anyone have a picture of what these look like inside?


I do have a question about how much material is in those plugs on the side. I'd like to tap the one that fed the fuel pressure regulator. Does anyone have a picture of what these look like inside?
Last edited by ryanleiker; 06-08-2014 at 06:31 PM.
#205
What paint are you guys using? Engine enamel with primer?
Will regular enamel work with scuffing and primer?
What brands? Rattle can? I just want a satin black because my plastic is a bit sun-baked and oxidized.
Will regular enamel work with scuffing and primer?
What brands? Rattle can? I just want a satin black because my plastic is a bit sun-baked and oxidized.
#206
I used Rustoleum sandable primer and 'satin nickle' enamel.
#208
#210
For plastic parts I always like to use the Duplicolor Adhesion Promotor first. After cleaning and drying the parts I spray it on. It is a clear primer that helps paints stick to plastic. Then depending on the location and temp of the plastic I use Rustoleum Plastic Paint (interior parts) and an Engine paint (or something that is made a little more heat) for the engine bay stuff.
#211
Nice input and find! 

Herr is a detailed you tube video of the whole process: LSx Truck Intake Shave - Plastic Welding - 5.3 6.0 LS1 LSx - YouTube
#212
Good stuff, I never knew the truck intake was a "performance" intake. I might have tried one on my 1935 Ford if it wasn't for the frontal clearance problem we have on our old cars. I will have my Edelbrock Victor Jr intake finished next week with the stock throttle body mounted vertically. We'll see how that works out.
#213
#214
Here's my work in progress...Not sure if I'm going shave the nubs off the sides, and possibly relocate the sensors and vacuum yet...depends on if I can find a cheap intake for a plastic donor to plastic weld...still a bit of work to be done yet...but I'm happy so far
The Beginning

Cleaned up all the excess plastic fins and such


Half way done with filing the small ridges


3/4 done filing

FINALLY done with breaking down all the ridges


Still have some touching up to do...Personally think it looks a hella lot better even with the nubs on the sides, most likely going to go away with them though. I'll keep updating through painting.
The Beginning

Cleaned up all the excess plastic fins and such


Half way done with filing the small ridges


3/4 done filing


FINALLY done with breaking down all the ridges


Still have some touching up to do...Personally think it looks a hella lot better even with the nubs on the sides, most likely going to go away with them though. I'll keep updating through painting.
#216
#218
Welp...No turning back now...Decided to do away with the nubs, and relocate the vacuum and sensor to the rear.
Also, Going to put billet rails on this then and use the aeromotive a1000-6 to accommodate my fuel return needs.
With the 'nubs' and sensors shaved


Also, Going to put billet rails on this then and use the aeromotive a1000-6 to accommodate my fuel return needs.
With the 'nubs' and sensors shaved


#219
Also started, but unfortunately unable to finish the plugging/plastic welding of the holes. I used a combination of a soldering iron with a fine tip (used to initially tack the filler piece, and blend the filler piece into the intake itself), and a plastic welder (to get a more overall fill as the plastic welder has a broad triangular tip).
But as I got 4 of the 6 'nubs' done, the tip broke off the plastic welder (its a cheap one), I think I just left it on for too long straight.
So I've got a couple more, and the small center holes to weld, and after that some general touch up, sanding, body filler, paint.
Here's a pic of the first fill/welding, my first ever

All 3 'nubs' finished on the passenger side!


Pics of the Driver side which I started and didn't get to finish


But as I got 4 of the 6 'nubs' done, the tip broke off the plastic welder (its a cheap one), I think I just left it on for too long straight.
So I've got a couple more, and the small center holes to weld, and after that some general touch up, sanding, body filler, paint.
Here's a pic of the first fill/welding, my first ever

All 3 'nubs' finished on the passenger side!


Pics of the Driver side which I started and didn't get to finish


#220
Some further progress. Just about done with the top side. There are still a couple SMALL divets I need to go back and re-fill with plastic
Still have some other parts on the intake I've yet to work on.
About done, sanded with 80 grit on an orbital, went back refilled some low spots/divets with plastic, re-sanded with 80 on the orbital


Still have some other parts on the intake I've yet to work on.
About done, sanded with 80 grit on an orbital, went back refilled some low spots/divets with plastic, re-sanded with 80 on the orbital


