
Solder heat shrink connectors / solder sleeves
 02-09-2013, 09:15 PM
#1

Anyone using them?
I'm finishing up some under dash fuse panel wiring. Had to go through some wires to figure out what I needed and what I could ditch for my Dakota Digital gauges. In the process I decided to shorten just a few connectors so I could clean things up and maybe toss on some wire loom.
I've been soldering everything so far, but after stripping some of the heavier gauge wire I found out how much of a PINTA it is to twist these thick strands of wire together so I can solder them.
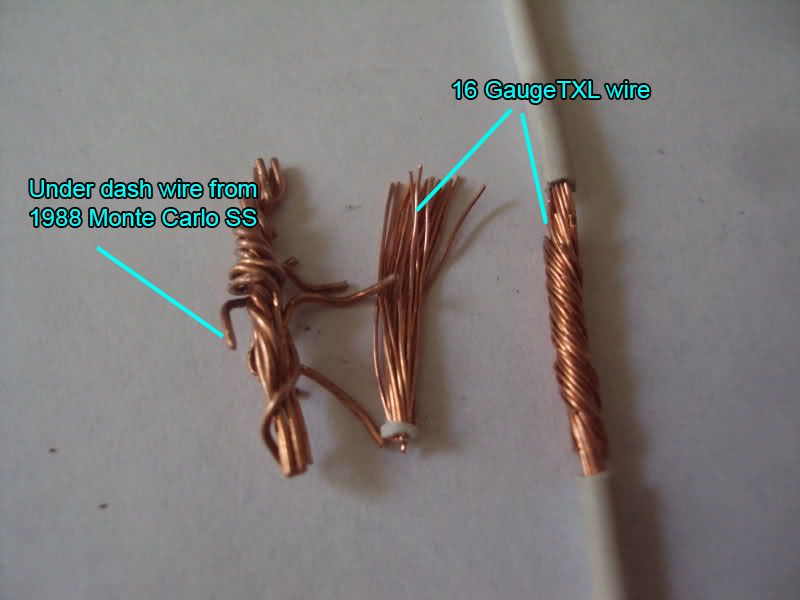
To the far left is the the copper strands from the under dash wiring in my 88 Monte Carlo.. Very difficult to get twisted together like the far right stranded wire.
I was going to use some uninsulated butt connectors on that thick wire and then soldered the ends of the wire to the butt connector then used adhesive lined heat shrink over it.
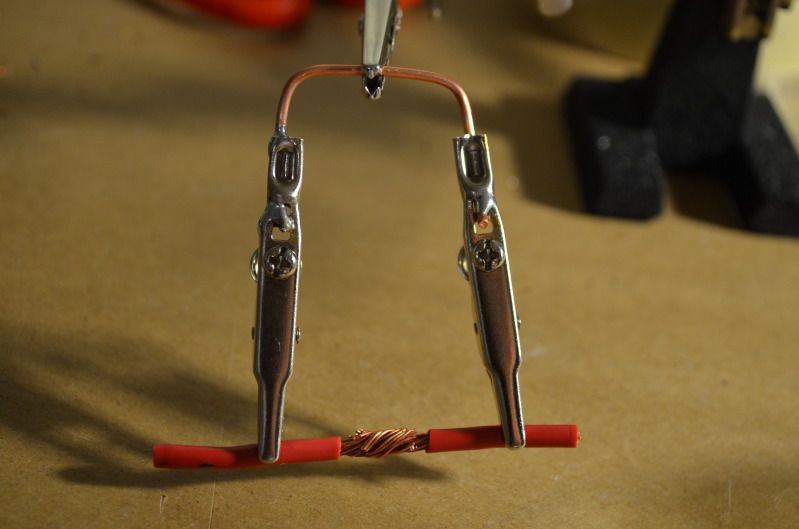
Or do a Lap solder splice like so

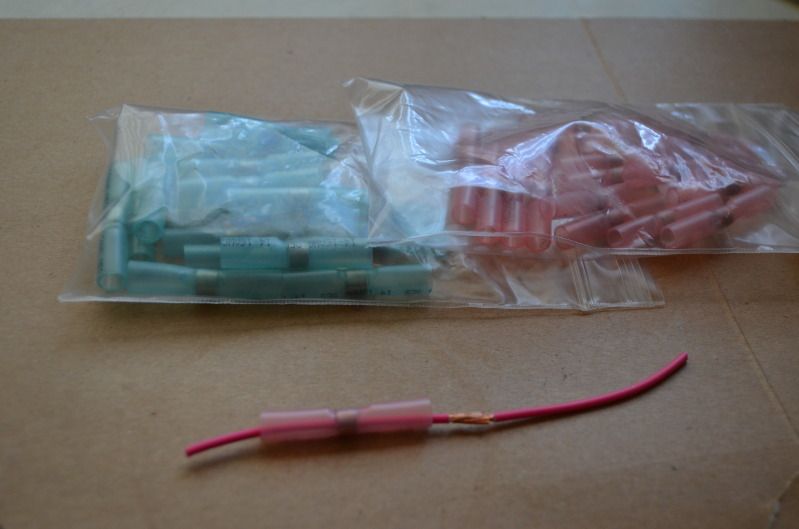
Lastly try out these Solder heat shrink connectors.
..
I'm finishing up some under dash fuse panel wiring. Had to go through some wires to figure out what I needed and what I could ditch for my Dakota Digital gauges. In the process I decided to shorten just a few connectors so I could clean things up and maybe toss on some wire loom.
I've been soldering everything so far, but after stripping some of the heavier gauge wire I found out how much of a PINTA it is to twist these thick strands of wire together so I can solder them.
To the far left is the the copper strands from the under dash wiring in my 88 Monte Carlo.. Very difficult to get twisted together like the far right stranded wire.
I was going to use some uninsulated butt connectors on that thick wire and then soldered the ends of the wire to the butt connector then used adhesive lined heat shrink over it.
Or do a Lap solder splice like so
Lastly try out these Solder heat shrink connectors.
..
Last edited by BOXCHEV; 02-10-2013 at 06:17 PM.
 02-09-2013, 10:37 PM
#2
TECH Regular

Join Date: Jun 2010
Posts: 448
Likes: 0
Received 0 Likes
on
0 Posts
Either or will be good. If you use the butt slice make sure you tin your wires first. Always use flux on all soldered wires this just helps draw the solder in to strands. Youll be fine. ggod luck with the project.
 02-10-2013, 05:28 PM
#4
Yes the wire on far left is factory wire from my 1988 Monte Carlo SS. It is from the under dash harness. From fuse panel to the steering column.
Guess I never realized how thick the wire was that they used for it.
When I went to strip the wire and maybe two of the strands combined would be as thick as commercial electrical wire like you said. I think the skin on my fingers were tearing before I could get a clean mechanical bond by twisting the to stripped ends together so I could attempt to solder.
I bought a few different sizes of the solder sleeves to give them a try.
http://www.delcity.net/store/Solder-...ctors/p_801828
May make another purchase for these as well. I think they might be better option for the thicker gauge wire like above in first post.
Crimp and solder.
http://www.delcity.net/store/Heat-Sh...ctors/p_801819
Along with a new ratchet crimper, One of the following.
http://www.delcity.net/store/Insulat...-Tool/p_793366
http://www.delcity.net/store/Open-Ba...-Tool/p_714008
http://www.carolinaboatoutfitters.co...FSTZQgodx00AWw
02-10-2013, 06:02 PM
#5
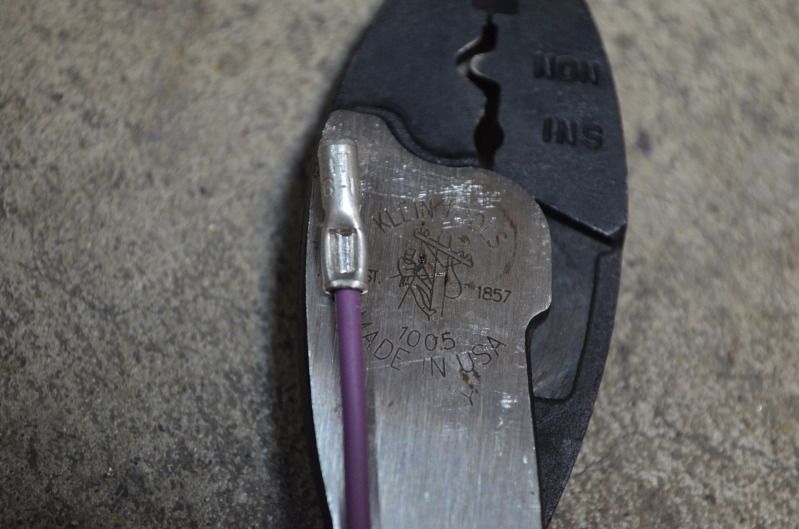
Ok, scale of the pic threw me off. Choice of crimp/solder/seal splices looks good.
Ratcheting crimpers nice. If they have removable jaws you can buy jaws that fit other connectors down the road.
Klein has a crimp tool KLE-1005 that provides good leverage and can fit into spots where the ratcheting ones sometimes won't.
Ratcheting crimpers nice. If they have removable jaws you can buy jaws that fit other connectors down the road.
Klein has a crimp tool KLE-1005 that provides good leverage and can fit into spots where the ratcheting ones sometimes won't.
02-10-2013, 06:08 PM
#6
Starting to read some comments from people on other forums that the "double" crimp ratchet crimpers are tearing the heat shrink terminals when crimping.
Here is a good link where someone tested multiple crimp tools and performed load test. His final thought and youtube video are posted.
http://forums.sbo.sailboatowners.com...d.php?t=125926
This seems to be the tool for the heat shrink ones.
http://sailorssolutions.com/index.as...ils&Item=WP042
Here is a good link where someone tested multiple crimp tools and performed load test. His final thought and youtube video are posted.
http://forums.sbo.sailboatowners.com...d.php?t=125926
This seems to be the tool for the heat shrink ones.
http://sailorssolutions.com/index.as...ils&Item=WP042

Trending Topics
02-10-2013, 08:19 PM
#8
I usually remove 1/2" of insulation from both wires, force the wires into each other (the full length of the bare wire), twist them the best that I can, solder, then use a quality shrink tube with glue core. That vid in the bottom of post #1 looks good and much easier!
02-10-2013, 08:45 PM
#9
@ S10xGN
That's exactly what I do, matter of fact I did this for the majority of my wiring. Except twisting those thick strands of wire pictured in post# 1 have proven to be quite difficult. Reasoning for trying the solder sleeve or crimp connector that are heat shrink covered.
That's exactly what I do, matter of fact I did this for the majority of my wiring. Except twisting those thick strands of wire pictured in post# 1 have proven to be quite difficult. Reasoning for trying the solder sleeve or crimp connector that are heat shrink covered.
02-11-2013, 07:51 AM
#10
I use the non insulated butt crimp connectors like 67 skylark pictured and then a good heat shrink for insulation. I have never had 1 fail. I have had soldered connections fail (on motorcycles) due to vibration and the solder making the wire stiff at the soldered connection. I feel if a crimp is good enough for the factory for 10, 20, 30 years and 100s of thousands of miles it is good enough for me!
02-11-2013, 11:47 AM
#11
TECH Apprentice
iTrader: (1)
Join Date: Jun 2011
Location: Land of the Mormon's although I'm not one of them
Posts: 314
Likes: 0
Received 0 Likes
on
0 Posts

Personally, from my time in aerospace and being IPC certified for a time...
I do mostly lap splices with adhesive lined heat-shrink in automotive applications. Cleanest/best results for most applications. With small wires (20+ gauge) I'll do the twist together then solder, but most others 18 AWG and larger I just do lap with great results.
For special applications I will use the solder lined heatshrink, they're $$, but work great for a lot of applications (And are FAA/NASA certified for wire splices).
The crimp inside heatshrink are ok, but like has been said, a lot of crimpers can/do damage the heatshrink on the outside, and can cause issues when it's shrunk.
02-11-2013, 09:52 PM
#12
I have that crimper, it is a fine tool. Much better then the standard Strip/cut/crimp style crimpers. Will kill hands after a few crimps though. I know cause the palms of my hands were feeling it the next morning. If I were to do a lot of crimps the ratchet kind would be the option. This tool IMO would be for last minute fixes, or to install something non important in the ride like a stereo. These crimpers aren't consistent cause the crimp is only as good, as the users strength and how tight they grip down on it.
Uninsulated butt connector with heat shrink over it.

Front (dimple)
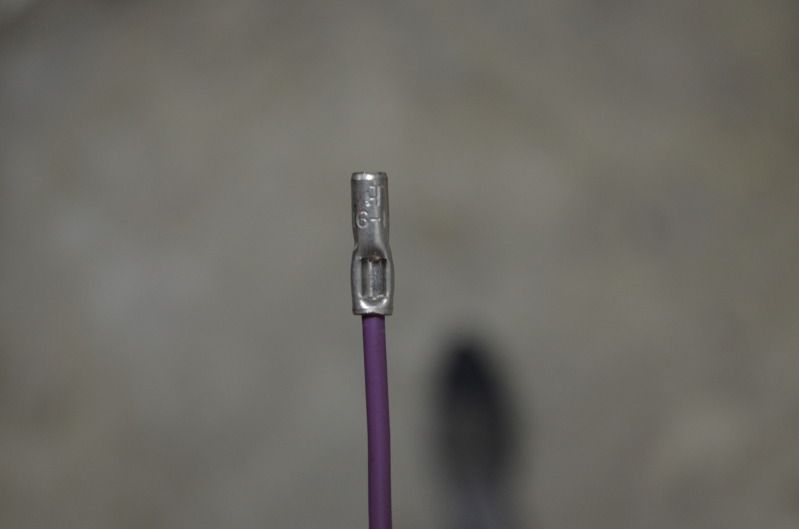
Back (seam side)
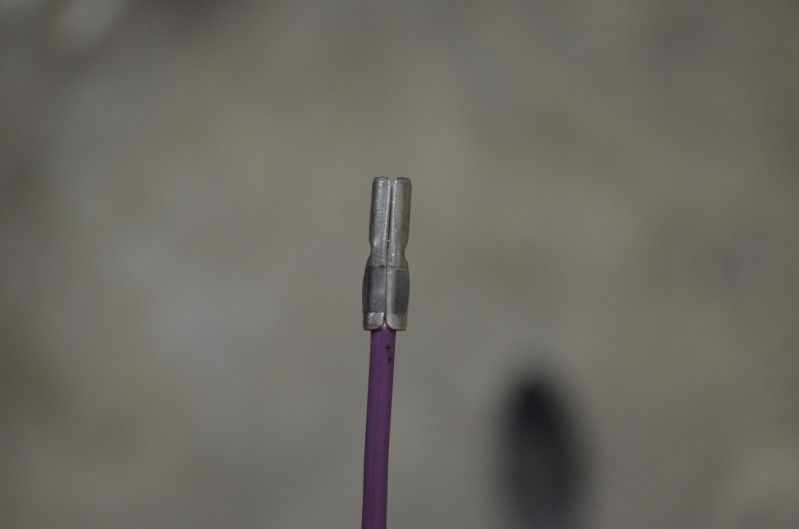
Crimp cut in half, I squeeze the crimper until the cutting end of the tool on the top close and meet. No half crimp'n over here lol.
Personally, from my time in aerospace and being IPC certified for a time...
I do mostly lap splices with adhesive lined heat-shrink in automotive applications. Cleanest/best results for most applications. With small wires (20+ gauge) I'll do the twist together then solder, but most others 18 AWG and larger I just do lap with great results.
For special applications I will use the solder lined heatshrink, they're $$, but work great for a lot of applications (And are FAA/NASA certified for wire splices).
The crimp inside heatshrink are ok, but like has been said, a lot of crimpers can/do damage the heatshrink on the outside, and can cause issues when it's shrunk.
I do mostly lap splices with adhesive lined heat-shrink in automotive applications. Cleanest/best results for most applications. With small wires (20+ gauge) I'll do the twist together then solder, but most others 18 AWG and larger I just do lap with great results.
For special applications I will use the solder lined heatshrink, they're $$, but work great for a lot of applications (And are FAA/NASA certified for wire splices).
The crimp inside heatshrink are ok, but like has been said, a lot of crimpers can/do damage the heatshrink on the outside, and can cause issues when it's shrunk.
I attempted my first lap splice, and it was a
 to try and achieve a good joint. Even with the little "helper hands" stand with the gator clips to hold the wire they kept wanting to separate while I was holding the iron and solder.
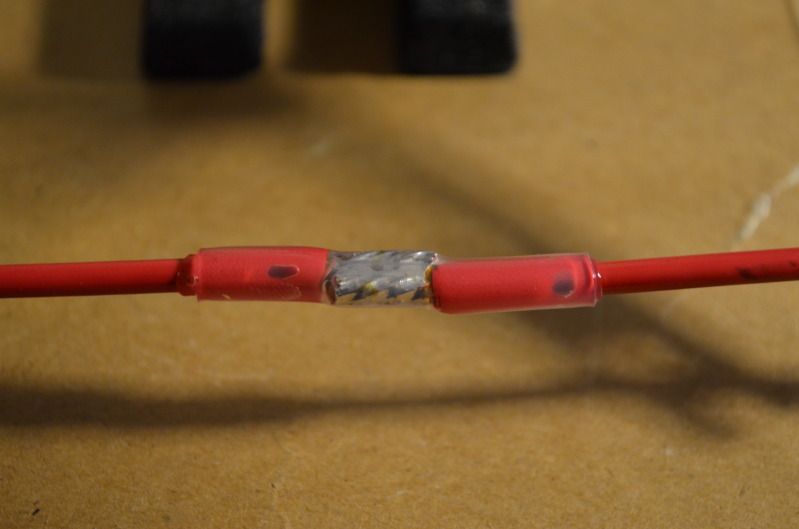 02-12-2013, 07:56 AM
#13
TECH Apprentice
iTrader: (1)
Join Date: Jun 2011
Location: Land of the Mormon's although I'm not one of them
Posts: 314
Likes: 0
Received 0 Likes
on
0 Posts
I made up a "custom" helper-hands out of scrap hardware I had laying around for when I need it.
But the easiest way I've found is to tin both leads, and tin one VERY heavy, so it's JUST about to drip solder off.
Then to connect them; One wire is supported by the car harness, a wire clip, or something. The other wire is in one hand, and the solder iron is in the other hand. Touch the wires together/align then, and put the iron across both tinned areas. The "Drip" will create the nice fillets between the wires so you don't have to add more when doing the joint. Makes an almost perfect solder joint every time. (Pending you're not like Michael J Fox or have had too much coffee!)
02-12-2013, 12:54 PM
#15
 02-12-2013, 02:28 PM
#16

http://www.buyheatshrink.com/
And I have 1/8in adhesive heat shrink from this person on ebay. Ebay seller install_depot
http://www.ebay.com/itm/10-FEET-1-8-...item5892cea79a
1/8in from ebay is a little more tough then the stuff from buyheatshrink. After heated and fully cooled the ebay stuff is a little more stiff. Both have about the same amount of adhesive that oozes out.
1/4in stuff from buyheatshrink has enough glue that comes out the ends to suit my needs. However I do wish it was a little more rigid once shrunk and cooled down.
Ebay stuff is slightly less translucent then the other heat shrink.
Where are you getting your heat shrink from? Whats the shrink ratio? I use my Old Milwaukee Heat gun I got from Homedepot for less then $20 for the heat shrink. I use highest setting and damn near put the gun right up next to the clear stuff, just long enough to shrink fully and until the glue comes out the ends then I stop. Handles the heat pretty good to me.
02-13-2013, 12:43 AM
#17
TECH Enthusiast
iTrader: (9)
Join Date: Mar 2008
Location: IL
Posts: 698
Likes: 0
Received 0 Likes
on
0 Posts
http://www.delcity.net/store/Shrink-...ctors/p_801794
Not sure how many you have to do but those work pretty well
GM doesn't even support soldering connections together anymore. Now whether or not they trust the technician doing the repair is a different story
Not sure how many you have to do but those work pretty well
GM doesn't even support soldering connections together anymore. Now whether or not they trust the technician doing the repair is a different story
02-13-2013, 04:09 PM
#18
http://www.delcity.net/store/Shrink-...ctors/p_801794
Not sure how many you have to do but those work pretty well
GM doesn't even support soldering connections together anymore. Now whether or not they trust the technician doing the repair is a different story
Not sure how many you have to do but those work pretty well
GM doesn't even support soldering connections together anymore. Now whether or not they trust the technician doing the repair is a different story
I plan on purchasing some of those. I want to buy those from delcity and compare to the 3m ones you can get on ebay for a pretty good price. Get around 100 of them for like $22.
I purchased a Ratchet crimper for those heat shrink crimp terminals. Its manufactured by FTZ. Should be here tomorrow according to tracking.
.
.
.
.
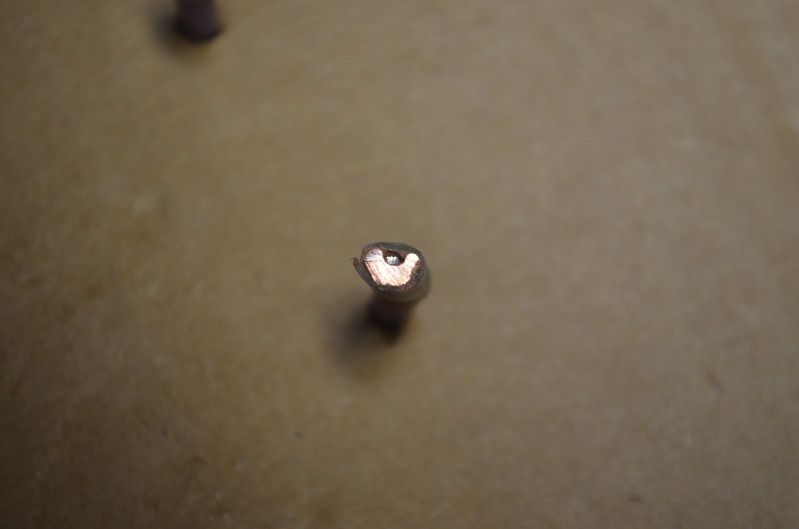
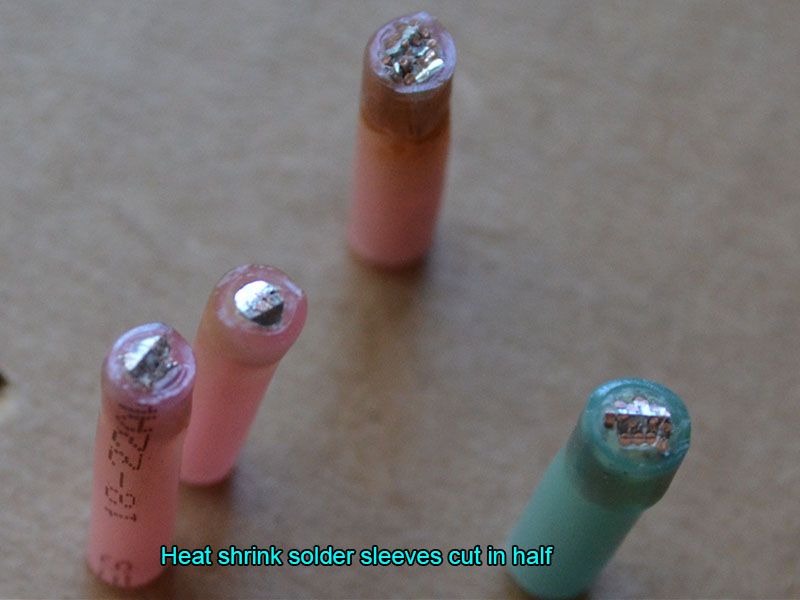
Got these in last night.
These cut in half after heated look similar to my solder splices with my iron and rosin core solder cut in half. The solder sleeves to do cover all of the copper strands but if you look close enough while heating them up they solder melts around the wire and wicks up inbetween the strands pretty good as seen in the pic below.
A heat gun alone works fine with these, but I would recommend the heat shield attachment for a heat gun like in the video in post #1.
Plan on test running these on the courtesy lights that mount under my dash when the doors are open. Or maybe a stereo install, how well they do there will depend on if I purchases more of these.
Last edited by BOXCHEV; 02-13-2013 at 04:20 PM.
02-13-2013, 10:02 PM
#19

We use all those butt connectors here at work and as long as they they are properly crimped then they are durable... And that's on snow plows loaded with salt and mag chloride.. which is known to eat metal like a fat kid loves cake!! we use the one's with the crimp portion and when sealed the solder spreads to both sections.. I've used them with out any issues for years! I'll try to take a pic of what we use and post.